


 本文深入解析Spring4中事务管理的基本概念、特性、隔离级别、传播行为及其实现方式,包括编程式和声明式事务管理,通过银行转账示例详细讲解了如何配置和使用Spring的事务管理。
Spring4入门之第五章事务管理
事务的概述
-
事务:逻辑上的一组操作,组成这组操作的各个单元,要么全都成功,要么全都失败。
-
事务的特性:
-
原子性(Atomicity):即不可分割,,事务要么全部被执行,要么全部不被执行。如果事务的的所有子事务全部提交成功,则所有的数据库操作被提交,数据库状态发生改变;如果有子事务失败,则其它子事务的的数据库操作被回滚。即数据库回到事务执行前的状态,不会发生任何转化。
-
一致性(Consistency):一致性事务必须使数据库从一个一致性状态转化到另一个一致性状态,也就是说一个事务执行之前和执行之后都必须处于一致状态。
举例:假如用户A账户和用户B账户两者的钱加起来一共10000,那么不管A和B之间如何转账,转几次账,事务结束后两用户的钱加起来都应该还是10000,这就是事务的一致性
-
隔离性(Isolation):一个事务的执行不应该受到其他事务的干扰。当多个用户并发访问数据库时,比如操作同一张表,数据库为每一个用户开启一个事务,不能别其它的事务所干扰,多个并发事务之间要相互隔离。
-
持久性(Durability):一旦事务结束,数据就持久化到数据库。指的是事务一旦被提交,那么对数据库中的数据改变就是永久的。
-
-
如果不考虑隔离性引发安全性问题
- 读问题:
-
** 脏读(dirty read):**一个事务读取到另一个事务为提交的数据。
比如银行取钱,事务A开启事务,此时切换到事务B,事务B开启事务–>取走100元,此时切换回事务A,事务A读取的肯定是数据库里面的原始数据,因为事务B取走了100块钱,并没有提交,数据库里面的账务余额肯定还是原始余额,这就是脏读。
-
**不可重复读(non-repeatable read):**一个事务读到另一个事务已经提交的update的数据,导致一个事务中多次查询结果不一致。
当B事务select读取数据后,A事务update操作更改B事务select到的数据,此时B事务再次读去该数据,发现前后两次的数据不一样。
-
**虚读/幻读(phantom read):**一个事务读到另一个事务已经提交的insert的数据,导致一个事务中多次查询结果不一致。
当B事务select读取数据后,A事务insert或delete了一条满足A事务的select条件的记录,此时B事务再次select,发现查询到前次不存在的记录(“幻影”),或者前次的某个记录不见了。
-
写问题:
-
更新丢失:个并发的事务 基于同一个查询结果进行更新操作后提交的事务 忽略了先提交的事务对数据库的影响 造成的问题 称之为更新丢失问题

数据库的锁机制解决丢失更新
- 使用悲观锁:
-
共享锁
select * from table lock in shark modl (读锁,共享锁)
-
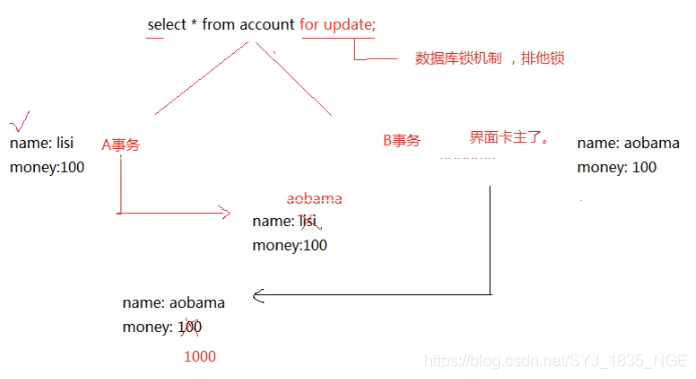
排它锁:认为丢失更新一定会出现,可以在查询的时候加入for update
select * from table forupdate (写锁,排它锁)
认为丢失更新一定会出现,查询时: select * from account for update;for update : 数据库锁机制,排它锁。(针对的是记录)
-
使用乐观锁:
认为丢失更新一定不会出现,设置Version为0,A事务先提交:数据库Version变成1,B事务在提交的时候,比对数据库和自己的version。或者使用时间戳。

-
-
解决读问题
-
Read uncommitted :未提交读,任何读问题解决不了。
-
Read committed :已提交读,解决脏读,但是不可重复读和虚读有可能发生。
-
Repeatable read :重复读,解决脏读和不可重复读,但是虚读有可能发生。
-
Serializable :解决所有读问题。
ISOLATION_DEFAULT 使用后端数据库默认的隔离级别 ISOLATION_READ_UNCOMMITTED 最低的隔离级别,允许读取尚未提交的数据变更,可能会导致脏读、幻读或不可重复读 ISOLATION_READ_COMMITTED 允许读取并发事务已经提交的数据,可以阻止脏读,但是幻读或不可重复读仍有可能发生 ISOLATION_REPEATABLE_READ 对同一字段的多次读取结果都是一致的,除非数据是被本身事务自己所修改,可以阻止脏读和不可重复读,但幻读仍有可能发生 ISOLATION_SERIALIZABLE 最高的隔离级别,完全服从ACID的隔离级别,确保阻止脏读、不可重复读以及幻读,也是最慢的事务隔离级别,因为它通常是通过完全锁定事务相关的数据库表来实现的 -
Spring的事务管理的API
- Spring事务管理涉及的接口的联系如下:

-
PlatformTransactionManager:平台事务管理器
- DataSourceTransactionManager :底层使用JDBC管理事务
- HibernateTransactionManager :底层使用Hibernate管理事务
-
TransactionDefinition:事务定义信息
事务定义:用于定义事务的相关的信息,隔离级别、超时信息、传播行为、是否只读
-
TransactionStatus:事务的状态
事务状态:用于记录在事务管理过程中,事务的状态的对象。
-
事务管理的API的关系
Spring进行事务管理的时候,首先平台事务管理器根据事务定义信息进行事务的管理,在事务管理过程中,产生各种状态,将这些状态的信息记录到事务状态的对象中。
Spring的事务的传播行为

- 保证多个操作在同一个事务中:
- PROPAGATION_REQUIRED :默认值,如果A中有事务,使用A中的事务,如果A没有,创建一个新的事务,将操作包含进来。
- PROPAGATION_SUPPORTS :支持事务,如果A中有事务,使用A中的事务。如果A没有事务,不使用事务。
- PROPAGATION_MANDATORY :如果A中有事务,使用A中的事务。如果A没有事务,抛出异常。
- 保证多个操作不在同一个事务中
- PROPAGATION_REQUIRES_NEW :如果A中有事务,将A的事务挂起(暂停),创建新事务,只包含自身操作。如果A中没有事务,创建一个新事务,包含自身操作。
- PROPAGATION_NOT_SUPPORTED :如果A中有事务,将A的事务挂起。不使用事务管理。
- PROPAGATION_NEVER :如果A中有事务,报异常。
- 嵌套式事务
- PROPAGATION_NESTED :嵌套事务,如果A中有事务,按照A的事务执行,执行完成后,设置一个保存点,执行B中的操作,如果没有异常,执行通过,如果有异常,可以选择回滚到最初始位置,也可以回滚到保存点。
编程式事务管理
-
Spring提供了对编程式事务和声明式事务的支持,编程式事务(Spring推荐的)允许用户在代码中精确定义事务的边界,而声明式事务(基于AOP)有助于用户将操作与事务规则进行解耦。
-
简单地说,编程式事务侵入到了业务代码里面,但是提供了更加详细的事务管理;而声明式事务由于基于AOP,所以既能起到事务管理的作用,又可以不影响业务代码的具体实现。
-
使用到的数据库的创建
create database spring4_day03; use spring4_day03; create table account( id int primary key auto_increment, name varchar(20), money double ); -
以银行转账为例,进行说明
分别创建Dao和Service,实现A给B转账,A减去1000,B加上1000。同时使用外部的C3P0连接池。
-
编写Dao和实现类
对于使用到的Spring提供的JDBC模板,有三种方式获取
-
第一种:在applicationContext.xml文件中配置,然后在Dao的实现类上提供private JdbcTemplate jdbcTemplate的set方法。注入到AccountDaoImpl中。
<bean id="jdbcTemplate" class="org.springframework.jdbc.core.JdbcTemplate" > <!--在JdbcTemplate的父类setDataSource直接传入数据库源即可--> <property name="dataSource" ref="dataSource"/> </bean> -
第二种:继承自JdbcDaoSupport类,在类中,有JdbcTemplate 属性,并提供了相应的set方法。可以直接在AccountDaoImpl中进行属性的注入。
-
第三种:因为在JdbcTemplate 模板中也需要注入DataSource数据源。所以在JdbcDaoSupport类中也提供了DataSource。

所以我们可以直接在applicationContext.xml中的AccountDaoImpl中直接注入DataSource。
<bean id="accountDao" class="com.syj.spring.dao.AccountDaoImpl">
		<!-- <property name="jdbcTemplate" ref="jdbcTemplate" /> -->
			<property name="dataSource" ref="dataSource" />
</bean>
/** * 转账的DAO接口 * @author SYJ */ public interface AccountDao { public void outMoney(String from, Double money); public void inMoney(String to, Double money); } //====================================================== /** * 转账的Dao的实现类 * @author SYJ */ public class AccountDaoImpl extends JdbcDaoSupport implements AccountDao { @Override public void outMoney(String from, Double money) { this.getJdbcTemplate().update("update account set money = money - ? where name = ?", money, from); } @Override public void inMoney(String to, Double money) { this.getJdbcTemplate().update("update account set money = money + ? where name = ?", money, to); } } -
-
编写Service和实现类
/** * Service层实现转账 * @author SYJ */ public interface AccountService { public void transfer(String from, String to, Double money); } //================================================ /** * 转账的业务层接口 * * @author SYJ * */ public class AccountServiceImpl implements AccountService { private AccountDao accountDao; public void setAccountDao(AccountDao accountDao) { this.accountDao = accountDao; } // 注入Spring对于事务的管理 transactionTemplate private TransactionTemplate transactionTemplate; public void setTransactionTemplate(TransactionTemplate transactionTemplate) { this.transactionTemplate = transactionTemplate; } /** * from 转出人 to 转入人 */ @Override public void transfer(final String from, final String to, Double money) { accountDao.outMoney(from, money); //int i = 1 / 0; accountDao.inMoney(to, money); } } -
将Dao和Service的创建权交给Spring管理,并将accountDao注入accountService中,配置applicationContext.xml。
<!-- 将转账的Service实现类交给Spring管理 --> <bean id="accountService" class="com.syj.spring.service.AccountServiceImpl" > <property name="accountDao" ref="accountDao" /> </bean> <bean id="accountDao" class="com.syj.spring.dao.AccountDaoImpl"> </bean> -
配置C3P0连接池
创建jdbc.properties
#mysql

jdbc.driver=com.mysql.jdbc.Driver
jdbc.url=jdbc:mysql:///spring4_day03
jdbc.username=root
jdbc.password=root
C3P0连接池
<!-- 引入外部连接数据库的文件 --> <context:property-placeholder location="classpath:jdbc.properties" /> <!-- C3P0连接池的配置 --> <bean id="dataSource" class="com.mchange.v2.c3p0.ComboPooledDataSource"> <property name="driverClass" value="${jdbc.driver}" /> <property name="jdbcUrl" value="${jdbc.url}" /> <property name="user" value="${jdbc.username}" /> <property name="password" value="${jdbc.password}" /> </bean> -
配置JDBC的事务平台管理器,并将数据库注入到事务平台管理器中。
<!-- 1.配置平台事务管理器(JDBC的)================ --> <bean id="transactionManager" class="org.springframework.jdbc.datasource.DataSourceTransactionManager" > <!-- 因为是使用Spring的对于事务的管理,所有我们需要将数据库源对象引入 --> <property name="dataSource" ref="dataSource" /> </bean> -
Spring为我们提供了事务管理的模板,需要我们手动的传入平台事务管理器
<!-- 事务本身的管理非常的复杂,SPring为我们提供了事务管理的模板 --> <bean id="transactionTemplate" class="org.springframework.transaction.support.TransactionTemplate" > <property name="transactionManager" ref="transactionManager"></property> </bean> -
事务的使用一般都是在Service层,所以我们将Spring提供的事务管理模板注入到accountService中
<!-- 将转账的Service实现类交给Spring管理 -->
	<bean  id="accountService" class="com.syj.spring.service.AccountServiceImpl" >
		<property name="accountDao" ref="accountDao" />
		<!-- 注入Spring的事务管理的模板 -->
		<property name="transactionTemplate" ref="transactionTemplate" />
	</bean>
并提供相应的set方法:
// 注入Spring对于事务的管理 transactionTemplate private TransactionTemplate transactionTemplate; public void setTransactionTemplate(TransactionTemplate transactionTemplate) { this.transactionTemplate = transactionTemplate; } -
在accountService中使用配置好的事务和模板
/** * from 转出人 to 转入人 */ @Override public void transfer(final String from, final String to, Double money) { // 使用Spring的事务管理模板进行事务的管理 transactionTemplate.execute(new TransactionCallbackWithoutResult() { @Override protected void doInTransactionWithoutResult(TransactionStatus arg0) { accountDao.outMoney(from, money); int i = 1 / 0; accountDao.inMoney(to, money); } }); } -
完整的applicationContetx.xml和accountServiceImpl.java代码:
accountServiceImpl.java
/**
 * 转账的业务层接口
 *
 * @author SYJ
 *
 */
public class AccountServiceImpl implements AccountService {

	private AccountDao accountDao;

	public void setAccountDao(AccountDao accountDao) {
		this.accountDao = accountDao;
	}

	// 注入Spring对于事务的管理 transactionTemplate
	private TransactionTemplate transactionTemplate;

	public void setTransactionTemplate(TransactionTemplate transactionTemplate) {
		this.transactionTemplate = transactionTemplate;
	}

	/**
	 * from 转出人 to 转入人
	 */
	@Override
	public void transfer(final String from, final String to, Double money) {
		// 使用Spring的事务管理模板进行事务的管理
		transactionTemplate.execute(new TransactionCallbackWithoutResult() {
			@Override
			protected void doInTransactionWithoutResult(TransactionStatus arg0) {
				accountDao.outMoney(from, money);
				int i = 1 / 0;
				accountDao.inMoney(to, money);
			}
		});
	}

}
applicationContetx.xml
<?xml version="1.0" encoding="UTF-8"?>
<beans xmlns="http://www.springframework.org/schema/beans"
	xmlns:xsi="http://www.w3.org/2001/XMLSchema-instance"
	xmlns:context="http://www.springframework.org/schema/context"
	xmlns:aop="http://www.springframework.org/schema/aop"
	xmlns:tx="http://www.springframework.org/schema/tx"
	xsi:schemaLocation="http://www.springframework.org/schema/beans
	http://www.springframework.org/schema/beans/spring-beans.xsd
	http://www.springframework.org/schema/context
	http://www.springframework.org/schema/context/spring-context.xsd
	http://www.springframework.org/schema/aop
	http://www.springframework.org/schema/aop/spring-aop.xsd
	http://www.springframework.org/schema/tx
	http://www.springframework.org/schema/tx/spring-tx.xsd">

	<!-- 将转账的Service实现类交给Spring管理 -->
	<bean  id="accountService" class="com.syj.spring.service.AccountServiceImpl" >
		<property name="accountDao" ref="accountDao" />
		<!-- 注入Spring的事务管理的模板 -->
		<property name="transactionTemplate" ref="transactionTemplate" />
	</bean>


	<bean id="accountDao" class="com.syj.spring.dao.AccountDaoImpl">
		<!-- <property name="jdbcTemplate" ref="jdbcTemplate" /> -->
			<property name="dataSource" ref="dataSource" />
	</bean>

	<!-- 引入外部连接数据库的文件 -->
	<context:property-placeholder location="classpath:jdbc.properties" />

	<!-- C3P0连接池的配置 -->
	<bean id="dataSource" class="com.mchange.v2.c3p0.ComboPooledDataSource">
		<property name="driverClass" value="${jdbc.driver}"  />
		<property name="jdbcUrl" value="${jdbc.url}"  />
		<property name="user" value="${jdbc.username}"  />
		<property name="password" value="${jdbc.password}"  />
	</bean>

	<!-- 注入Spring自带的jdbc模板 -->
	<!-- <bean id="jdbcTemplate"  class="org.springframework.jdbc.core.JdbcTemplate" >
			在JdbcTemplate的父类setDataSource直接传入数据库源即可
			<property name="dataSource"  ref="dataSource"/>
	</bean> -->

	<!-- 1.配置平台事务管理器(JDBC的)================ -->
	<bean id="transactionManager" class="org.springframework.jdbc.datasource.DataSourceTransactionManager" >
		<!-- 因为是使用Spring的对于事务的管理,所有我们需要将数据库源对象引入 -->
		<property name="dataSource"  ref="dataSource" />
	</bean>

	<!-- 事务本身的管理非常的复杂,SPring为我们提供了事务管理的模板 -->
	<bean id="transactionTemplate" class="org.springframework.transaction.support.TransactionTemplate" >
			<property name="transactionManager"  ref="transactionManager"></property>
	</bean>

</beans>
-
声明式事务管理
XML方式的生命式事务管理
-
恢复转账环境,使用AOP进行事务的管理
-
在applicationContext.xml中配置事务管理器
<!-- 配置事务管理器:生命式的XML方式 --> <bean id="transactionManger" class="org.springframework.jdbc.datasource.DataSourceTransactionManager" > <!-- 注入数据源 --> <property name="dataSource" ref="dataSource"></property> </bean> -
配置事务的规则,事务的增强
<!-- 配置事务的增强AOP(不影响源代码的基础上做出相应的修改) 将相应的事务管理器交给Spring提供的事务管理机制--> <tx:advice id="txAdvice" transaction-manager="transactionManger" > <tx:attributes> <!-- 是事务的管理规则 --> <!-- propagation:传播行为 isolation :隔离级别 timeout :超时时间限制 read-only :是否只读 --> <!-- <tx:method name="save*" propagation="REQUIRED" /> <tx:method name="update*" propagation="REQUIRED" /> <tx:method name="find*" propagation="REQUIRED" /> <tx:method name="delete*" read-only="true" /> <tx:method name="transfer" propagation="REQUIRED" isolation="DEFAULT" timeout="-1" read-only="false" /> --> <tx:method name="*" propagation="REQUIRED" /> </tx:attributes> </tx:advice> -
配置AOP
<!-- AOP的配置(将定义好的事务管理的规则应用到目标类) --> <!-- AOP的配置 --> <aop:config> <!-- 定义切入点(那个包的那个类需要进行增强) --> <aop:pointcut expression="execution(* com.syj.spring.demo2.AccountServiceImpl.*(..))" id="pointcut1"/> <!-- 定义切面 --> <!-- 一个切入点和一个通知的组合 --> <aop:advisor advice-ref="txAdvice" pointcut-ref="pointcut1" /> <!-- 多个切入点和多个通知的组合 --> <!-- <aop:aspect></aop:aspect> --> </aop:config> -
</tx:advice>定义的是事务的规则,如何使用怎么使用;<aop:config>定义的是具体的那个类的那个方式使用这个规则进行事务的管理。
-
applicationContext的完整代码:
<?xml version="1.0" encoding="UTF-8"?>
<beans xmlns="http://www.springframework.org/schema/beans"
	xmlns:xsi="http://www.w3.org/2001/XMLSchema-instance"
	xmlns:context="http://www.springframework.org/schema/context"
	xmlns:aop="http://www.springframework.org/schema/aop"
	xmlns:tx="http://www.springframework.org/schema/tx"
	xsi:schemaLocation="http://www.springframework.org/schema/beans
	http://www.springframework.org/schema/beans/spring-beans.xsd
	http://www.springframework.org/schema/context
	http://www.springframework.org/schema/context/spring-context.xsd
	http://www.springframework.org/schema/aop
	http://www.springframework.org/schema/aop/spring-aop.xsd
	http://www.springframework.org/schema/tx
	http://www.springframework.org/schema/tx/spring-tx.xsd">

	<!-- 将转账的Service实现类交给Spring管理 -->
	<bean  id="accountService" class="com.syj.spring.demo2.AccountServiceImpl" >
		<property name="accountDao" ref="accountDao" />
		<!-- 注入Spring的事务管理的模板 -->
	</bean>


	<bean id="accountDao" class="com.syj.spring.demo2.AccountDaoImpl">
		<!-- <property name="jdbcTemplate" ref="jdbcTemplate" /> -->
			<property name="dataSource" ref="dataSource" />
	</bean>

	<!-- 引入外部连接数据库的文件 -->
	<context:property-placeholder location="classpath:jdbc.properties" />

	<!-- C3P0连接池的配置 -->
	<bean id="dataSource" class="com.mchange.v2.c3p0.ComboPooledDataSource">
		<property name="driverClass" value="${jdbc.driver}"  />
		<property name="jdbcUrl" value="${jdbc.url}"  />
		<property name="user" value="${jdbc.username}"  />
		<property name="password" value="${jdbc.password}"  />
	</bean>

	<!-- 注入Spring自带的jdbc模板 -->
	<!-- <bean id="jdbcTemplate"  class="org.springframework.jdbc.core.JdbcTemplate" >
			在JdbcTemplate的父类setDataSource直接传入数据库源即可
			<property name="dataSource"  ref="dataSource"/>
	</bean> -->

	<!-- 配置事务管理器:生命式的XML方式 -->
	<bean id="transactionManger"  class="org.springframework.jdbc.datasource.DataSourceTransactionManager" >
		<!-- 注入数据源 -->
		<property name="dataSource"  ref="dataSource"></property>
	</bean>

	<!-- 配置事务的增强AOP(不影响源代码的基础上做出相应的修改) 将相应的事务管理器交给Spring提供的事务管理机制-->
	<tx:advice id="txAdvice" transaction-manager="transactionManger" >
		<tx:attributes>
			<!-- 是事务的管理规则 -->
			<!--
				propagation:传播行为
				isolation  :隔离级别
				timeout	   :超时时间限制
				read-only  :是否只读
			 -->
			 <!-- <tx:method name="save*" propagation="REQUIRED" />
			 <tx:method name="update*" propagation="REQUIRED" />
			 <tx:method name="find*" propagation="REQUIRED" />
			 <tx:method name="delete*" read-only="true" />
			<tx:method name="transfer" propagation="REQUIRED"  isolation="DEFAULT"   timeout="-1"   read-only="false"  /> -->
			<tx:method name="*" propagation="REQUIRED" />
			</tx:attributes>
	</tx:advice>

	<!-- AOP的配置(将定义好的事务管理的规则应用到目标类) -->
	<!-- AOP的配置 -->
	<aop:config>
		<!-- 定义切入点(那个包的那个类需要进行增强) -->
		<aop:pointcut expression="execution(* com.syj.spring.demo2.AccountServiceImpl.*(..))" id="pointcut1"/>

		<!-- 定义切面 -->

		<!-- 一个切入点和一个通知的组合 -->
		<aop:advisor advice-ref="txAdvice" pointcut-ref="pointcut1" />

		<!-- 多个切入点和多个通知的组合 -->
		<!-- <aop:aspect></aop:aspect> -->

	</aop:config>
</beans>
注解方式的生命式事务管理
-
注解方式的生命式事务管理一共分为三步
-
第一步:配置事务管理器
<!-- 1.配置事务管理器(生命式的注解方式使用注解) --> <bean id="transactionManager" class="org.springframework.jdbc.datasource.DataSourceTransactionManager" > <property name="dataSource" ref="dataSource" /> </bean> -
第二步开启注解事务
<!-- 2.开启注解事务 --> <tx:annotation-driven transaction-manager="transactionManager" /> -
第三步:在业务层添加注解
/**
 * 转账的业务层
 * @author SYJ
 */
//使用注解管理事务
//里面有事务的(传播行为、隔离级别、是否超时等等属性)
@Transactional(propagation = Propagation.REQUIRED, isolation = Isolation.DEFAULT)
public class AccountServiceImpl implements AccountService {

	private AccountDao accountDao;

	public void setAccountDao(AccountDao accountDao) {
		this.accountDao = accountDao;
	}

	/**
	 * from 转出人 to 转入人
	 */
	@Override
	public void transfer(final String from, final String to, Double money) {
		accountDao.outMoney(from, money);
		//	int i = 1 / 0;
		accountDao.inMoney(to, money);
	}
}


 1万+
1万+

 被折叠的 条评论
为什么被折叠?
被折叠的 条评论
为什么被折叠?
 到【灌水乐园】发言


