


1.概述
本篇内容记录了一次搭建Syncthing并且完成两台服务器之间文件同步的过程。为了对Syncthing的配置有更加直观的理解,搭建过程中没有使用Syncthing GUI界面对设备进行配置与管理,而是通过编辑config.xml文件对Syncthing进行配置。
2.下载与安装
下载与安装不是本篇内容的重点,因此仅在这里做简要的描述。
通过以下命令从syncthing官网获取syncthing二进制代码
图1
获取到syncthing后进行解压:tar -xvf syncthing-linux-amd64-v1.26.1.tar.gz syncthing-linux-amd64-v1.26.1得到以下目录。

图2
到此,我们就已经可以使用syncthing了。
3. 首次运行
首次运行时,syncthing会初始化一些基本的目录及文件,以下列举一些基础的文件及目录:
1.$HOME/.config/syncthing:该目录是默认的Data目录和配置文件目录
2.$HOME/.config/syncthing/config.conf:该文件是syncthing默认的配置文件
3.$HOME/Sync:该文件是syncthing默认的将要同步的目录
以上三个目录及文件是比较基础和关键的目录。需要注意的是,上述目录是1.27.0以前版本默认的默认路径,如果使用的是1.27.0以后的文件,默认的目录文件不同。详细信息请参考Syncthing Configuration — Syncthing documentation
4. 关键配置解释
<configuration version="37">
    <folder id="default" label="Default Folder" path="/home/ming/SelfTest" type="sendreceive" rescanIntervalS="3600" fsWatcherEnabled="true" fsWatcherDelayS="10" ignorePerms="false" autoNormalize="true">
        <filesystemType>basic</filesystemType>
        <device id="2ANZFD3-VNMF2DT-STCJ4OX-IDM6HP6-2ZHLTGM-QSYWH6F-CXW7Q4V-Q5VDEAI" introducedBy="">
            <encryptionPassword></encryptionPassword>
        </device>
        <device id="5SLKBYU-MUACV4E-TXUDYIA-BKBPQE2-ENXHR6B-YESV4PX-RLFJ2OQ-TSRUMAU" introducedBy="">
            <encryptionPassword></encryptionPassword>
        </device>
        <minDiskFree unit="%">1</minDiskFree>
        <versioning>
            <cleanupIntervalS>3600</cleanupIntervalS>
            <fsPath></fsPath>
            <fsType>basic</fsType>
        </versioning>
        <copiers>0</copiers>
        <pullerMaxPendingKiB>0</pullerMaxPendingKiB>
        <hashers>0</hashers>
        <order>random</order>
        <ignoreDelete>false</ignoreDelete>
        <scanProgressIntervalS>0</scanProgressIntervalS>
        <pullerPauseS>0</pullerPauseS>
        <maxConflicts>10</maxConflicts>
        <disableSparseFiles>false</disableSparseFiles>
        <disableTempIndexes>false</disableTempIndexes>
        <paused>false</paused>
        <weakHashThresholdPct>25</weakHashThresholdPct>
        <markerName>.stfolder</markerName>
        <copyOwnershipFromParent>false</copyOwnershipFromParent>
        <modTimeWindowS>0</modTimeWindowS>
        <maxConcurrentWrites>2</maxConcurrentWrites>
        <disableFsync>false</disableFsync>
        <blockPullOrder>standard</blockPullOrder>
        <copyRangeMethod>standard</copyRangeMethod>
        <caseSensitiveFS>false</caseSensitiveFS>
        <junctionsAsDirs>false</junctionsAsDirs>
        <syncOwnership>false</syncOwnership>
        <sendOwnership>false</sendOwnership>
        <syncXattrs>false</syncXattrs>
        <sendXattrs>false</sendXattrs>
        <xattrFilter>
            <maxSingleEntrySize>1024</maxSingleEntrySize>
            <maxTotalSize>4096</maxTotalSize>
        </xattrFilter>
    </folder>
    <device id="2ANZFD3-VNMF2DT-STCJ4OX-IDM6HP6-2ZHLTGM-QSYWH6F-CXW7Q4V-Q5VDEAI" name="VM-0-9-centos" compression="metadata" introducer="false" skipIntroductionRemovals="false" introducedBy="">
        <address>quic://远端服务器地址</address>
        <paused>false</paused>
        <autoAcceptFolders>false</autoAcceptFolders>
        <maxSendKbps>0</maxSendKbps>
        <maxRecvKbps>0</maxRecvKbps>
        <maxRequestKiB>0</maxRequestKiB>
        <untrusted>false</untrusted>
        <remoteGUIPort>0</remoteGUIPort>
        <numConnections>0</numConnections>
    </device>
    <device id="5SLKBYU-MUACV4E-TXUDYIA-BKBPQE2-ENXHR6B-YESV4PX-RLFJ2OQ-TSRUMAU" name="iZ7xv761vd3tpv1ns6v1ofZ" compression="metadata" introducer="false" skipIntroductionRemovals="false" introducedBy="">
        <address>dynamic</address>
        <paused>false</paused>
        <autoAcceptFolders>false</autoAcceptFolders>
        <maxSendKbps>0</maxSendKbps>
        <maxRecvKbps>0</maxRecvKbps>
        <maxRequestKiB>0</maxRequestKiB>
        <untrusted>false</untrusted>
        <remoteGUIPort>0</remoteGUIPort>
        <numConnections>0</numConnections>
    </device>
    <gui enabled="true" tls="false" debugging="false" sendBasicAuthPrompt="false">
        <address>0.0.0.0:8384</address>
        <apikey>ztcTobSTWTC3cdpAmvcprwnAH9trupJM</apikey>
        <theme>default</theme>
    </gui>

</configuration>
在以上配置文件中,本篇文章需要关注的地方是:
(1).<folder>元素中的path属性。该属性指定了将要同步的文件路径
(2).<folder>元素中的<device>子元素。<device>子元素指定了将要同步上述path指定的路径的设备。device 中的ID是用来标识设备。每个设备在首次执行syncthing时,都会生成自己的ID。因此,如果需要获取某个设备的ID,我们只需要在首次运行syncthing后,从$HOME/.config/syncthing/config.conf文件中获取即可。需要注意的是,这里的<device>必须在<configuration>元素中同样通过<device>进行声明。
(3).<configuration>元素中的<device>子元素。这里的<device>子元素用来指定我们希望进行同步的远程设备的信息。其中比较关键的是:
1)ID属性:从远程设备上的$HOME/.config/syncthing/config.conf文件中获取
2)<address>子元素:远程设备的地址
5.所有设备配置成功后,启动syncthing即可,看到以下红框中类似的信息即表示syncthing已经检测并连接到远程服务器,两台服务器之间可以开始进行同步了。同时,也可以通过登录syncthing GUI管理界面查看服务器连接或者同步情况。现在,你可以试一试在指定的path中创建或者删除文件,来验证服务器之间是否同步成功。
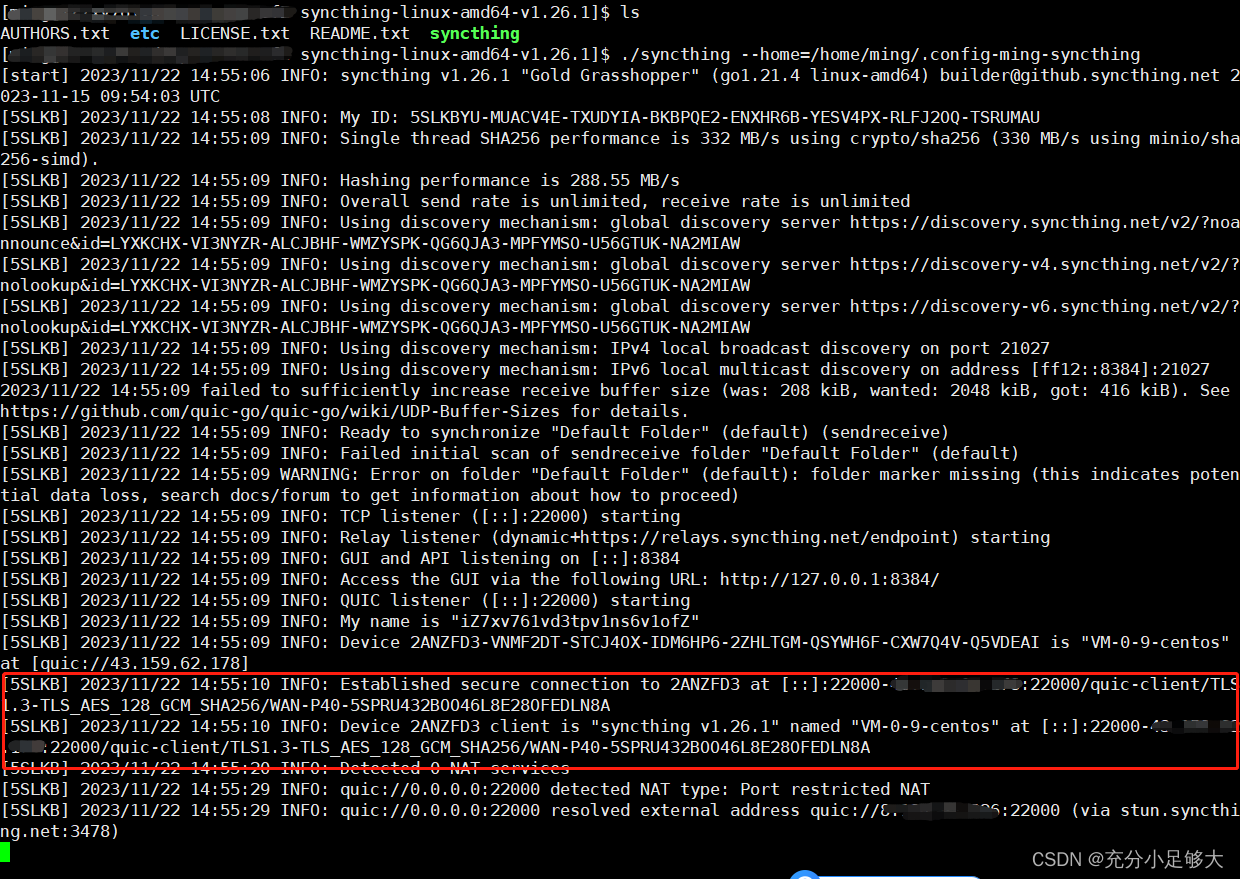
图3


 1万+
1万+


 被折叠的 条评论
为什么被折叠?
被折叠的 条评论
为什么被折叠?
 到【灌水乐园】发言


