


今天自己整了一下springboot+druid+mybatisplus+sharding-jdbc读写分离,遇到的一些坑及解决办法
1、导入pom.xml依赖
<parent>
        <groupId>org.springframework.boot</groupId>
        <artifactId>spring-boot-starter-parent</artifactId>
        <version>2.7.5</version>
        <relativePath/> <!-- lookup parent from repository -->
    </parent>
    <groupId>com.itcast</groupId>
    <artifactId>rw</artifactId>
    <version>0.0.1-SNAPSHOT</version>
    <name>rw</name>
    <description>Demo project for Spring Boot</description>
    <properties>
        <java.version>1.8</java.version>
    </properties>
    <dependencies>
        <dependency>
            <groupId>org.springframework.boot</groupId>
            <artifactId>spring-boot-starter-web</artifactId>
        </dependency>

        <dependency>
            <groupId>org.springframework.boot</groupId>
            <artifactId>spring-boot-starter-test</artifactId>
            <scope>test</scope>
        </dependency>
        <dependency>
            <groupId>junit</groupId>
            <artifactId>junit</artifactId>
            <scope>test</scope>
        </dependency>


        <!--数据库相关-->
        <dependency>
            <groupId>mysql</groupId>
            <artifactId>mysql-connector-java</artifactId>
            <scope>runtime</scope>
        </dependency>
        <dependency>
            <groupId>com.alibaba</groupId>
            <artifactId>druid</artifactId>
            <version>1.1.20</version>
        </dependency>
        <dependency>
            <groupId>com.baomidou</groupId>
            <artifactId>mybatis-plus-boot-starter</artifactId>
            <version>3.3.1.tmp</version>
        </dependency>


        <dependency>
            <groupId>org.projectlombok</groupId>
            <artifactId>lombok</artifactId>
            <optional>true</optional>
        </dependency>

        <!--MySQL读写分离-->
        <dependency>
            <groupId>org.apache.shardingsphere</groupId>
            <artifactId>sharding-jdbc-spring-boot-starter</artifactId>
            <version>4.0.0</version>
        </dependency>


        <dependency>
            <groupId>com.alibaba</groupId>
            <artifactId>fastjson</artifactId>
            <version>1.2.76</version>
        </dependency>
    </dependencies>

    <build>
        <plugins>
            <plugin>
                <groupId>org.springframework.boot</groupId>
                <artifactId>spring-boot-maven-plugin</artifactId>
            </plugin>
        </plugins>
    </build>
- 坑1:引用了sharding-jdbc-spring=boot-starter包,那么druid 不能用spring-boot-starter版本,只能是普通版本的包,不然启动会报错,找不到url
- 坑2:sharding-jdbc包版本好像和mybatisplus的版本有冲突,项目页启动不了,经过测试,mybatisplus版本选择(3.3.1.tmp / 3.4.0),sharding版本选择4.0.0就不会出现这样的问题
2、配置application.yml
server:
  port: 6080
spring:
  #  environment: dev
  application:
    name: rw # 服务名称
  shardingsphere:
    props:
      sql:
        show: true  # 开启显示sql
    sharding:
      default-data-source-name: master
    masterslave:
      name: ms
      master-data-source-name: master
      slave-data-source-names: slave
      load-balance-algorithm-type: round_robin
    datasource:
      # 数据源名称,名称自定义,需要与后面配置的一一对应,可以多个,以英文逗号分割
      names: master,slave
      master:
        # 采用 druid 数据库连接池
        type: com.alibaba.druid.pool.DruidDataSource
        driver-class-name: com.mysql.cj.jdbc.Driver
        url: jdbc:mysql://192.168.1.1:3306/itcast?serverTimezone=Asia/Shanghai&useUnicode=true&characterEncoding=utf-8&zeroDateTimeBehavior=convertToNull&useSSL=false&allowPublicKeyRetrieval=true
        username: root
        password: admin1234
        initialSize: 5   # 初始化连接池数量
        minIdle: 5   # 最小空闲连接池
        minPoolSize: 5    # 最小连接数量
        maxPoolSize: 20   # 最大连数量
        maxWait: 60000
      slave:
        type: com.alibaba.druid.pool.DruidDataSource
        driver-class-name: com.mysql.cj.jdbc.Driver
        url: jdbc:mysql://192.168.1.2:3306/itcast?serverTimezone=Asia/Shanghai&useUnicode=true&characterEncoding=utf-8&zeroDateTimeBehavior=convertToNull&useSSL=false&allowPublicKeyRetrieval=true
        username: root
        password: admin1234
        initialSize: 5
        minIdle: 5
        minPoolSize: 5
        maxPoolSize: 20
        maxWait: 60000
  main:
    allow-bean-definition-overriding: true
sharding:
  jdbc:
    config:
      masterslave:
        load-balance-algorithm-type: random

mybatis-plus:
  datasource: dataSource
  type-aliases-package: com.itcast.entity
  configuration:
    #在映射实体或者属性时,将数据库中表名和字段名中的下划线去掉,按照驼峰命名法映射  实体类属性名:idNumber -> 数据库字段名:id_number
    map-underscore-to-camel-case: true
    log-impl: org.apache.ibatis.logging.stdout.StdOutImpl
  global-config:
    db-config:
      id-type: AUTO
      table-prefix: tb_
3、创建实体类、controller、mapper、service
@Data
public class User implements Serializable {
    private static final long serialVersionUID = 1L;

    private Long id;

    private String name;

    private Integer age;

    private String address;

}

#-------------

@RestController
@RequestMapping("/user")
public class UserController {

    @Autowired
    private UserService userService;

    @PostMapping("/add")
    public String add(@RequestBody User user){
        userService.save(user);
        return "0";
    }

    @GetMapping("/list")
    public List<User> list(){
        List<User> userList = userService.list();
        return userList;
    }
}

#-------------
@Mapper
public interface UserDao extends BaseMapper<User> {
}

#-------------
public interface UserService extends IService<User> {
}

#-------------
@Service
public class UserServiceImpl extends ServiceImpl<UserDao, User> implements UserService {
}
4、启动项目,测试
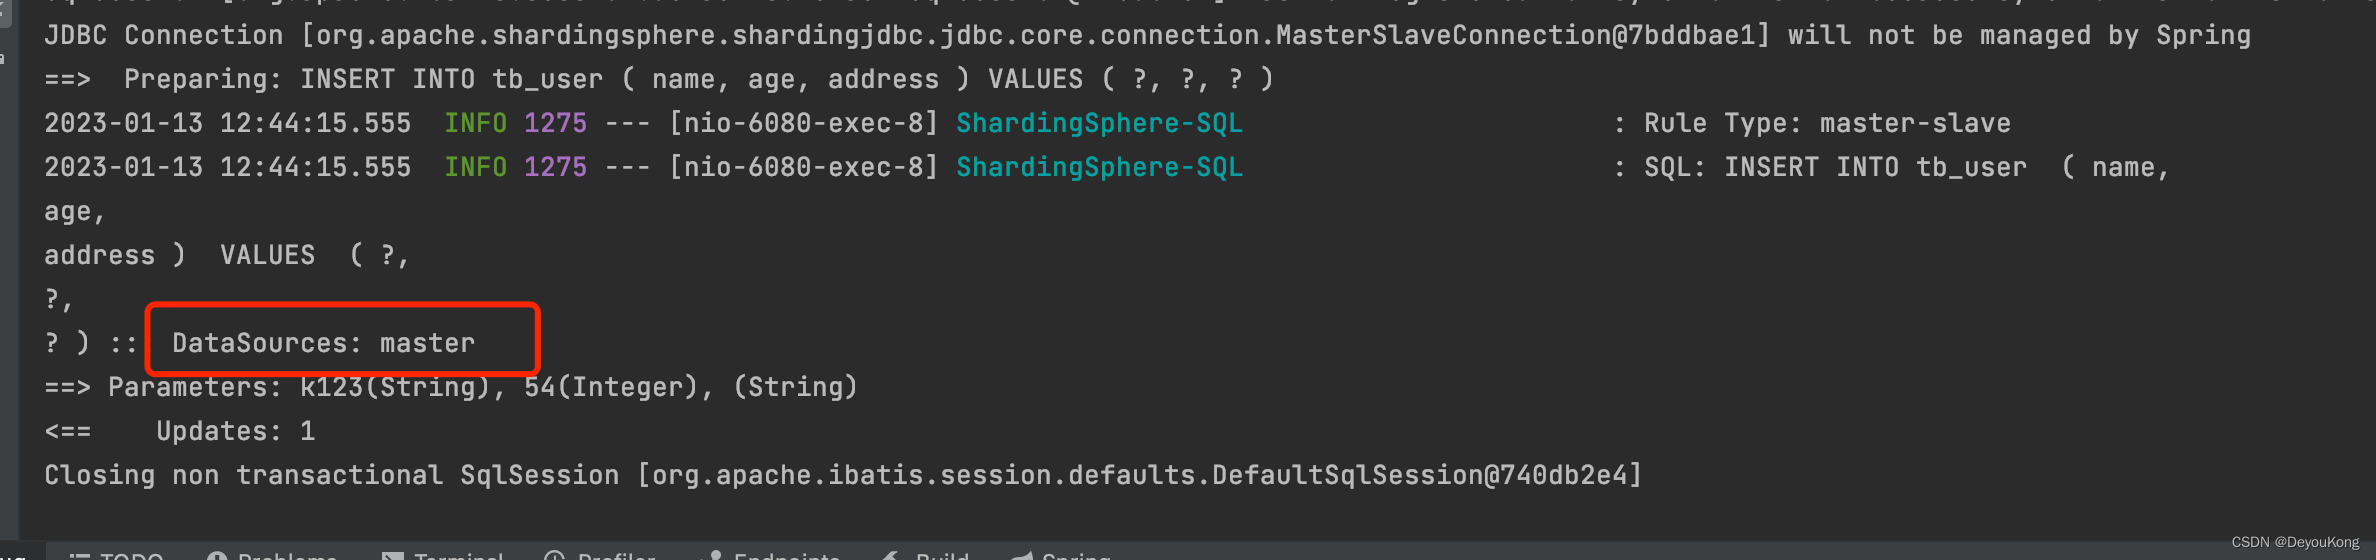
- 查询

- 新增
参考文档:https://www.jianshu.com/p/ed7bc1e49b61


 1382
1382


 被折叠的 条评论
为什么被折叠?
被折叠的 条评论
为什么被折叠?
 到【灌水乐园】发言


