


Springmvc的介绍
Spring Web MVC是一种基于Java的实现了Web MVC设计模式的请求驱动类型的轻量级Web 框架,即使用了MVC架构模式的思想,将web 层进行职责解耦,基于请求驱动指的就是使用请求-响应模型,框架的目的就是帮助我们简化开发,Spring Web MVC也是要简化我们日常Web开发的。
SpringMVC常见开发方式
1.传统的开发方式
通过作用域(request,session)实现数据的传递
通过视图技术进行视图的渲染(jsp thymleaf freeMarker)
2.前后端分离开发方式
多种新的访问方式(get 、post 、put、 delete)
Restful风格的访问
Springmvc的作用
- 提供MVC架构:Spring MVC提供了一个模型视图控制器(MVC)架构,使开发人员能够更好地分离业务逻辑、模型对象、视图模板和其他模型组件。这种分离使得应用程序更易于维护和扩展。
- 处理用户输入:Spring MVC提供了一种精细的控制器,用于处理用户输入和Web请求。这使得开发人员能够以简单的方式处理各种Web请求,包括表单提交、文件上传等。
- 模型和视图的容器:Spring MVC提供了模型和视图的轻量级容器,帮助开发人员更加高效地管理应用程序的组件。开发人员可以方便地创建、管理和共享这些组件,从而提高开发效率。
- 客户端支持:Spring MVC支持多种浏览器,包括Internet Explorer、Mozilla Firefox和Google Chrome等。这使得开发人员可以构建跨浏览器的Web应用程序,为用户提供更好的体验。
- 语言支持:Spring MVC可以轻松地与多种语言协同工作,如JavaScript、HTML、CSS和XML等。这使得开发人员可以使用自己熟悉的技术来构建Web应用程序。
- 功能强大的组件:Spring MVC提供了许多功能强大的组件,如拦截器、数据验证、国际化支持、文件上传等。这些组件可以帮助开发人员更快、更简单地构建高质量的Web应用程序。
- 高效性:Spring MVC采用了基于HandlerMapping和HandlerAdapter的处理方式,使得请求处理流程更加高效。同时,它还支持异步请求处理,提高了系统的并发性能。
- 社区支持强大:作为Spring框架的一部分,Spring MVC拥有庞大的开发者社区和完善的文档资料。这使得开发人员可以方便地获取技术支持和学习资料,加快项目的开发进度。
Springmvc的执行流程以及执行步骤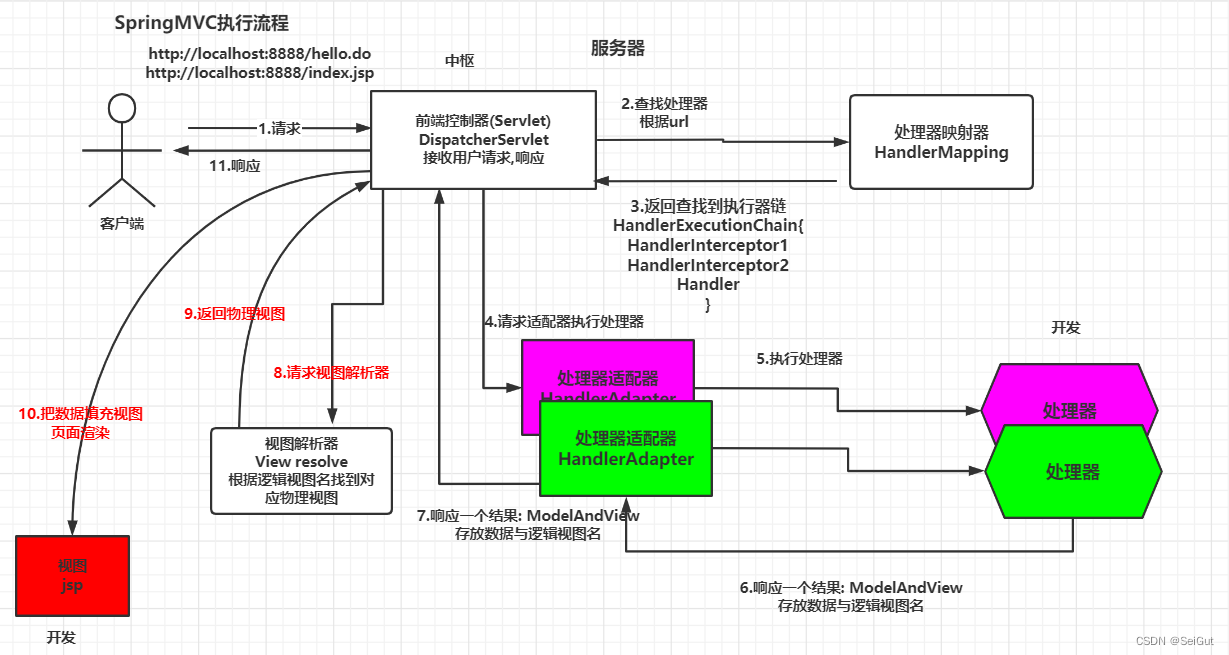
- 发起请求:用户通过浏览器或其他客户端向Web服务器发起HTTP请求。
- 前端控制器(DispatcherServlet)接收请求:DispatcherServlet作为前端控制器,接收所有的HTTP请求。它负责接收请求,并根据请求的URL和配置信息,将请求转发给合适的处理器(Handler)。
- 处理器映射器(HandlerMapping)查找处理器:DispatcherServlet根据请求的URL和配置信息,向处理器映射器(HandlerMapping)发送请求,处理器映射器会查找与请求URL匹配的处理器(Handler)。处理器一般是一个Controller,由开发人员自己开发。
- 调用处理器(Handler)处理请求:处理器映射器将查找到的处理器返回给DispatcherServlet,DispatcherServlet调用处理器来处理请求。处理器会执行相应的业务逻辑,并返回处理结果。
- 处理器适配器(HandlerAdapter)处理处理器返回的结果:处理器适配器(HandlerAdapter)是连接处理器和DispatcherServlet的桥梁。处理器适配器会处理处理器返回的结果,并将其转换为合适的格式,以便后续步骤使用。
- 视图解析器(ViewResolver)解析视图:如果处理器返回的结果是一个视图名称(如JSP页面),那么DispatcherServlet会将视图名称发送给视图解析器(ViewResolver)。视图解析器会解析视图名称,并将其转换为具体的视图实现(如JSP页面)。
- 渲染视图:DispatcherServlet将视图实现和模型数据一起发送给视图渲染器,视图渲染器负责将模型数据渲染到视图中,生成最终的HTML页面或其他类型的响应结果。
- 响应客户端:最终生成的HTML页面或其他类型的响应结果会被发送给客户端浏览器进行展示。
构建Springmvc
- 首先添加依赖
    <dependency>
      <groupId>org.springframework</groupId>
      <artifactId>spring-webmvc</artifactId>
      <version>${spring.version}</version>
</dependency>- 而后在web.xml文件中设置servlet配置Springmvc文件并且配置过滤器
<?xml version="1.0" encoding="UTF-8"?>
<web-app version="3.0"
         xmlns="http://java.sun.com/xml/ns/javaee"
         xmlns:xsi="http://www.w3.org/2001/XMLSchema-instance"
         xsi:schemaLocation="http://java.sun.com/xml/ns/javaee
	http://java.sun.com/xml/ns/javaee/web-app_3_0.xsd">
    <display-name></display-name>
    <welcome-file-list>
        <welcome-file>index.jsp</welcome-file>
    </welcome-file-list>
    <!-- 加载Spring的配置文件 -->
    <context-param>
        <param-name>contextConfigLocation</param-name>
        <param-value>classpath:bean-*.xml</param-value>
    </context-param>
    <!-- 配置Spring的监听器 -->
    <listener>
        <listener-class>org.springframework.web.context.ContextLoaderListener</listener-class>
    </listener>

    <!-- 配置post乱码处理 -->
    <filter>
        <filter-name>CharacterEncodingFilter</filter-name>
        <filter-class>org.springframework.web.filter.CharacterEncodingFilter</filter-class>
        <init-param>
            <param-name>encoding</param-name>
            <param-value>UTF-8</param-value>
        </init-param>
    </filter>

    <filter-mapping>
        <filter-name>CharacterEncodingFilter</filter-name>
        <url-pattern>/*</url-pattern>
    </filter-mapping>

    <!-- 配置SpringMVC的前端控制器 -->
    <servlet>
        <servlet-name>springmvc</servlet-name>
        <servlet-class>org.springframework.web.servlet.DispatcherServlet</servlet-class>
        <init-param>
            <param-name>contextConfigLocation</param-name>
            <param-value>classpath:spring-mvc.xml</param-value>
        </init-param>
        <load-on-startup>1</load-on-startup>
    </servlet>

    <servlet-mapping>
        <servlet-name>springmvc</servlet-name>
        <url-pattern>/</url-pattern>
    </servlet-mapping>

</web-app>- 配置springmvc.xml文件内容为
<?xml version="1.0" encoding="UTF-8"?>
<beans xmlns="http://www.springframework.org/schema/beans"
       xmlns:context="http://www.springframework.org/schema/context"
       xmlns:mvc="http://www.springframework.org/schema/mvc"
       xmlns:xsi="http://www.w3.org/2001/XMLSchema-instance"
       xsi:schemaLocation="http://www.springframework.org/schema/beans
        https://www.springframework.org/schema/beans/spring-beans.xsd
        http://www.springframework.org/schema/context
        https://www.springframework.org/schema/context/spring-context.xsd
        http://www.springframework.org/schema/mvc
        https://www.springframework.org/schema/mvc/spring-mvc.xsd">

    <!--视图解析器-->
    <bean class="org.springframework.web.servlet.view.InternalResourceViewResolver">

        <!--前缀: 默认值: ""  前缀设置为 / 决定路径
           /userinfo.jsp      /: http://localhost:8080/
         -->
        <property name="prefix" value="/"/>
        <property name="suffix" value=".jsp"/>
    </bean>

    <!--mvc注解驱动-->
    <mvc:annotation-driven>

    </mvc:annotation-driven>

    <!--扫描web层注解-->
    <context:component-scan base-package="com.Controller"/>


    <mvc:default-servlet-handler/>

</beans>- 创建处理器
package com.Controller;

import com.Bean.Page;
import com.Bean.User;
import com.Bean.UserCondition;
import com.Service.UserService;
import com.dao.UserMapper;
import org.springframework.beans.factory.annotation.Autowired;
import org.springframework.beans.factory.annotation.Qualifier;
import org.springframework.context.annotation.ComponentScan;
import org.springframework.context.annotation.Configuration;
import org.springframework.stereotype.Controller;
import org.springframework.web.bind.annotation.*;
import org.springframework.web.servlet.ModelAndView;

import javax.annotation.Resource;
@RestController
@Controller
@Configuration
@ComponentScan(basePackages = "com.Service")
@RequestMapping(value ={ "/kkk","/xxx"},method = RequestMethod.GET)// /api/kkk/selectById
public class UserController {

    @Qualifier("userService1")
    @Autowired
    private UserService service;

    @GetMapping("/selectById")
    public ModelAndView selectById(Integer id){
        ModelAndView modelAndView=new ModelAndView();
        User user= service.selectById(id);
        modelAndView.addObject("user",user);
        modelAndView.setViewName("userinfo");
        return modelAndView;
    }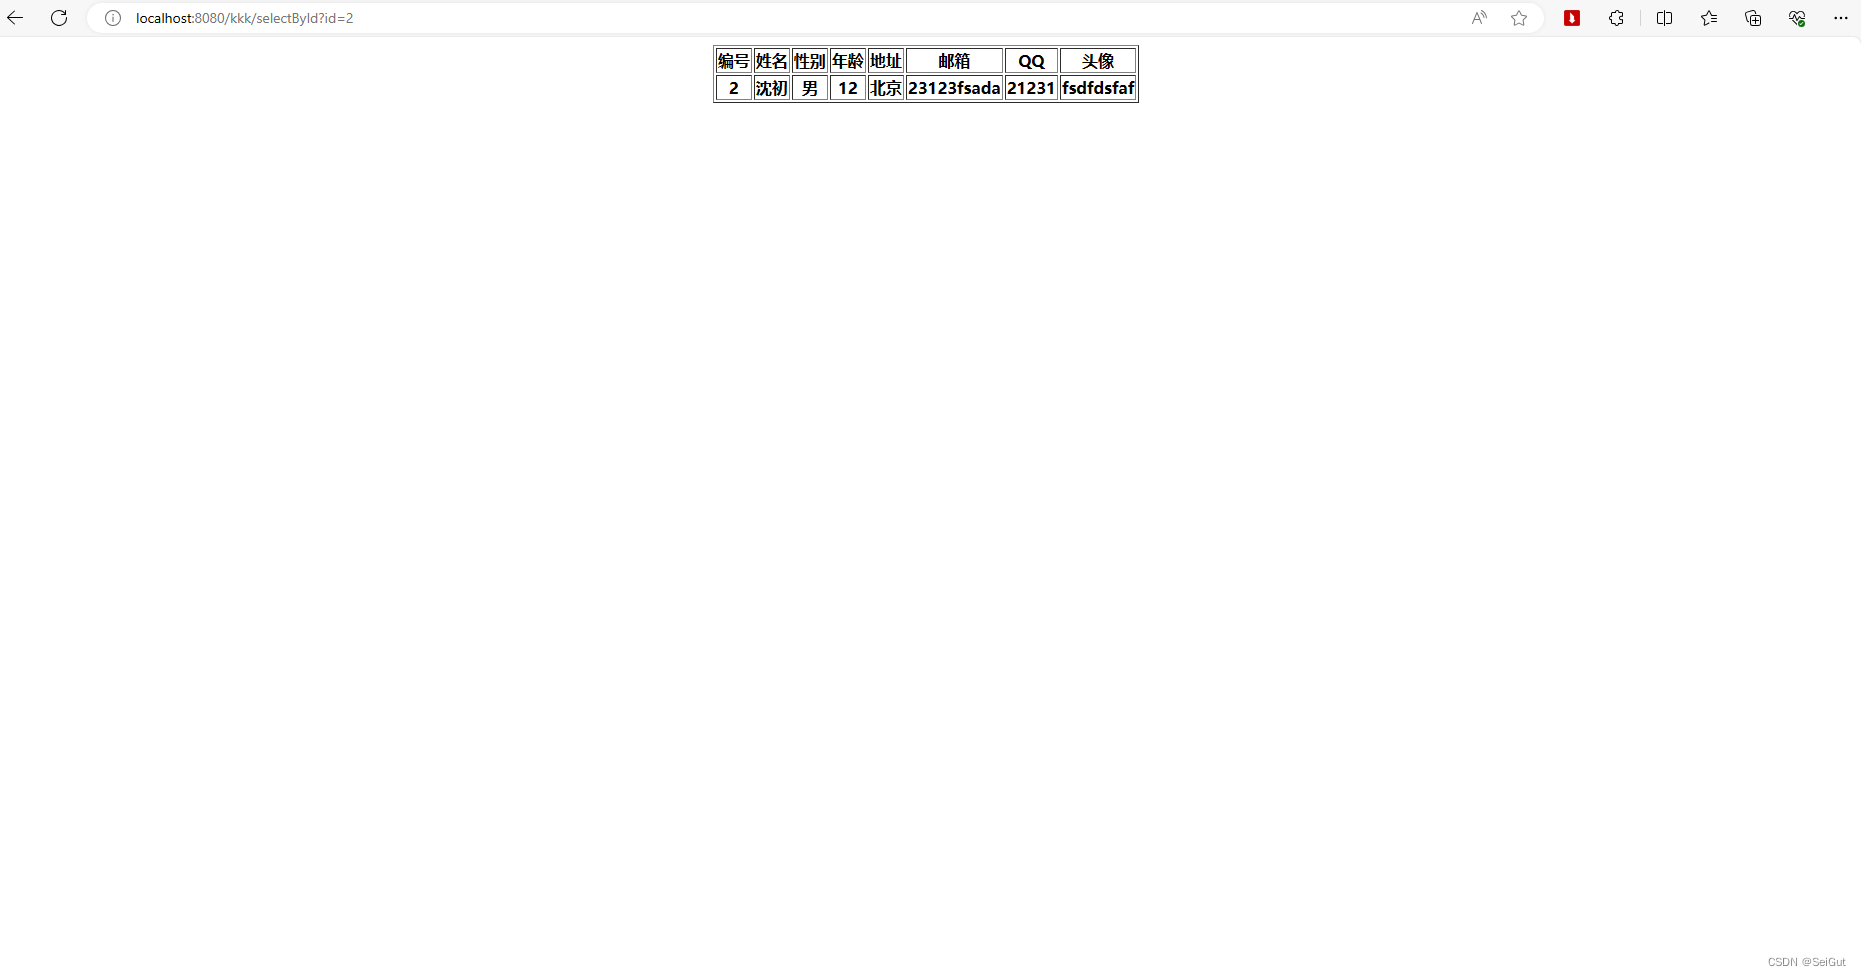
}- 最后创建视图userinfo.jsp
<%--
  Created by IntelliJ IDEA.
  User: suke
  Date: 2024/5/7
  Time: 19:29
  To change this template use File | Settings | File Templates.
--%>
<%@ page contentType="text/html;charset=UTF-8" language="java"  isELIgnored="false" %>
<html>
<head>
    <title>用户信息</title>
</head>
<body>
<table border="1" align="center">
    <tr>
        <th>编号</th>
        <th>姓名</th>
        <th>性别</th>
        <th>年龄</th>
        <th>地址</th>
        <th>邮箱</th>
        <th>QQ</th>
        <th>头像</th>
    </tr>

    <tr>
        <th>${user.id}</th>
        <th>${user.name}</th>
        <th>${user.gender}</th>
        <th>${user.age}</th>
        <th>${user.address}</th>
        <th>${user.email}</th>
        <th>${user.qq}</th>
        <th>${user.photo}</th>
    </tr>
</table>
</body>
</html>- 运行结果为


 1343
1343

 被折叠的 条评论
为什么被折叠?
被折叠的 条评论
为什么被折叠?
 到【灌水乐园】发言


