


目录
1、Feign和OpenFeign
让通过HTTP请求访问远程服务,就像调用本地方法一样简单
官网地址:https://www.springcloud.cc/spring-cloud-greenwich.html#_spring_cloud_openfeign
1.1 Feign概述
Feign 是由 Netflix 开发的一个声明式的 Web Service 客户端。Feign旨在使编写Java Http客户端变得更容易,使用Feign能让编写Web Service客户端更加简单,降低了访问http Api的复杂性。
前面在使用Ribbon+RestTemplate时,利用RestTemplate对http请求的封装处理,形成了一套模版化的调用方法。但是在实际开发中,由于对服务依赖的调用可能不止一处,往往一个接口会被多处调用,所以通常都会针对每个微服务自行封装一些客户端类来包装这些依赖服务的调用。所以,Feign在此基础上做了进一步封装,由他来帮助我们定义和实现依赖服务接口的定义。
在Feign的实现下,我们只需创建一个接口并使用注解的方式来配置它(在一个微服务接口上面标注一个Feign注解即可),即可完成对服务提供方的接口绑定,简化了使用Spring cloud Ribbon时,自动封装服务调用客户端的开发量
1.2 OpenFeign概述
Spring Cloud OpenFeign 对 Feign 进行了二次封装,使得在 Spring Cloud 中使用 Feign 的时候,可以做到使用 HTTP 请求访问远程服务,就像调用本地方法一样的,开发者完全感知不到这是在调用远程访问,更感知不到在访问 HTTP 请求。Spring Cloud OpenFeign 增强了 Feign 的功能,使 Feign 有限支持 Spring MVC 的注解,如 @RequestMapping 等。OpenFeign 的 @FeignClient 注解可以解析 Spring MVC 的 @RequestMapping 注解下的接口,并通过动态代理的方式产生实现类,在实现类中做负载均衡并调用其他服务,默认集成了 Ribbon 与 Hystrix。
2、Feign和OpenFeign的区别和联系
| Feign | OpenFeign |
|---|---|
| Feign是Spring Cloud组件中的一个轻量级RESTful的HTTP服务客户端。Feign内置了Ribbon,用来做客户端负载均衡,去调用服务注册中心的服务。Feign的使用方式是:使用Feign的注解定义接口,调用这个接口,就可以调用服务注册中心的服务 | OpenFeign是Spring Cloud 在Feign的基础上支持了SpringMVC的注解,如@RequesMapping等等。OpenFeign的@FeignClient可以解析SpringMVC的@RequestMapping注解下的接口,并通过动态代理的方式产生实现类,实现类中做负载均衡并调用其他服务。 |
| 依赖:spring-cloud-starter-feign | 依赖:spring-cloud-starter-openfeign |
3、Feign 与 Spring Cloud OpenFeign 的选择
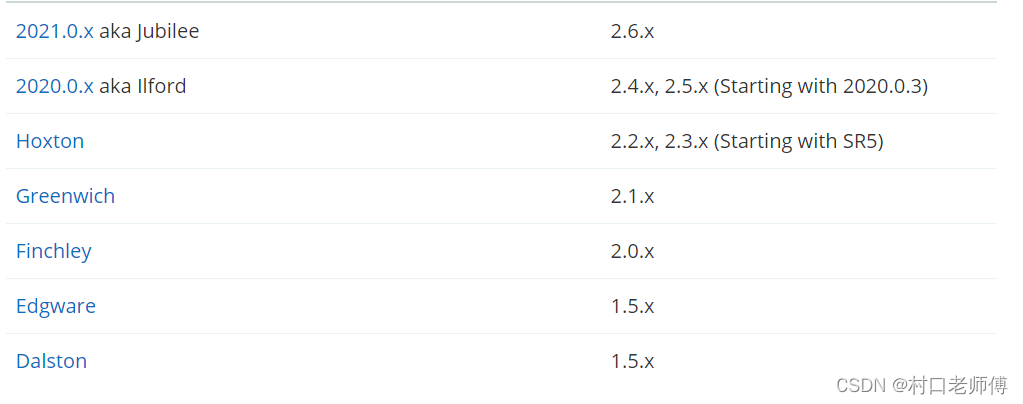
Spring Cloud F 及 F 版本以上与 Spring Boot 2.0 以上一般使用 OpenFeign。
spring cloud 和 spring boot的版本对应关系:
4、如何使用OpenFeign
4.1 引入依赖
<!--openfeign-->
<dependency>
    <groupId>org.springframework.cloud</groupId>
    <artifactId>spring-cloud-starter-openfeign</artifactId>
</dependency>
4.2 启动类添加@EnableFeignClients
@SpringBootApplication
@EnableEurekaClient
@EnableFeignClients
// OpenFeign使用的是Ribbon做负载均衡,所以可以用Ribbon的方法修改负载均衡的规则
@RibbonClients(value={@RibbonClient(name = "PROVIDER-PAYMENT-8001-3",configuration= changeRibbonRule.class)})
public class OpenFeignOrder80Start {
    public static void main(String[] args) {
        SpringApplication.run(OpenFeignOrder80Start.class,args);
    }
}
4.3 创建一个接口,指定服务提供者地址和请求方式,并用@FeignClient注释
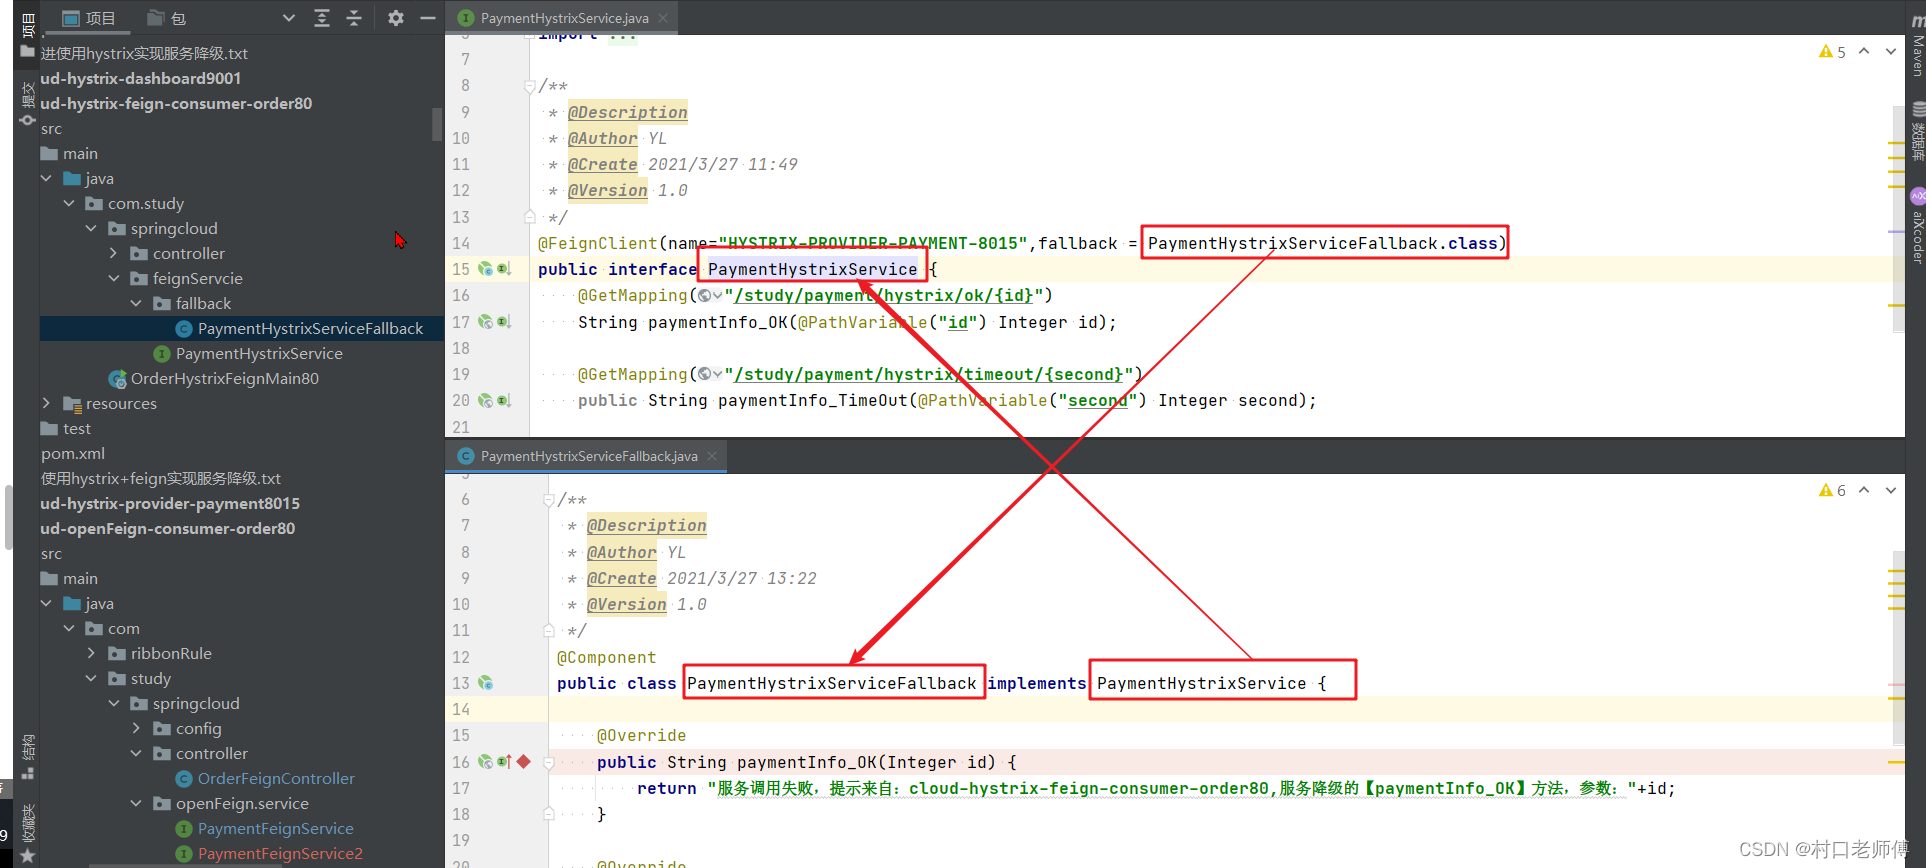
@FeignClient(value = "PROVIDER-PAYMENT-8001-3",contextId="contextId1",qualifier = "paymentFeignService",decode404 = true,path = "${server.servlet.context-path}")
public interface PaymentFeignService
{
    @GetMapping(value = "/provider/payment/get/{id}")
    CommonResult<Payment> getPaymentById(@PathVariable("id") Long id);

    // 测试调用超时的方法,使用seconds传递方法等待时间
    @GetMapping(value = "/payment/feign/timeout/{seconds}")
    public String paymentFeignTimeOut(@PathVariable("seconds") String seconds);
}
说明:
PROVIDER-PAYMENT-8001-3是服务提供者的服务名称。
@FeignClient是支持配置文件占位符的:@FeignClient(name = "${feign.name}", url = "${feign.url}")。
可以通过url属性来指定主机地址。
contextId:除非你将对PROVIDER-PAYMENT-8001-3服务的所有调用都写在同一个service中,不然就需要指定contextId,不指定会报bean冲突(具体分析见后面的@FeignClient注解参数说明)。
decode404:解析404状态码错误(具体分析见后面的@FeignClient注解参数说明)。
path:就是用来配置server.servlet.context-path这样,就不用在每个接口地址前都自己拼接。
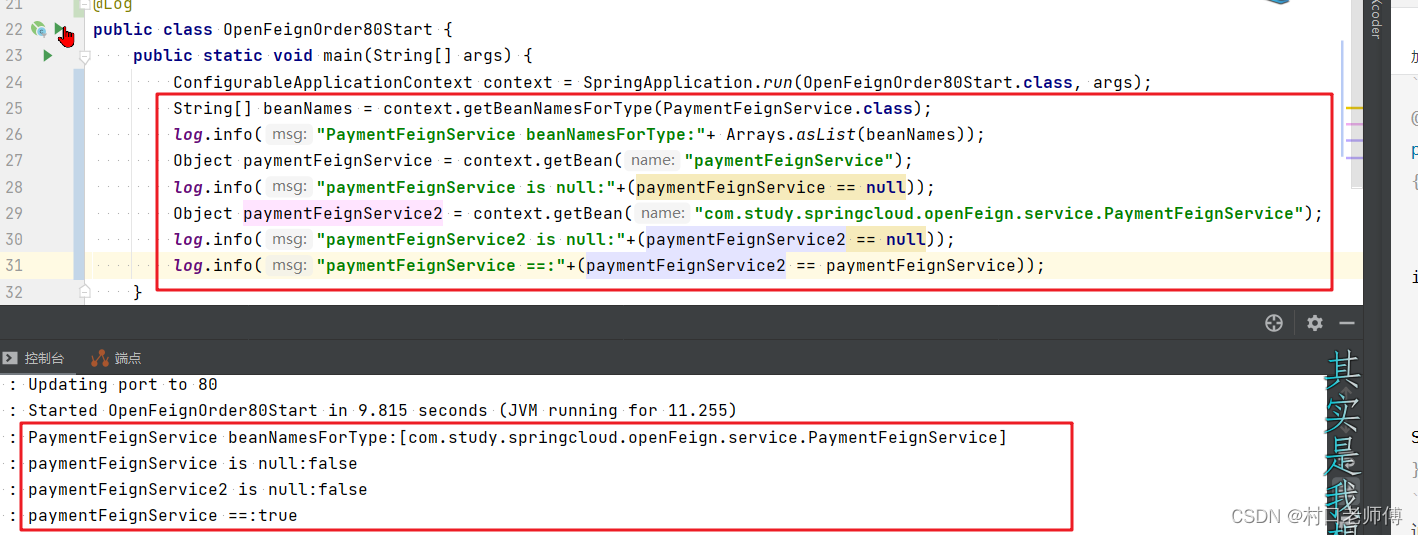
通过该接口生成的代理bean的名称是接口的全限定名称,本例子中为com.study.springcloud.openFeign.service.PaymentFeignService。可以使用qualifier属性指定bean的一个别名paymentFeignService,通过这两个bean名称都能获取到这个bean。
4.4 配置Feign客户端
在例子中只修改Feign的日志打印内容,更多配置,参考feign客户端相关配置.
@Configuration
public class FeignLogConfig {
    @Bean
    Logger.Level feignLoggerLevel()
    {
        // NONE:默认的,不显示任何日志;
        // BASIC:仅记录请求方法、URL、响应状态码及执行时间;
        // HEADERS:除了 BASIC 中定义的信息之外,还有请求和响应的头信息;
        // FULL:除了 HEADERS 中定义的信息之外,还有请求和响应的正文及元数据。
        return Logger.Level.FULL;
    }
}
5、@FeignClient 注解参数说明
-
String value() default ""; 和 String name() default "";
value()和name()一样,是被调用的服务的服务名称,无论是否提供 url,都要配置该属性,可以使用${propertyKey}的方式配置 -
String serviceId() default "";
弃用,改为使用name -
String contextId() default "";
比如我们对同一个PROVIDER-PAYMENT-8001-3服务分多个接口调用想下面的写法,启动会报Bean名称冲突:
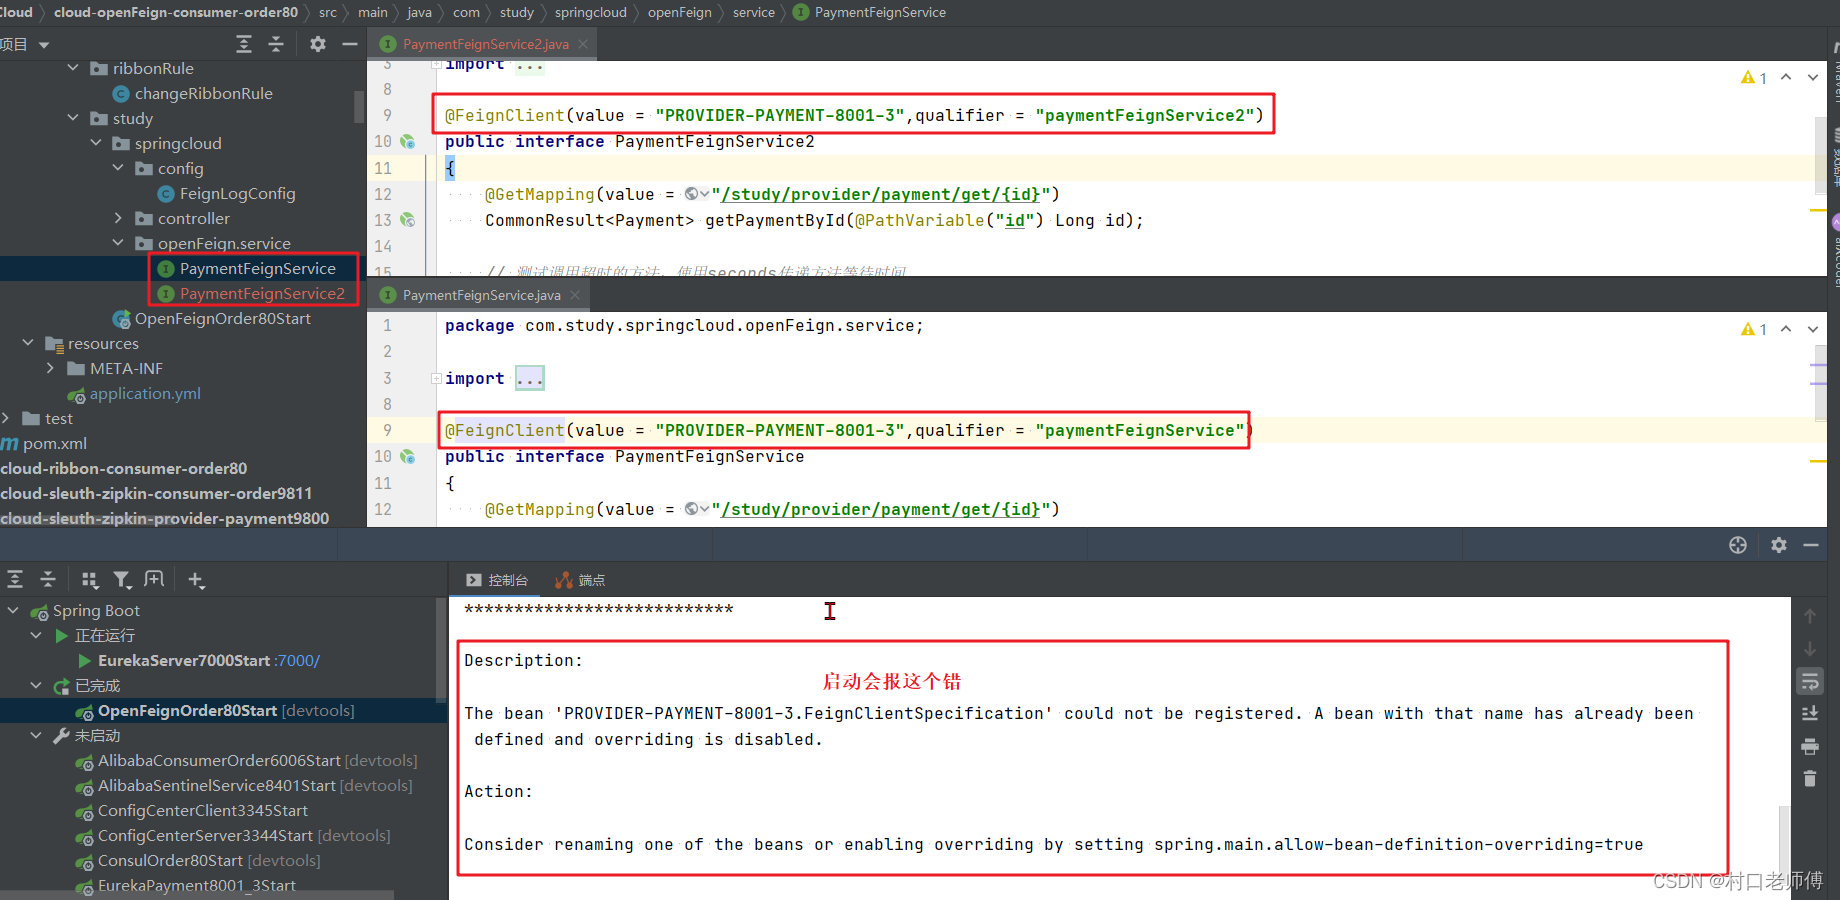
解决方案有以下两种:
1、将spring.main.allow-bean-definition-overriding=true设置为true,该配置的作用是:是否允许通过注册与现有定义同名的bean
2、使用contextId隔离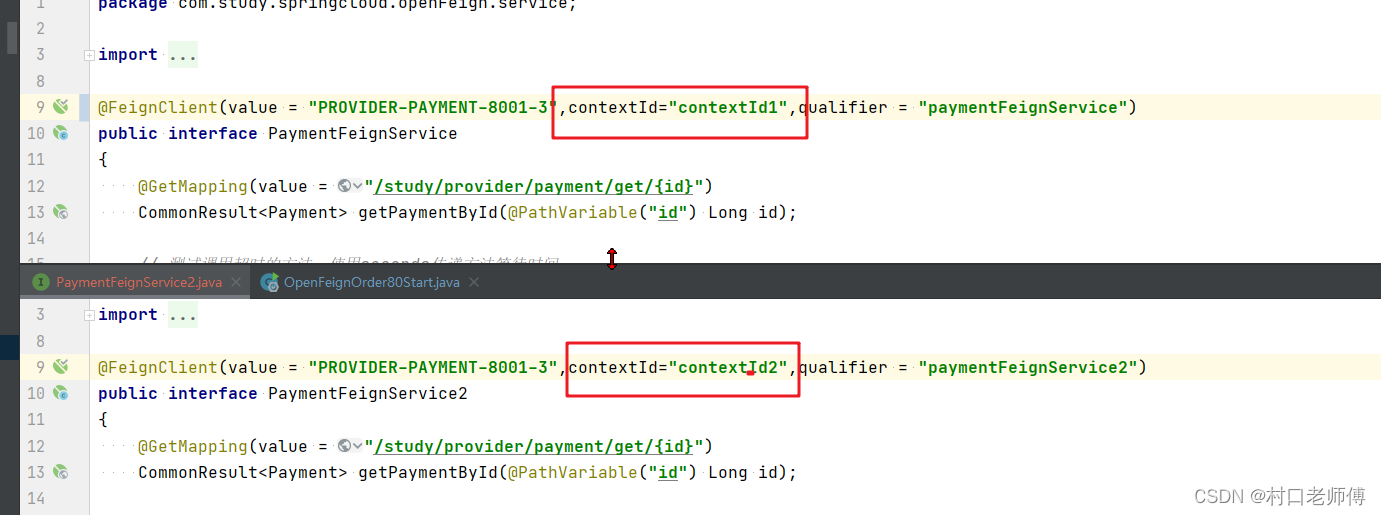
-
String qualifier() default "";
生成的bean的别名,可以将这个别名作为bean的名称,通过getBean方式获取到bean。 -
String url() default "";
配置指定服务的地址,可用于在开发调试阶段,调用指定地址的服务。
例如:@FeignClient(name = "PROVIDER-PAYMENT-8001-3", url = "http://localhost:8085") -
boolean decode404() default false;
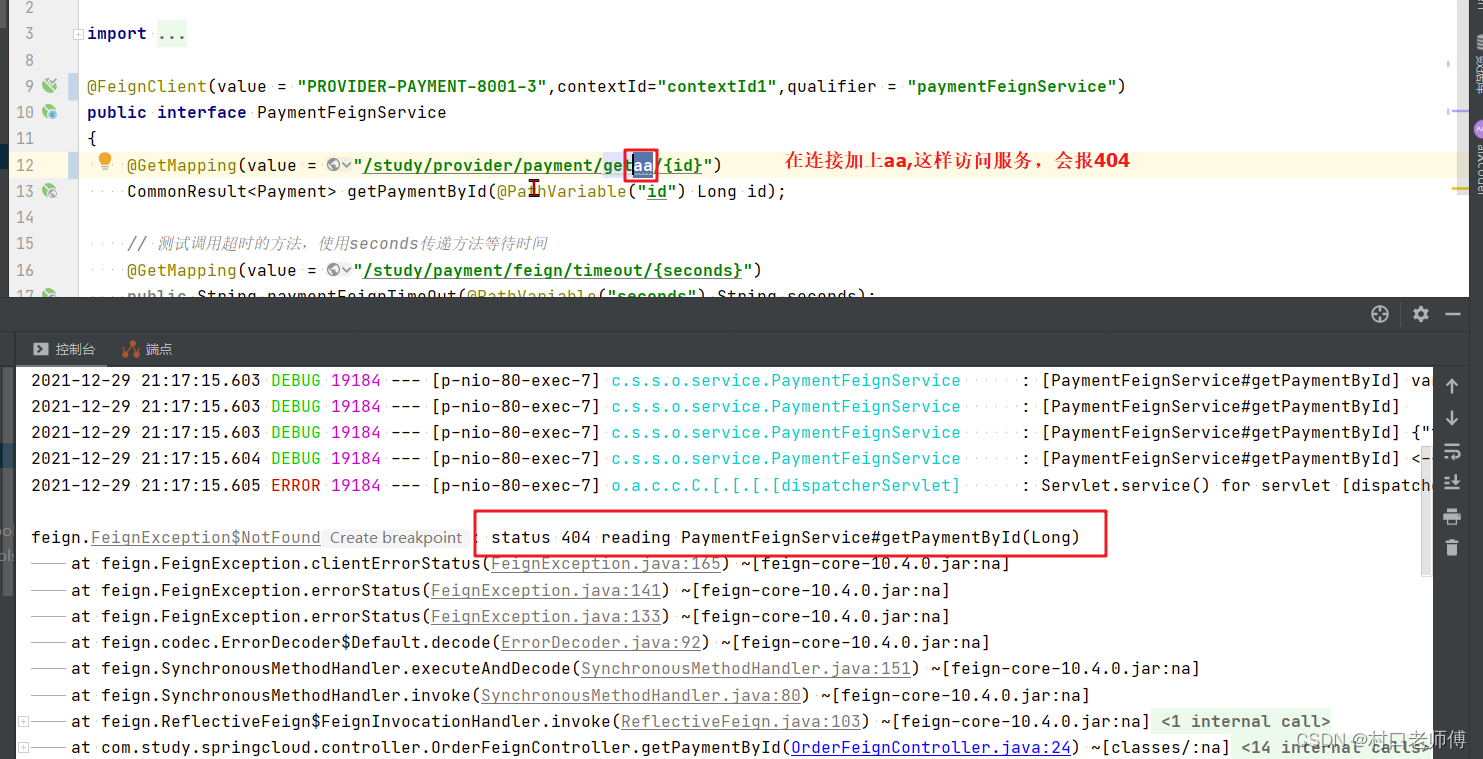
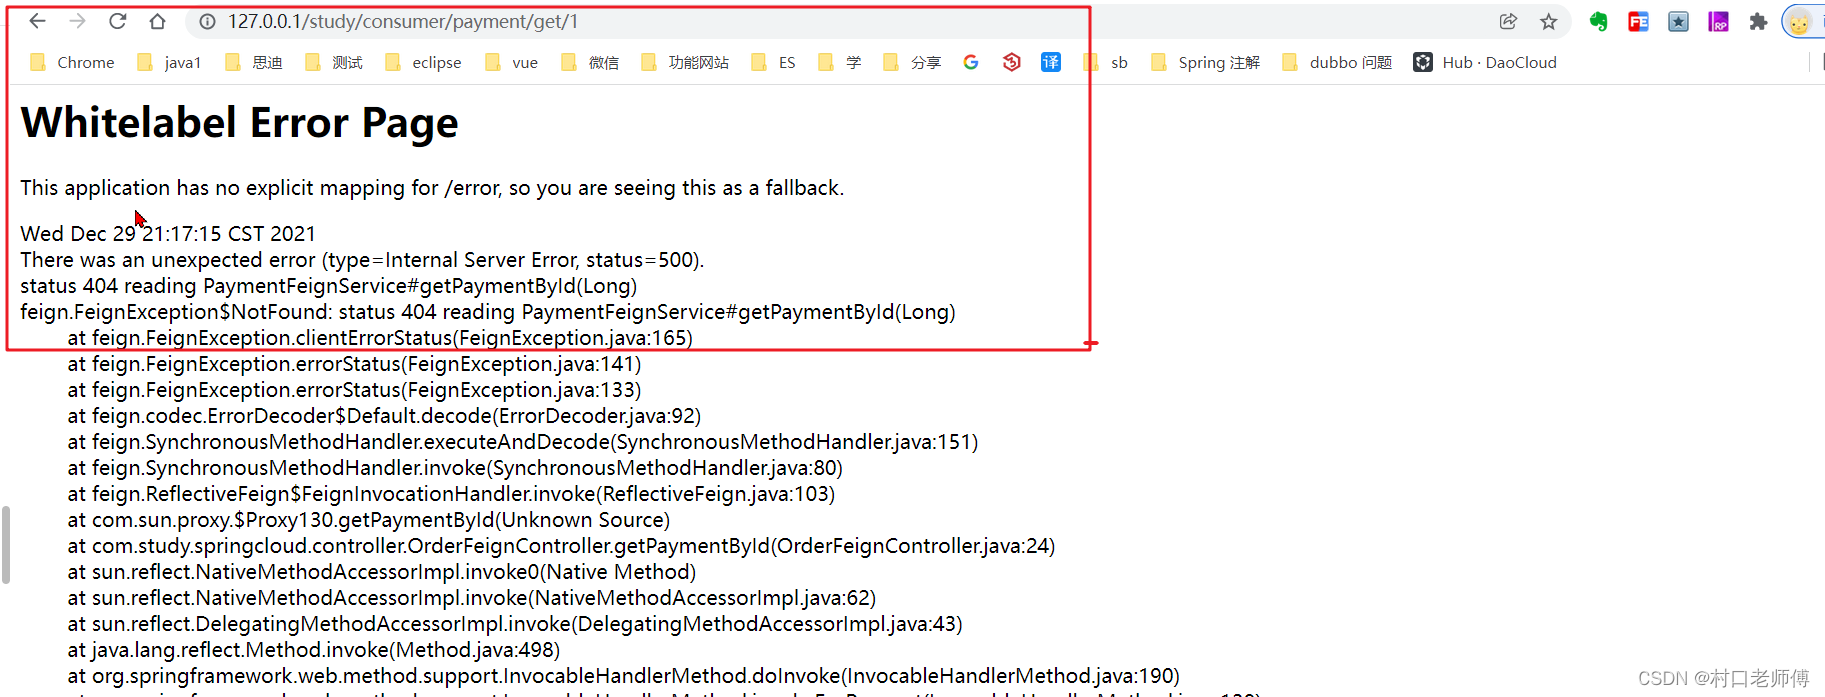
当调用请求发生404错误时,decode404的值为true,那么会执行decoder解码,否则抛出异常。
当decode404=false时改变正确的调用地址,访问返回404。浏览器页面打印的是异常信息
再将decode404=true,此时,将不会在抛异常到客户端,而是将404解码。
解码也就是会返回固定的数据格式给你:
{"timestamp":"2021-12-29T13:23:08.962+0000","status":404,"error":"Not Found","message":"No message available","path":"/study/provider/payment/getaa/1"}
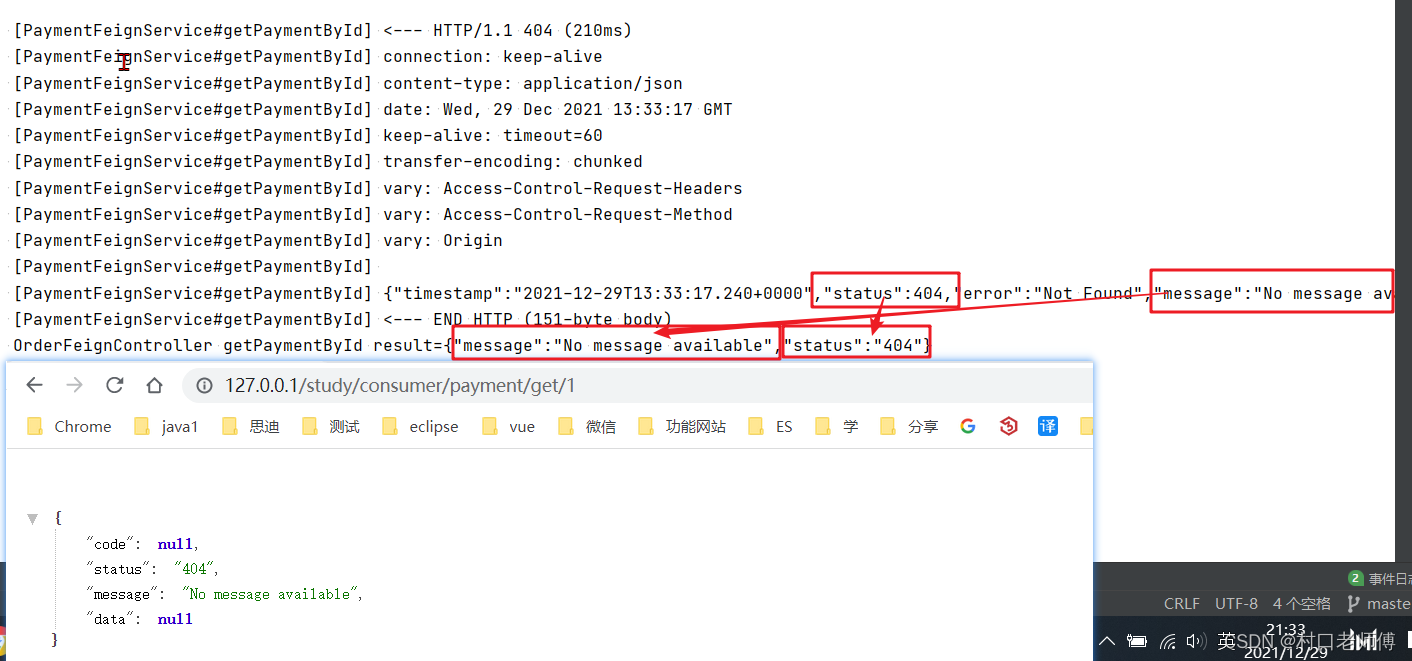
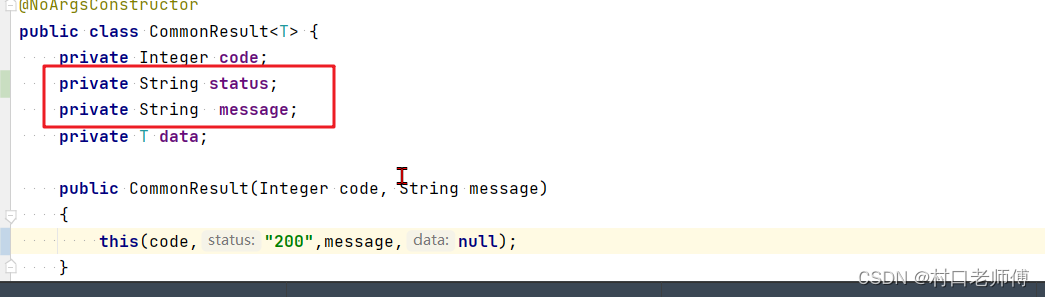
注:浏览器看到的返回值之所以是只有status和message这两个字段有值,是因为我自己定义的接口返回对象CommonResult没有对应的字段存储解析处理后404错误的信息中的数据。
-
Class<?>[] configuration() default {};
指定Feign配置类,在配置类中可以自定义Feign的Encoder、Decoder、LogLevel、Contract等。 -
Class<?> fallback() default void.class;
定义容错的处理类,也就是熔断后的兜底方法,fallback的类必须实现@FeignClient注解修饰的接口,并且是一个有效的 spring bean。
-
Class<?> fallbackFactory() default void.class;
容错处理的工厂,工厂必须生成实现由FeignClient注释的接口的回退类的实例。并且工厂类也必须是有效的 spring bean -
String path() default "";
方法级映射使用的路径前缀
写法可以是path = "${server.servlet.context-path}"、path = "/study"、path = "study" -
boolean primary() default true;
是否将 feign 代理标记为主要 bean
6、feign客户端相关配置
Feign Client 默认的配置类为FeignClientsConfiguration, 这个类在 spring-cloud-netflix-core 的 jar 包下.
当我们自己也定义了配置类后,例如上文中所创建的FeignLogConfig.class ,那么此时的客户端配置是由FeignClientsConfiguration中已有的配置bean以及FeignLogConfig中的配置bean组成(其中后者将覆盖前者)。
6.1 配置的默认值
Spring Cloud Netflix通过FeignClientsConfiguration默认为feign提供以下beans(Beanleix beanName:ClassName):
| Bean类型 | beanName | 实现类 |
|---|---|---|
| Decoder | feignDecoder | ResponseEntityDecoder(包装SpringDecoder) |
| Encoder | feignEncoder | SpringEncoder |
| Logger | feignLogger | Slf4jLogger |
| Contract | feignContract | SpringMvcContract |
| Feign.Builder | feignBuilder | HystrixFeign.Builder |
| Client | feignClient | 如果启用了Ribbon,则它是LoadBalancerFeignClient,否则使用默认的伪装客户端。 |
Spring Cloud Netflix 默认情况下不会为feign提供以下beans,但仍会从应用程序上下文中查找以下类型的beans用来配置客户端。
Logger.LevelRetryerErrorDecoderRequest.OptionsCollection<RequestInterceptor>SetterFactory
6.2 使用注入Bean的方式配置
来自官网的例子:
@Configuration
public class FooConfiguration {
    @Bean
    public Contract feignContract() {
        return new feign.Contract.Default();
    }

    @Bean
    public BasicAuthRequestInterceptor basicAuthRequestInterceptor() {
        return new BasicAuthRequestInterceptor("user", "password");
    }
}

@FeignClient(name = "stores", configuration = FooConfiguration.class)
public interface StoreClient {
    //..
}
FooConfiguration不需要用@Configuration进行注释。但是,如果是使用@Configuration注释的话,请注意将其从任何可能包含此配置的@ComponentScan中排除,因为它将成为feign.Decoder,feign.Encoder,feign.Contract等的默认来源。(因为FeignClientsConfiguration中配置的bean都使用@ConditionalOnMissingBean注释了,即如果存在,则不会再注入该类型的bean)
可以通过将其与任何@ComponentScan或@SpringBootApplication放在单独的,不重叠的包中来避免这种情况,也可以在@ComponentScan中将其明确排除在外
将一个配置类应用到所有的feign客户端的方法
除了上面所说的将配置类放置在@ComponentScan的扫包范围内,还可以通过@EnableFeignClients 注解上的 defaultConfiguration 属性,将默认配置统一写在一个配置类中,然后在主程序入口用 defaultConfiguration 来应用配置类,这样也可以作用于所有 Feign。
@SpringBootApplication
@EnableEurekaClient
@EnableFeignClients(defaultConfiguration = FeignLogConfig.class)
@RibbonClients(value={@RibbonClient(name = "PROVIDER-PAYMENT-8001-3",configuration= changeRibbonRule.class)})
@Log
public class OpenFeignOrder80Start {
    public static void main(String[] args) {
    	SpringApplication.run(OpenFeignOrder80Start.class, args);
    }
}
6.3 使用配置文件的方式
若希望对单个指定特定名称的 Feign 进行配置,此时可以将 @FeignClient 注解的属性配置写在 application.yml 或者 application.properties,配置示例如下:
feign:
  client:
    config:
      feignName:  # 注意这个地方并不一定是服务的名称。如果@FeignClient没有配置contextId,则取value或者name
        connectTimeout: 5000  # 连接超时时间
        readTimeout: 5000     # 读超时时间设置
        loggerLevel: full     # 配置Feign的日志级别
        errorDecoder: com.example.SimpleErrorDecoder   # Feign的错误解码器
        retryer: com.example.SimpleRetryer    # 配置重试
        requestInterceptors:  # 配置拦截器
          - com.example.FooRequestInterceptor
          - com.example.BarRequestInterceptor
        decode404: false
        encoder: com.example.SimpleEncoder    # Feign的编码器
        decoder: com.example.SimpleDecoder    # Feign的解码器
        contract: com.example.SimpleContract  # Feign的Contract配置
将feignName设置为default(之所以是这个名字,是因为FeignClientProperties.class 的 private String defaultConfig = "default";)则是对所有feign客户端生效。
另外这个地方配置一定要注意<feignName>到底要配置啥:
- 如果你的feign客户端配置是:
@FeignClient(value = "PROVIDER-PAYMENT-8001-3",contextId="contextId1"),那么<feignName>为contextId1 - 如果你的feign客户端配置是:
@FeignClient(value = "PROVIDER-PAYMENT-8001-3"即没有使用contextId属性显示设置,此时contextId默认读取name或value属性的值,<feignName>就为PROVIDER-PAYMENT-8001-3
配置文件中可配置的内容参见FeignClientProperties的内部类FeignClientConfiguration.class:
public static class FeignClientConfiguration {
		private Logger.Level loggerLevel;
		private Class<Retryer> retryer;
		private Class<ErrorDecoder> errorDecoder;
		private List<Class<RequestInterceptor>> requestInterceptors;
		private Integer connectTimeout;
		private Integer readTimeout;
		private Boolean decode404;
		private Class<Decoder> decoder;
		private Class<Encoder> encoder;
		private Class<Contract> contract;
  }
6.4 配置的优先级
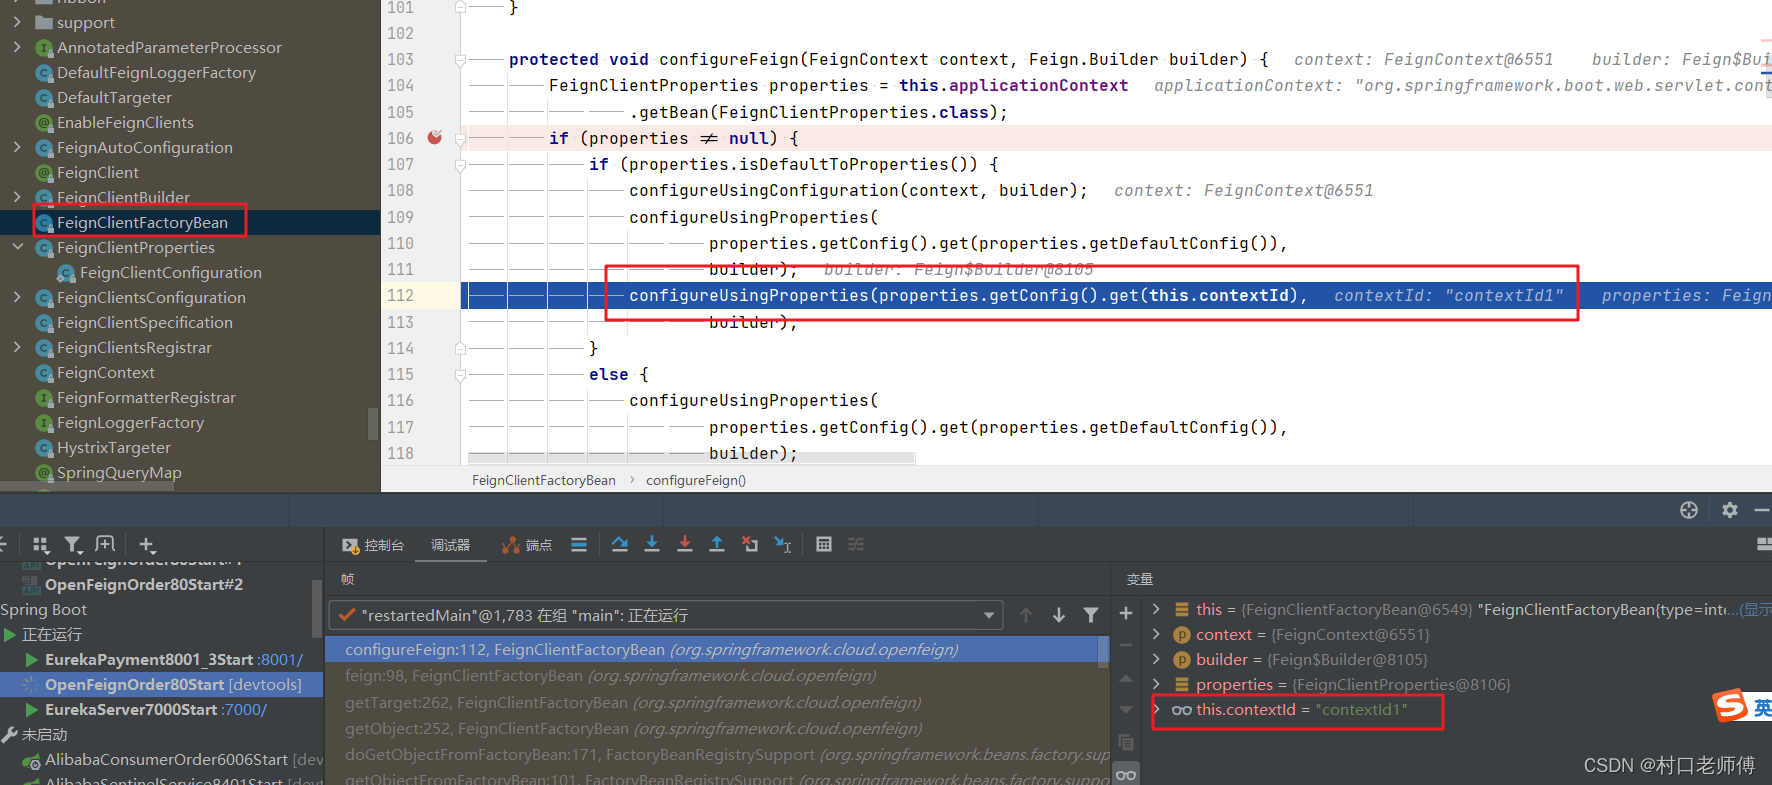
如果通过 Java 代码的方式配置过 Feign,然后又通过 application.yml 或者 application.properties 属性文件的方式配置 Feign,默认情况下属性文件中 Feign 的配置会覆盖 Java 代码的配置。但是可以通过使用参数 feign.client.default-to-properties=false 来改变 Feign 配置生效的优先级。
可以通过查看源码FeignClientFactoryBean.class看下为啥是这样:
从下面可以看到,配置的读取顺序,后面的配置会覆盖前面的。
feign.client.default-to-properties的作用是:是否以properties(yml)中的配置优先,默认为true。
默认情况是:服务的配置>default的配置>配置类 但是可以通过 feign.client.default-to-properties修改 为:配置类>服务的配置>default的配置
class FeignClientFactoryBean implements FactoryBean<Object>, InitializingBean, ApplicationContextAware {

	......
	// 配置feign的客户端
	protected void configureFeign(FeignContext context, Feign.Builder builder) {
		FeignClientProperties properties = this.applicationContext
				.getBean(FeignClientProperties.class);
		if (properties != null) {
			if (properties.isDefaultToProperties()) { // feign.client.default-to-properties的值,默认是true
				configureUsingConfiguration(context, builder); 												 // 作用是读取配置类中的配置
				configureUsingProperties(properties.getConfig().get(properties.getDefaultConfig()),builder); // 读取properties中default的配置

				configureUsingProperties(properties.getConfig().get(this.contextId),builder);				 // 读取properties中default的配置
			}
			else {
				configureUsingProperties(properties.getConfig().get(properties.getDefaultConfig()),builder); // 读取properties中default的配置
				configureUsingProperties(properties.getConfig().get(this.contextId),builder);				 // 读取properties中default的配置

				configureUsingConfiguration(context, builder);												 // 作用是读取配置类中的配置
			}
		}
		else {
			configureUsingConfiguration(context, builder);
		}
	}

	......
}
7、Feign和Hystrix
7.1 Feign Hystrix支持
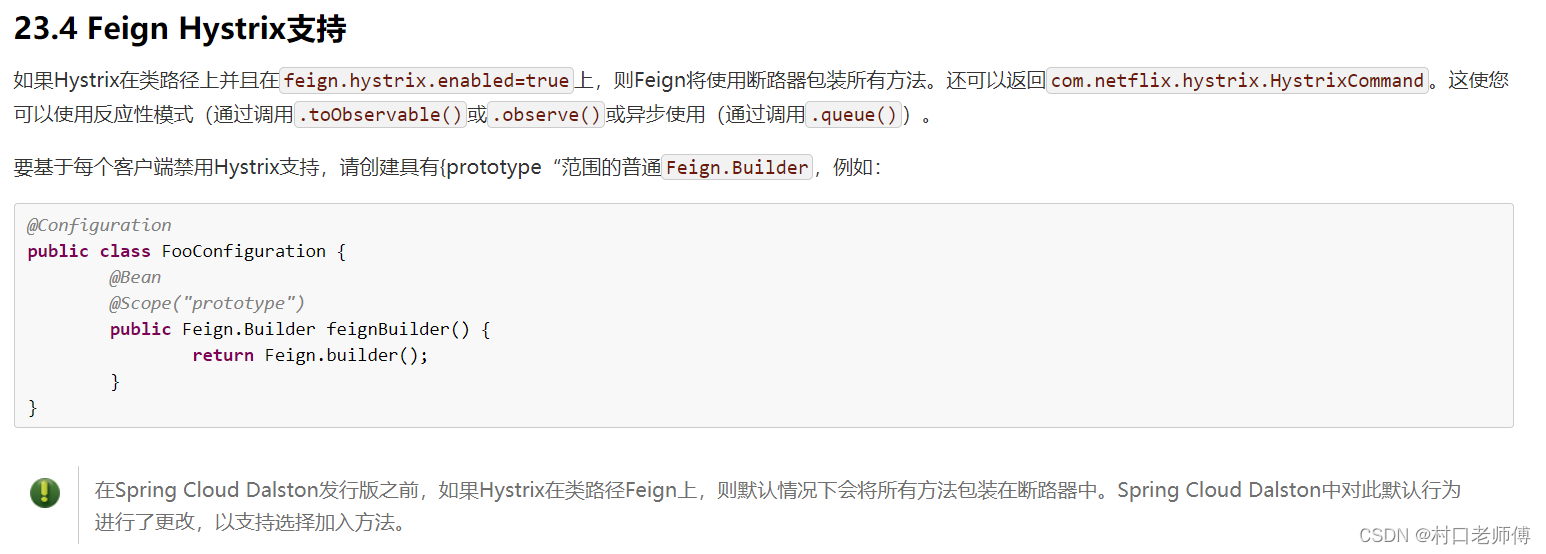
-
全局禁用Hystrix
要想Feign全局禁用Hystrix,只须在application中配置feign.hystrix.enabled=false即可。 -
为指定Feign客户端禁用Hystrix
借助Feign客户的自定义配置,可轻松为指定名称的Feign客户端禁用Hystrix。例如
@Configuration
public class FooConfiguration {
    @Bean
    @Scope("prototype")
    public Feign.Builder feignBuilder() {
        return Feign.builder();
    }
}
想要禁用Hystrix的@FeignClient引用该配置类即可,例如:
@FeignClient(name = "user", configuration = FooConfig uration.class)
public interface UserFeignClient {
    //..
}
7.1 Feign Hystrix 服务降级
通过@FeignClient将fallback属性设置为实现回退的类名称来启用回退。回退类必须实现@FeignClient注解修饰的那个接口,并且声明为一个bean。
@FeignClient(name = "hello", fallback = HystrixClientFallback.class)
protected interface HystrixClient {
    @RequestMapping(method = RequestMethod.GET, value = "/hello")
    Hello iFailSometimes();
}

static class HystrixClientFallback implements HystrixClient {
    @Override
    public Hello iFailSometimes() {
        return new Hello("fallback");
    }
}
如果我们还想要知道引发服务降级的原因,那么可以通过@FeignClient中的fallbackFactory属性这样做:
@FeignClient(name = "hello", fallbackFactory = HystrixClientFallbackFactory.class)
protected interface HystrixClient {
	@RequestMapping(method = RequestMethod.GET, value = "/hello")
	Hello iFailSometimes();
}

@Component
static class HystrixClientFallbackFactory implements FallbackFactory<HystrixClient> {
	@Override
	public HystrixClient create(Throwable cause) { // 通过Throwable即可获取到服务降级原因
		return new HystrixClient() {
			@Override
			public Hello iFailSometimes() {
				return new Hello("fallback; reason was: " + cause.getMessage());
			}
		};
	}
}
7.3 Feign和@Primary
看@FeignClient注解的 boolean primary() default true; 发现其默认是true,为什么呢?
@FeignClient(name = "hello", fallback = HystrixClientFallback.class)
protected interface HystrixClient {
    @RequestMapping(method = RequestMethod.GET, value = "/hello")
    Hello iFailSometimes();
}

static class HystrixClientFallback implements HystrixClient {
    @Override
    public Hello iFailSometimes() {
        return new Hello("fallback");
    }
}
试想一下,在上面的这个例子中,当Feign和Hystrix服务降级一起使用时,针对于接口HystrixClient,会有两个实现类的bean,那么这个时候若在其他地方使用@Autowired注入该bean则会出现问题。因为Spring Framework不知道要插入哪个bean。为解决此问题,Spring Cloud Netflix将所有Feign实例标记为@Primary。如果我们有特殊的需求,也可以将其primary属性设置为false。
8、Feign请求/响应压缩
Feign 支持对请求和响应进行 GZIP 压缩,以此提高通信效率,下述内容配置了 Consumer 通过 Feign 到 Provider 的请求与相应的 Gzip 压缩(在服务消费者端配置):
feign:
  client:
    config:
      default:
        decode404: false
        loggerLevel: full
  compression:  # 请求或响应GZIP压缩
    request:
      enabled: true # 开启请求压缩
      mime-types: text/xml, application/xml, application/json # 配置压缩支持的MIME TYPE
      min-request-size: 10 # 配置压缩数据大小的下限 默认是2048
    response:
      enabled: true # 开启响应压缩
      useGzipDecoder: true # 启用要使用的默认 gzip 解码器。
验证压缩效果,首先开启 Feign 的日志输出,然后分别启用 Feign 压缩与关闭 Feign 压缩,观察前后输出的日志信息:
关闭 GZIP 压缩的 Request
---> GET http://PROVIDER/provider/say?msg=hello HTTP/1.1
---> END HTTP (0-byte body)
开启 GZIP 压缩的 Request,增加了 Accept-Encoding: gzip,证明 Request 开启了 GZIP 压缩
---> GET http://PROVIDER/provider/say?msg=hello HTTP/1.1
Accept-Encoding: gzip
Accept-Encoding: deflate
---> END HTTP (0-byte body)
开启之后

9、Feign Client 开启日志
Feign 为每一个 FeignClient 都提供了一个 feign.Logger 实例,可以在配置中开启日志,开启方式比较简单,分为两步。
第一步:在 application.yml 中配置日志输出,默认情况下,记录器的名称是用于创建 Feign 客户端的接口的完整类名,Feign 日志记录仅响应 DEBUG 级别
logging:
  level:
    # feign日志以什么级别监控哪个接口
    com.study.springcloud.openFeign.service.PaymentFeignService: debug
第二步:通过 Java 代码的方式配置日志 Bean,可以配置在主程序入口类或者带有 @Configuration 注解的类,作用是通过配置的 Logger.Level 对象告诉 Feign 记录哪些日志内容
@Configuration
public class FeignLogConfig {
    @Bean
    Logger.Level feignLoggerLevel()
    {
        // NONE:默认的,不显示任何日志;
        // BASIC:仅记录请求方法、URL、响应状态码及执行时间;
        // HEADERS:除了 BASIC 中定义的信息之外,还有请求和响应的头信息;
        // FULL:除了 HEADERS 中定义的信息之外,还有请求和响应的正文及元数据。
        return Logger.Level.FULL;
    }
}
10、替换HTTP Client
Feign 在默认情况下使用的是 JDK 原生的 URLConnection 发送 HTTP 请求,没有使用连接池,但是对每个地址都会保持一个长连接。
在org.springframework.cloud.openfeign.ribbon.FeignRibbonClientAutoConfiguration中使用@Import按顺序导入了3个配置类(优先级和导入顺序一致):HttpClientFeignLoadBalancedConfiguration.class,OkHttpFeignLoadBalancedConfiguration.class,DefaultFeignLoadBalancedConfiguration.class。
10.1 默认客户端
@Configuration(proxyBeanMethods = false)
class DefaultFeignLoadBalancedConfiguration {
	@Bean
	@ConditionalOnMissingBean
	public Client feignClient(CachingSpringLoadBalancerFactory cachingFactory,SpringClientFactory clientFactory) {
		return new LoadBalancerFeignClient(new Client.Default(null, null), cachingFactory,clientFactory);
	}
}
10.2 Feign-HTTPClient客户端
@Configuration(proxyBeanMethods = false)
@ConditionalOnClass(ApacheHttpClient.class)
@ConditionalOnProperty(value = “feign.httpclient.enabled”, matchIfMissing = true)
@Import(HttpClientFeignConfiguration.class)
class HttpClientFeignLoadBalancedConfiguration {…}
从HttpClientFeignLoadBalancedConfiguration类可以看到开启Feign-HTTPClient客户端的必要条件是:
- 存在ApacheHttpClient.class类
- feign.httpclient.enabled=true,因为matchIfMissing=true,所以只要不显示的在配置文件设置为false,那么只需要导入相关jar包,即可完成客户端的替换。
注:@ConditionalOn****都是用于控制注解所修饰的配置类是否生效。其中@ConditionalOnClass通过类是否存在来控制配置类是否生效, 而@ConditionalOnProperty用于通过配置的值来控制配置类是否生效,它有两个关键属性havingValue和matchIfMissing,默认情况下matchIfMissing为false,也就是说如果未进行属性配置,则自动配置不生效。如果matchIfMissing为true,则表示如果没有对应的属性配置,则配置默认生效。在matchIfMissing为false时,如果name值为空,则配置不生效;如果name不为空,则将该值与havingValue指定的值进行比较,如果一样则返回配置生效,否则返回配置不生效。
开启方式: 引入下面的jar包,将feign.httpclient.enabled=true
<!-- 引入 HTTP Client -->
<dependency>
     <groupId>org.apache.httpcomponents</groupId>
     <artifactId>httpclient</artifactId>
 </dependency>
 <!-- 引入 Feign 对 Http Client 的支持 -->
 <dependency>
     <groupId>com.netflix.feign</groupId>
     <artifactId>feign-httpclient</artifactId>
     <version>8.17.0</version>
 </dependency>
10.2 okhttp客户端
@Configuration(proxyBeanMethods = false)
@ConditionalOnClass(OkHttpClient.class)
@ConditionalOnProperty(“feign.okhttp.enabled”)
@Import(OkHttpFeignConfiguration.class)
class OkHttpFeignLoadBalancedConfiguration {…}
从OkHttpFeignLoadBalancedConfiguration 类可以看到开启Feign-HTTPClient客户端的必要条件是:
- 存在OkHttpClient.class类
- feign.okhttp.enabled=true
使用Okhttp 的优点:
- 支持 SPDY,可以合并多个到同一个主机的请求
- 使用连接池技术减少请求的延迟
- 使用 GZIP 压缩减少传输的数据量
- 缓存响应结果,避免重复的网络请求
**开启方式:**引入下面的jar包,将feign.okhttp.enabled=true
<!-- 引入 Feign 对 Okhttp 的支持 -->
<dependency>
    <groupId>io.github.openfeign</groupId>
    <artifactId>feign-okhttp</artifactId>
</dependency>
11、请求POJO参数传递
11.1 POST请求
- 1、服务提供者接口
@PostMapping("/providerTest/postRequest")
public String postRequest(@RequestBody User user)
{
    String bearer_token = request.getHeader(HttpHeaders.AUTHORIZATION);
    User user1 = service.queryUserInfo(user.getNickname(), user.getPassword());
    log.info("调用postRequest");
    return "postRequest userId="+ JSONUtil.toJsonStr(user1)+" Authorization="+bearer_token;
}
- 2、服务消费者feign接口
需要使用@RequestBody注解将参数放到Post请求的请求体中
@FeignClient(name="CLOUD-OPENFEIGN-OTHER-PROVIDER8020",fallbackFactory = FeignFallbackFactory.class,path = "study")
public interface ProviderTestService {
    @PostMapping("/providerTest/postRequest")
    String postRequest(@RequestBody User user);
}
11.2 GET请求
- 1、服务提供者接口
只需要使用一个实体对象接收参数
 @GetMapping(path="/providerTest/getRequest")
public String getRequest(User user)
{
    User user1 = service.queryUserInfo(user.getNickname(), user.getPassword());
    log.info("调用getRequest");
    return "getRequest userId="+ JSONUtil.toJsonStr(user1);
}
- 2、服务消费者feign接口
@FeignClient(name="CLOUD-OPENFEIGN-OTHER-PROVIDER8020",fallbackFactory = FeignFallbackFactory.class,path = "study")
public interface ProviderTestService {
    @GetMapping(path="/providerTest/getRequest")
    String getRequest(User user);
}
- 3、通过拦截器重新设置get请求的参数
使用get请求发送POJO对象参数,feign会将参数放在请求的body中。
但是服务消费者的get请求接口是不会从请求体中获取参数,所以需要在拦截器中将请求体中的参数设置到请求参数中
package com.study.springcloud.interceptors;

import cn.hutool.json.JSONUtil;
import com.fasterxml.jackson.databind.JsonNode;
import com.fasterxml.jackson.databind.ObjectMapper;
import feign.Request;
import feign.RequestInterceptor;
import feign.RequestTemplate;
import lombok.extern.slf4j.Slf4j;
import org.springframework.util.StringUtils;

import java.io.IOException;
import java.util.*;

/**
 * Get处理通过body传递POJO对象参数处理
 */
@Slf4j
public class FeignRequestGetParamInterceptor implements RequestInterceptor {

    @Override
    public void apply(RequestTemplate template) {
        log.info("FeignGetRequestInterceptor 请求路径:{}", template.path());
        log.info("FeignGetRequestInterceptor 请求方式:{}", template.method());
        log.info("FeignGetRequestInterceptor 请求头:{}", JSONUtil.toJsonStr(template.headers()));
        log.info("FeignGetRequestInterceptor 请求参数列表:{}", JSONUtil.toJsonStr(template.getRequestVariables()));
        log.info("FeignGetRequestInterceptor 请求体参数:{}", JSONUtil.toJsonStr(template.requestBody().asString()));

        // 使用get请求发送POJO对象参数,feign会将参数放在请求的body中。
        // 但是服务提供者的get请求接口是不会从请求体中获取参数,所以需要在拦截器中将请求体中的参数设置到请求参数中
        if (template.method().equals(Request.HttpMethod.GET) && org.apache.commons.lang.StringUtils.isNotBlank(template.requestBody().asString())) {
            try {
                ObjectMapper objectMapper = new ObjectMapper();
                JsonNode jsonNode = objectMapper.readTree(template.requestBody().asBytes());
                template.body(Request.Body.empty()); // 将请求体置空

                Map<String, Collection<String>> queries = new HashMap<>();
                buildQuery(jsonNode, "", queries);
                template.queries(queries);
            } catch (IOException e) {
                log.error("FeignRequestInterceptor apply error:",e);
            }
        }
    }


    private void buildQuery(JsonNode jsonNode, String path, Map<String, Collection<String>> queries) {
        if (!jsonNode.isContainerNode()) {   // 叶子节点
            if (jsonNode.isNull()) {
                return;
            }
            Collection<String> values = queries.get(path);
            if (null == values) {
                values = new ArrayList<>();
                queries.put(path, values);
            }
            values.add(jsonNode.asText());
            return;
        }
        if (jsonNode.isArray()) {   // 数组节点
            Iterator<JsonNode> it = jsonNode.elements();
            while (it.hasNext()) {
                buildQuery(it.next(), path, queries);
            }
        } else {
            Iterator<Map.Entry<String, JsonNode>> it = jsonNode.fields();
            while (it.hasNext()) {
                Map.Entry<String, JsonNode> entry = it.next();
                if (StringUtils.hasText(path)) {
                    buildQuery(entry.getValue(), path + "." + entry.getKey(), queries);
                } else {  // 根节点
                    buildQuery(entry.getValue(), entry.getKey(), queries);
                }
            }
        }
    }
}
12、Feign 处理首次请求失败
当 Feign 和 Ribbon 整合了 Hystrix 之后,可能会出现首次调用失败的问题。原因是 Hystrix 默认的超时时间是 1 秒,如果超过这个时间尚未作出响应,将会进入 fallback 代码。由于 Bean 的装配以及懒加载机制等,Feign 首次请求都会比较慢,如果这个响应时间超过 1 秒,就会出现请求失败的问题。此时可以采取以下三种方法处理:
- 使用 Feign 的时候直接关闭 Hystrix(不推荐):
feign.hystrix.enabled=false - 禁用 Hystrix 的超时时间:
hystrix.command.default.execution.timeout.enabled=false - 将 Hystrix 的超时时间改为 5 秒:
hystrix.command.default.execution.isolation.thread.timeoutInMilliseconds=5000
13、文件上传下载
13.1 服务消费端,提供对外的文件上传下载接口
13.1.1 controller接口
@RestController
@Slf4j
public class FeignUploadController
{
    @Autowired
    private ProviderTestService service;

    @PostMapping("/other/consumer/saveFile")
    @LogPrintout
    public String saveFile(@RequestPart(name="fileName") MultipartFile uploadFile)
    {
        return service.saveFile(uploadFile);
    }

    @GetMapping("/other/consumer/queryFile/{fileName}")
    @LogPrintout
    public void queryFile(@PathVariable("fileName") String fileName, HttpServletResponse response) throws IOException {
        log.info("线程id:"+Thread.currentThread().getId());
        // 1、在浏览器访问时直接显示图片
        response.reset();
        response.setContentType(MediaType.IMAGE_PNG_VALUE);

        // 2、在浏览器访问时弹出下载图片
        //response.setContentType(MediaType.APPLICATION_OCTET_STREAM_VALUE);
        //response.addHeader("Content-Disposition", "attachment; filename=" + URLEncoder.encode(fileName, "UTF-8"));

        try(OutputStream outputStream = response.getOutputStream(); //因为服务B中没有返回值的,但是这里它需要把文件给保留下来,所以使用Response接收参数
            Response r = service.queryFile(fileName);
            InputStream stream = r.body().asInputStream())
        {
            IOUtils.copy(stream,outputStream); //调用 IOUtils.copy。将输入流复制到输出流即可,就可以返回到前端了
        }
    }
}
13.1.2 Feign 文件上传下载的客户端
@FeignClient(name="CLOUD-OPENFEIGN-OTHER-PROVIDER8020",fallbackFactory = FeignFallbackFactory.class,path = "study")
public interface ProviderTestService {
    // http://127.0.0.1:80/study/providerTest/saveFile
    // consumes 设置发送的数据的格式multipart/form-data
    @PostMapping(path="/providerTest/saveFile",consumes = MediaType.MULTIPART_FORM_DATA_VALUE)
    String saveFile(@RequestPart(name="fileName",required = false) MultipartFile uploadFile);

    // http://127.0.0.1:80/study/providerTest/queryFile
    @GetMapping("/providerTest/queryFile/{fileName}")
    Response queryFile(@PathVariable("fileName") String fileName);
}
13.2 服务提供者
13.2.1 配置文件上传大小限制,以及自定义的文件上传类型
spring:
  servlet:
    multipart:
      max-request-size: 10MB #上传附件大小限制 请求总体大小
      max-file-size: 5MB #单个文件大小的限制

#允许上传的文件类型
upload:
  path: C:\Users\lei.yan004\Desktop\临时文件\文件上传下载
  allow_upload_file:
    - jpg
    - jpeg
    - png
13.2.2 controller接口,未服务消费者提供服务
@RestController
@Slf4j
public class OtherProviderController {
	// 允许上传文件类型
    @Value("#{'${upload.allow_upload_file:jpg,jpeg,png}'.split(',')}")
    private Set<String> CAN_UPLOAD_TYPES;

	// 上传文件保存路径
    @Value("${upload.path}")
    private String filePath;

    @Resource
    private HttpServletRequest request;
    @Resource
    private HttpServletResponse response;

    // http://127.0.0.1:8020/study/providerTest/saveFile
    @PostMapping("/providerTest/saveFile")
    public String saveFile(@RequestPart(name="fileName") MultipartFile uploadFile) throws IOException {
        if(uploadFile == null || uploadFile.getSize() ==0){
            return "请选择需要上传的文件";
        }
        //获取上传文件后缀,比如图片的jpeg,png
        String fileName = uploadFile.getOriginalFilename();
        String suffixName = fileName.substring(fileName.lastIndexOf(".") +1).toLowerCase();

        if (!CAN_UPLOAD_TYPES.contains(suffixName)) {
            return "仅允许上传" + CAN_UPLOAD_TYPES.toString() + "格式的文件";
        }

        // 文件名称
        fileName = UUID.randomUUID().toString().replaceAll("-", "")+ "." +suffixName;
        log.info("转换后的名称:" + fileName);

        //获取输入流
        InputStream is = uploadFile.getInputStream();
        //获取输出流
        File file = new File(filePath + File.separator + fileName);
        OutputStream os = new FileOutputStream(file);

        //开始复制
        int i;
        byte[] bytes = new byte[1024];
        while ((i = is.read(bytes)) != -1){
            os.write(bytes, 0, i);
        }
        os.close();
        is.close();

        return fileName;
    }

    // http://127.0.0.1:8020/study/providerTest/queryFile
    @GetMapping("/providerTest/queryFile/{fileName}")
    public void queryFile(@PathVariable("fileName") String fileName) throws IOException {
        // 读到流中
        File file = new File(filePath + File.separator + fileName);
        InputStream inputStream = new FileInputStream(file);// 文件的存放路径

        // 设置响应头
        response.reset();
        response.setContentType(MediaType.APPLICATION_OCTET_STREAM_VALUE);
        response.addHeader("Content-Disposition", "attachment; filename=" + URLEncoder.encode(fileName, "UTF-8"));

        ServletOutputStream outputStream = response.getOutputStream();
        byte[] b = new byte[1024];
        int len;
        while ((len = inputStream.read(b)) > 0) {
            outputStream.write(b, 0, len);
        }
        inputStream.close();
        outputStream.close();
    }
}
13.3 测试
上传图片:
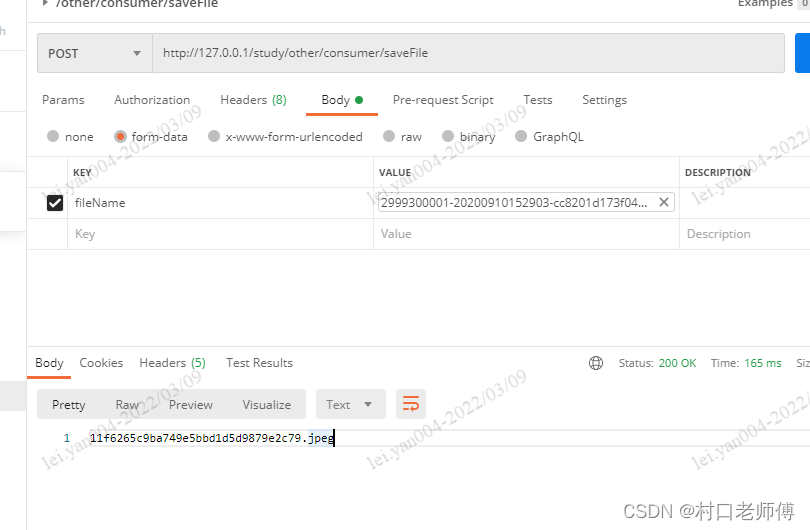
下载图片:
http://127.0.0.1/study/other/consumer/queryFile/11f6265c9ba749e5bbd1d5d9879e2c79.jpeg
14、将Token传递到下游
在使用token进行认证鉴权的时候,使用 Feign 就会发现外部请求到 A 服务的时候,A 服务是可以拿到 Token 的;然而当 A 服务使用 Feign 调用 B 服务时,Token 就会丢失,从而导致认证失败。解决方法比较简单,可以利用 RequestInterceptor 拦截器,在 Feign 调用的时候,向请求头里面添加需要传递的 Token。
注:因为hystrix默认使用线程池隔离,导致RequestContextHolder.getRequestAttributes()(因为是使用ThreadLocal实现的)无法获取到原始请求的request。
此种方式传递Token,就必须使用信号量隔离的模式(hystrix.command.default.execution.isolation.strategy: SEMAPHORE)
或者是关闭hystrix(feign.hystrix.enabled=false)
编写拦截器
@Slf4j
public class FeignRequestTokenInterceptor implements RequestInterceptor {

    @Override
    public void apply(RequestTemplate template) {
        HttpServletRequest httpServletRequest = getHttpServletRequest();
        if(httpServletRequest != null){
            Map<String, String> headers = getHeaders(httpServletRequest);
            template.header(HttpHeaders.AUTHORIZATION,headers.get(HttpHeaders.AUTHORIZATION.toLowerCase()));
        }
        log.info("FeignRequestTokenInterceptor 请求路径:{}", template.path());
        log.info("FeignRequestTokenInterceptor 请求方式:{}", template.method());
        log.info("FeignRequestTokenInterceptor 请求头:{}", JSONUtil.toJsonStr(template.headers()));
        log.info("FeignRequestTokenInterceptor 请求参数列表:{}", JSONUtil.toJsonStr(template.getRequestVariables()));
        log.info("FeignRequestTokenInterceptor 请求体参数:{}", JSONUtil.toJsonStr(template.requestBody().asString()));
    }

    private HttpServletRequest getHttpServletRequest() {
        try {
            return ((ServletRequestAttributes) RequestContextHolder.getRequestAttributes()).getRequest();
        } catch (Exception e) {
            log.error("FeignRequestTokenInterceptor getHttpServletRequest error",e);
        }
        return null;
    }

    /**
     * Feign拦截器拦截请求获取Token对应的值
     * @param request
     * @return
     */
    private Map<String, String> getHeaders(HttpServletRequest request) {
        Map<String, String> map = new LinkedHashMap<>();
        Enumeration<String> enumeration = request.getHeaderNames();
        while (enumeration.hasMoreElements()) {
            String key = enumeration.nextElement();
            String value = request.getHeader(key);
            map.put(key, value);
        }
        return map;
    }

}
因为上面的拦截器并没有添加@Component注解纳入容器管理,所以需要配置拦截器:
feign:
  hystrix:
    enabled: true #在Feign中开启Hystrix
  client:
    default-to-properties: true # 是否以properties(yml)中的配置优先,默认为true
    config:
      default: # 默认配置
        loggerLevel: full
        decode404: true
        requestInterceptors:
          - com.study.springcloud.interceptors.FeignRequestTokenInterceptor
  httpclient:
      enabled: true # Feign 使用 Apache HTTP 客户端
  okhttp:
    enabled: false

hystrix:
  command:
    default:
      execution:
        timeout:
          enabled: false #禁用 Hystrix 的超时时间
        isolation:
          strategy: SEMAPHORE


 7719
7719


 被折叠的 条评论
为什么被折叠?
被折叠的 条评论
为什么被折叠?
 到【灌水乐园】发言


