


web学习笔记-servlet
概念
servlet是一个小应用程序,用于处理从客户端发送的请求及服务端的响应。
详情参见: 百度百科的定义
在idea创建servlet
- 在src右键新建servlet,如图所示:
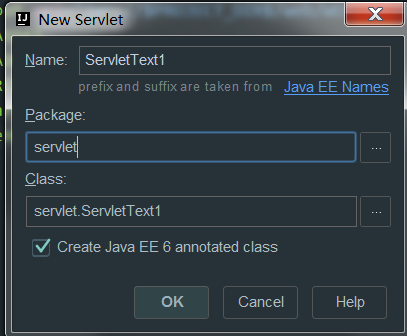
- 然后会报异常可以下载包,也可以添加tomcat中的包,添加tomcat—>lib—->servlet-api.jar作为libraries。
- 然后再打开web.xml此时会发现多出一个servlet标签
    <servlet>
        <servlet-name>ServletDemo1</servlet-name>
        <servlet-class>servelt.ServletDemo1</servlet-class>
    </servlet>
这时系统报错,我们还要写出如下代码:
    <servlet-mapping>
        <servlet-name>ServletDemo1</servlet-name>
        <url-pattern>/ServletDemo1/demo1</url-pattern>
    </servlet-mapping>
至此servlet初步创建完毕
详解servlet
servlet生命周期:
  public void init(ServletConfig) ; 初始化方法
  public service(ServletRequest,ServletResponse) ; 服务方法
public destroy() ; 销毁方法 默认情况下,servlet对象在第一次请求的时候调用构造函数创建, 创建之后自动调用带参的init方法,然后调用service方法.destroy方法在停止服务器或者停止应用的时候调用。整个过程中,init方法和destroy方法只会调用一次,而service方法会反复调用。
可以通过配置web.xml文件来改变创建servlet的时机.配置如下
<load-on-startup>2</load-on-startup>
数字从2开始的整数,因为系统占用了1,这时的servlet就会在应用创建时启动,而不是客户端发出请求在创建servlet。
此时在服务器启动的时候就创建对象并进行初始化了.此Servlet对象在服务器停止或者应用停止时才死亡.
servlet工作流程

servlet线程安全:
线程安全要求将变量创建成一个局部变量,而不要创建成实例变量
servletConfig
在servlet注册在web.xml文件中,我们可以给servlet添加属性:
    <servlet>
        <servlet-name>ServletDemo1</servlet-name>
        <servlet-class>servelt.ServletDemo1</servlet-class>
        <load-on-startup>2</load-on-startup>
        <init-param>
            <param-name>hty</param-name>
            <param-value>gggg</param-value>
        </init-param>
    </servlet>
可以看出添加属性只要使用iny-parm标签即可,然后我们就可以在java代码中获得servletConfig的属性:
 * 获取的方式有两种:
 *          1. 采用带参的init方法
 *          2. 采用servlet实例拿取(不要写带参的init方法)
 * @author Administrator
 *
 */
public class ServletConfig1 extends HttpServlet {

    ServletConfig config ;

    @Override
    public void init(ServletConfig config) throws ServletException {
        //这里调用super.init方法,因为在this.getservletConfig中会调用init方法,然而此处重写了init方法,所以系统不会调用父类的init方法,所以要写super.init方法
        super.init(config) ;
        this.config = config ;
    }

    public void doGet(HttpServletRequest request, HttpServletResponse response)throws ServletException, IOException {
        ServletConfig sc = this.getServletConfig() ;
        //System.out.println(config == sc);
        System.out.println(sc);
        System.out.println(config == sc);
    }
拿取多个属性
//演示servletConfig对象的应用
public class ServletConfig2 extends HttpServlet {
public void doGet(HttpServletRequest request, HttpServletResponse response)throws ServletException, IOException {
//拿到servletConfi对象
ServletConfig sc = this.getServletConfig() ;
//拿取配置的单个信息
// String name = sc.getInitParameter("name") ;
// System.out.println(name);
//拿取配置的多个信息
Enumeration<String> enu = sc.getInitParameterNames() ;
while(enu.hasMoreElements()){
String name = enu.nextElement() ;
System.out.println(name + ":" + sc.getInitParameter(name));
}
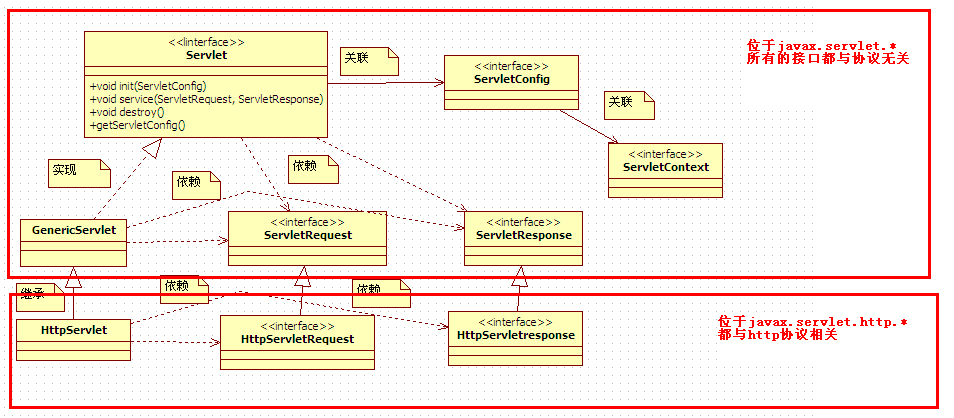
}servletContext
servletContext和其他类的关系图
基本属性:
1.  每个web应用都有一个唯一的servletContext对象.
2.  在每个应用加载的时候,服务器就会创建servletContext对象。
3.  ServletContext对象是一个域对象(领域)
定义:百度百科
ServletContext对象是在Web应用程序装载时初始化的。正像Servlet具有初始化参数一样,ServletContext也有初始化参数。Servlet上下文初始化参数指定应用程序范围内的信息。
在web.xml中配置初始化参数:
<context-param>
    <param-name>adminEmail</param-name>
    <param-value>webmaster</param-value>
</context-param>
context-param元素是针对整个应用的,所以并不嵌套在某个servlet元素中,该元素是web-app元 素的直接子元素。
获取servletContext的三种方式:
 * 有三种方式获取servletContext对象
 *          1. 采用servletConfig对象获取
 *          2. 采用servlet实例对象获取
 *          3. 采用request对象获取
 * @author Administrator
 *
 */
public class ServletContext1 extends HttpServlet {

    ServletContext sc ;

    @Override
    public void init(ServletConfig config) throws ServletException {
        super.init(config) ;
        //第一种方式
        sc = config.getServletContext() ;
    }

    public void doGet(HttpServletRequest request, HttpServletResponse response)throws ServletException, IOException {
        //第二种方式
        ServletContext sc1 = this.getServletContext() ;
        System.out.println(sc);
        System.out.println(sc1 == sc);
        //第三种方式
        ServletContext sc2 = request.getSession().getServletContext() ;
        System.out.println(sc2 == sc);
    }
延伸url的写法注意
客户端跳转:(由浏览器发出的请求) 一定需要在地址前加应用的名称
服务端跳转: (由服务端发出的请求)不需要在地址前加应用的名称
servletContext的作用
- 共享数据
存储数据
public void doGet(HttpServletRequest request, HttpServletResponse response)throws ServletException, IOException {

        //获取全局对象
        ServletContext sc = this.getServletContext() ;

        //存储数据
        sc.setAttribute("name", "张三丰") ;
        System.out.println("数据存储完毕");
    }
拿出数据
public void doGet(HttpServletRequest request, HttpServletResponse response)throws ServletException, IOException {

        //拿取全局对象
        ServletContext sc = this.getServletContext() ;
        //从sc中拿取数据
        String name = (String)sc.getAttribute("name") ;
        System.out.println(name);
    }
获得全局参数:
    public void doGet(HttpServletRequest request, HttpServletResponse response)throws ServletException, IOException {
        //拿到全局对象
        ServletContext sc = this.getServletContext() ;
        //获取单个配置参数(获取姓名)
//      String name = sc.getInitParameter("name") ;
//      System.out.println(name);

        //拿取多个配置参数的值
        Enumeration<String> enu = sc.getInitParameterNames() ;
        while(enu.hasMoreElements()){
            String name = enu.nextElement() ;
            System.out.println(name + ":" + sc.getInitParameter(name));
        }

}- 请求转发
转发方:
public void doGet(HttpServletRequest request, HttpServletResponse response)throws ServletException, IOException {

        //拿到全局对象
        ServletContext sc = this.getServletContext() ;

        request.setAttribute("name", "乔峰") ;

        //拿到请求转发器
        RequestDispatcher rd = sc.getRequestDispatcher("/servlet/ServletContext6") ;
        //转发过去
        rd.forward(request, response) ;
    }
接收方:
public void doGet(HttpServletRequest request, HttpServletResponse response)throws ServletException, IOException {

        System.out.println("你终于过来了");
        String name = (String)request.getAttribute("name") ;
        System.out.println("转发过来的数据: " + name);
}- 获取资源文件
 * 获取资源文件有三种方式:
 *              1.采用 ServletContext对象获取
 *              2.采用ResourceBundle类来获取
 *              3.采用类加载器获取
 *
 *             第一种方式:优点: 任意文件,任意路径
 *                         缺点: 必须有web环境
 *             第二种方式: 优点:简单方便
 *                          缺点: 1.只能拿取properties文件 2. 只能拿取非web环境下的资源
 *             第三种方式: 优点: 任意文件,任意路径
 *                         缺点: 编写稍显麻烦
 *
 *
 * @author Administrator
 *
 */
public class ServletContext7 extends HttpServlet {

    public void doGet(HttpServletRequest request, HttpServletResponse response)
            throws ServletException, IOException {

        //test11() ;
        // test12() ;
        // test13();
        // test22();
        // test31();
//      test32();
//      test33();
    //  test34();

    }

    // 获取p1资源文件的内容
    public void test11() {
        // 拿到全局对象
        ServletContext sc = this.getServletContext();

        // 获取p1.properties文件的路径
        String path = sc.getRealPath("/WEB-INF/classes/p1.properties");
        System.out.println(path);
        // 创建一个Properties对象
        Properties pro = new Properties();
        // 加载文件
        try {
            pro.load(new FileReader(path));
        } catch (Exception e) {
            e.printStackTrace();
        }
        // 读取k的值
        System.out.println(pro.get("k"));
    }

    // 获取p2资源文件的内容
    public void test12() {
        // 拿到全局对象
        ServletContext sc = this.getServletContext();

        // 获取p2.properties文件的路径,在java工程src中的代码
        String path = sc
                .getRealPath("/WEB-INF/classes/com/heima/four/p2.properties");
        System.out.println(path);
        // 创建一个Properties对象
        Properties pro = new Properties();
        // 加载文件
        try {
            pro.load(new FileReader(path));
        } catch (Exception e) {
            e.printStackTrace();
        }
        // 读取k的值
        System.out.println(pro.get("k"));
    }

    // 获取p3资源文件的内容,p3在web下的根目录
    public void test13() {
        // 拿到全局对象
        ServletContext sc = this.getServletContext();

        // 获取p1.properties文件的路径
        String path = sc.getRealPath("/p3.properties");
        System.out.println(path);
        // 创建一个Properties对象
        Properties pro = new Properties();
        // 加载文件
        try {
            pro.load(new FileReader(path));
        } catch (Exception e) {
            e.printStackTrace();
        }
        // 读取k的值
        System.out.println(pro.get("k"));
    }

    // 采用resourceBunble拿取资源文件:获取p1资源文件的内容 默认路径是src,对用到web环境就是classes目录
    //p1在src的根目录下
    public void test21() {
        // 拿取ResourceBundle对象(专门用来获取properties文件的信息)
        ResourceBundle rb = ResourceBundle.getBundle("p1");
        // 拿取文件中的内容太
        System.out.println(rb.getString("k"));
    }

    // 采用resourceBunble拿取资源文件:获取p2资源文件的内容
    // p2和java代码在同一个文件夹中
    public void test22() {
        // 拿取ResourceBundle对象(专门用来获取properties文件的信息)
        ResourceBundle rb = ResourceBundle.getBundle("com.heima.four.p2");
        // 拿取文件中的内容太
        System.out.println(rb.getString("k"));
    }

    // 采用类加载器拿取资源文件:获取p1资源文件的内容 : 默认路径是src,对用到web环境就是classes目录
    public void test31() {
        // 获取类加载器的方式
        /*
         * 1. 通过类名 ServletContext7.class.getClassLoader() 2. 通过对象
         * this.getClass().getClassLoader() 3. Class.forName()
         * 获取Class.forName("ServletContext7").getClassLoader()
         */
        InputStream in = this.getClass().getClassLoader()
                .getResourceAsStream("p1.properties");

        // 创建Properties对象
        Properties pro = new Properties();
        try {
            pro.load(in);
        } catch (IOException e) {
            // TODO Auto-generated catch block
            e.printStackTrace();
        }

        // 拿取文件的数据
        System.out.println(pro.getProperty("k"));

    }

    // 采用类加载器拿取资源文件:获取p2资源文件的内容 : 默认路径是src,对用到web环境就是classes目录
    public void test32() {
        // 获取类加载器的方式
        /*
         * 1. 通过类名 ServletContext7.class.getClassLoader() 2. 通过对象
         * this.getClass().getClassLoader() 3. Class.forName()
         * 获取Class.forName("ServletContext7").getClassLoader()
         */
        InputStream in = this.getClass().getClassLoader()
                .getResourceAsStream("com/heima/four/p2.properties");

        // 创建Properties对象
        Properties pro = new Properties();
        try {
            pro.load(in);
        } catch (IOException e) {
            // TODO Auto-generated catch block
            e.printStackTrace();
        }

        // 拿取文件的数据
        System.out.println(pro.getProperty("k"));

    }

    // 采用类加载器拿取资源文件:获取p3资源文件的内容 : 默认路径是src,对用到web环境就是classes目录
    public void test33() {
        // 获取类加载器的方式
        /*
         * 1. 通过类名 ServletContext7.class.getClassLoader() 2. 通过对象
         * this.getClass().getClassLoader() 3. Class.forName()
         * 获取Class.forName("ServletContext7").getClassLoader()
         */
        InputStream in = this.getClass().getClassLoader()
                .getResourceAsStream("../../p3.properties");

        // 创建Properties对象
        Properties pro = new Properties();
        try {
            pro.load(in);
        } catch (IOException e) {
            // TODO Auto-generated catch block
            e.printStackTrace();
        }

        // 拿取文件的数据
        System.out.println(pro.getProperty("k"));

    }

    // 采用类加载器拿取资源文件:获取p3资源文件的内容 : 默认路径是src,对用到web环境就是classes目录
    public void test34() {
        // 获取类加载器的方式
        /*
         * 1. 通过类名 ServletContext7.class.getClassLoader() 2. 通过对象
         * this.getClass().getClassLoader() 3. Class.forName()
         * 获取Class.forName("ServletContext7").getClassLoader()
         */
        URL url  = this.getClass().getClassLoader().getResource("p1.properties") ;

        String path = url.getPath() ;


        // 创建Properties对象
        Properties pro = new Properties();
        try {
            pro.load(new FileReader(path));
        } catch (IOException e) {
            // TODO Auto-generated catch block
            e.printStackTrace();
        }

        // 拿取文件的数据
        System.out.println(pro.getProperty("k"));

    }
}
更多好玩文章: 天意博文


 960
960

 被折叠的 条评论
为什么被折叠?
被折叠的 条评论
为什么被折叠?
 到【灌水乐园】发言


