


记录一下基于vue/Cli2下的typescript配置。
或者直接使用此空白项目
本文根据以下文章步步实践而来,部分配置按个人习惯有所修改。
文章目录
一、新建项目
vue init webpack xxxx
二、安装TypeScript相关依赖
//安装vue的官方插件
npm i vue-class-component vue-property-decorator vuex-class --save

// ts-loader typescript 必须安装,其他的相信你以后也会装上的
npm i ts-loader typescript tslint tslint-loader tslint-config-standard --save-dev
这些依赖的大概作用如下:
vue-class-component:强化 Vue 组件,使用 TypeScript/装饰器 增强 Vue 组件
vue-property-decorator:在 vue-class-component 上增强更多的结合 Vue 特性的装饰器
ts-loader:TypeScript 为 Webpack 提供了 ts-loader,其实就是为了让webpack识别 .ts .tsx文件
tslint-loader跟tslint:类似于eslint,但是在TypeScript中就是tslint及其loader
tslint-config-standard:tslint 配置 standard风格的约束
三、修改webpack配置。
打开./build/webpack.base.conf.js
找到入口entry ,将main.js改为main.ts 。同时将src中的入口main.js改为main.ts
  entry: {
    app: './src/main.ts'  // 改为main.ts
  },
然后,找到resolve.extensions,在数组中增加’.ts’项,这样引入ts时不用写后缀。
  resolve: {
    extensions: ['.js', '.vue', '.json','.ts'],// 增加.ts后缀,这样引入ts时不用写后缀。
    alias: {
      'vue$': 'vue/dist/vue.esm.js',
      '@': resolve('src'),
    }
  },
最后找到module.rules数组,增加两项。
  module: {
    rules: [
      // 增加tslint-loader
      {
        test: /\.ts$/,
        exclude: /node_modules/,
        enforce: 'pre',
        loader: 'tslint-loader'
      },
      // 增加ts-loader,用于解析ts
      {
        test: /\.tsx?$/,
        loader: 'ts-loader',
        exclude: /node_modules/,
        options: {
          appendTsSuffixTo: [/\.vue$/],
        }
      },
      ...
    ]
  }
ts-loader 会检索当前目录下的 tsconfig.json 文件,根据里面定义的规则来解析.ts文件(就跟.babelrc的作用一样)
tslint-loader 作用等同于 eslint-loader
四、添加 tsconfig.json
接下来在根目录下创建 tsconfig.json,这里主要有以下几个属性可以配置:“compilerOptions”,“files”,“exclude”,“include”
完整的配置文档点击这里
这里主要需要进行配置的是compilerOptions,compilerOptions的具体选项说明见这里——传送门
这里贴一份个人配置。
{
  // 包含文件。
  "include": [
    "src/**/*"
  ],
  // 排除文件。
  "exclude": [
    "node_modules",
    "**/*.spec.ts"
  ],
  "compilerOptions": {
    "allowSyntheticDefaultImports": true, // 允许从没有设置默认导出的模块中默认导入。这并不影响代码的显示,仅为了类型检查。
    "experimentalDecorators": true, // 启用ES装饰器。
    "allowJs": true,  // 允许编译javascript文件。
    "module": "ES6", // 指定生成哪个模块系统代码:"None","CommonJS","AMD","System","UMD","ES6"或"ES2015"。
    "target": "ES6", // 指定ECMAScript目标版本 "ES3"(默认), "ES5", "ES6"/ "ES2015", "ES2016", "ES2017"或 "ESNext"。
    "moduleResolution": "Classic", // module === "AMD" or "System" or "ES6" ? "Classic" : "Node" 决定如何处理模块。 https://www.tslang.cn/docs/handbook/module-resolution.html
    "isolatedModules": true, // 将每个文件作为单独的模块
    /*
    编译过程中需要引入的库文件的列表。
    注意:如果--lib没有指定默认注入的库的列表。默认注入的库为:
    ► 针对于--target ES5:DOM,ES5,ScriptHost
    ► 针对于--target ES6:DOM,ES6,DOM.Iterable,ScriptHost
    */
    "lib": [
      "DOM",
      "ES6",
      "ES5",
      "ES7",
      "ES2015.Promise",
      "DOM.Iterable",
      "ScriptHost"
    ],
    "sourceMap": true, // 生成相应的 .map文件。
    "pretty": true, // 给错误和消息设置样式,使用颜色和上下文。
  }
}
五、添加 tslint.json
在根路径下创建tslint.json文件
这里如果使用standard 规范就很简单,直接引入 ts standard 规范
{
  "extends": "tslint-config-standard",
  "globals": {
    "require": true
  }
}
但是如果想要实现定制化的格式规范,就得大概知道每项的意思。官方完整规则文档点击这里,不过是英文的。这里简要的翻译了一下:
默认json格式是无法注释的,但是可以通过在vscode中配置成jsonc格式的文件,从而实现可以添加注释。
在vscode中的user setting中增加以下代码,即可在tslint.json中使用注释。
  "files.associations": {
    "tslint.json": "jsonc" // 使得tslint.json中能够使用//注释。
  },
// tslint.json
{
  "extends": "tslint-config-standard",
  "rules": {
    "adjacent-overload-signatures": true, // Enforces function overloads to be consecutive.
    "ban-comma-operator": true, //禁止逗号运算符。
    "ban-type": [true, ["object", "User {} instead."],
      ["string"]
    ], //禁止类型
    "member-access": [true, "no-public" ,"check-accessor" , "check-constructor" , "check-parameter-property"], //类成员必须显示声明 private public ....
    "member-ordering": [true, {
      "order": "fields-first"
    }], //类声明排序
    "no-any": true, //不需使用any类型
    "no-empty-interface": true, //禁止空接口 {}
    "no-import-side-effect": [true, {
      "ignore-module": "(\\.html|\\.css)$"
    }], //禁止导入带有副作用的语句
    "no-inferrable-types": [true, "ignore-params", "ignore-properties"], //不允许将变量或参数初始化为数字,字符串或布尔值的显式类型声明。
    "no-internal-module": true, //不允许内部模块
    "no-magic-numbers": [true, 1, 2, 3], //不允许在变量赋值之外使用常量数值。当没有指定允许值列表时,默认允许-1,0和1
    "no-namespace": [true, "allpw-declarations"], //不允许使用内部modules和命名空间
    "no-non-null-assertion": true, //不允许使用!后缀操作符的非空断言。
    "no-parameter-reassignment": true, //不允许重新分配参数
    "no-reference": true, // 禁止使用/// <reference path=> 导入 ,使用import代替
    "no-unnecessary-type-assertion": true, //如果类型断言没有改变表达式的类型就发出警告
    "no-var-requires": true, //不允许使用var module = require("module"),用 import foo = require('foo')导入
    "only-arrow-functions": [true, "allow-declarations", "allow-named-functions"], //允许箭头表达式,不需要传统表达式 ; 允许独立的函数声明 ;允许表达,function foo() {}但不是function() {}
    "prefer-for-of": true, //建议使用for(..of)
    "promise-function-async": true, // 要求异步函数返回promise
    "typedef": [true, "call-signature", "parameter", "member-variable-declaration"], //需要定义的类型存在
    "typedef-whitespace": true, //类型声明的冒号之前是否需要空格
    "unified-signatures": true, //重载可以被统一联合成一个

    //function 专用
    "await-promise": true, //警告不是一个promise的await
    // "ban": [ // 禁止使用特定功能或全局方法,这里看得有点懵,就不开启吧。 https://palantir.github.io/tslint/rules/ban/
    //   true,"eval",
    //   {"name": "$", "message": "please don't"},
    //   ["describe", "only"],
    //   {"name": ["it", "only"], "message": "don't focus tests"},
    //   {
    //   "name": ["chai", "assert", "equal"],
    //   "message": "Use 'strictEqual' instead."
    //   },
    //   {"name": ["*", "forEach"], "message": "Use a regular for loop instead."}
    // ],
    "curly": true, //for if do while 要有括号
    "forin": true, //用for in 必须用if进行过滤
    "import-blacklist": true, //允许使用import require导入具体的模块
    "label-postion": true, //允许在do/for/while/swith中使用label
    "no-arg": true, //不允许使用 argument.callee
    "no-bitwise": true, //不允许使用按位运算符
    "no-conditional-assignmen": true, //不允许在do-while/for/if/while判断语句中使用赋值语句
    "no-console": true, //不能使用console
    "no-construct": true, //不允许使用 String/Number/Boolean的构造函数
    "no-debugger": true, //不允许使用debugger
    "no-duplicate-super": true, //构造函数两次用super会发出警告
    "no-empty": true, //不允许空的块
    "no-eval": true, //不允许使用eval
    "no-floating-promises": true, //必须正确处理promise的返回函数
    "no-for-in-array": true, //不允许使用for in 遍历数组
    "no-implicit-dependencies": true, //不允许在项目的package.json中导入未列为依赖项的模块
    "no-inferred-empty-object-type": true, //不允许在函数和构造函数中使用{}的类型推断
    "no-invalid-template-strings": true, //警告在非模板字符中使用${
    "no-invalid-this": true, //不允许在非class中使用 this关键字
    "no-misused-new": true, //禁止定义构造函数或new class
    "no-null-keyword": true, //不允许使用null关键字
    "no-object-literal-type-assertion": true, //禁止objext出现在类型断言表达式中
    "no-return-await": true, //不允许return await
    "arrow-parens": true, //箭头函数定义的参数需要括号

    "quotemark": [true, "single", "avoid-escape"], //引号的使用规则
    "semicolon": [true, "never", "ignore-interfaces"], //分号的使用规则
    "indent": [true, "tabs", 2], //使用Tab进行缩进,每次强制缩进2个字符
    "whitespace": false, //空格的校验
    "one-line": false, //要求指定的标记与它们之前的表达式位于同一行
    "trailing-comma": [true, { //对尾随逗号的校验
      "multiline": {
        "objects": "ignore",
        "arrays": "never",
        "functions": "never",
        "typeLiterals": "ignore"
      },
      "esSpecCompliant": true //是否允许尾随逗号出现在剩余变量中
    }]
  }
}
六、让 ts 识别 .vue
由于 TypeScript 默认并不支持 *.vue 后缀的文件,所以在 vue 项目中引入的时候需要创建一个 vue-shim.d.ts 文件,放在项目项目对应使用目录下,例如 src/vue-shim.d.ts
declare module "*.vue" {
  import Vue from "vue";
  export default Vue;
}
所以在引入组件导入"*.vue"结尾的文件时,需要写上.vue,不能省略。
七、了解vue相关装饰器写法。
在这之前先让我们了解一下所需要的插件(下面的内容需要掌握es7的装饰器, 就是下面使用的@符号)
vue-class-component
vue-class-component 对 Vue 组件进行了一层封装,让 Vue 组件语法在结合了 TypeScript 语法之后更加扁平化:
<template>
  <div>
    <input v-model="msg">
    <p>msg: {{ msg }}</p>
    <p>computed msg: {{ computedMsg }}</p>
    <button @click="greet">Greet</button>
  </div>
</template>

<script lang="ts">
  import Vue from 'vue'
  import Component from 'vue-class-component'

  @Component
  export default class App extends Vue {
    // 初始化数据
    msg = 123

    // 声明周期钩子
    mounted () {
      this.greet()
    }

    // 计算属性
    get computedMsg () {
      return 'computed ' + this.msg
    }

    // 方法
    greet () {
      alert('greeting: ' + this.msg)
    }
  }
</script>
上面的代码跟下面的代码作用是一样的
export default {
  data () {
    return {
      msg: 123
    }
  }

  // 声明周期钩子
  mounted () {
    this.greet()
  }

  // 计算属性
  computed: {
    computedMsg () {
      return 'computed ' + this.msg
    }
  }

  // 方法
  methods: {
    greet () {
      alert('greeting: ' + this.msg)
    }
  }
}
vue-property-decorator
vue-property-decorator 是在 vue-class-component 上增强了更多的结合 Vue 特性的装饰器,新增了这 7 个装饰器:
- @Emit
- @Inject
- @Model
- @Prop
- @Provide
- @Watch
- @Component (从 vue-class-component 继承)
在这里列举几个常用的@Prop/@Watch/@Component, 更多信息,详见官方文档
import { Component, Emit, Inject, Model, Prop, Provide, Vue, Watch } from 'vue-property-decorator'

@Component
export class MyComponent extends Vue {
  @Model('change', { type: Boolean }) readonly checked!: boolean
  @Prop()
  propA: number = 1

  @Prop({ default: 'default value' })
  propB: string

  @Prop([String, Boolean])
  propC: string | boolean

  @Prop({ type: null })
  propD: any

  @PropSync('name', { type: String }) syncedName!: string

  @Watch('child', { immediate: true, deep: true })
  onChildChanged(val: string, oldVal: string) { }
}
上面的代码相当于:
export default {
  model:{
    event:'change',
    prop:'checked'
  },
  props: {
    checked: {
      type: Boolean
    },
    propA: Number,
    propB: {
      type: String,
      default: 'default value'
    },
    propC: [String, Boolean],
    propD: { type: null },
    name: {
      type: String
    }
  },
  computed:{
  	syncedName:{
  	  get() {
        return this.name
      },
      set(value) {
        this.$emit('update:name', value)
      }
  	}
  },
  methods: {
    onChildChanged(val, oldVal) { }
  },
  watch: {
    'child': {
      handler: 'onChildChanged',
      immediate: true,
      deep: true
    }
  }
}
@Ref(refKey?: string) decorator
import { Vue, Component, Ref } from 'vue-property-decorator'

import AnotherComponent from '@/path/to/another-component.vue'

@Component
export default class YourComponent extends Vue {
  @Ref() readonly anotherComponent!: AnotherComponent
  @Ref('aButton') readonly button!: HTMLButtonElement
}
等效于:
export default {
  computed() {
    anotherComponent: {
      get() {
        return this.$refs.anotherComponent as AnotherComponent
      }
    },
    button: {
      get() {
        return this.$refs.aButton as HTMLButtonElement
      }
    }
  }
}
八、开始修改*.vue文件。
- 在script 标签上加上 lang=“ts”, 意思是让webpack将这段代码识别为typescript 而非javascript
- 修改vue组件的构造方式( 跟react组件写法有点类似, 详见官方 ), 如下图
- 用vue-property-decorator语法改造之前代码
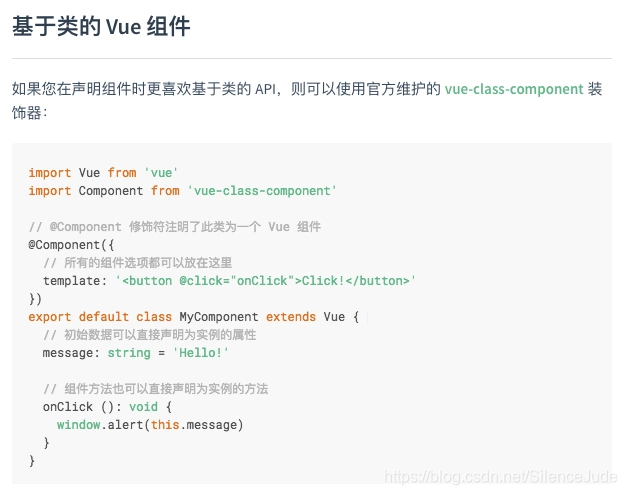
以App.vue为例:
template和style不变,仅需要修改script代码
<script lang="ts">
import Vue from 'vue'
import Component from 'vue-class-component'
@Component
export default class App extends Vue {
}
</script>
HelloWorld.vue中:
<script lang="ts">
import { Vue, Component } from 'vue-property-decorator'
@Component
export default class HelloWorld extends Vue {
  msg:string = 'Welcome to Your Vue.js App'
}
</script>
可以看到,这里主要是参考vue-property-decorator 和vue-class-component 中的写法。
九、降级ts-loader至3.5.0
此时直接npm run dev 是会报错的,Module build failed: Error: You may be using an old version of webpack; please check you’re using at least version 4
这是由于ts-loader的版本较高的原因,所以需要将ts-loader降级到3.5.0
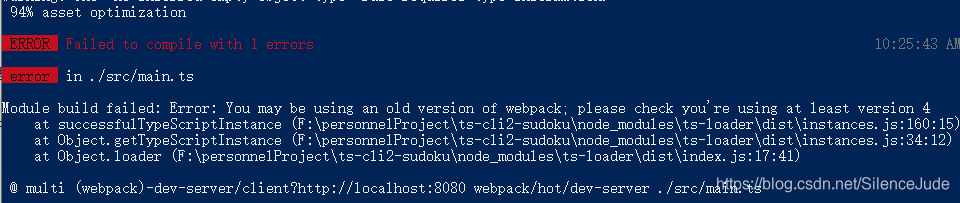
npm i ts-loader@3.5.0 --save-dev
十、配置 vuex
# 安装依赖
npm i vuex vuex-class --save
vuex-class :在 vue-class-component 写法中 绑定 vuex
Store的配置和原来一模一样,只是在调用方法和引用属性上有所不同,需要写成装饰器的形式,同上面的例子。摘一个官网文档的例子:
import Vue from 'vue'
import Component from 'vue-class-component'
import {
  State,
  Getter,
  Action,
  Mutation,
  namespace
} from 'vuex-class'

const someModule = namespace('path/to/module')

@Component
export class MyComp extends Vue {
  @State('foo') stateFoo
  @State(state => state.bar) stateBar
  @Getter('foo') getterFoo
  @Action('foo') actionFoo
  @Mutation('foo') mutationFoo
  @someModule.Getter('foo') moduleGetterFoo

  // If the argument is omitted, use the property name
  // for each state/getter/action/mutation type
  @State foo
  @Getter bar
  @Action baz
  @Mutation qux

  created () {
    this.stateFoo // -> store.state.foo
    this.stateBar // -> store.state.bar
    this.getterFoo // -> store.getters.foo
    this.actionFoo({ value: true }) // -> store.dispatch('foo', { value: true })
    this.mutationFoo({ value: true }) // -> store.commit('foo', { value: true })
    this.moduleGetterFoo // -> store.getters['path/to/module/foo']
  }
}
十一、npm run dev
再次npm run dev ,此时终于可以成功运行。
如果报错:
warning in ./src/main.ts
[10, 1]: unused expression, expected an assignment or function call
那么看看main.ts
改为 :
export default new Vue({
  el: '#app',
  router,
  components: { App },
  template: '<App/>'
})
本文是根据以下文章步步实践而来,部分配置按个人习惯有所修改。


 443
443


 被折叠的 条评论
为什么被折叠?
被折叠的 条评论
为什么被折叠?
 到【灌水乐园】发言


