


1.ES安装配置文件
1.1主节点配置文件
# ======================== Elasticsearch Configuration =========================
# ---------------------------------- Cluster -----------------------------------
cluster.name: GzEsCluster
# ------------------------------------ Node ------------------------------------
node.name: master
node.master: true
node.data: false
node.ingest: true
#node.attr.rack: r1
# ----------------------------------- Paths ------------------------------------
#path.data: /path/to/data
path.data: /home/hadoop/es/data/data/
#path.logs: /path/to/logs
path.logs: /home/hadoop/es/data/logs/
# ----------------------------------- Memory -----------------------------------
bootstrap.memory_lock: false
bootstrap.system_call_filter: false
# ---------------------------------- Network -----------------------------------
network.host: 192.168.206.152
http.port: 9200
transport.tcp.port: 9310
# --------------------------------- Discovery ----------------------------------
#discovery.zen.ping.multicast.enabled: true
discovery.zen.ping.unicast.hosts: [ "192.168.206.152:9310", "192.168.206.152:9310", "192.168.206.152:9310" ]
discovery.zen.minimum_master_nodes: 1
# ---------------------------------- Gateway -----------------------------------
#gateway.recover_after_nodes: 3
# ---------------------------------- Various -----------------------------------
#action.destructive_requires_name: true
### 20180913 set
cluster.routing.allocation.same_shard.host: true
#index.number_of_replicas: 3
#index.number_of_shards: 27
#临时文件保存目录
#path.work: /es01/work
#插件安装路径
#path.plugins: /es01/plugins
#内存配置
#bootstrap.mlockall: true
# 设置是否压缩tcp传输时的数据,默认为false,不压缩
transport.tcp.compress: true
# 设置插件作为启动条件,如果一下插件没有安装,则该节点服务不会启动
#plugin.mandatory: mapper-attachments,lang-groovy
####sed 20180929
thread_pool.index.queue_size: 1000
thread_pool.bulk.queue_size: 1000
thread_pool.get.size: 32
thread_pool.write.queue_size: 1000
#### sed 20181022
#thread_pool.index.size: 32
#thread_pool.write.size: 32
#thread_pool.bulk.size: 32
#indices.memory.index_buffer_size: 30%
#indices.memory.min_index_buffer_size: 5120mb
#http.max_content_length: 200mb
#header访问
http.cors.enabled: true
http.cors.allow-origin: "*"
#添加密码相关
xpack.security.enabled: true
xpack.ml.enabled: true
xpack.license.self_generated.type: trial
http.cors.allow-headers: Authorization,X-Requested-With,Content-Length,Content-Type
#index.cache.field.max_size: 10000
#Indices.store.throttle.type: merge
#Index.store.throttl.max_bytes_per_sec: 200mb
#index.translog.durability=async
#index.translog.disable_flush=true
1.2从节点配置文件
# ======================== Elasticsearch Configuration =========================
# ---------------------------------- Cluster -----------------------------------
cluster.name: GzEsCluster
# ------------------------------------ Node ------------------------------------
node.name: node-1
node.master: false
node.data: true
node.ingest: true
#node.attr.rack: r1
# ----------------------------------- Paths ------------------------------------
#path.data: /path/to/data
path.data: /home/hadoop/es/data/data/
#path.logs: /path/to/logs
path.logs: /home/hadoop/es/data/logs/
# ----------------------------------- Memory -----------------------------------
bootstrap.memory_lock: false
bootstrap.system_call_filter: false
# ---------------------------------- Network -----------------------------------
network.host: 192.168.206.153
http.port: 9200
transport.tcp.port: 9310
# --------------------------------- Discovery ----------------------------------
#discovery.zen.ping.multicast.enabled: true
discovery.zen.ping.unicast.hosts: [ "192.168.206.152:9310", "192.168.206.152:9310", "192.168.206.152:9310" ]
discovery.zen.minimum_master_nodes: 1
# ---------------------------------- Gateway -----------------------------------
#gateway.recover_after_nodes: 3
# ---------------------------------- Various -----------------------------------
#action.destructive_requires_name: true
### 20180913 set
cluster.routing.allocation.same_shard.host: true
#index.number_of_replicas: 3
#index.number_of_shards: 27
#临时文件保存目录
#path.work: /es01/work
#插件安装路径
#path.plugins: /es01/plugins
#内存配置
#bootstrap.mlockall: true
# 设置是否压缩tcp传输时的数据,默认为false,不压缩
transport.tcp.compress: true
# 设置插件作为启动条件,如果一下插件没有安装,则该节点服务不会启动
#plugin.mandatory: mapper-attachments,lang-groovy
####sed 20180929
#thread_pool.index.queue_size: 1000
#thread_pool.bulk.queue_size: 1000
#thread_pool.get.size: 32
#thread_pool.write.queue_size: 1000
#### sed 20181022
#thread_pool.index.size: 40
#thread_pool.write.size: 40
#thread_pool.bulk.size: 40
#indices.memory.index_buffer_size: 30%
#indices.memory.min_index_buffer_size: 5120mb
#http.max_content_length: 200mb
##index.cache.field.max_size: 10000
##Indices.store.throttle.type: merge
#Index.store.throttl.max_bytes_per_sec: 200mb
#index.translog.durability=async
#index.translog.disable_flush=true
#es加密相关
xpack.security.enabled: true
xpack.ml.enabled: true
xpack.license.self_generated.type: trial
http.cors.allow-headers: Authorization,X-Requested-With,Content-Length,Content-Type
1.3启动脚本
[hadoop@host153 elasticsearch-6.5.4]$ cat start.sh
nohup ./bin/elasticsearch > elasticsearch.log 2>&1 &
tail -f elasticsearch.log
2.安装常见报错
2.1进程文件数限制
[2021-02-02T21:37:13,463][INFO ][o.e.b.BootstrapChecks ] [master] bound or publishing to a non-loopback address, enforcing bootstrap checks
ERROR: [2] bootstrap checks failed
[1]: max file descriptors [4096] for elasticsearch process is too low, increase to at least [65536]
[2]: max virtual memory areas vm.max_map_count [65530] is too low, increase to at least [262144]
[2021-02-02T21:37:13,498][INFO ][o.e.n.Node ] [master] stopping ...
[2021-02-02T21:37:13,591][INFO ][o.e.n.Node ] [master] stopped
[2021-02-02T21:37:13,591][INFO ][o.e.n.Node ] [master] closing ...
[2021-02-02T21:37:13,612][INFO ][o.e.n.Node ] [master] closed
每个进程最大同时打开文件数太小,可通过下面2个命令查看当前数量
[hadoop@host152 elasticsearch-6.5.4]$ ulimit -Hn
4096
[hadoop@host152 elasticsearch-6.5.4]$ ulimit -Sn
1024
修改 /etc/security/limits.conf文件,增加配置
* soft nofile 65536
* hard nofile 65536
2.2用户进程数限制
max number of threads [3818] for user [hadoop] is too low, increase to at least [4096]
查看用户进程数
[hadoop@host152 elasticsearch-6.5.4]$ ulimit -Hu
1024
[hadoop@host152 elasticsearch-6.5.4]$ ulimit -Su
1024
修改/etc/security/limits.conf,增加配置
* soft nproc 4096
* hard nproc 4096
2.3虚拟内存区域数量限制
[2021-02-02T21:59:15,424][INFO ][o.e.b.BootstrapChecks ] [master] bound or publishing to a non-loopback address, enforcing bootstrap checks
ERROR: [1] bootstrap checks failed
[1]: max virtual memory areas vm.max_map_count [65530] is too low, increase to at least [262144]
[2021-02-02T21:59:15,437][INFO ][o.e.n.Node ] [master] stopping ...
[2021-02-02T21:59:15,477][INFO ][o.e.n.Node ] [master] stopped
[2021-02-02T21:59:15,477][INFO ][o.e.n.Node ] [master] closing ...
[2021-02-02T21:59:15,493][INFO ][o.e.n.Node ] [master] closed
修改/etc/sysctl.conf文件,增加系统配置
vm.max_map_count=262144
生效系统参数
[root@host152 ~]# sysctl -p
vm.max_map_count = 262144
2.4关闭防火墙No route to host
启动节点报错
[2021-02-03T00:07:37,053][INFO ][o.e.d.z.ZenDiscovery ] [hode-2] failed to send join request to master [{master}{1u6DUu14SwmPsTIWLOsoHQ}{jcAfT7QATMK5N8WTOAeGKg}{192.168.206.152}{192.168.206.152:9310}{ml.machine_memory=1912107008, ml.max_open_jobs=20, xpack.installed=true, ml.enabled=true}], reason [RemoteTransportException[[master][192.168.206.152:9310][internal:discovery/zen/join]]; nested: ConnectTransportException[[hode-2][192.168.206.154:9310] connect_exception]; nested: IOException[No route to host: 192.168.206.154/192.168.206.154:9310]; nested: IOException[No route to host]; ]
禁止开机启动,永久关闭防火墙
[root@host154 ~]# sudo systemctl disable firewalld.service
[root@host154 ~]# sudo systemctl stop firewalld.service
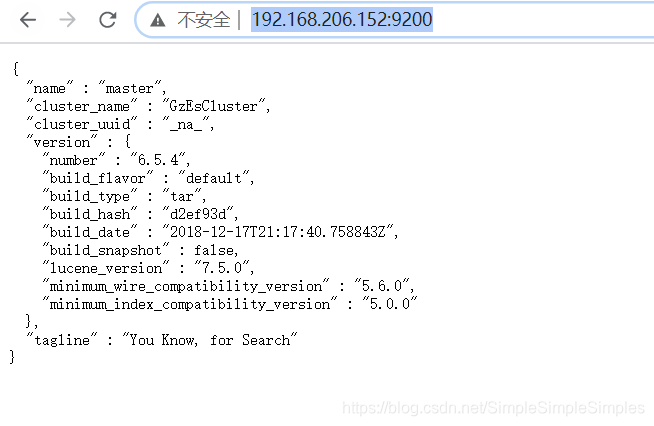
2.5访问集群信息地址
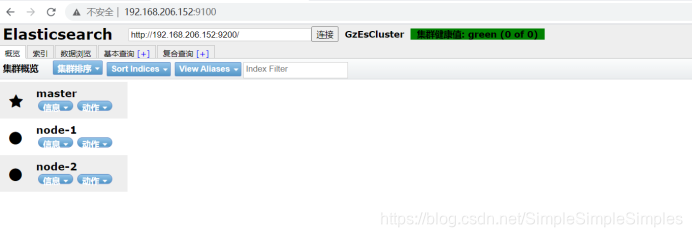
3.安装header
3.1安装head需要node支持
[root@host152 ~]# curl -sL https://rpm.nodesource.com/setup_8.x | bash -
[root@host152 ~]# yum install -y nodejs
查看安装node和rpm
[root@host152 ~]# node -v
v8.17.0
[root@host152 ~]# npm -v
6.13.4
3.2安装grunt
由于head 插件的执行文件是有grunt 命令来执行的,所以这个命令必须安装,切换到head目录下,npm install需要package.json
[root@host152 ~]# npm install
若长时间卡死
[ .................] / fetchMetadata: sill pacote version manifest for engine.io-parser@1.2.4 fetched in 53249ms
可以修改yum源为淘宝源再重新安装
[root@host152 elasticsearch-head-master]# npm config set registry https://registry.npm.taobao.org
[root@host152 elasticsearch-head-master]# npm config get registry
https://registry.npm.taobao.org/
3.3修改Gruntfile.js,增加hostname:'*'属性

3.4修改app.js

3.5启动header访问
[hadoop@host152 elasticsearch-6.5.4]$grunt server &
访问header
4.安装kibana
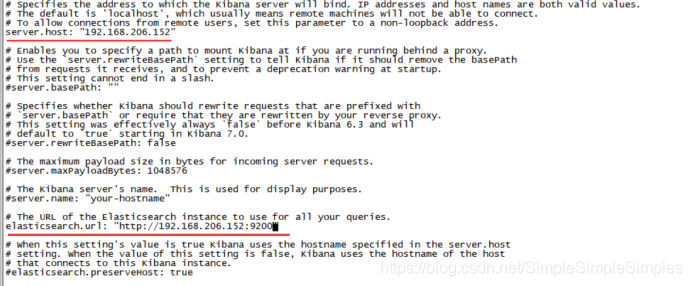
4.1解压修改配置文件kibana.yml
4.2启动kibana
[hadoop@host152 kibana-6.5.4-linux-x86_64]$ ./bin/kibana &
访问地址

5.ES集群设置密码
5.1访问es的_xpack的安全项security
地址:
http://192.168.206.152:9200/_xpack
返回:
{
"build": {
"hash": "d2ef93d",
"date": "2018-12-17T21:20:45.656445Z"
},
"license": {
"uid": "92423e2b-551b-4b2f-b916-43d9dca4f124",
"type": "basic",
"mode": "basic",
"status": "active"
},
"features": {
"graph": {
"description": "Graph Data Exploration for the Elastic Stack",
"available": false,
"enabled": true
},
"logstash": {
"description": "Logstash management component for X-Pack",
"available": false,
"enabled": true
},
"ml": {
"description": "Machine Learning for the Elastic Stack",
"available": false,
"enabled": true,
"native_code_info": {
"version": "6.5.4",
"build_hash": "b616085ef32393"
}
},
"monitoring": {
"description": "Monitoring for the Elastic Stack",
"available": true,
"enabled": true
},
"rollup": {
"description": "Time series pre-aggregation and rollup",
"available": true,
"enabled": true
},
"security": {
"description": "Security for the Elastic Stack",
"available": false,
"enabled": true
},
"watcher": {
"description": "Alerting, Notification and Automation for the Elastic Stack",
"available": false,
"enabled": true
}
},
"tagline": "You know, for X"
}
5.2修改es的elasticsearch.yml配置文件
xpack.security.enabled: true
xpack.ml.enabled: true
xpack.license.self_generated.type: trial
http.cors.allow-headers: Authorization,X-Requested-With,Content-Length,Content-Type
5.3任意主节点执行设置密码命令
[hadoop@host154 elasticsearch-6.5.4]$ ./bin/elasticsearch-setup-passwords interactive
报错如下:
Unexpected response code [403] from calling GET http://192.168.206.152:9200/_xpack/security/_authenticate?pretty
It doesn't look like the X-Pack security feature is available on this Elasticsearch node.
Please check if you have installed a license that allows access to X-Pack Security feature.
ERROR: X-Pack Security is not available
原因:
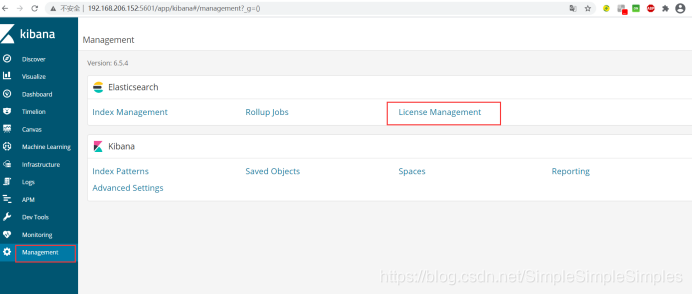
在es6.x中使用安全功能,需要在kibana中升级license。购买一个icense或申请一个30天的试用,在 Kibana 中访问 Management -> Elasticsearch -> License Management。选择试用。7.x版本中,es的安全核心功能免费使用。es7.x版本以默认安装好x-pack,修改配置激活即可。
从ES6.8&ES7.0开始,Security纳入x-pack的Basic版本中,免费使用一些基本的功能,X-Pack中的认证服务称为 Realms, Realms 有两种类型:
内置 Realms(免费)
File/Native 用户名密码保存在 ElasticSearch
外置 Realms (收费)
连接 LDAP / Active Directroy / PKI / SAML / Kerberos 进行统一认证
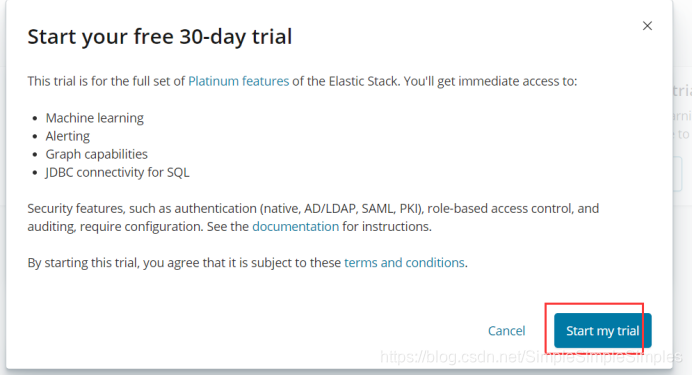
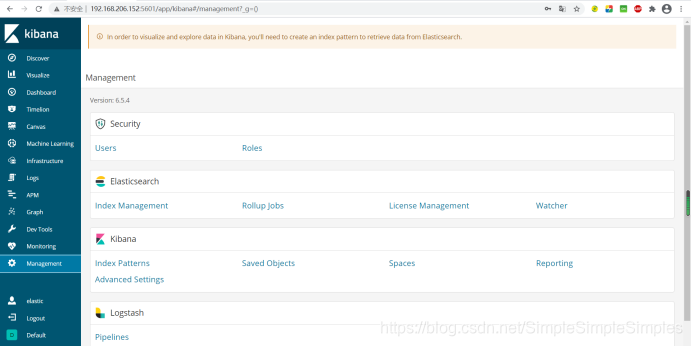
5.4使用kibana获取license
访问地址
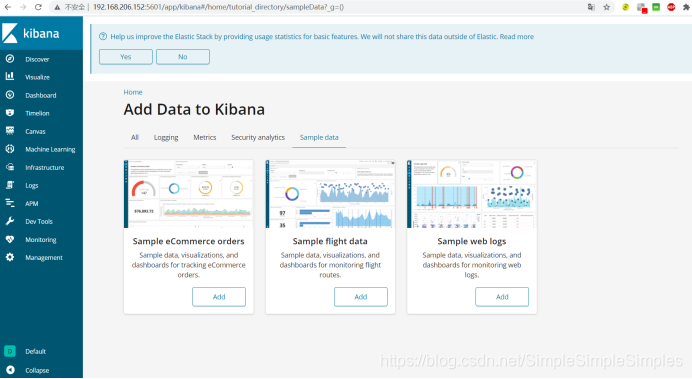
在 Kibana 中访问 Management -> Elasticsearch -> License Management,点击右侧的升级 License 按钮,可以免费试用 30 天的高级 License。

升级完成之后kibana页面会显示如下:

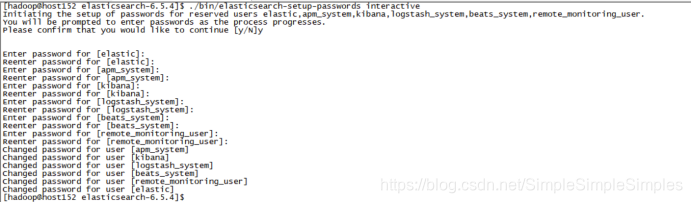
5.5获取license后重新设置密码
[hadoop@host152 elasticsearch-6.5.4]$ ./bin/elasticsearch-setup-passwords interactive
Unexpected response code [500] from calling GET http://192.168.206.152:9200/_xpack/security/_authenticate?pretty
It doesn't look like the X-Pack security feature is enabled on this Elasticsearch node.
Please check if you have enabled X-Pack security in your elasticsearch.yml configuration file.
ERROR: X-Pack Security is disabled by configuration.
原因:修改配置文件必须重启生效,重启es,再设置密码
[hadoop@host152 elasticsearch-6.5.4]$ ./bin/elasticsearch-setup-passwords interactive
Initiating the setup of passwords for reserved users elastic,apm_system,kibana,logstash_system,beats_system,remote_monitoring_user.
You will be prompted to enter passwords as the process progresses.
Please confirm that you would like to continue [y/N]y
6.设置密码后的访问
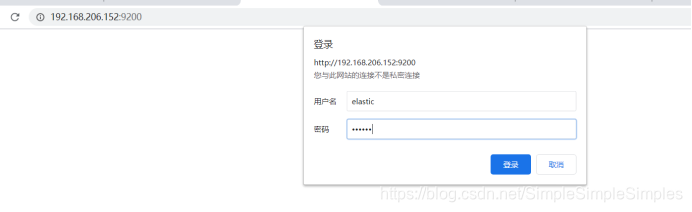
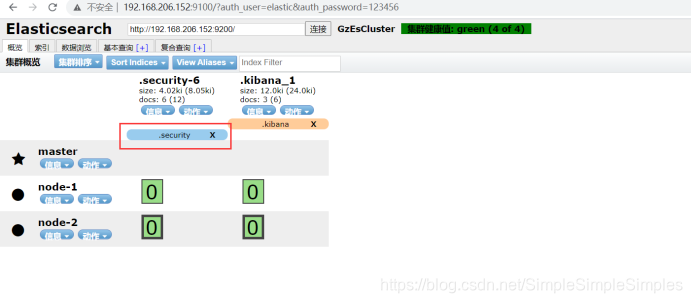
6.1集群信息访问
6.2header访问
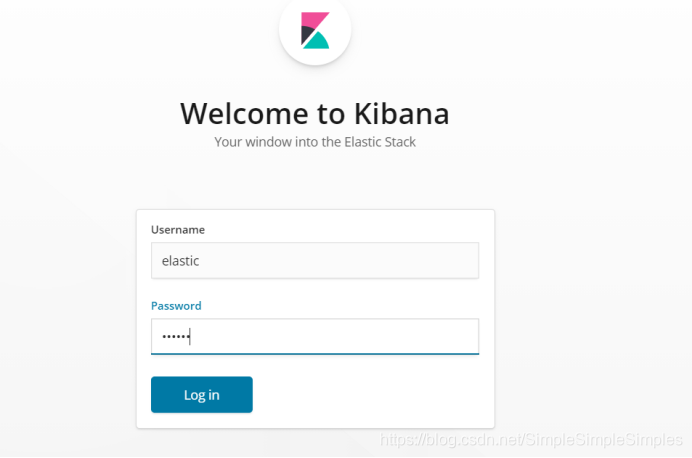
6.3kibana访问
修改配置文件 kibana.yml,设置用户名密码
elasticsearch.username: "elastic"
elasticsearch.password: "123456"
重启kibana
[hadoop@host152 kibana-6.5.4-linux-x86_64]$ netstat -apn|grep 5601
(Not all processes could be identified, non-owned process info
will not be shown, you would have to be root to see it all.)
tcp 0 0 192.168.206.152:5601 0.0.0.0:* LISTEN 5900/./bin/../node/
[hadoop@host152 kibana-6.5.4-linux-x86_64]$ kill -9 5900
[hadoop@host152 kibana-6.5.4-linux-x86_64]$ ./bin/kibana &
启动完成后访问
http://192.168.206.152:5601/
Ok,全剧终!!!


 1万+
1万+

 被折叠的 条评论
为什么被折叠?
被折叠的 条评论
为什么被折叠?
 到【灌水乐园】发言


