


第一组UI组件——以viewGroup为基类的布局管理器
Android的布局管理器本身就是一个UI组件,继承了View类,是ViewGroup的一个子类。
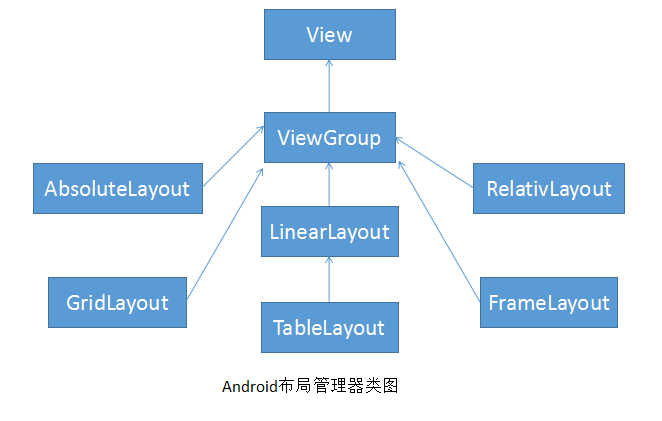
从图可以看出来,所有布局都可以作为容器类使用,因此可以调用多个重载的方法addView()向布局容器添加组件。
1.线性布局
线性布局即LinearLayout,能将容器的组件一个挨着一个排列起来,可以控制横向排列还是纵向排列。当然,线性布局不会换行,当组件一个挨着一个排列到头之后,剩下的组件不会被显示出来。
1.1LinearLayout常用XML属性及方法
| XML属性 | 相关方法 | 说明 |
|---|---|---|
| android:baselineAligned | setBaselineAligned(boolean) | 该属性值为fasle,将会阻止该布局管理器与它的子元素的基线对齐 |
| android:divider | setDividerDrawable(Drawable) | 设置垂直布局时两个按钮之间的分隔条 |
| android:gravity | setGravity(int) | 设置布局管理器内组件的对其方式 |
| android:orientation | setOrientation(int) | 设置布局管理器内组件的排列方式 |
备注:
android:gravity——该属性值支持top、left、right、center_vertical、fill_vertivla、center_horizontal、fill_horizontal、fill,clip_vertical、clip_horizontal几个属性值。也可以同时制定多种对齐方式的组合,例如:left|center_vertical代表出现在屏幕的左边而且垂直居中
android:orientation——属性可以设置为horizontal(水平排列)、vertical(垂直排列)
1.2LinearLayout子组件支持的XML属性及方法
| XML属性 | 相关方法 | 说明 |
|---|---|---|
| android:layout_gravity | 设置该元素在LinearLayout中的对齐方式 | |
| android:layout_weight | 设置该元素在LinearLayout中所占的权重 |
1.3线性布局实例
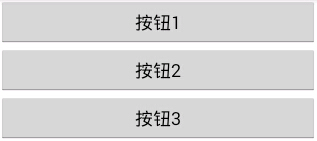
<?xml version="1.0" encoding="utf-8"?>
<LinearLayout xmlns:android="http://schemas.android.com/apk/res/android"
    android:layout_width="match_parent"
    android:layout_height="match_parent"
    android:orientation="vertical" >

<Button
    android:layout_width="match_parent"
    android:layout_height="wrap_content"
    android:text="按钮1"
    />

<Button
    android:layout_width="match_parent"
    android:layout_height="wrap_content"
    android:text="按钮2"
    />
<Button
    android:layout_width="match_parent"
    android:layout_height="wrap_content"
    android:text="按钮3"
    />
<Button
    android:layout_width="match_parent"
    android:layout_height="wrap_content"
    android:text="按钮4"
    />
</LinearLayout>
2.表格布局
表格布局继承了线性布局,所以本质上还是线性布局。TableLayout不需要明确的说出有多少行多少列,而是通过添加TableRow、其他组件来控制行数和列数。
每次向TableLayout添加一个TableRow,即添加一行,TableRow也是容器,可以在里面添加其他组件,每添加一个组件该表格就增加一列。如果直接在TableLayout中添加组件,这个组件就直接占一行。
2.1TableLayout常用的XML属性及相关方法
| XML属性 | 相关方法 | 说明 |
|---|---|---|
| android:collapsColumns | setColumnCollapsd(int,boolean) | 设置需要被隐藏的列的序号,多个序号之间用逗号隔开 |
| android:shrinkColumns | setColumnCollapsd(int,boolean) | 设置需要被收缩的列的序号,多个序号之间用逗号隔开 |
| android:stretchColumns | setColumnCollapsd(int,boolean) | 设置需要被拉伸的列的序号,多个序号之间用逗号隔开 |
2.2表格布局实例

<?xml version="1.0" encoding="utf-8"?>
<LinearLayout xmlns:android="http://schemas.android.com/apk/res/android"
    android:orientation="vertical"
    android:layout_width="match_parent"
    android:layout_height="match_parent">
    <!--定义表格文件,指定第二例允许收缩,,第三列循序拉伸-->
    <TableLayout
        android:layout_width="match_parent"
        android:layout_height="wrap_content"
        android:shrinkColumns="1"
        android:stretchColumns="2">
        <Button
            android:layout_width="wrap_content"
            android:layout_height="wrap_content"
            android:text="占一行的按钮"/>

        <TableRow>
            <Button
                android:layout_width="wrap_content"
                android:layout_height="wrap_content"
                android:text="普通按钮"/>
            <Button
                android:layout_width="wrap_content"
                android:layout_height="wrap_content"
                android:text="收缩的按钮"/>
            <Button
                android:layout_width="wrap_content"
                android:layout_height="wrap_content"
                android:text="拉伸的按钮"/>
        </TableRow>
    </TableLayout>
    <!--定义第二个表格文件,制定第二列隐藏-->
    <TableLayout
        android:layout_width="match_parent"
        android:layout_height="wrap_content"
        android:collapseColumns="1">
        <Button
            android:layout_width="wrap_content"
            android:layout_height="wrap_content"
            android:text="占一行的按钮"/>
        <TableRow>
            <Button
                android:layout_width="wrap_content"
                android:layout_height="wrap_content"
                android:text="普通的按钮1"/> <Button
            android:layout_width="wrap_content"
            android:layout_height="wrap_content"
            android:text="隐藏的按钮2"/> <Button
            android:layout_width="wrap_content"
            android:layout_height="wrap_content"
            android:text="普通的按钮3"/>
        </TableRow>

    </TableLayout>
    <!--定义第三个表格文件,指定第二列和第三列可以被拉伸-->
    <TableLayout
        android:layout_width="match_parent"
        android:layout_height="wrap_content"
        android:stretchColumns="1,2">
        <Button
            android:layout_width="wrap_content"
            android:layout_height="wrap_content"
            android:text="占一行的按钮"/>
        <TableRow>
            <Button
                android:layout_width="wrap_content"
                android:layout_height="wrap_content"
                android:text="普通的按钮"/>
            <Button
                android:layout_width="wrap_content"
                android:layout_height="wrap_content"
                android:text="拉伸的按钮"/>
            <Button
                android:layout_width="wrap_content"
                android:layout_height="wrap_content"
                android:text="拉伸的按钮"/>
        </TableRow>
        <TableRow>
            <Button
                android:layout_width="wrap_content"
                android:layout_height="wrap_content"
                android:text="普通的按钮"/>
            <Button
                android:layout_width="wrap_content"
                android:layout_height="wrap_content"
                android:text="拉伸的按钮"/>
        </TableRow>
    </TableLayout>
</LinearLayout>
3.相对布局
相对布局(RelativeLayout)中,所有组件的位置总是相对兄弟组件、容器来决定。
3.1RelativeLayout常用XML属性及方法
| XML属性 | 相关方法 | 说明 |
|---|---|---|
| android:gravity | setGravity(int) | 设置布局容器内子组件的对其方式 |
| android:ignoreGravity | setIgnoreGravity(int) | 设置哪个组件不受gravity属性的影响 |
3.2RelativeLayout子组件支持的XML属性及方法
| XML属性 | 说明 |
|---|---|
| android:layout_centerHorizontal | 控制该子组件是否位于布局容器的水平居中 |
| android:layout_centerVertical | 控制该子组件是否位于布局容器的垂直居中 |
| android:layout_centerInParent | 控制该子组件是否位于布局容器的中央位置 |
| android:layout_alignParentBottom | 控制该子组件是否与布局容器的底端对齐 |
| android:layout_alignParentLeft | 控制该子组件是否与布局容器的左端对齐 |
| android:layout_alignParentRight | 控制该子组件是否与布局容器的右端对齐 |
| android:layout_alignParentTop | 控制该子组件是否与布局容器的顶端对齐 |
| android:layout_toRightOf | 控制该子组件位于给出ID组件的右侧 |
| android:layout_toLeftOf | 控制该子组件位于给出ID组件的左侧 |
| android:layout_above | 控制该子组件位于给出ID组件的上方 |
| android:layout_below | 控制该子组件位于给出ID组件的下方 |
| android:layout_alignTop | 控制该子组件位于给出ID组件的上边界对齐 |
| android:layout_alignBottom | 控制该子组件位于给出ID组件的下边界对齐 |
| android:layout_alignLeft | 控制该子组件位于给出ID组件的左边界对齐 |
| android:layout_alignRight | 控制该子组件位于给出ID组件的右边界对齐 |
3.3相对布局实例
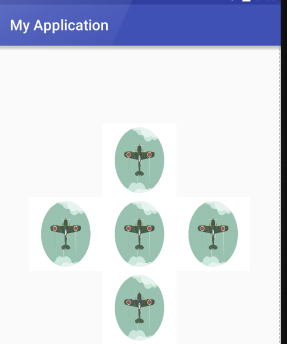
<?xml version="1.0" encoding="utf-8"?>
<RelativeLayout xmlns:android="http://schemas.android.com/apk/res/android"
    android:layout_width="match_parent"
    android:layout_height="match_parent">
<TextView
    android:layout_width="100dp"
    android:layout_height="100dp"
    android:id="@+id/view01"
    android:background="@drawable/feiji"
    android:layout_centerInParent="true"/>
    <TextView
        android:layout_width="100dp"
        android:layout_height="100dp"
        android:id="@+id/view02"
        android:background="@drawable/feiji"
        android:layout_above="@id/view01"
        android:layout_alignLeft="@id/view01"/>
    <TextView
        android:layout_width="100dp"
        android:layout_height="100dp"
        android:id="@+id/view03"
        android:background="@drawable/feiji"
        android:layout_below="@id/view01"
        android:layout_alignLeft="@id/view01"/>
    <TextView
        android:layout_width="100dp"
        android:layout_height="100dp"
        android:id="@+id/view04"
        android:background="@drawable/feiji"
        android:layout_toLeftOf="@id/view01"
        android:layout_alignBottom="@id/view01"/>
    <TextView
        android:layout_width="100dp"
        android:layout_height="100dp"
        android:id="@+id/view05"
        android:background="@drawable/feiji"
        android:layout_toRightOf="@id/view01"
        android:layout_alignTop="@id/view01"/>
</RelativeLayout>
4.帧布局
帧布局(FrameLayout)中,为每个加入其中的组件创建一个空白的区域(称为一帧),每个子组件占一帧,这些帧会根据gravity属性自动对齐。帧布局中,每个组件是一个个的叠加在一起的。
4.1FrameLayout常用的属性及方法
| XML属性 | 相关方法 | 说明 |
|---|---|---|
| android:foreground | setForeGround(Drawable) | 设置该帧布局的前景图 |
| android:foregroundGravity | setForeGroundGravity(int) | 设置前景图的gravity属性 |
4.2帧布局实例
<?xml version="1.0" encoding="utf-8"?>
<FrameLayout xmlns:android="http://schemas.android.com/apk/res/android"
    android:layout_width="match_parent"
    android:layout_height="match_parent">
<TextView
    android:id="@+id/view1"
    android:layout_width="wrap_content"
    android:layout_height="wrap_content"
    android:layout_gravity="center"
    android:width="320dp"
    android:height="320dp"
    android:background="#f00"
    />
    <TextView
        android:id="@+id/view2"
        android:layout_width="wrap_content"
        android:layout_height="wrap_content"
        android:layout_gravity="center"
        android:width="280dp"
        android:height="280dp"
        android:background="#0f0"
        />
    <TextView
        android:id="@+id/view3"
        android:layout_width="wrap_content"
        android:layout_height="wrap_content"
        android:layout_gravity="center"
        android:width="240dp"
        android:height="240dp"
        android:background="#00f"
        />
    <TextView
        android:id="@+id/view4"
        android:layout_width="wrap_content"
        android:layout_height="wrap_content"
        android:layout_gravity="center"
        android:width="200dp"
        android:height="200dp"
        android:background="#ff0"
        />
    <TextView
        android:id="@+id/view5"
        android:layout_width="wrap_content"
        android:layout_height="wrap_content"
        android:layout_gravity="center"
        android:width="160dp"
        android:height="160dp"
        android:background="#f0f"
        />
    <TextView
        android:id="@+id/view6"
        android:layout_width="wrap_content"
        android:layout_height="wrap_content"
        android:layout_gravity="center"
        android:width="120dp"
        android:height="120dp"
        android:background="#0ff"
        />
</FrameLayout>
5.网格布局
网格布局(GridLayout)是Android4.0后新增的布局管理器,类似于HTML里面的table标签,他可以把整个布局划分n*m的网格。也可以设置一个组件横跨多少行多少列。
5.1FrameLayout常用的属性及方法
| XML属性 | 相关方法 | 说明 |
|---|---|---|
| android:alignmentMode | setAlignmentMode(int) | 设置该布局管理器采用的对齐模式 |
| android:columnCount | setColumnCount(int) | 设置该网格的列数 |
| android:columnOderPreserved | setColumnOderPreserved(boolean) | 设置该网格容器是否保留列序号 |
| android:rowCount | setRowCount(int) | 设置该网格的行数 |
| android:rowOderPreserved | setRowOderPreserved(boolean) | 设置该网格容器是否保留行序号 |
| android:useDefaultMargins | setUseDefaultMargins(boolean) | 设置该网格布局是否使用默认的页边距 |
5.2GridLayout子组件支持的XML属性及方法
| XML属性 | 相关方法 | 说明 |
|---|---|---|
| android:layout_column | 设置该子组件在GridLayout的第几列 | |
| android:layout_columnSpan | 设置该子组件在GridLayout横向跨几列 | |
| android:layout_gravity | setGravity(int) | 设置该子组件以什么方式占据网格空间 |
| android:layout_row | 设置该子组件在GridLayout的第几行 | |
| android:layout_rowSpan | 设置该子组件在GridLayout纵向跨几行 |
5.3网格布局实例
6.绝对布局
绝对布局(AbsoluteLayout)在大多数不赞成使用,因为支持Android应用的手机千差万别,屏幕大小分辨率都不一样,使用绝对布局很难控制组件的位置。这里只做一个简单的介绍
layout_x:指定该组件的X坐标
layout_y:指定该组件的Y坐标


 1万+
1万+

 被折叠的 条评论
为什么被折叠?
被折叠的 条评论
为什么被折叠?
 到【灌水乐园】发言


