


监听:对某一些操作进行监视,那么就称为监听。
在WEB中的监听主要的功能是用于对ServletContext、Session、Request进行监听的一种操作。
监听器:
第三种Servlet程序称为监听Servlet,主要的功能是负责监听WEB的各种操作,当相关的事件触发之后,将产生事件,并对此事件进行处理,在WEB中可以对application、session、request三种操作进行监听。
1.对application进行监听
Application是ServletContext接口的对象,表示的是整个上下文的环境。
JSP程序中的getServletContext()代表的就是application对象。
如果要想实现对application监听则可以使用如下两个接口。
1):ServletContextListener:是对整个上下文环境的监控;
2):ServletContextAttributeListener:对属性的监听。
在整个WEB中,可以通过getServletContext()这个方法来表示application对象。
【一个简单的监听器】
package com.skewrain.demo5;
public class ServletContextListenerDemo implements ServletContextListener{
void contextInitialized(ServletContextEvent sce){
System.out.println("*** 容器初始化 --->" + event.getServletContext().getContextPath());
}
void contextDestroyed(ServletContextEvent sce){
System.out.println("*** 容器初始化 --->" + event.getServletContext().getContextPath());
}
}
配置此监听器的XML文件如下:
<listener>
<listener-class>
com.skewrain.demo5.ServletContextListenerDemo
</listener-class>
</listener>
只做了简单的输出。

编译语句:javac -d . *.java。
简单Servlet:<servlet>、<servlet-mapping>
过滤器:<filter>、<filter-mapping>
但是现在的监听器就省事了,直接编写<listener>即可。
如果现在一个web.xml文件之中包含简单Servlet、过滤器、监听器、则建议的编写配置的顺序为:
1):<filter>
2):<filter-mapping>
3):<listener>
4):<servlet>
5):<servlet-mapping>
只要是容器的启动和关闭,都要触发这些操作。
还可以实现ServletContextAttribute接口,此接口可以直接对属性监听。
【application_attribute_add.jsp】
<%@ page contentType="text/html" pageEncoding="GBK"%>
<html>
<head><title>www.baidu.com</title></head>
<body>
<%
this.getServletContext().setAttribute("info","www.baidu.com");
%>
</body>
</html>
【ServletContextAttributeListenerDemo.java内容如下:】
package com.skewrain.demo5;
import javax.servlet.*;
public class ServletContextAttributeListenerDemo implements ServletContextAttributeListener{
public void attributeAdded(ServletContextAttributeEvent scab){
System.out.println("*** 属性增加--->属性名称:"+scab.getName()+",属性内容:"+scab.getValue());
}
public void attributeRemoved(ServletContextAttributeEvent scab){
System.out.println("*** 删除属性--->属性名称:"+scab.getName()+",属性内容:"+scab.getValue());
}
public void attributeReplaced(ServletContextAttributeEvent scab){
System.out.println("*** 属性替换--->属性名称:"+scab.getName()+",属性内容:"+scab.getValue());
}
}
XML文件中配置此Servlet的内容如下:
<listener>
<listener-class>
com.skewrain.demo5.ServletContextAttributeListenerDemo
</listener-class>
</listener>
在浏览器中执行此JSP文件的输出如下:

【application_attribute_remove.jsp】
<%@ page contentType="text/html" pageEncoding="GBK"%>
<html>
<head><title>www.baidu.com</title></head>
<body>
<%
this.getServletContext().removeAttribute("info");
%>
</body>
</html>
监听器就是实现接口,覆写方法,实际上这个与SWING中的操作都是非常类似的。
2.对session监听
在监听器中,针对于session的监听操作提供了三个接口:
1):HttpSessionListener
2):HttpSessionAttributeListener
3):HttpSessionBindingListener
Session属于HTTP协议的范畴,所以这些接口肯定在javax.servlet.http包中定义的。
在Servlet中如果要想取得session依靠HttpServletRequest接口中的getSession()方法。
在讲解内置对象的时候一直强调,当客户端第一次连接到服务器上的时候,服务器将会自动为用户创建一个新的session,同时会分配一个新的session id。
【HttpSessionListenerDemo.java的内容如下:】
package com.skewrain.demo5;
import javax.servlet.http.*;
public class HttpSessionListenerDemo implements HttpSessionListener{
public void sessionCreated(HttpSessionEvent se){
System.out.println("*** SESSION创建,SESSION ID = " + se.getSession().getId());
}
public void sessionDestroyed(HttpSessionEvent se){
System.out.println("*** SESSION销毁,SESSION ID = " + se.getSession().getId());
}
}
配置的XML文件如下:
<listener>
<listener-class>
com.skewrain.demo5.HttpSessionListenerDemo
</listener-class>
</listener>
我们任意打开一个JSP 文件后的结果如下所示:

现在的Session已经被创建,在第一次访问的时候触发了事件,可是还有一点,什么时候销毁呢?
如果现在要想让一个session销毁的话,有两种方法,但是这两种方法并不是直接关闭页面就可以实现的:
1):session注销:invalidate()
2):超时时间到了,在TOMCAT中一般的超时时间是30分钟。
Tomcat的安装目录下的web.xml文件中有如下配置:
<session-config>
<session-timeout>30</session-timeout>
</session-config>
【手工销毁一个Session的方法】
<%@ page contentType = "text/html" pageEncoding="GBK"%>
<html>
<head><title>www.baidu.com</title></head>
<body>
<% //手工注销
session.invalidate();
%>
</body>
</html>
之前一直强调,当调用invalidate()方法的时候就意味着session的内容将被清空。
不过一般的销毁时间都是设置在30分钟或者更长的时间,如果时间保存的长也就意味着占用的空间的时间就长。
还可以对session的属性监听。
【HttpSessionAttributeListenerDemo.java】
package com.skewrain.demo5;
import javax.servlet.http.*;
public class HttpSessionAttributeListenerDemo implements HttpSessionAttributeListener{
public void attributeAdded(HttpSessionBindingEvent se){
System.out.println(se.getSession().getId() + ",增加属性 ---> 属性名称" + se.getName() + ",属 性内容:" + se.getValue());
}
public void attributeRemoved(HttpSessionBindingEvent se){
System.out.println(se.getSession().getId() + ",删除属性 ---> 属性名称" + se.getName() + ",属性内容:" + se.getValue());
}
public void attributeReplaced(HttpSessionBindingEvent se){
System.out.println(se.getSession().getId() + ",替换属性 ---> 属性名称" + se.getName() + ",属性内容:" + se.getValue());
}
}
XML文件的配置如下:
<listener>
<listener-class>
com.skewrain.demo5.HttpSessionAttributeListenerDemo
</listener-class>
</listener>
【session_attribute_add.jsp】
<%@ page contentType="text/html" pageEncoding="GBK"%>
<html>
<head><title>www.baidu.com</title></head>
<body>
<%
session.setAttribute("info","www.baidu.com");
%>
</body>
</html>
在浏览器中执行此JSP的结果如下:

要删除属性,只用将上面的JSP中的“session.setAttribute("info","www.baidu.com");”换为:session.removeAttribute(“info”);即可。
到此为止的操作都与ServletContext非常的类似,但是在之前所讲解的全部监听中都要求对web.xml文件进行配置,在session的监听器里面有一个HttpSessionBingListener,它也是一个实现监听的接口,但是这个接口的监听不用配置,直接使用。
【LoginUser.java的内容如下所示:】
package com.skewrain.demo5;
import javax.servlet.http.*;
public class LoginUser implements HttpSessionBindingListener{
private String name;
public LoginUser(String name){
this.setName(name);
}
public void valueBound(HttpSessionBindingEvent event){
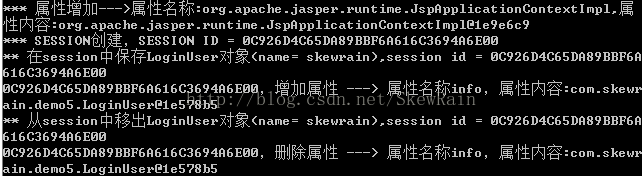
System.out.println("** 在session中保存LoginUser对 象(name= " + this.getName() + "),session id = " + event.getSession().getId());
}
public void valueUnbound(HttpSessionBindingEvent event){
System.out.println("** 从session中移出LoginUser对 象(name= " + this.getName() + "),session id = " + event.getSession().getId());
}
public String getName(){
return this.name;
}
public void setName(String name){
this.name = name;
}
}
此处就不需要任何的配置文件的支持。
【session_bound.jsp】
<%@ page contentType="text/html" pageEncoding="GBK"%>
<%@ page import="com.skewrain.demo5*"%>
<html>
<head><title>www.baidu.com</title></head>
<body>
<%
LoginUser user = new LoginUser("skewrain");
session.setAttribute("info",user); //直接保存LoginUser对象
%>
</body>
</html>
由于此处需要手工绑定,所以才不需要做任何额外的配置。

【session_unbound.jsp】
<%@ page contentType="text/html" pageEncoding="GBK"%>
<%@ page import="com.skewrain.demo5.*"%>
<html>
<head><title>www.baidu.com</title></head>
<body>
<%
session.removeAttribute("info"); //直接保存LoginUser对象
%>
</body>
</html>
执行此JSP的结果如下所示:
3.对request监听
在Servlet2.4之后增加了对request操作的监听,主要使用ServletRequestListener、ServletRequestAttributeListener两个接口。
【ServletRequestListenerDemo.java的内容如下】
package com.skewrain.demo6;
import javax.servlet.http.*;
public class ServletRequestListenerDemo implements ServletRequestListener{
public void requestInitialized(ServletRequestEvent sre){
System.out.println("** request初始化。http://" + sre.getServletRequest().getRemoteAddr() + sre.getServletContext().getContectPath());
}
public void requestDestroyed(ServletRequestEvent sre){
System.out.println("** request销 毁。http://" + sre.getServletRequest().getRemoteAddr() + sre.getServletContext().getContectPath());
}
}
【配置web.xml文件】
/* <listener>
<listener-class>
com.skewrain.demo6.ServletRequestListenerDemo
</listener-class>
</listener>
*/
对属性的监听依然包含增加属性、删除属性、替换属性的操作。
【ServletRequestAttributeListenerDemo.java的内容如下】
package com.skewrain.demo7;
import javax.servlet.*;
public class ServletRequestAttributeListenerDemo implements ServletRequestAttributeListener{
public void attributeAdded(ServletRequestAttributeEvent srae){
System.out.println("** 增加request属性 -->属性名称:" + srae.getName() + ",属性内容:" + srae.getValue());
}
public void attributeRemoved(ServletRequestAttributeEvent srae){
System.out.println("** 删除request属性 -->属性名称:" + srae.getName() + ",属性内容:" + srae.getValue());
}
public void attributeReplaced(ServletRequestAttributeEvent srae){
System.out.println("** 替换request属性 -->属性名称:" + srae.getName() + ",属性内容:" + srae.getValue());
}
}
/* <listener>
<listener-class>
com.skewrain.demo7.ServletRequestAttributeListenerDemo
</listener-class>
</listener>
*/
【request_attribute_add.jsp的内容如下】
<%@ page contentType="text/html" pageEncoding="GBK"%>
<%@ page import="com.skewrain.demo7.*"%>
<html>
<head><title>www.baidu.com</title></head>
<body>
<%
request.setAttribute("info","www.baidu.com");
%>
</body>
</html>
在浏览器中打开后,在tomcat终端的显示如下:

从实际来讲,对request范围的监听操作并不是很常见的,用的最多的还是ServletContext、HttpSession监听。
【监听器的实例】
经常会在各个站点上看见一些在线人员的列表操作,实际上此操作就可以通过监听完成。
监听器实例—在线人员统计
在线人员列表是一个较为常见的功能,每当用户登录成功之后,就会在列表中增加此用户名称,这样就可以知道当前在线的用户有哪些了,这个功能在WEB中只能靠监听器实现。
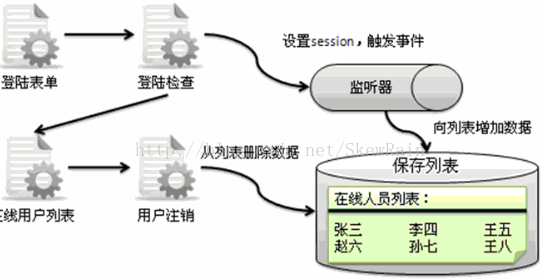
在整个的操作中,需要使用以下几个接口:
1):所有的人员列表应该使用集合保存,但是这个集合所有的用户都可以看见,而且以后也要操作,那么证明在整个监听中必然要有一个application对象保存。
2):用户登录成功,增加属性,肯定要在属性监听接口中使用。
3):当用户离开之后,如果超时时间已到,应该将用户从列表中删除。
【OnlineUserList.java的内容】
package com.skewrain.demo7;
import java.util.*;
import javax.servlet.*;
import javax.servlet.http.*;
public class OnlineUserList implements ServletContextListener,HttpSessionAttributeListener,HttpSessionListener {
private ServletContext app = null;
public void contextInitialized(ServletContextEvent sce){
this.app = sce.getServletContext();
this.app.setAttribute("online",new TreeSet());
}
public void contextDestroyed(ServletContextEvent sce){
}
public void attributeAdded(HttpSessionBindingEvent se){
Set all = (Set) this.app.getAttribute("online");
all.add(se.getValue());
this.app.setAttribute("online",all);
}
public void attributeRemoved(HttpSessionBindingEvent se){
Set all = (Set)this.app.getAttribute("online");
all.remove(se.getSession().getAttribute("userid"));
this.app.setAttribute("online",all);
}
public void attributeReplaced(HttpSessionBindingEvent se){
}
public void sessionCreated(HttpSessionEvent se){
}
public void sessionDestroyed(HttpSessionEvent se){
Set all = (Set)this.app.getAttribute("online");
all.remove(se.getSession().getAttribute("userid"));
this.app.setAttribute("online",all);
}
}
/* <listener>
<listener-class>
com.skewrain.demo7.OnlineUserList
</listener-class>
</listener>
<session-config>
<session-timeout>1</session-timeout>
</session-config>
*/
【login.jsp的内容如下】
<%@ page contentType="text/html" pageEncoding="GBK"%>
<html>
<head><title>www.baidu.com</title></head>
<body>
<form action="login.jsp" method="post">
用户ID:<input type="text" name="userid">
<input type="submit" value="登录">
</form>
<%
String userid = request.getParameter("userid");
if(!(userid==null) || "".equals(userid)){
session.setAttribute("userid",userid);
response.sendRedirect("list.jsp");
}
%>
</body>
</html>
【list.jsp的内容如下】
<%@ page contentType="text/html" pageEncoding="GBK"%>
<%@ page import="java.util.*"%>
<html>
<head><title>www.baidu.com</title></head>
<body>
<%
Set all = (Set) this.getServletContext().getAttribute("online");
Iterator iter = all.iterator();
while(iter.hasNext()){
%>
<h3><%=iter.next()%></h3>
<%
}
%>
</body>
</html>
【在web-xml中配置的超时时间为1分钟】
<session-config>
<session-timeout>1</session-timeout>
</session-config>
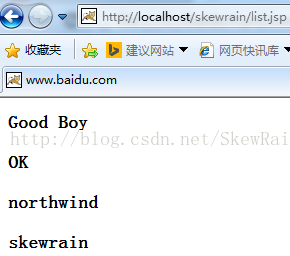
开启多个浏览器窗口,分别输入四个字符串后提交,在浏览器中运行的结果如下:
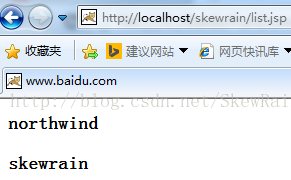
一分钟到了之后,刷新页面的内容如下:
小结:
1):使用监听器可以对application、session、request的属性范围进行监听。
2):在WEB中可以配置每一个session的超时时间。


 1142
1142

 被折叠的 条评论
为什么被折叠?
被折叠的 条评论
为什么被折叠?
 到【灌水乐园】发言


