


安裝Apache
yum install httpd
配置
配置文件:/etc/httpd/conf/httpd.conf
默認訪問目錄:/var/www/html
1) 修改默認路徑:
DocumentRoot "/u/wwww/"
# Relax access to content within /var/www.
<Directory "/u/wwww">
    AllowOverride None
# Allow open access:
    Require all granted
</Directory>
2) 可按需修改端口:
Listen 80 改為其他端口
3) 修改selinux:
vim /etc/selinux/config SELINUX=disabled
或者
setenforce 0
4) 注意訪問目錄的權限
5) 在web目錄中可通過添加文件夾設置多站點:
在web目錄中放入maven 文件夾+ maven.conf文件
訪問/data/tools/maven/repository
Alias /maven "/data/tools/maven/repository"
<Directory "/data/tools/maven/repository">
  Options +Indexes +FollowSymLinks
  Require all granted
</Directory>
<Location /maven>
  SetHandler None
</Location>
+Indexes表示顯示目錄
6) 通过软件链接直接引用网站根目录以外的内容
[root@xuegod63 html]#mkdir /web2
[root@xuegod63 html]#echo "welcome to the test1" > /web2/b.html
[root@xuegod63 html]#ln -s /web2 /var/www/html/web2       #ln创建软连接,s指原目标
[root@xuegod63 html]#vim /etc/httpd/conf/httpd.conf

<Directory "/var/www/html/web2">
    Options Indexes FollowSymLinks    #默认开启
</Directory>
訪問HTTP://IP:Port/web2即可
7) 通过用户认证的方式
方法一:
vim /etc/httpd/conf/httpd.conf #在需要使用用户验证的目录的相关Directory段落添加以下红色标记内容:
<Directory "/usr/local/phpmyadmin/">
    Options Indexes FollowSymLinks
    AllowOverride None
    Order deny,allow
    Allow from all
    authtype basic
    authname "MySQL admin software......."
    authuserfile /etc/httpd/conf/passwd.secret
    require user tom
    require valid-user`
</Directory>
参数说明:
authtype basic指定认证类型为:basic
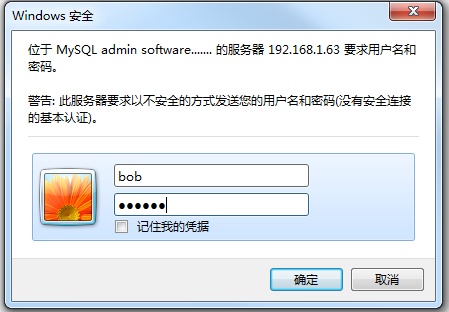
authname "MySQL admin software.......
AuthName命令:指定认证区域名称。区域名称是在提示要求认证的对话框中显示给用户的。如图:

authuserfile /etc/httpd/conf/passwd.secret #AuthUserFile命令:指定一个包含用户名和密码的文本文件,每行一对。
require命令:指定哪些用户才能被授权访问。如:
require tom(只有用户tom可以访问)
require valid-user (在AuthUserFile指定的文件中任何用户都可以访问)
利用Apache附带的程序htpasswd,生成包含用户名和密码的文本文
[root@xuegod63 conf]# htpasswd -cm /etc/httpd/conf/passwd.secret tom
New password:123456
Re-type new password:123456
Adding password for user tom
注释:这里记得把之前写的“禁止显示目录列表”的‘-’给去掉。
方法二:
#vim httpd.conf #在需要使用用户验证的目录的相关Directory段落添加
Alias /phpmyadmin/ "/usr/local/phpmyadmin/"
<Directory "/usr/local/phpmyadmin/">
    Options Indexes FollowSymLinks
    AllowOverride None
    Order deny,allow
    Allow from all
    AllowOverride AuthConfig
</Directory>
AllowOverride AuthConfig一行表示允许对/usr/local/phpmyadmin/目录下的文件进行用户认证。
[root@xuegod63 conf]# vim /usr/local/phpmyadmin/.htaccess         #写入以下内容**
authtype basic
authname "MySQL admin software by .htaccess"
authuserfile /etc/httpd/conf/passwd.secret
require user tom
require valid-user
利用Apache附带的程序htpasswd,生成包含用户名和密码的文本文
[root@xuegod63 conf]# htpasswd -cm /etc/httpd/conf/passwd.secret tom
http://192.168.1.63/phpmyadmin/

8) 配置apache虚拟主机,实现在一台服务器上运行多个网站
apache虚拟主机实现有三种方法:
1、通过不同的IP地址
2、通过不同的域名
3、通过不同的端口号
首先:
[root@xuegod63 html]# vim /etc/httpd/conf/httpd.conf
添加Include /etc/httpd/conf/vhost.conf,修改默認目錄
然後新增一個vhost.conf文件
在裡面進行編輯
方法一:通过不同的IP地址,解析不同域名
- 請查看**
單網卡配置多IP.md**配置雙IP - 編輯vhost.conf文件配置不同IP
<VirtualHost IP1>
    ServerAdmin root@test.com
    DocumentRoot /u/web1/
    ServerName hzlh-cl.test.com
    ErrorlOg logs/hzlh-cl.test.com-error_log
    CustomLOg logs/hzlh-cl.test.com-access_log common
</Virtualhost>
<VirtualHost IP2>
    ServerAdmin root@test.com
    DocumentRoot /u/web2/
    ServerName hzlh-cl.test.com
    ErrorlOg logs/hzlh-cl.test.com-error_log
    CustomLOg logs/hzlh-cl.test.com-access_log common
</Virtualhost>
最後使用不同IP訪問即可
方法二:通过不同域名:
- 編輯/etc/hosts 添加IP 域名
- 編輯vhost.conf文件配置不同域名
<VirtualHost web1.test.com>
    ServerAdmin root@test.com
    DocumentRoot /u/web1/
    ServerName hzlh-cl.web1.test.com
    ErrorlOg logs/hzlh-cl.test.com-error_log
    CustomLOg logs/hzlh-cl.test.com-access_log common
</Virtualhost>
<VirtualHost web2.test.com>
    ServerAdmin root@test.com
    DocumentRoot /u/web2/
    ServerName hzlh-cl.web2.test.com
    ErrorlOg logs/hzlh-cl.test.com-error_log
    CustomLOg logs/hzlh-cl.test.com-access_log common
</Virtualhost>
方法三:基于端口配置虚拟主机:
-
編輯httpd.conf文件,添加Listen 81端口
-
編輯vhost.conf文件,配置不同IP對應不同端口
<VirtualHost IP1:80>
    ServerAdmin root@test.com
    DocumentRoot /u/web1/
    ServerName hzlh-cl.test.com
    ErrorlOg logs/hzlh-cl.test.com-error_log
    CustomLOg logs/hzlh-cl.test.com-access_log common
</Virtualhost>
<VirtualHost IP2:81>
    ServerAdmin root@test.com
    DocumentRoot /u/web2/
    ServerName hzlh-cl.test.com
    ErrorlOg logs/hzlh-cl.test.com-error_log
    CustomLOg logs/hzlh-cl.test.com-access_log common
</Virtualhost>


 被折叠的 条评论
为什么被折叠?
被折叠的 条评论
为什么被折叠?
 到【灌水乐园】发言


