


Docker网络
docker容器之间实现网络互联主要有--link和自定义网络(主要使用)两种方式。
–link
实现两个容器之间网络可以通过容器服务名称互通,而不仅仅是ip
docker run -d --link [需要通的容器名] [镜像]
自定义网络
通过自定义网络可以保证不同集群之间数据的隔离,保证数据的隔离。
网络模式
- bridge: 桥接模式(docker默认模式)
- none: 不配置网络
- host: 和宿主机共享网络
- container: 容器网络联通(局限较大)
网络创建
使用 docker network create 创建自己的网络。
# -d bridge 指定桥接模式
# --subnet 192.168.0.0/16 指定子网
# --gateway 192.168.0.1 指定网关
[root@localhost ~]# docker network create -d bridge --subnet 192.168.0.0/16 --gateway 192.168.0.1 mynet
b215aedcc3257b54ab1f72d581751c8224dc878c40159e558447ef9113404e60
# 查询网络列表
[root@localhost ~]# docker network ls
NETWORK ID     NAME          DRIVER    SCOPE
51e8a6b15ff7   bridge        bridge    local
d6a8cf22b5a6   host          host      local
b215aedcc325   mynet         bridge    local
7b2bb96fe66e   none          null      local
[root@localhost ~]# docker network inspect b215aedcc325
[
    {
        "Name": "mynet",
        "Id": "b215aedcc3257b54ab1f72d581751c8224dc878c40159e558447ef9113404e60",
        "Created": "2022-08-17T15:37:56.07625129+08:00",
        "Scope": "local",
        "Driver": "bridge",
        "EnableIPv6": false,
        "IPAM": {
            "Driver": "default",
            "Options": {},
            "Config": [
                {
                    "Subnet": "192.168.0.0/16",
                    "Gateway": "192.168.0.1"
                }
            ]
        },
        "Internal": false,
        "Attachable": false,
        "Ingress": false,
        "ConfigFrom": {
            "Network": ""
        },
        "ConfigOnly": false,
        "Containers": {},
        "Options": {},
        "Labels": {}
    }
]
容器在启动是默认使用的docker0的bridge网络,我们可以通过指定--net 网络名 来使用自己的网络
# 容器启动默认docker0,默认会有--net bridge
docker run -d -P --name tomcat02 --net bridge tomcat

# 通过--net指定网络
docker run -d -P --name tomcat-mynet-01 --net mynet tomcat
docker run -d -P --name tomcat-mynet-02 --net mynet tomcat

# 通过自定义网络启动的容器可以直接使用容器名实现网络互联
[root@localhost ~]# docker exec -it tomcat-mynet-02 ping tomcat-mynet-01
PING tomcat-mynet-01 (192.168.0.2): 56 data bytes
64 bytes from 192.168.0.2: icmp_seq=0 ttl=64 time=0.300 ms
64 bytes from 192.168.0.2: icmp_seq=1 ttl=64 time=0.104 ms
64 bytes from 192.168.0.2: icmp_seq=2 ttl=64 time=0.090 ms
网络连通
将容器与另一个网络下的容器进行网络连通,可以是从connect命令进行网络连通
docker network connect --help

Usage:  docker network connect [OPTIONS] NETWORK CONTAINER
Connect a container to a network
Options:
      --alias strings           Add network-scoped alias for the container
      --driver-opt strings      driver options for the network
      --ip string               IPv4 address (e.g., 172.30.100.104)
      --ip6 string              IPv6 address (e.g., 2001:db8::33)
      --link list               Add link to another container
      --link-local-ip strings   Add a link-local address for the container
redis集群搭建-- 3主3从模式
- 创建redis自己网络
docker network create -d bridge --subnet 172.16.0.0/16 --gateway 172.16.0.1 redis
- 脚本创建文件
for port in $(seq 1 6);\
do \
mkdir -p /mydata/redis/node-${port}/conf
touch /mydata/redis/node-${port}/conf/redis.conf
cat << EOF >/mydata/redis/node-${port}/conf/redis.conf
port 6379
bind 0.0.0.0
cluster-enabled yes
cluster-config-file nodes.conf
cluster-node-timeout 5000
cluster-announce-ip 172.16.0.1${port}
cluster-announce-port 6379
cluster-announce-bus-port 16379
appendonly yes
EOF
done
- 脚本启动容器服务
for port in $(seq 1 6);\
do \
docker run -p 637${port}:6379 -p 1637${port}:16379 --name redis-${port} \
-v /mydata/redis/node-${port}/data:/data \
-v /mydata/redis/node-${port}/conf/redis.conf:/etc/redis/redis.conf \
-d --net redis --ip 172.16.0.1${port} redis redis-server /etc/redis/redis.conf; \
done

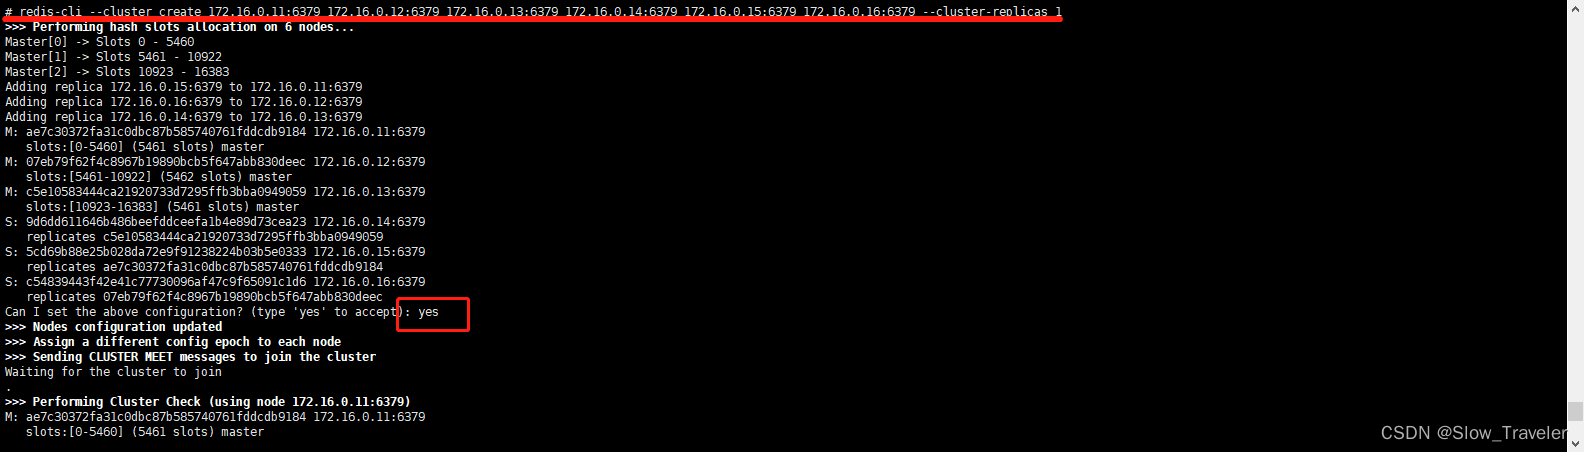
- 进入某个容器创建集群
# 进如容器
docker exec -it db0011d841ac /bin/sh

# 创建集群: 主从模式配置正确手动确认yes
redis-cli --cluster create 172.16.0.11:6379 172.16.0.12:6379 172.16.0.13:6379 172.16.0.14:6379 172.16.0.15:6379 172.16.0.16:6379 --cluster-replicas 1
docker 容器精简版异常问题解决方法
问题:ip addr命令无法使用
OCI runtime exec failed: exec failed: container_linux.go:380: starting container process caused: exec: “ip”: executable file not found in $PATH: unknown
解决方法:
# 进入配置文件
cd /etc/apt
# 查看目录信息
ls
cat sources.list
# 备份
mkdir cat sources.list.backup
cp sources.list ./sources.list.backup
cd ../
# 以覆盖+追加的方式替换掉sources.list文件
echo 'deb https://mirrors.aliyun.com/debian bullseye main'>sources.list
echo 'deb https://mirrors.aliyun.com/debian-security bullseye-security main'>>sources.list
echo 'deb https://mirrors.aliyun.com/debian bullseye-updates main'>>sources.list
# 执行一下更新命令:
apt-get update -y
# 执行下载 iproute2命令:
apt install -y iproute2
ping 命令无法使用
bash: ping: command not found
解决方法:apt工具异常参考上面
apt-get install inetutils-ping


 1017
1017


 被折叠的 条评论
为什么被折叠?
被折叠的 条评论
为什么被折叠?
 到【灌水乐园】发言


