Retrofit网络框架搭建

概述

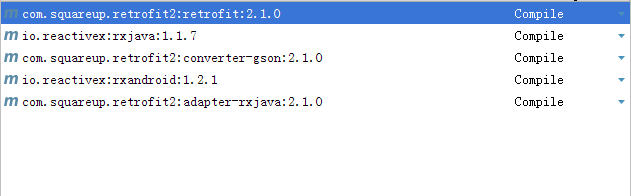
Retrofit与RxJava结合起来用的比较多,现在我们一起来搭建一个基于Retrofit和RxJava的框架,方便以后的使用,搭建框架以前我们需要引入相应的库引用地址,如下所示:
这里写图片描述

代码

假设我们的项目名称为APP,我们需要写三个文件,首先是配置Retrofit

public class AppRetrofit {
    private final Retrofit mRetrofit;
    private final AppApi appApi;

    public AppRetrofit(){
        //添加gson转换;
        mRetrofit = new Retrofit.Builder().baseUrl("http://www.weather.com.cn/")
                .addConverterFactory(GsonConverterFactory.create())
                .addCallAdapterFactory(RxJavaCallAdapterFactory.create())
                .build();
        appApi = mRetrofit.create(AppApi.class);
    }
    public AppApi getGankApiService(){
        return appApi;
    }
}

然后是我们请求的方法以及携带的参数,写在AppApi中

public interface AppApi {
    @GET("adat/sk/{cityId}.html")//注意参数名称必须一样 @Path表示将参数进行匹配,与{}结合使用
    Observable<WeatherInfo> getWeatherInfo(@Path("cityId") String cityId);
}

最后我们写一个单例来获取这个AppApi

public class AppFactory {
    private static Object monitor = new Object();
    private static AppApi sAppApi;
    public static AppApi getGankApi() {
        if (sAppApi == null) {
            synchronized (monitor) {
                if (sAppApi == null) {
                    sAppApi = new AppRetrofit().getGankApiService();
                }
            }
        }
        return sAppApi;
    }
}

经过上面的三个步骤,关于Retrofit和RxJava的框架已经搭建好了,下面我们尝试着去发一个请求。

public class MainActivity extends AppCompatActivity {
    private TextView textView;
    @Override
    protected void onCreate(Bundle savedInstanceState) {
        super.onCreate(savedInstanceState);
        setContentView(R.layout.activity_main);
        textView = (TextView) findViewById(R.id.textview);
        Observable<WeatherInfo> weatherInfo = AppFactory.getGankApi().getWeatherInfo("101010100");
        weatherInfo.subscribeOn(Schedulers.io()).observeOn(AndroidSchedulers.mainThread())
                .subscribe(new Action1<WeatherInfo>() {
                    @Override
                    public void call(WeatherInfo weatherInfo) {
                        textView.setText(weatherInfo.toString());
                    }
                });
    }
}

代码很简单,我们先获取了一个AppApi的单例对象,然后调用方法发起了请求,运行效果如下
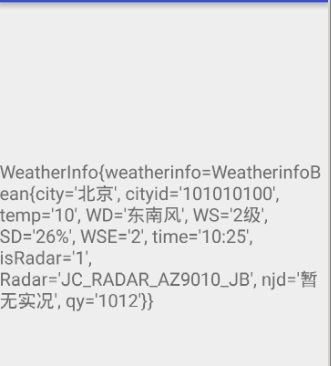
这里写图片描述

可以看到,请求成功了。

  • 0
    点赞
  • 1
    收藏
    觉得还不错? 一键收藏
  • 0
    评论
Kotlin是一种基于JVM的静态类型编程语言,可以与Java无缝地进行交互。Retrofit是一个用于构建网络请求框架的库,结合使用Kotlin和Retrofit可以更加高效地开发网络应用。 使用Kotlin和Retrofit搭建网络框架的步骤包括: 1. 添加依赖:首先需要在项目中添加Kotlin和Retrofit的依赖。在项目的build.gradle文件中,添加以下依赖: ```kotlin implementation 'org.jetbrains.kotlin:kotlin-stdlib:1.x.x' // Kotlin标准库依赖 implementation 'com.squareup.retrofit2:retrofit:2.x.x' // Retrofit依赖 ``` 2. 创建API接口:使用Kotlin创建一个包含网络请求接口方法的API接口。在这里可以定义各种需要的请求方式(GET、POST等),以及请求参数和返回数据的定义。例如: ```kotlin interface ApiService { @GET("path/to/api") suspend fun getData(): Response<Data> } ``` 3. 创建Retrofit实例:使用Retrofit的Builder模式创建一个Retrofit实例,并进行必要的配置,如baseUrl、Gson解析器等。例如: ```kotlin val retrofit = Retrofit.Builder() .baseUrl("https://api.example.com/") .addConverterFactory(GsonConverterFactory.create()) .build() ``` 4. 创建API服务实例:使用刚才创建的Retrofit实例,调用create()方法创建一个API服务实例。例如: ```kotlin val apiService = retrofit.create(ApiService::class.java) ``` 5. 发起网络请求:使用API服务实例来发起网络请求,可以通过调用接口方法来发起对应的网络请求。例如: ```kotlin CoroutineScope(Dispatchers.IO).launch { try { val response = apiService.getData() if (response.isSuccessful) { val data = response.body() // 在这里处理返回的数据 } else { // 网络请求失败 } } catch (e: Exception) { // 发生异常 } } ``` 通过以上步骤,我们就可以使用Kotlin和Retrofit搭建一个简单的网络框架,实现网络请求的发送和数据的解析。Kotlin的语法简洁且易于理解,Retrofit提供了方便的API接口定义和网络请求的封装,这让我们能够更加高效地进行网络开发。
评论
添加红包

请填写红包祝福语或标题

红包个数最小为10个

红包金额最低5元

当前余额3.43前往充值 >
需支付:10.00
成就一亿技术人!
领取后你会自动成为博主和红包主的粉丝 规则
hope_wisdom
发出的红包
实付
使用余额支付
点击重新获取
扫码支付
钱包余额 0

抵扣说明:

1.余额是钱包充值的虚拟货币,按照1:1的比例进行支付金额的抵扣。
2.余额无法直接购买下载,可以购买VIP、付费专栏及课程。

余额充值