


使用roles安装lnmp
nginx
1、准备四台主机
192.168.142.10
192.168.142.20
192.168.142.30
192.168.142.40
2、10作为ansible管理端
首先ssh连接剩下三台主机
3、vim/etc/ansible/hosts
添加[nginxservers]配置nginx ip,[phpservers]php ip,[mysqlservers]mysql ip
4、cd /etc/ansible
mkdir roles/{nginx,php,mysql}
mkdir -p roles/nginx/{tasks,vars,files,templates,handlers,defaults,meta}
mkdir -p roles/php/{tasks,vars,files,templates,handlers,defaults,meta}
mkdir -p roles/mysql/{tasks,vars,files,templates,handlers,defaults,meta}
touch roles/nginx/{tasks,vars,handlers,defaults,meta}/main.yml
touch roles/php/{tasks,vars,handlers,defaults,meta}/main.yml
touch roles/mysql/{tasks,vars,handlers,defaults,meta}/main.yml
5、准备nginx配置模板文件,需要在管理端下载nginx、php、mysql。
cp /etc/nginx/conf.d/default.conf /etc/nginx/conf.d/default.conf.j2
mv default.conf.j2 /etc/ansible/roles/nginx/templates/
6、在模板文件中修改j2模板文件
listen {{http_port}};
server_name {{host_name}};
root {{root_dir}};
location ~ \.php$ {
root {{root_dir}};
fastcgi_pass {{remote_addr}}:{{remote_port}};
fastcgi_index index.php;
fastcgi_param SCRIPT_FILENAME {{root_dir}}$fastcgi_script_name;
include fastcgi_params;
}
7、在vars文件中准备变量
vim main.yml
http_port: 192.168.142.20:80
host_name: www.kgc.com
root_dir: /usr/share/nginx/html
remote_addr: 192.168.142.30
remote_port: 9000
pkg: nginx
service: nginx
8、tasks
cd tasks
vim init.yml(设置关闭防火墙、selinux)
- name: disable selinux
command: '/usr/sbin/setenforce 0'
ignore_errors: true
- name: disable firewalld
systemd: name=firewalld state=stopped enabled=no
ignore_errors: true
这个文件可以复用!!
9、编写main.yml
首先可以进入/etc/ansible/roles/nginx/files
vim index.php
<?php
phpinfo();
?>
再将nginx.repo 复制道files中 cp /etc/yum.repos.d/nginx.repo ./
vim /tasks/main.yml
- include: "init.yml"
- name: copy local yum repo file
copy: src=nginx.repo dest=/etc/yum.repos.d/
- name: install nginx
yum: name=nginx state=latest
- name: copy index.php
copy: src=index.php dest={{root_dir}}
- name: copy template configure file
template: src=default.conf.j2 dest=/etc/nginx/conf.d/default.conf
notify: restart service
- name: start nginx
systemd: name=nginx state=started enabled=yes
vim /handlers/main.yml
- name: restart service
systemd: name=nginx state=restarted
10、创建playbook yml文件
cd /etc/ansible
mkdir playbook
vim lnmproles.yaml
- name: nginx play
hosts: nginxservers
remote_user: root
roles:
- nginx
ansible-playbook lnmproles.yaml
启动剧本
准备mysql
先在本地安装mysql
yum remove mariadb* -y
cd /etc/yum.repos.d
wget -i -c http://dev.mysql.com/get/mysql57-community-release-el7-10.noarch.rpm
yum -y install mysql57-community-release-el7-10.noarch.rpm
sed -i 's/gpgcheck=1/gpgcheck=0/' mysql-community.repo
yum -y install mysql-community-server
或
wget https://repo.mysql.com/mysql57-community-release-el7-11.noarch.rpm
rpm -ivh mysql57-community-release-el7-11.noarch.rpm
sed -i 's/gpgcheck=1/gpgcheck=0/' mysql-community.repo
yum -y install mysql-server
systemctl start mysqld.service
systemctl enable mysqld.service
grep "password" /var/log/mysqld.log #在日志文件中找出root用户的初始密码
2021-07-31T07:55:00.366359Z 1 [Note] A temporary password is generated for root@localhost: ga7%<d<0*jD&
grep "password" /var/log/mysqld.log | awk '{print $NF}'
##登录 mysql
mysql -uroot -p
Enter password: #输入初始密码 ga7%<d<0*jD&
ALTER USER 'root'@'localhost' IDENTIFIED BY 'Admin@123'; #密码设置要求有 大小写字母、数字和符号 组合
grant all privileges on *.* to root@"%" identified by "Admin@123" with grant option;
flush privileges;
yum -y remove mysql57-community-release-el7-10.noarch #为了防止每次yum操作都会自动更新,卸载这个软件
首先cp /etc/ansible/roles/nginx/tasks/init.yml /etc/ansible/roles/mysql/tasks/
vim /etc/ansible/roles/mysql/tasks/main.yml
- include: init.yml
- name: remove mariadb
command: 'yum remove mariadb* -y && cd /etc/yum.repo.d'
- name: yum install mysql
shell: 'wget -i -c http://dev.mysql.com/get/mysql57-community-release-el7-10.noarch.rpm && yum -y install mysql57-community-release-el7-10.noarch.rpm'
ignore_errors: true
- name: replace file
replace: "path=/etc/yum.repos.d/mysql-community.repo regexp='gpgcheck=1' replace='gpgcheck=0'"
- name: yum install mysql1
yum: name=mysql-community-server
- name: system mysql
service: enabled=true name={{svc}} state=started
vim /etc/ansible/roles/mysql/vars/main.yml
svc: mysqld
cd /etc/ansible/playbook
vim /etc/ansible/playbook/lnmproles.yaml
- name: nginx play
hosts: nginxservers
remote_user: root
roles:
- nginx
- name: mysql play
hosts: mysqlservers
remote_user: root
roles:
- mysql
准备php
首先现在本机yum安装php
rpm -Uvh https://dl.fedoraproject.org/pub/epel/epel-release-latest-7.noarch.rpm
rpm -Uvh https://mirror.webtatic.com/yum/el7/webtatic-release.rpm
yum -y install php72w php72w-cli php72w-common php72w-devel php72w-embedded php72w-gd php72w-mbstring php72w-pdo php72w-xml php72w-fpm php72w-mysqlnd php72w-opcache php72w-redis
systemctl start php-fpm
systemctl enable php-fpm
php -v
useradd -M -s /sbin/nologin php
vim /etc/php.ini
date.timezone = Asia/Shanghai
vim /etc/php-fpm.d/www.conf
user = php
group = php
listen = 192.168.142.30:9000
listen.allowed_clients = 192.168.142.30
cp /etc/php.ini /etc/ansible/roles/php/files
cp /etc/php-fpm.d/www.conf /etc/ansible/roles/php/files
vim php.ini
#877 date.timezone = Asia/Shanghai
vim /etc/ansible/roles/php/tasks/main.yml
- include: init.yml
- name: install epel
shell: 'rpm -Uvh https://dl.fedoraproject.org/pub/epel/epel-release-latest-7.noarch.rpm && rpm -Uvh https://mirror.webtatic.com/yum/el7/webtatic-release.rpm'
- name: install php
yum: name={{item}}
with_items:
- php72w
- php72w-cli
- php72w-common
- php72w-devel
- php72w-embedded
- php72w-gd
- php72w-mbstring
- php72w-pdo
- php72w-xml
- php72w-fpm
- php72w-mysqlnd
- php72w-opcache
- php72w-redis
- name: create php user
user: name={{user_name}}
- name: copy php configure file
copy: src=php.ini dest=/etc/php.ini
- name: modify www.conf
replace: path=/etc/php-fpm.d/www.conf regexp="apache" replace="php"
- name: modify listen address
replace: path=/etc/php-fpm.d/www.conf regexp="127.0.0.1:9000" replace={{http_port}}
- name: modify allowed_clients
replace: path=/etc/php-fpm.d/www.conf regexp="127.0.0.1" replace={{remote_addr}}
- name: create root dir
file: state=directory path={{root_dir}}
- name: copy index.php
copy: src=index.php dest={{root_dir}}
- name: start php
systemd: name=php-fpm state=started enabled=yes
cp /etc/ansible/roles/nginx/tasks/init.yml /etc/ansible/roles/php/tasks
cp /etc/ansible/roles/nginx/files/index.php /etc/ansible/roles/php/files/
cd /php/vars
vim main.yml
user_name: php
http_port: 192.168.142.30:9000
remote_addr: 192.168.142.20
root_dir: /usr/share/nginx/html
cd /etc/ansible/playbook
vim lnmproles.yaml
- name: nginx play
hosts: nginxservers
remote_user: root
roles:
- nginx
- name: mysql play
hosts: mysqlservers
remote_user: root
roles:
- mysql
- name: php play
hosts: phpservers
remote_user: root
roles:
- php


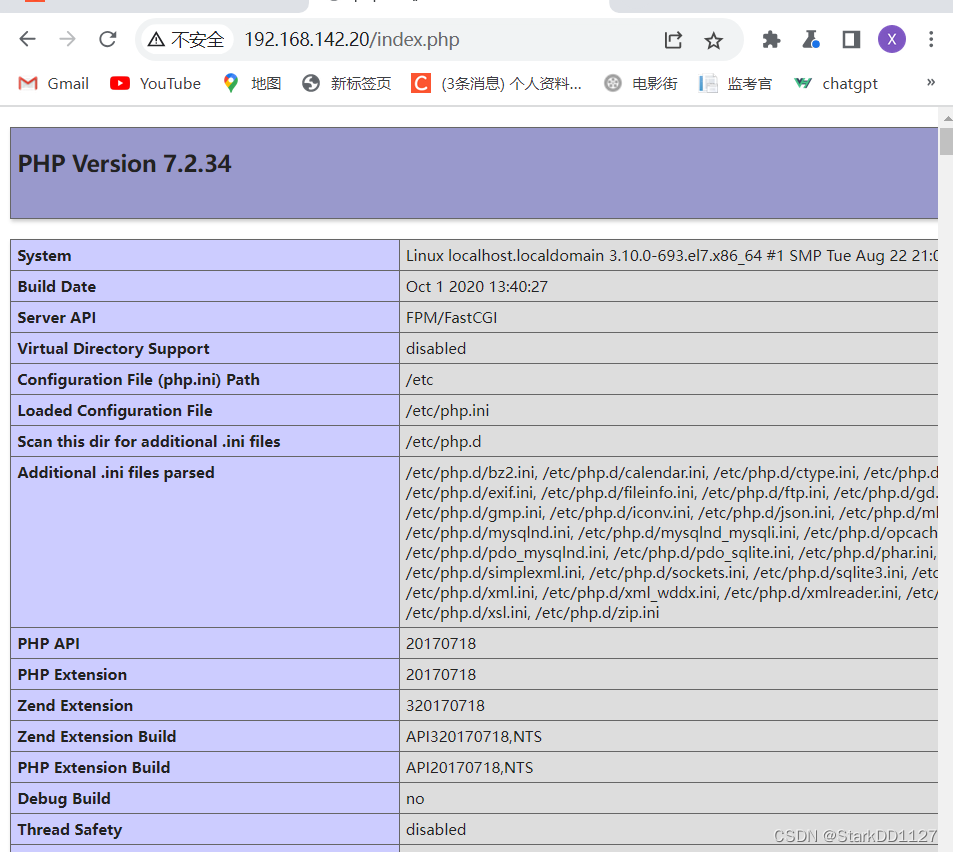
安装成功
验证
浏览器访问:http://192.168.142.20/index.php


 727
727


 被折叠的 条评论
为什么被折叠?
被折叠的 条评论
为什么被折叠?
 到【灌水乐园】发言


