


spark基础知识-涉及多个方面
一、Scala的一些知识
1、Scala和Java的区别
| 对比的内容 | Scala | java |
|---|---|---|
| 变量声明 | 只需要声明是val或是var,具体的类型由编译器自行推断 | 需要在变量前面先注明变量的类型 |
| 返回值 | 申明返回值是在后面,并不需要return语句,也可以用 | 如果有返回值,需要return语句 |
| 结束符 | 不需要使用分号作为结束符 | 每个语句结束需要作为结束符 |
| 循环 | 循环语句可以用于守卫 | 不能 |
| 通配符 | _ | * |
| 构造器 | 构造器名称为this,Scala的辅助构造器之前需要有一个主构造器或者其他辅助构造器,并且Scala的构造器可以放在类的后面 | 构造器名称需要与类名称一样 |
| 内部类 | scala实例化的内部类是不同的,可以使用类型投影 | 内部类从属于外部类 |
| 接口 | Scala中接口称为特质(trait),特质中是可以写抽象方法,也可以写具体的方法体状态,且类可以实现多个特质的。特质可以继承普通的类 | 接口中的方法只能是抽象方法,不可以写具体的方法体的方法,接口不能继承普通的类 |
| 赋值 | Scala中的赋值语句返回结果是unit的不可以串联,例如x=y=1,这样是有问题的,x并没有被赋值为1 | x=y=1,这样是没问题的 |
Scala语言的特点?什么是函数式编程?
- Scala语言集成面向对象和函数式编程。
- 函数式编程是一种典范,将电脑的运算视为是函数式的运算。
- 与过程化编程相比,函数式编程里的函数计算可以随时调用。
- 函数式编程中函数是一等功名。
Scala中的闭包
- 你可以在任何作用域定义函数:包,类甚至是另一个函数或方法,在函数体内,可以访问到相应作用域内的任何变量。(重点)函数可以不再处于作用域内时被调用
def main(args: Array[String]): Unit = {
    def sss():Int={
      def s1():Int={
        println("s1这个方法")
        1
      }
      println("sss这个方法")
      s1()
      2
    }
    sss()
  }
#控制台结果
sss这个方法
s1这个方法
Scala中的柯里化
- 定义:将原来接受两个参数的函数变成新的接受一个参数的函数的过程。新的函数返回一个以原有的第二个参数作为参数的函数。
Scala中的模式匹配
    var sign = 77
    var ch: Char = '+'
    ch match {
      case '+' => sign = 1
      case '-' => sign = -1
      case _ => sign = 0
    }
    print(sign)
trait(特质) 和abstract class(抽象类)的区别
- 一个类只能集成一个抽象类,但可以通过width关键字继承多个特质
- 抽象类有参数的构造函数,特质不行(trait t(i:Int){},错误写法)
2、scala的一些函数
- 匿名函数
 (a:Int)=>{}

      def fun1=(a:Int) => {
      }
      def funq(s:String*): Unit ={
        s.foreach(print(_))
      }
- 偏应用函数(方法中某一函数参数特别多,又需要频繁调用,又只想改变一部分参数的值可用这种函数)
def showlog(logdate:Date,log:String): Unit ={
        println(s"logtime is $logdate,content is $log")
      }
    val date =new Date()
    showlog(date,"a")
    showlog(date,"b")
    showlog(date,"c")
def fun = showlog(date,_:String)
    fun("ss")
//输出
logtime is Fri Nov 06 12:37:41 CST 2020,content is a
logtime is Fri Nov 06 12:37:41 CST 2020,content is b
logtime is Fri Nov 06 12:37:41 CST 2020,content is c
logtime is Fri Nov 06 12:37:41 CST 2020,content is ss
- 高阶函数
- 方法的参数是函数
    def sum(a:Int,b:Int): Int ={
      a+b
    }
    def sum1(f:(Int,Int)=>Int,s:String): String ={
      val i:Int=f(100,200)
      i+"&&&"+s
    }
    val result=sum1((a:Int,b:Int)=>{a+b},"scala")
    //这两个结果是一样的
    val result1=sum1(sum,"scala")
- 方法的返回值是函数(要显式的写出方法的返回值类型)
                        //此处是返回值类型,只有该sum函数的返回值符合该类型,调用该函数才会显示
    def sum3(a:Int,b:Int):(String,String)=>String={
		//函数值可以嵌套函数,该函数类型符合sum3函数返回类型
      def fun3(c:String,d:String):String={
        c+"#"+d+""+c+"***"+a
      }
	  //此处是一个返回值
      fun3
    }
    print(sum3(1,2)("c1","d1"))
- 柯里化函数
    def keli(a:Int,b:Int)(c:Int,d:Int)={
      a+b+c+d
    }
    print(keli(1,2)(3,4))
二、spark2.1.1
- 是什么
- Apache Spark™是一个用于大规模数据处理的统一分析引擎
- Spark围绕着弹性分布式数据集(RDD)的概念,RDD是可并行操作的元素的容错集合;
- RDD(Resilient Distributed Dataset)叫做弹性分布式数据集,是Spark中最基本的数据抽象,它代表一个不可变、可分区、里面的元素可并行计算的集合,每个 RDD 都被分为多个分区,这些分区运行在集群中的不同节点上。RDD 可以包含 Python、Java、Scala 中任意类型的对象, 甚至可以包含用户自定义的对象.
- RDD的操作算子包括两类,一类叫做transformations,它是用来将RDD进行转化,构建RDD的血缘关系;另一类叫做actions,它是用来触发RDD的计算,得到RDD的相关计算结果或者将RDD保存的文件系统中.
- 在Spark中创建RDD的创建方式大概可以分为三种:(1)、从集合中创建RDD;(2)、从外部存储创建RDD;(3)、从其他RDD创建。
1.RDD的五大特性
A list of partitions
RDD由很多partition构成,在spark中,计算式,有多少partition就对应有多少个task来执行,对于RDD来说,每个分片都会被一个计算任务处理,并决定并行计算的粒度。用户可以在创建RDD时指定RDD的分片个数,如果没有指定,那么就会采用默认值。默认值就是程序所分配到的CPU Core的数目。
-
A function for computing each split
对RDD做计算,相当于对RDD的每个split或partition做计算。2)Spark中RDD的计算是以分片为单位的,每个RDD都会实现compute函数以达到这个目的。compute函数会对迭代器进行复合,不需要保存每次计算的结果。 -
A list of dependencies on other RDDs
RDD之间有依赖关系,可溯源。RDD的每次转换都会生成一个新的RDD,所以RDD之间就会形成类似于流水线一样的前后依赖关系。在部分分区数据丢失时,Spark可以通过这个依赖关系重新计算丢失的分区数据,而不是对RDD的所有分区进行重新计算。
4.Optionally, a Partitioner for key-value RDDs (e.g. to say that the RDD is hash-partitioned)
如果RDD里面存的数据是key-value形式,则可以传递一个自定义的Partitioner进行重新分区,比如可以按key的hash值分区。一个Partitioner,即RDD的分片函数。当前Spark中实现了两种类型的分片函数,一个是基于哈希的HashPartitioner,另外一个是基于范围的RangePartitioner。只有对于于key-value的RDD,才会有Partitioner,非key-value的RDD的Parititioner的值是None。Partitioner函数不但决定了RDD本身的分片数量,也决定了parent RDD Shuffle输出时的分片数量。
Optionally, a list of preferred locations to compute each split on (e.g. block locations for an HDFS file)
最优的位置去计算,也就是数据的本地性
计算每个split时,在split所在机器的本地上运行task是最好的,避免了数据的移动;split有多个副本,所以preferred location不止一个
数据在哪里,应优先把作业调度到数据所在机器上,减少数据的IO和网络传输,这样才能更好地减少作业运行时间(木桶原理:作业运行时间取决于运行最慢的task所需的时间),提高性能。对于一个HDFS文件来说,这个列表保存的就是每个Partition所在的块的位置。按照“移动数据不如移动计算”的理念,Spark在进行任务调度的时候,会尽可能地将计算任务分配到其所要处理数据块的存储位置。
2.RDD两种创建方式
- 并行化 驱动程序中的现有集合
val data = Array(1, 2, 3, 4, 5)
val distData = sc.parallelize(data)
- 或引用外部存储系统(例如共享文件系统,HDFS,HBase或提供Hadoop InputFormat的任何数据源)中的数据集。
val distFile = sc.textFile("data.txt")
Spark支持Java、Python和Scala的API。大致把Spark的用例分为两类:数据科学应用和数据处理应用,是一种快速、通用、可扩展的大数据分析引擎,基于内存计算的大数据并行计算框架,Spark 适用于各种各样原先需要多种不同的分布式平台的场景,包括批处理、迭代算法、交互式查询、流处理。
3.RDD弹性
- 自动进行内存和磁盘数据存储的切换
Spark优先把数据放到内存中,如果内存放不下,就会放到磁盘里面,程序进行自动的存储切换 - 基于血统的高效容错机制
在RDD进行转换和动作的时候,会形成RDD的Lineage依赖链,当某一个RDD失效的时候,可以通过重新计算上游的RDD来重新生成丢失的RDD数据。 - Task如果失败会自动进行特定次数的重试
RDD的计算任务如果运行失败,会自动进行任务的重新计算,默认次数是4次。 - Stage如果失败会自动进行特定次数的重试
如果Job的某个Stage阶段计算失败,框架也会自动进行任务的重新计算,默认次数也是4次。 - Checkpoint和Persist可主动或被动触发
RDD可以通过Persist持久化将RDD缓存到内存或者磁盘,当再次用到该RDD时直接读取就行。也可以将RDD进行检查点,检查点会将数据存储在HDFS中,该RDD的所有父RDD依赖都会被移除。 - 数据调度弹性
Spark把这个JOB执行模型抽象为通用的有向无环图DAG,可以将多Stage的任务串联或并行执行,调度引擎自动处理Stage的失败以及Task的失败。 - 数据分片的高度弹性
可以根据业务的特征,动态调整数据分片的个数,提升整体的应用执行效率。
4.RDD 持久化
- RDD的缓存
Spark速度非常快的原因之一,就是在不同操作中可以在内存中持久化或缓存个数据集。当持久化某个RDD后,每一个节点都将把计算的分片结果保存在内存中,并在对此RDD或衍生出的RDD进行的其他动作中重用 - RDD缓存方式
RDD通过persist方法或cache方法可以将前面的计算结果缓存,默认情况下 persist() 会把数据以序列化的形式缓存在 JVM 的堆空 间中。
但是并不是这两个方法被调用时立即缓存,而是触发后面的action时,该RDD将会被缓存在计算节点的内存中,并供后面重用。通过查看源码发现cache最终也是调用了persist方法,默认的存储级别都是仅在内存存储一份,Spark的存储级别还有好多种,存储级别在object StorageLevel中定义的。在存储级别的末尾加上“_2”来把持久化数据存为两份。
通过基于RDD的一系列转换,丢失的数据会被重算,由于RDD的各个Partition是相对独立的,因此只需要计算丢失的部分即可,并不需要重算全部Partition。 - RDD检查点机制
Spark中对于数据的保存除了持久化操作之外,还提供了一种检查点的机制,检查点(本质是通过将RDD写入Disk做检查点)是为了通过lineage做容错的辅助,lineage过长会造成容错成本过高,这样就不如在中间阶段做检查点容错,如果之后有节点出现问题而丢失分区,从做检查点的RDD开始重做Lineage,就会减少开销。检查点通过将数据写入到HDFS文件系统实现了RDD的检查点功能。
cache 和 checkpoint 是有显著区别的, 缓存把 RDD 计算出来然后放在内存中,但是RDD 的依赖链(相当于数据库中的redo 日志), 也不能丢掉, 当某个点某个 executor 宕了,上面cache 的RDD就会丢掉, 需要通过 依赖链重放计算出来, 不同的是, checkpoint 是把 RDD 保存在 HDFS中, 是多副本可靠存储,所以依赖链就可以丢掉了,就斩断了依赖链, 是通过复制实现的高容错。
    val conf = new SparkConf()
      .setAppName("demo1")
      .setMaster("local[2]")
    val sc = new SparkContext(conf)
#设置HDFS上检查点存储的路径
    sc.setCheckpointDir("C:\\Users\\Administrator\\Desktop\\mapdata\\")
RDD的依赖关系
- RDD和它依赖的父RDD(s)的关系有两种不同的类型,即窄依赖(narrow dependency)和宽依赖(wide dependency)。
- 窄依赖指的是每一个父RDD的Partition最多被子RDD的一个Partition使用.窄依赖我们形象的比喻为独生子女
- 宽依赖指的是多个子RDD的Partition会依赖同一个父RDD的Partition,会引起shuffle.宽依赖我们形象的比喻为超生
5.DAG的生成
DAG(Directed Acyclic Graph)叫做有向无环图,原始的RDD通过一系列的转换就就形成了DAG,根据RDD之间的依赖关系的不同将DAG划分成不同的Stage,对于窄依赖,partition的转换处理在Stage中完成计算。对于宽依赖,由于有Shuffle的存在,只能在parent RDD处理完成后,才能开始接下来的计算,因此宽依赖是划分Stage的依据。
6.调优
申请的计算节点(Executor)数目和每个计算节点核数,决定了你同一时刻可以并行执行的task。
比如的RDD有100个分区,那么计算的时候就会生成100个task,你的资源配置为10个计算节点,每个2个核,同一时刻可以并行的task数目为20,计算这个RDD就需要5个轮次。
如果计算资源不变,你有101个task的话,就需要6个轮次,在最后一轮中,只有一个task在执行,其余核都在空转。
如果资源不变,你的RDD只有2个分区,那么同一时刻只有2个task运行,其余18个核空转,造成资源浪费。这就是在spark调优中,增大RDD分区数目,增大任务并行度的做法。
在sparkUI上查看调取任务的所用时间与计算所用时间,如果计算任务用时小于调取任务用时则说明分区数太多
7.键值对RDD的数据分区
- Spark目前支持Hash分区和Range分区,用户也可以自定义分区,Hash分区为当前的默认分区,Spark中分区器直接决定了:RDD中分区的个数、RDD中每条数据经过Shuffle过程属于哪个分区和Reduce的个数。
(1)只有Key-Value类型的RDD才有分区的,非Key-Value类型的RDD分区的值是None
scala> val pp=sc.parallelize(List(1,1))
pp: org.apache.spark.rdd.RDD[Int] = ParallelCollectionRDD[1] at parallelize at <console>:24
scala> pp.partitioner
res1: Option[org.apache.spark.Partitioner] = None
(2)每个RDD的分区ID范围:0~numPartitions-1,决定这个值是属于那个分区的。
- 可以通过使用RDD的partitioner 属性来获取 RDD 的分区方式。它会返回一个 scala.Option 对象, 通过get方法获取其中的值。
- Hash分区方式
HashPartitioner分区的原理:对于给定的key,计算其hashCode,并除于分区的个数取余,如果余数小于0,则用余数+分区的个数,最后返回的值就是这个key所属的分区ID。 - Range分区方式
HashPartitioner分区弊端:可能导致每个分区中数据量的不均匀,极端情况下会导致某些分区拥有RDD的全部数据。
RangePartitioner分区优势:尽量保证每个分区中数据量的均匀,而且分区与分区之间是有序的,一个分区中的元素肯定都是比另一个分区内的元素小或者大;
但是分区内的元素是不能保证顺序的。简单的说就是将一定范围内的数映射到某一个分区内。
RangePartitioner作用:将一定范围内的数映射到某一个分区内,在实现中,分界的算法尤为重要。用到了水塘抽样算法。 - 自定义分区方式
要实现自定义的分区器,你需要继承 org.apache.spark.Partitioner 类并实现下面三个方法。
numPartitions: Int:返回创建出来的分区数。
getPartition(key: Any): Int:返回给定键的分区编号(0到numPartitions-1)。
equals():Java 判断相等性的标准方法。这个方法的实现非常重要,Spark 需要用这个方法来检查你的分区器对象是否和其他分区器实例相同,这样 Spark 才可以判断两个 RDD 的分区方式是否相同。
package com.wq1.spark
import org.apache.spark.{Partitioner, SparkConf, SparkContext}
class CustomerPartitioner(numParts:Int) extends Partitioner {
  //覆盖分区数
  override def numPartitions: Int = numParts
  //覆盖分区号获取函数
  override def getPartition(key: Any): Int = {
    val ckey: String = key.toString
    ckey.substring(ckey.length-1).toInt%numParts
  }
}
object CustomerPartitioner {
  def main(args: Array[String]) {
    val conf=new SparkConf().setAppName("partitioner")
    val sc=new SparkContext(conf)
    val data=sc.parallelize(List("aa.2","bb.2","cc.3","dd.3","ee.5"))
    data.map((_,1)).partitionBy(new CustomerPartitioner(5)).keys.saveAsTextFile("hdfs://hadoop01:9000/partitioner")
  }
}
三、Standalone模式配置
- slaves
# A Spark Worker will be started on each of the machines listed below.
wq1
wq2
wq3
- spark-site.conf
# Licensed to the Apache Software Foundation (ASF) under one or more
# contributor license agreements.  See the NOTICE file distributed with
# this work for additional information regarding copyright ownership.
# The ASF licenses this file to You under the Apache License, Version 2.0
# (the "License"); you may not use this file except in compliance with
# the License.  You may obtain a copy of the License at
#
#    http://www.apache.org/licenses/LICENSE-2.0
#
# Unless required by applicable law or agreed to in writing, software
# distributed under the License is distributed on an "AS IS" BASIS,
# WITHOUT WARRANTIES OR CONDITIONS OF ANY KIND, either express or implied.
# See the License for the specific language governing permissions and
# limitations under the License.
#
# Default system properties included when running spark-submit.
# This is useful for setting default environmental settings.
# Example:
# spark.master                     spark://master:7077
# spark.eventLog.enabled           true
# spark.eventLog.dir               hdfs://namenode:8021/directory
# spark.serializer                 org.apache.spark.serializer.KryoSerializer
# spark.driver.memory              5g
# spark.executor.extraJavaOptions  -XX:+PrintGCDetails -Dkey=value -Dnumbers="one two three"
# sparkMaster的配置
spark.master                     spark://wq1:7077
# # 开启Spark任务历史记录
spark.eventLog.enabled           true
# # 设置任务历史记录的存储目录
spark.eventLog.dir               hdfs://wq1:9000/sparklogs
- spark-env.sh
#!/usr/bin/env bash
#
# Licensed to the Apache Software Foundation (ASF) under one or more
# contributor license agreements.  See the NOTICE file distributed with
# this work for additional information regarding copyright ownership.
# The ASF licenses this file to You under the Apache License, Version 2.0
# (the "License"); you may not use this file except in compliance with
# the License.  You may obtain a copy of the License at
#
#    http://www.apache.org/licenses/LICENSE-2.0
#
# Unless required by applicable law or agreed to in writing, software
# distributed under the License is distributed on an "AS IS" BASIS,
# WITHOUT WARRANTIES OR CONDITIONS OF ANY KIND, either express or implied.
# See the License for the specific language governing permissions and
# limitations under the License.
#
# This file is sourced when running various Spark programs.
# Copy it as spark-env.sh and edit that to configure Spark for your site.
# Options read when launching programs locally with
# ./bin/run-example or ./bin/spark-submit
# - HADOOP_CONF_DIR, to point Spark towards Hadoop configuration files
# - SPARK_LOCAL_IP, to set the IP address Spark binds to on this node
# - SPARK_PUBLIC_DNS, to set the public dns name of the driver program
# Options read by executors and drivers running inside the cluster
# - SPARK_LOCAL_IP, to set the IP address Spark binds to on this node
# - SPARK_PUBLIC_DNS, to set the public DNS name of the driver program
# - SPARK_LOCAL_DIRS, storage directories to use on this node for shuffle and RDD data
# - MESOS_NATIVE_JAVA_LIBRARY, to point to your libmesos.so if you use Mesos
# Options read in YARN client/cluster mode
# - SPARK_CONF_DIR, Alternate conf dir. (Default: ${SPARK_HOME}/conf)
# - HADOOP_CONF_DIR, to point Spark towards Hadoop configuration files
# - YARN_CONF_DIR, to point Spark towards YARN configuration files when you use YARN
# - SPARK_EXECUTOR_CORES, Number of cores for the executors (Default: 1).
# - SPARK_EXECUTOR_MEMORY, Memory per Executor (e.g. 1000M, 2G) (Default: 1G)
# - SPARK_DRIVER_MEMORY, Memory for Driver (e.g. 1000M, 2G) (Default: 1G)
# Options for the daemons used in the standalone deploy mode
# - SPARK_MASTER_HOST, to bind the master to a different IP address or hostname
# - SPARK_MASTER_PORT / SPARK_MASTER_WEBUI_PORT, to use non-default ports for the master
# - SPARK_MASTER_OPTS, to set config properties only for the master (e.g. "-Dx=y")
# - SPARK_WORKER_CORES, to set the number of cores to use on this machine
# - SPARK_WORKER_MEMORY, to set how much total memory workers have to give executors (e.g. 1000m, 2g)
# - SPARK_WORKER_PORT / SPARK_WORKER_WEBUI_PORT, to use non-default ports for the worker
# - SPARK_WORKER_DIR, to set the working directory of worker processes
# - SPARK_WORKER_OPTS, to set config properties only for the worker (e.g. "-Dx=y")
# - SPARK_DAEMON_MEMORY, to allocate to the master, worker and history server themselves (default: 1g).
# - SPARK_HISTORY_OPTS, to set config properties only for the history server (e.g. "-Dx=y")
# - SPARK_SHUFFLE_OPTS, to set config properties only for the external shuffle service (e.g. "-Dx=y")
# - SPARK_DAEMON_JAVA_OPTS, to set config properties for all daemons (e.g. "-Dx=y")
# - SPARK_DAEMON_CLASSPATH, to set the classpath for all daemons
# - SPARK_PUBLIC_DNS, to set the public dns name of the master or workers
# Generic options for the daemons used in the standalone deploy mode
# - SPARK_CONF_DIR      Alternate conf dir. (Default: ${SPARK_HOME}/conf)
# - SPARK_LOG_DIR       Where log files are stored.  (Default: ${SPARK_HOME}/logs)
# - SPARK_PID_DIR       Where the pid file is stored. (Default: /tmp)
# - SPARK_IDENT_STRING  A string representing this instance of spark. (Default: $USER)
# - SPARK_NICENESS      The scheduling priority for daemons. (Default: 0)
# - SPARK_NO_DAEMONIZE  Run the proposed command in the foreground. It will not output a PID file.
# Options for native BLAS, like Intel MKL, OpenBLAS, and so on.
# You might get better performance to enable these options if using native BLAS (see SPARK-21305).
# - MKL_NUM_THREADS=1        Disable multi-threading of Intel MKL
# - OPENBLAS_NUM_THREADS=1   Disable multi-threading of OpenBLAS
# 配置Hadoop集群的配置文件目录
HADOOP_CONF_DIR=/opt/hadoop-2.7.7/etc/hadoop
# 配置SparkStandalone集群的Master节点主机名
SPARK_MASTER_HOST=wq3
# 配置SparkStandalone集群的Master节点服务端口
SPARK_MASTER_PORT=7077
1.Job history 配置
vim spark-env.sh
#调整WEBUI访问的端口号为4000
#指定保存Application历史记录的个数,如果超过这个值,旧的应用程序信息将被删除,这个是内存中的应用数,而不是页面上显示的应用数。
export SPARK_HISTORY_OPTS="-Dspark.history.ui.port=4000
-Dspark.history.retainedApplications=3
-Dspark.history.fs.logDirectory=hdfs://wq1:9000/sparklog"
2.Spark应用提交
- 执行第一个spark程序
这是/opt/spark-2.4.7/examples/jars/spark-examples_2.11-2.4.7.jar安装spark时就有的示例架包
该算法是利用蒙特·卡罗算法求PI
spark-submit \
--class org.apache.spark.examples.SparkPi \
--master spark://wq1:7077 \
--executor-memory 1G \
--total-executor-cores 2 \
/opt/spark-2.4.7/examples/jars/spark-examples_2.11-2.4.7.jar
3.spark应用执行过程
- 运行前的内存情况
[root@wq1 bin]# free -h
              total        used        free      shared  buff/cache   available
Mem:           1.4G        1.1G        131M        1.6M        197M        178M
Swap:          2.0G        1.5G        531M
- spark context
20/11/15 11:27:38 INFO spark.SparkContext: Running Spark version 2.4.7
20/11/15 11:27:38 INFO spark.SparkContext: Submitted application: Spark Pi
20/11/15 11:27:38 INFO spark.SecurityManager: Changing view acls to: root
20/11/15 11:27:38 INFO spark.SecurityManager: Changing modify acls to: root
20/11/15 11:27:38 INFO spark.SecurityManager: Changing view acls groups to:
20/11/15 11:27:38 INFO spark.SecurityManager: Changing modify acls groups to:
20/11/15 11:27:38 INFO spark.SecurityManager: SecurityManager: authentication disabled; ui acls disabled; users  with view permissions: Set(root); groups with view permissions: Set(); users  with modify permissions: Set(root); groups with modify permissions: Set()
20/11/15 11:27:39 INFO util.Utils: Successfully started service 'sparkDriver' on port 33990.
- Spark Env
20/11/15 11:27:39 INFO spark.SparkEnv: Registering MapOutputTracker
20/11/15 11:27:39 INFO spark.SparkEnv: Registering BlockManagerMaster
20/11/15 11:27:39 INFO storage.BlockManagerMasterEndpoint: Using org.apache.spark.storage.DefaultTopologyMapper for getting topology information
20/11/15 11:27:39 INFO storage.BlockManagerMasterEndpoint: BlockManagerMasterEndpoint up
20/11/15 11:27:39 INFO storage.DiskBlockManager: Created local directory at /tmp/blockmgr-079ea711-ad6d-4f17-83c1-109db4c44642
20/11/15 11:27:39 INFO memory.MemoryStore: MemoryStore started with capacity 413.9 MB
20/11/15 11:27:39 INFO spark.SparkEnv: Registering OutputCommitCoordinator
20/11/15 11:27:40 INFO util.log: Logging initialized @7087ms
20/11/15 11:27:41 INFO server.Server: jetty-9.3.z-SNAPSHOT, build timestamp: unknown, git hash: unknown
20/11/15 11:27:41 INFO server.Server: Started @8796ms
20/11/15 11:27:42 INFO server.AbstractConnector: Started ServerConnector@cdfa952{HTTP/1.1,[http/1.1]}{0.0.0.0:4040}
20/11/15 11:27:42 INFO util.Utils: Successfully started service 'SparkUI' on port 4040.
- Add jar
20/11/15 11:27:44 INFO spark.SparkContext: Added JAR file:/opt/spark-2.4.7/examples/jars/spark-examples_2.11-2.4.7.jar at spark://wq1:33990/jars/spark-examples_2.11-2.4.7.jar with timestamp 1605410864239
20/11/15 11:27:44 INFO client.StandaloneAppClient$ClientEndpoint: Connecting to master spark://wq1:7077...
20/11/15 11:27:46 INFO client.TransportClientFactory: Successfully created connection to wq1/192.168.236.236:7077 after 2363 ms (0 ms spent in bootstraps)
20/11/15 11:27:50 INFO cluster.StandaloneSchedulerBackend: Connected to Spark cluster with app ID app-20201115112750-0000
20/11/15 11:27:50 INFO util.Utils: Successfully started service 'org.apache.spark.network.netty.NettyBlockTransferService' on port 45469.
- DAGScheduler
20/11/15 11:29:04 INFO scheduler.DAGScheduler: Shuffle files lost for worker worker-20201114204626-192.168.236.236-45453 on host 192.168.236.236
20/11/15 11:29:16 INFO spark.SparkContext: Starting job: reduce at SparkPi.scala:38
20/11/15 11:29:16 INFO scheduler.DAGScheduler: Got job 0 (reduce at SparkPi.scala:38) with 2 output partitions
20/11/15 11:29:16 INFO scheduler.DAGScheduler: Final stage: ResultStage 0 (reduce at SparkPi.scala:38)
20/11/15 11:29:16 INFO scheduler.DAGScheduler: Parents of final stage: List()
20/11/15 11:29:17 INFO scheduler.DAGScheduler: Missing parents: List()
20/11/15 11:29:17 INFO scheduler.DAGScheduler: Submitting ResultStage 0 (MapPartitionsRDD[1] at map at SparkPi.scala:34), which has no missing parents
20/11/15 11:29:27 INFO memory.MemoryStore: Block broadcast_0 stored as values in memory (estimated size 2.0 KB, free 413.9 MB)
20/11/15 11:29:27 INFO memory.MemoryStore: Block broadcast_0_piece0 stored as bytes in memory (estimated size 1381.0 B, free 413.9 MB)
20/11/15 11:29:27 INFO storage.BlockManagerInfo: Added broadcast_0_piece0 in memory on wq1:45469 (size: 1381.0 B, free: 413.9 MB)
20/11/15 11:29:27 INFO spark.SparkContext: Created broadcast 0 from broadcast at DAGScheduler.scala:1184
20/11/15 11:29:28 INFO scheduler.DAGScheduler: Submitting 2 missing tasks from ResultStage 0 (MapPartitionsRDD[1] at map at SparkPi.scala:34) (first 15 tasks are for partitions Vector(0, 1))
20/11/15 11:29:28 INFO scheduler.TaskSchedulerImpl: Adding task set 0.0 with 2 tasks
20/11/15 11:29:32 INFO client.StandaloneAppClient$ClientEndpoint: Executor added: app-20201115112750-0000/2 on worker-20201114204626-192.168.236.236-45453 (192.168.236.236:45453) with 1 core(s)
20/11/15 11:29:32 INFO cluster.StandaloneSchedulerBackend: Granted executor ID app-20201115112750-0000/2 on hostPort 192.168.236.236:45453 with 1 core(s), 1024.0 MB RAM
20/11/15 11:29:34 INFO client.StandaloneAppClient$ClientEndpoint: Executor updated: app-20201115112750-0000/2 is now RUNNING
20/11/15 11:29:44 WARN scheduler.TaskSchedulerImpl: Initial job has not accepted any resources; check your cluster UI to ensure that workers are registered and have sufficient resources
20/11/15 11:29:58 WARN scheduler.TaskSchedulerImpl: Initial job has not accepted any resources; check your cluster UI to ensure that workers are registered and have sufficient resources
20/11/15 11:30:13 WARN scheduler.TaskSchedulerImpl: Initial job has not accepted any resources; check your cluster UI to ensure that workers are registered and have sufficient resources
20/11/15 11:30:28 WARN scheduler.TaskSchedulerImpl: Initial job has not accepted any resources; check your cluster UI to ensure that workers are registered and have sufficient resources
20/11/15 11:30:42 INFO cluster.CoarseGrainedSchedulerBackend$DriverEndpoint: Registered executor NettyRpcEndpointRef(spark-client://Executor) (192.168.236.236:35316) with ID 2
20/11/15 11:30:43 INFO scheduler.TaskSetManager: Starting task 0.0 in stage 0.0 (TID 0, 192.168.236.236, executor 2, partition 0, PROCESS_LOCAL, 7870 bytes)
20/11/15 11:30:43 WARN scheduler.TaskSchedulerImpl: Initial job has not accepted any resources; check your cluster UI to ensure that workers are registered and have sufficient resources
20/11/15 11:30:57 INFO storage.BlockManagerMasterEndpoint: Registering block manager 192.168.236.236:40409 with 413.9 MB RAM, BlockManagerId(2, 192.168.236.236, 40409, None)
20/11/15 11:31:17 INFO storage.BlockManagerInfo: Added broadcast_0_piece0 in memory on 192.168.236.236:40409 (size: 1381.0 B, free: 413.9 MB)
20/11/15 11:31:21 INFO scheduler.TaskSetManager: Starting task 1.0 in stage 0.0 (TID 1, 192.168.236.236, executor 2, partition 1, PROCESS_LOCAL, 7870 bytes)
20/11/15 11:31:22 INFO scheduler.TaskSetManager: Finished task 1.0 in stage 0.0 (TID 1) in 628 ms on 192.168.236.236 (executor 2) (1/2)
20/11/15 11:31:22 INFO scheduler.TaskSetManager: Finished task 0.0 in stage 0.0 (TID 0) in 39599 ms on 192.168.236.236 (executor 2) (2/2)
20/11/15 11:31:23 INFO scheduler.TaskSchedulerImpl: Removed TaskSet 0.0, whose tasks have all completed, from pool
20/11/15 11:31:23 INFO scheduler.DAGScheduler: ResultStage 0 (reduce at SparkPi.scala:38) finished in 120.427 s
20/11/15 11:31:23 INFO scheduler.DAGScheduler: Job 0 finished: reduce at SparkPi.scala:38, took 126.891304 s
Pi is roughly 3.144115720578603
- Stop
20/11/15 11:31:24 INFO server.AbstractConnector: Stopped Spark@cdfa952{HTTP/1.1,[http/1.1]}{0.0.0.0:4040}
20/11/15 11:31:24 INFO ui.SparkUI: Stopped Spark web UI at http://wq1:4040
20/11/15 11:31:24 INFO cluster.StandaloneSchedulerBackend: Shutting down all executors
20/11/15 11:31:24 INFO cluster.CoarseGrainedSchedulerBackend$DriverEndpoint: Asking each executor to shut down
20/11/15 11:31:25 INFO spark.MapOutputTrackerMasterEndpoint: MapOutputTrackerMasterEndpoint stopped!
20/11/15 11:31:26 INFO memory.MemoryStore: MemoryStore cleared
20/11/15 11:31:26 INFO storage.BlockManager: BlockManager stopped
20/11/15 11:31:26 INFO storage.BlockManagerMaster: BlockManagerMaster stopped
20/11/15 11:31:26 INFO scheduler.OutputCommitCoordinator$OutputCommitCoordinatorEndpoint: OutputCommitCoordinator stopped!
20/11/15 11:31:27 INFO spark.SparkContext: Successfully stopped SparkContext
20/11/15 11:31:27 INFO util.ShutdownHookManager: Shutdown hook called
20/11/15 11:31:27 INFO util.ShutdownHookManager: Deleting directory /tmp/spark-cf55fd85-0595-4bb5-bec8-0a17aa11b740
20/11/15 11:31:27 INFO util.ShutdownHookManager: Deleting directory /tmp/spark-095181a6-933e-4eca-9ad2-93e8e288abdf
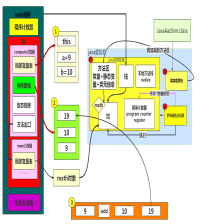
- spark有哪些组件?

(1)master:管理集群和节点,不参与计算。
(2)worker:计算节点,进程本⾝不参与计算,和master汇报。
(3)Driver:运⾏程序的main⽅法,创建spark context对象。
(4)spark context:控制整个application的⽣命周期,包括dagsheduler和task scheduler等组件。
(5)client:⽤户提交程序的入口。
(6)DAG Scheduler:根据job构建基于stage的DAG,并提交stage给taskscheduler.
(7)TaskScheduler:将任务task分发给Excutor
(8)SparkEnv:线程级别的上下文,存储运行时的重要组件的引用 - saprk工作机制
1、⽤户在client端提交作业后,会由Driver运⾏main⽅法并创建spark context上下⽂。
2、执⾏add算⼦,形成dag图输⼊dagscheduler,按照add之间的依赖关系划分stage输⼊task scheduler。 task scheduler会将stage
划分为task set分发到各个节点的executor中执⾏。 - spark核⼼编程原理?
(1)定义初始的RDD,即第⼀个RDD是从哪⾥来,读取数据,包括hdfs、linux本地⽂件、程序中的集合;
(2)定义对RDD的计算操作,这在spark中称为算⼦,转换操作和⾏动操作,包括map、reduce、flatmap、reducebykey等,⽐mapreduce提供的map和reduce强⼤的太多; - 算子介绍
spark实现单词计数的代码
简写版
 val conf = new SparkConf().setMaster("local[2]").setAppName("demo")
    val sc = new SparkContext(conf)
    val rdd1: RDD[String] = sc.textFile("C:\\Users\\Administrator\\Desktop\\mapdata\\words.txt")
rdd1.flatMap(_.split("")).map((_,1)).reduceByKey((_+_)).foreach(println)
- 细化版
object WCSpark {
  def main(args: Array[String]): Unit = {
    //创建配置对象
    val conf = new SparkConf()
    //设置App的名称   有啥用? 方便在监控页面找到  MR-》Yarn 8088
    conf.setAppName("WCSpark")
    //设置Spark的运行模式  local本地运行  用于测试环境
    conf.setMaster("local")

    //创建Spark上下文 他是通往集群的唯一通道
    val sc = new SparkContext(conf)

    /**
      * 处理数据   在SparkCore中一切得计算都是基于RDD
      * R(Resilient)D(Distributed )D(Dataset)
      * RDD 弹性分布式数据集
      */
    val lineRDD = sc.textFile("d:/test.txt")
    //基于lineRDD中的数据 进行分词
    val wordRDD = lineRDD.flatMap { _.split(" ") }
    //每一个单词计数为1  pairRDD  K:word V:1
    val pairRDD = wordRDD.map { (_,1) }
    //相同的单词进行分组,对组内的数据进行累加
    //restRDD K:word V:count
    val restRDD = pairRDD.reduceByKey((v1,v2)=>v1+v2)
    /**
      * 根据单词出现的次数来排序
      * sortByKey 根据key来排序
      * sortBy
      */
    //    restRDD
    //      .map(_.swap)
    //      .sortByKey(false)
    //      .map(_.swap)
    //      .foreach(println)

    //释放资源
    sc.stop()
	  //最全的写法
	   rdd1.flatMap(line=>{
      line.split("")
    })
    val value = words.map(word => {
      new Tuple2(word, 1)
    })
    val value1 = value.reduceByKey((v1, v2) => {
      v1 + v2
    })
    value1.foreach(one=>{
      print(one)
    })
  }
}
根据网站日志分析出近几天有多少IP访问本网站

  def main(args: Array[String]): Unit = {
    val conf = new SparkConf()
      .setAppName("demo1")
      .setMaster("local[2]")
    val sc = new SparkContext(conf)
    sc.setCheckpointDir("C:\\Users\\Administrator\\Desktop\\mapdata\\")
    val rdd: RDD[String] = sc.textFile("C:\\Users\\Administrator\\Desktop\\mapdata\\access1.log")
    val rdd1: RDD[(String, String, Int, String)] = rdd.map(line => {
      val strs = line.split("\\s+")
      val ip = strs(0)
      val str = DateUtils.dateFormat(strs(3).tail)
      var rCode = 0
      try {
        rCode = strs(8).toInt
      } catch {
        case e: Exception =>
      }
      val osType = ""
      (ip, str, rCode, osType)
    })
    rdd1.map((x=>{
      new Tuple2(x._1,1)
    })).distinct().map(x=>{
      new Tuple2(1,1)
    }).reduceByKey(_+_).foreach(println)
  }
提取网站访问日志中的访问IP,访问日期,访问响应码为404的
统计访问IP中数字1到9出现的次数
 def main(args: Array[String]): Unit = {
    val conf = new SparkConf()
      .setAppName("demo1")
      .setMaster("local[2]")
    val sc = new SparkContext(conf)
    val rdd: RDD[String] = sc.textFile("C:\\Users\\Administrator\\Desktop\\mapdata\\access.log")
    val rdd1: RDD[(String, String, Int, String)] = rdd.map(line => {
      val strs = line.split("\\s+")
      val ip = strs(0)
      val str = DateUtils.dateFormat(strs(3).tail)
      var rCode = 0
      try {
        rCode = strs(8).toInt
      } catch {
        case e: Exception =>
      }
      val osType = ""
      (ip, str, rCode, osType)
    }).filter(trufalse=>{
      trufalse._3==404
    })

    //2.filter
    //2.1.声明def filter(f: T => Boolean): RDD[T]
    //2.2.参数 一元函数,参数是原rdd的中的元素,返回值是Boolean
    //2.3.返回值  和原RDD泛型一致的RDD
    //2.4.作用  过滤元素 (f返回True的元素将被留下)

//3.flatMap
    //1.声明def flatMap(f: T => TraversableOnce[U]): RDD[U]
    //2.参数 一个一元函数,参数是原RDD的元素类型,返回值是一个集合
    //3.返回值 是一个f的返回值泛型的RDD
    //4.作用 将二维集合变成一维集合

    //统计所有ip中0-9的数字的出现次数

    val rdd2: RDD[String] = rdd1.flatMap(x => {
      val res1: String = x._1
      val res2: String = res1.replace(".", "")
      val res3: Array[String] = res2.split("")
      res3
    })

    val rdd3: RDD[String] = rdd1.flatMap(_._1.replace(".", "").split(""))

    rdd3.map((_, 1))
      .reduceByKey(_ + _)
    .foreach(println)

  }
展示每天访问的IP数
首先这组数据结构如下,难点:每天的日期还得去除时分秒后作为一个key值,IP作为一个KEY值
(113.200.107.37,2020-11-27 14:39:26,200,)
(83.97.20.196,2020-11-27 14:39:28,0,)
(159.89.15.153,2020-11-27 14:39:35,400,)
combineByKey(createCombiner, mergeValue, mergeCombiners, partitioner)
def combineByKey[C](
      createCombiner: V => C,
      mergeValue: (C, V) => C,
      mergeCombiners: (C, C) => C,
      partitioner: Partitioner,
      mapSideCombine: Boolean = true,
      serializer: Serializer = null): RDD[(K, C)] = self.withScope {}
combineByKey的作用是:Combine values with the same key using a different result type.
createCombiner函数是通过value构造并返回一个新的类型为C的值,这个类型也是combineByKey函数返回值中value的类型(key的类型不变)。
mergeValue函数是把具有相同的key的value合并到C中。这时候C相当于一个累计器。(同一个partition内)
mergeCombiners函数把两个C合并成一个C。(partitions之间)
scala>  val textRDD = sc.parallelize(List(("A", "aa"), ("B","bb"),("C","cc"),("C","cc"), ("D","dd"), ("D","dd")))
textRDD: org.apache.spark.rdd.RDD[(String, String)] = ParallelCollectionRDD[0] at parallelize at <console>:24

scala>     val combinedRDD = textRDD.combineByKey(
     |       value => (1, value),
     |       (c:(Int, String), value) => (c._1+1, c._2),
     |       (c1:(Int, String), c2:(Int, String)) => (c1._1+c2._1, c1._2)
     |     )
combinedRDD: org.apache.spark.rdd.RDD[(String, (Int, String))] = ShuffledRDD[1] at combineByKey at <console>:26

scala>

scala>     combinedRDD.collect.foreach(x=>{
     |       println(x._1+","+x._2._1+","+x._2._2)
     |     })

D,2,dd
A,1,aa
B,1,bb
C,2,cc
aggregate
aggregate用户聚合RDD中的元素,先使用seqOp将RDD中每个分区中的T类型元素聚合成U类型,再使用combOp将之前每个分区聚合后的U类型聚合成U类型,特别注意seqOp和combOp都会使用zeroValue的值,zeroValue的类型为U。这个方法的参数和combineByKey函数差不多。我们需要注意的是,aggregate函数是先计算每个partition中的数据,在计算partition之间的数据。
/**
   * Aggregate the elements of each partition, and then the results for all the partitions, using
   * given combine functions and a neutral "zero value". This function can return a different result
   * type, U, than the type of this RDD, T. Thus, we need one operation for merging a T into an U
   * and one operation for merging two U's, as in scala.TraversableOnce. Both of these functions are
   * allowed to modify and return their first argument instead of creating a new U to avoid memory
   * allocation.
   *
   * @param zeroValue the initial value for the accumulated result of each partition for the
   *                  `seqOp` operator, and also the initial value for the combine results from
   *                  different partitions for the `combOp` operator - this will typically be the
   *                  neutral element (e.g. `Nil` for list concatenation or `0` for summation)
   * @param seqOp an operator used to accumulate results within a partition
   * @param combOp an associative operator used to combine results from different partitions
   */
  def aggregate[U: ClassTag](zeroValue: U)(seqOp: (U, T) => U, combOp: (U, U) => U): U = withScope {
    // Clone the zero value since we will also be serializing it as part of tasks
    var jobResult = Utils.clone(zeroValue, sc.env.serializer.newInstance())
    val cleanSeqOp = sc.clean(seqOp)
    val cleanCombOp = sc.clean(combOp)
    val aggregatePartition = (it: Iterator[T]) => it.aggregate(zeroValue)(cleanSeqOp, cleanCombOp)
    val mergeResult = (index: Int, taskResult: U) => jobResult = combOp(jobResult, taskResult)
    sc.runJob(this, aggregatePartition, mergeResult)
    jobResult
  }
scala> val textRDD = sc.parallelize(List("A", "B", "C", "D", "D", "E"))
textRDD: org.apache.spark.rdd.RDD[String] = ParallelCollectionRDD[3] at parallelize at <console>:24

scala> val resultRDD = textRDD.aggregate((0, ""))((acc, value)=>{(acc._1+1, acc._2+":"+value)}, (acc1, acc2)=> {(acc1._1+acc2._1, acc1._2+":"+acc2._2)})
resultRDD: (Int, String) = (6,::D:E::D::A::B:C)
spark各种运行模式
- local:调试用
- standalone:分布式部署集群,资源管理和任务监管都是spark自己监控
- spark on yarn:分布式部署集群,资源和任务监控交给yarn管理
- spark顶层调度层使用RDD的依赖为每个job创建一个由stages组成的DAG(有向无环图)
spark与Mapreduce的比较
- 线程和进程的区别
| 区别 | 进程 | 线程 |
|---|---|---|
| 根本区别 | 作为资源分配的单位 | 调度和执行的单位 |
| 开销 | 每个进程之都有独立的代码和数据空间,进程间切换会有较大的开销 | 线程可以看做轻量级的进程,同一类线程共享代码和数据空间,每个线程有独立的运行栈和程序计数器,线程切换开销小 |
| 所处环境 | 在操作系统中能同时运行多个任务(程序) | 在同一应用程序中有多个顺序流同时执行 |
| 分配内存 | 同一进程的线程共享本进程的地址空间和资源 | 而进程之间的地址空间和资源是相互独立的 |
| 影响关系 | 一个进程崩溃后,在保护模式下不会对其他进程产生影响 | 但是一个线程崩溃整个进程都死掉。所以多进程要比多线程健壮 |
- MapReduce多进程模型
- 每个Task运行在一个独立的JVM进程中;
- 可单独为不同类型的Task设置不同的资源量,目前支持内存和CPU两种资源;
- 每个Task运行完后,将释放所占用的资源,这些资源不能被其他Task复用,即使是同一个作业相同类型的Task。也就是说,每个Task都要经历“申请资源—> 运行Task –> 释放资源”的过程。
- Spark多线程模型
- 每个节点上可以运行一个或多个Executor服务;
- 每个Executor配有一定数量的slot,表示该Executor中可以同时运行多少个ShuffleMapTask或者ReduceTask;
- 每个Executor单独运行在一个JVM进程中,每个Task则是运行在Executor中的一个线程;
- 同一个Executor内部的Task可共享内存,比如通过函数SparkContext#broadcast广播的文件或者数据结构只会在每个Executor中加载一次,而不会像MapReduce那样,每个Task加载一次;
- Executor一旦启动后,将一直运行,且它的资源可以一直被Task复用,直到Spark程序运行完成后才释放退出。
Mapreduce shuffle和Spark shuffle的区别
- Mrshuffle:MapTask 到reduceTask之间的过程
- Sparkshuffle:job到stage之间的过程
Spark shuffle调优
- 程序调优
⾸先,尽量减少shuffle次数;
//两次shuffle
rdd.map().repartition(1000).reduceByKey(_+_,3000)
//⼀次shuffle
Rdd.map().repartition(3000).reduceByKey(_+_)
然后必要时主动shuffle,通常⽤于改变并⾏度,提⾼后续分布式运⾏速度;
rdd.repartition(largerNumPartition).map()
最后,使⽤treeReduce&treeAggregate替换reduce&aggregate。数据量较⼤时,reduce&aggregate⼀次性聚
合,shuffle量太⼤,⽽treeReduce&treeAggregate是分批聚合,更为保险
- 参数调优
- 减少⽹络传输的次数
spark.reducer.maxSizeFlight:reduce task去磁盘拉取数据
默认值:48m
参数说明:该参数⽤于设置shuffle read task的buffer缓冲⼤⼩,⽽这个buffer缓冲决定了每次能够拉取多少数据。
调优建议:如果作业可⽤的内存资源较为充⾜的话,可以增加这个参数的⼤⼩(⽐如96M),从⽽减少拉取数据的次
数,也就可以减少⽹络传输的次数,进⽽提升性能。在实践中发现,合理调节该参数,性能会有1到5%的提升。
- 对于传输大数据量调节该参数可以⼤幅度提升稳定性
Spark.shuffle.io.maxRetries
默认值:3
参数说明:shuffle read task从shuffle write task所在节点拉取属于⾃⼰的数据时,如果因为⽹络异常导致拉取失败,
时会⾃动进⾏重试的。该参数就代表了可以重试的最⼤次数,如果在指定次数内拉取属于还是没有成功,就可能
会导致作业执⾏失败。
调优建议:对于那些包含了特别耗时的shuffle操作的作业,建议增加重试最⼤次数(⽐如6次),可以避免由于JVM
的full gc或者⽹络不稳定等因素导致的数据拉取失败。在实践中发现,对于超⼤数据量(数⼗亿到上百亿)的shuffle
过程,调节该参数可以⼤幅度提升稳定性。
- 增加shuffle操作的稳定性。
Spark.shuffle.io.retryWait
默认值:5s
参数说明:shuffle read task从shuffle write task所在节点拉取属于⾃⼰的数据时,如果拉取失败了每次重试拉取数据
的等待时间间隔,默认是5s;
调优建议:建议加⼤时间间隔时长,⽐如60s,以增加shuffle操作的稳定性。
- 避免由于内存不⾜导致聚合过程中频繁读写磁盘
spark.shuffle.memoryFraction
默认值:0.2
参数说明:该参数代表了executor内存中,分配给shuffle read task进⾏聚合操作的内存⽐例,默认是20%;
调优建议:如果内存充⾜,⽽且很少使⽤持久化操作,建议调⾼和这个⽐例,给shuffle read的聚合操作更多内
存,以避免由于内存不⾜导致聚合过程中频繁读写磁盘。在实践中发现,合理调节该参数可以将性能提升10%。
- 提供较好的磁盘读写性能。
Spark.shuffle.manager
默认值:sort
参数说明:该参数⽤于设置shuffleManager的类型。Spark1.5以后有三个可选项:hash、sort和tungstensort。Tungsten-sort与sort类似,但是使⽤了tungsten计划中的堆外内存管理机制,内存使⽤效率提⾼。
调优建议:由于sort shuffleManager默认会对数据进⾏排序,因此如果你的业务逻辑中需要该排序机制的话,则使
⽤默认的sort ShuffleManager就可以;但是如果你的业务逻辑不需要对数据进⾏排序,那么建议参考后⾯的⼏个参
数调优,通过bypass机制或优化的hash ShuffleManager来避免排序操作,同时提供较好的磁盘读写性能。这⾥要
注意的是,tungsten-sort要慎⽤,因为之前发现了⼀些相应的bug。
Spark.shuffle.sort.bypassMergeThreshold
- 减少了排序的性能开销
默认值:200
参数说明:当shuffleManager为sortshuffleManager时,如果shuffle read task的数量⼩于这个阈值,则shuffle write过程
中不会进⾏排序操作,⽽是直接按照未经优化的hashShuffleManager的⽅式去写数据,但是最后会将每个task产⽣的
所有临时磁盘⽂件都合并成⼀个⽂件,并会创建单独的索引⽂件。
调优建议:当你使⽤sortShuffleManager时,如果的确不需要排序操作,那么建议将这个参数调⼤⼀些,⼤于shuffle
read task的数量,那么此时就会⾃动启⽤bupass机制,map-side就不会进⾏排序,减少了排序的性能开销。但是这
种⽅式下,依然会产⽣⼤量的磁盘⽂件,因此shuffle write性能有待提⾼。
- 极⼤地减少磁盘IO开销
Spark.shuffle.consolidateFiles
默认值:false
参数说明:如果使⽤hashShuffleManager,该参数有效。如果设置为true,那么就会开启consilidate机制,会⼤幅度
合并shuflle write的输出⽂件,对于shuffle read task数量特别多的情况下,这种⽅法可以极⼤地减少磁盘IO开销,提
升性能。
调优建议:如果的确不需要sortHashShuffle的排序机制,那么除了使⽤bypass机制,还可以尝试
将spark.shuffle.manager参数⼿动调节为hash,使⽤hashShuffleManager,同时开启consolidate机制。在实践中尝试
过,发现其性能⽐开启了bypass机制的sortshuffleManager要⾼出10%到30%。


 1163
1163

 被折叠的 条评论
为什么被折叠?
被折叠的 条评论
为什么被折叠?
 到【灌水乐园】发言


