


 本文详细介绍如何在Android开发中使用ListView与SimpleAdapter实现自定义列表。从布局文件的创建到SimpleAdapter的设置,再到数据源的准备及ListView的加载过程,文章提供了完整的示例代码。
/**
*@author StormMaybin
*@Date 2016-06-11
*/
写在前面:
遇到挫折,要有勇往直前的信念,马上行动,坚持到底,决不放弃,成功者绝不放弃,放弃者绝不会成功。
android开发当中ListView是最常见的控件,那么和ListView配合使用的有ArrayAdapter和SimpleAdapter,前者确实很简单,有关ListView和ArrayAdapter可参考:http://blog.csdn.net/strommaybin/article/details/51629122,后者SimpleAdapter顾名思义是简单适配器的意思,可是运用中不是很简单,而且还相当复杂。
SimpleAdapter的使用方法:
Step 1:
现在主布局文件中添加一个ListView控件
<RelativeLayout xmlns:android="http://schemas.android.com/apk/res/android"
    xmlns:tools="http://schemas.android.com/tools"
    android:layout_width="match_parent"
    android:layout_height="match_parent">
    <ListView
        android:id="@+id/listView"
        android:layout_marginTop="5dp"
        android:layout_width="wrap_content"
        android:layout_height="wrap_content" />
</RelativeLayout>
接着重新创建一个列表项的布局文件,这样说有点不好理解,通俗点说,ListView像是一个集合,其中每个元素包含的控件布局就是列表项的布局文件,也就是说明ListView各个元素怎么摆放的意思。
<LinearLayout xmlns:android="http://schemas.android.com/apk/res/android"
    android:layout_width="match_parent"
    android:layout_height="wrap_content">

    <ImageView
        android:id="@+id/fruit_image"
        android:layout_width="wrap_content"
        android:layout_height="wrap_content" />
    <TextView
        android:id="@+id/fruit_name"
        android:layout_width="wrap_content"
        android:layout_height="wrap_content"
        android:layout_gravity="center"
        android:layout_marginLeft="10dp"/>
</LinearLayout>
上面这个布局文件,就说明ListView的每一项有一个ImageView和TextView控件,这样就不难理解了。
Step 2:
创建一个SimpleAdapter适配器
package com.stormmaybin.androidsimpleadapterdemo;

import android.app.Activity;
import android.os.Bundle;
import android.widget.ListView;
import android.widget.SimpleAdapter;
import java.util.ArrayList;
import java.util.HashMap;
import java.util.List;
import java.util.Map;

public class MainActivity extends Activity
{
    private SimpleAdapter simpleAdapter;
    private ListView listView;

    @Override
    protected void onCreate(Bundle savedInstanceState)
    {
        super.onCreate(savedInstanceState);
        setContentView(R.layout.activity_main);
        setTitle("水果商店");
        simpleAdapter = new SimpleAdapter(this, getData(), R.layout.fruit_item,
                new String[]{"fruit_image", "fruit_name"},
                new int[]{R.id.fruit_image, R.id.fruit_name});
        /**
        *参数说明
        *1、上下文
        *2、数据源,这个和ArrayAdapter里面的数据源差不多
        *3、每项列表加载布局文件
        *4、这个参数和第五个是对应的,也就是ListView每一行中所包含的其他元素。
        *5、相对应的这个参数是int数组类型的id值,自行理解,解释起来不太好解释。
        */
    }
}
Step 3:
创建数据源:
private List<Map<String, Object>>  getData()
{
     List<Map<String, Object>> data = new ArrayList<Map<String, Object>>();
     //第一组
     Map<String, Object> map1 = new HashMap<String, Object>();
     map1.put("fruit_image",R.drawable.apple);
     map1.put("fruit_name","This is a Apple");
     data.add(map1);
     //第二组
     Map<String, Object> map2 = new HashMap<String, Object>();
     map2.put("fruit_image",R.drawable.banana);
     map2.put("fruit_name","This is a Banana");
     data.add(map2);
     //第三组
     Map<String, Object> map3 = new HashMap<String, Object>();
     map3.put("fruit_image",R.drawable.grapes);
     map3.put("fruit_name","This is a Grapes");
     data.add(map3);
     //第四组
     Map<String, Object> map4 = new HashMap<String, Object>();
     map4.put("fruit_image",R.drawable.kiwi);
     map4.put("fruit_name","This is a Kiwi");
     data.add(map4);
     //第五组
     Map<String, Object> map5 = new HashMap<String, Object>();
     map5.put("fruit_image",R.drawable.orange);
     map5.put("fruit_name","This is a Orange");
     data.add(map5);
     return data;
}
Step 4:
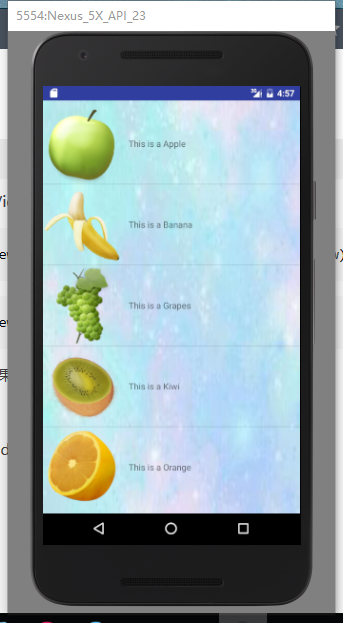
视图(ListView)加载适配器
listView = (ListView) findViewById(R.id.listView);listView.setAdapter(simpleAdapter);最后运行结果如图
写在最后
初学者写android笔记,有错误麻烦大牛指出,共同学习。


 被折叠的 条评论
为什么被折叠?
被折叠的 条评论
为什么被折叠?
 到【灌水乐园】发言


