


首先这个话题内容并不多,因为我们没有服务器,所以只能用线程来模拟登陆,从编写界面到实现功能都要模仿的像一点对吧。
内容实现从登录过程,到最后强制下线这一整套过程
下面来分步实现
一. 登陆界面
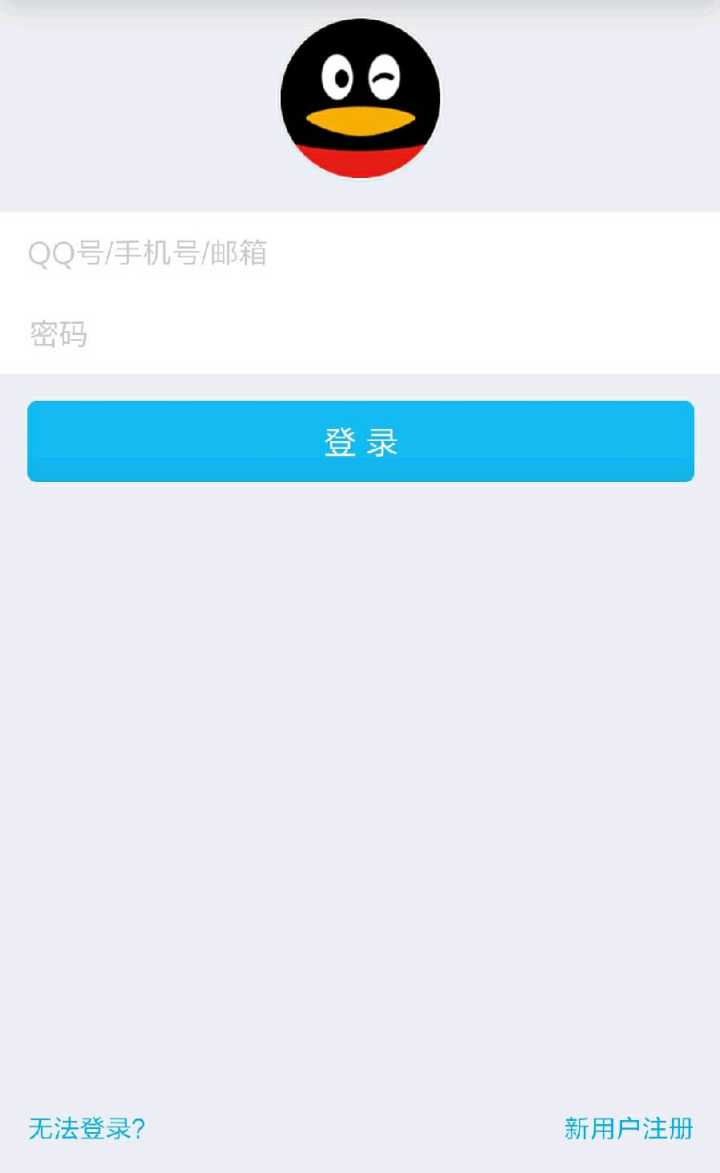
先上Android QQ 6.5登录界面效果
下面我们从布局xml开始写起
在做之前说一下,由于这里用的头像是ps的圆形头像,所以没使用圆形头像库,下面直接用。
新建qq_login.xml布局,内容如下
<?xml version="1.0" encoding="utf-8"?>
<RelativeLayout xmlns:android="http://schemas.android.com/apk/res/android"
    android:orientation="vertical" android:layout_width="match_parent"
    android:layout_height="match_parent"
    android:background="#eeebecec"
    >
    <ImageView
        android:layout_width="90dp"
        android:layout_height="90dp"
        android:id="@+id/imageView2"
        android:background="@drawable/qq_head"
        android:layout_marginTop="43dp"
        android:layout_below="@+id/relativeLayout"
        android:layout_centerHorizontal="true" />
    <TextView
        android:layout_width="wrap_content"
        android:layout_height="wrap_content"
        android:textAppearance="?android:attr/textAppearanceSmall"
        android:text="无法登陆?"
        android:id="@+id/textView7"
        android:textColor="#3eb0f2"
        android:layout_marginStart="14dp"
        android:layout_marginBottom="10dp"
        android:layout_alignParentBottom="true"
        android:layout_alignParentStart="true" />
    <TextView
        android:layout_width="wrap_content"
        android:layout_height="wrap_content"
        android:textAppearance="?android:attr/textAppearanceSmall"
        android:text="新用户注册"
        android:textColor="#3eb0f2"
        android:id="@+id/textView8"
        android:layout_alignTop="@+id/textView7"
        android:layout_alignParentEnd="true"
        android:layout_marginEnd="14dp" />
   <EditText
        android:layout_width="wrap_content"
        android:layout_height="42dp"
        android:inputType="number"
        android:ems="10"
        android:hint="QQ帐号/手机号/邮箱"
        android:textColorHint="#e4e3e3"
        android:background="@drawable/qq_edit_shape"
        android:id="@+id/editText"
        android:paddingStart="15dp"
        android:layout_below="@+id/imageView2"
        android:layout_alignParentStart="true"
        android:layout_marginTop="25dp"
        android:layout_alignParentEnd="true" />
    <EditText
        android:layout_width="wrap_content"
        android:layout_height="42dp"
        android:inputType="textPassword"
        android:ems="10"
        android:id="@+id/editText2"
        android:hint="密码"
        android:paddingStart="15dp"
        android:textColorHint="#e4e3e3"
        android:background="@drawable/qq_edit_shape"
        android:layout_below="@+id/editText"
        android:layout_alignParentStart="true"
        android:layout_alignParentEnd="true" />
    <ImageView
        android:layout_width="20dp"
        android:layout_height="20dp"
        android:id="@+id/imageView4"
        android:layout_marginLeft="1dp"
        android:visibility="gone"
        android:background="@drawable/clear"
        android:layout_margin="50dp"
        android:layout_alignTop="@+id/editText"
        android:layout_alignStart="@+id/textView8" />
    <ImageView
        android:layout_width="20dp"
        android:layout_height="20dp"
        android:id="@+id/imageView5"
        android:visibility="gone"
        android:background="@drawable/clear"
       android:layout_marginTop="10dp"
        android:layout_alignTop="@+id/editText"
        android:layout_alignEnd="@+id/imageView4"
        android:layout_marginEnd="1dp" />
    <ImageView
        android:layout_width="match_parent"
        android:layout_height="1dp"
        android:id="@+id/imageView3"
        android:background="#dbd9d9"
        android:layout_above="@+id/editText2"
        android:layout_alignParentStart="true" />
    <Button
        android:layout_width="wrap_content"
        android:layout_height="42dp"
        android:text="登 录"
        android:id="@+id/button"
        android:textColor="#fff"
        android:textSize="18sp"
        android:background="@drawable/login_btn_selector"
        android:layout_marginTop="18dp"
        android:layout_below="@+id/editText2"
        android:layout_alignEnd="@+id/textView8"
        android:layout_toEndOf="@+id/relativeLayout" />
</RelativeLayout>
从上到下分析,头像是事先做好的圆形这里代替一下,输入框背景是一个shape形状,所以在drawable下新建qq_edit_shape.xml,内容如下
<?xml version="1.0" encoding="utf-8"?>
<shape xmlns:android="http://schemas.android.com/apk/res/android"
    android:shape="rectangle"
    >
    <solid android:color="#fafbfb"/>
</shape>
按钮也是shape形状,不过我们需要做两个,并且还要添加一个背景选择器
初始状态shape
<?xml version="1.0" encoding="utf-8"?>
<shape xmlns:android="http://schemas.android.com/apk/res/android"
    android:shape="rectangle"
    >
    <corners
        android:bottomLeftRadius="10px"
        android:bottomRightRadius="10px"
        android:topLeftRadius="10px"
        android:topRightRadius="10px" />
    <solid android:color="#09c2fa"/>
</shape>
按下时
<?xml version="1.0" encoding="utf-8"?>
<shape xmlns:android="http://schemas.android.com/apk/res/android"
    android:shape="rectangle"
    >
    <corners
        android:bottomLeftRadius="10px"
        android:bottomRightRadius="10px"
        android:topLeftRadius="10px"
        android:topRightRadius="10px" />
    <solid android:color="#04c8eb"/>
</shape>
选择器
<?xml version="1.0" encoding="utf-8"?>
<selector xmlns:android="http://schemas.android.com/apk/res/android">
    <item android:state_pressed="true" android:drawable="@drawable/login_shape_press"/>
    <item android:drawable="@drawable/login_shape"/>
</selector>
然后是edittext分割线,用imageview代替,输入时显示的清除键,也用imageview代替(默认状态下隐藏)
最后的效果呢??
在这里!
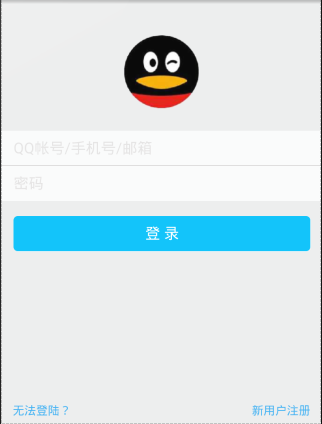
额,是不是有点太像了,会不会被告侵权呢,哈哈!
其实点睛的设计在配色和动画上面,配色一块我觉得用photoshop吸管可以检测出来搭配,但是我的这个颜色是根据知乎某网友给的rgb搭配的,模拟器上是这个效果,真机上会有差别,动画那一块就不实现了。
二.实现模拟登陆过程
由于文章的重点是强制下线,所以登录这个我们就用简单的if-else来判断一下就可以
首先我们来新建ActivityCollector类来管理所有类
public class ActivityCollector {
    public static List<Activity> activities=new ArrayList<Activity>();
    public static void addActivity(Activity activity)
    {
        activities.add(activity);
    }
    //添加
    public static void removeActivty(Activity activity)
    {
        activities.remove(activity);
    }
    //移除
    public static void finishAll()
    {
        for(Activity activty:activities)
        {
            if(!activty.isFinishing())
            {
                activty.finish();
            }
        }
    }
    //结束
}
接着建立活动父类
public class BaseActivity extends Activity {
    @Override
    protected void onCreate(Bundle savedInstanceState) {
        super.onCreate(savedInstanceState);
        ActivityCollector.addActivity(this);
    }

    @Override
    protected void onDestroy() {
        super.onDestroy();
        ActivityCollector.removeActivty(this);
    }
}
最后我们新建Login_Activity.java(注意:为了接收管理器管理我们要继承自BaseActivity)
在活动里声明用到的变量,oncreate方法里新建初始化的initView()方法
方法内容如下:
 private void initView() {
        login= (Button) findViewById(R.id.button);
        //取的按钮实例
        QQ= (EditText) findViewById(R.id.editText);
        //取的qq号输入框实例
        pw= (EditText) findViewById(R.id.editText2);
        //密码输入框实例
        clearpw= (ImageView) findViewById(R.id.imageView4);
        clearQQ= (ImageView) findViewById(R.id.imageView5);
        //清除图标实例
    }
把需要用到的控件初始化
下面设置监听,在initView()方法后面新建initlistener();方法,内容如下
  private void initlistener() {
        //获取输入情况
        QQ.addTextChangedListener(textWatcher);
        pw.addTextChangedListener(textWatcher2);
        clearQQ.setOnClickListener(new View.OnClickListener() {
            @Override
            public void onClick(View view) {
                QQ.setText("");
            }
        });
        clearpw.setOnClickListener(new View.OnClickListener() {
            @Override
            public void onClick(View view) {
                pw.setText("");
            }
        });
        //清除数据
        login.setOnClickListener(new View.OnClickListener() {
            @Override
            public void onClick(View view) {
                Q = QQ.getText().toString();
                P = pw.getText().toString();
                //获取输入的文本
                if (Q.equals("") || P.equals("")) {
                    if (Q.equals("")) {
                        Toast toast = Toast.makeText(getApplicationContext(),
                                "请输入帐号!", Toast.LENGTH_LONG);
                        toast.setGravity(Gravity.TOP, 0, 20);
                        toast.show();
                    }
                   else  if (P.equals("")) {
                        Toast toast = Toast.makeText(getApplicationContext(),
                                "请输入密码!", Toast.LENGTH_LONG);
                        toast.setGravity(Gravity.TOP, 0, 20);
                        toast.show();
                    }
                }
                //输入时的判断
                //开启子线程模拟耗时操作
                else {
                    dialogshow();
                    new Thread() {
                        @Override
                        public void run() {
                            Message message = new Message();
                            try {
                                Thread.sleep(2000);
                                if (Q.equals("123456") && P.equals("123456")) {
                                    message.what = 1;
                                }
                                //如果帐号密码匹配,发送信息
                                else {
                                    message.what = 0;
                                }
                                //不匹配发送消息
                            } catch (InterruptedException e) {
                                e.printStackTrace();
                            }
                            handler.sendMessage(message);
                        }
                    }.start();
                }
            }
        });

    }
这里我们用textWatcher方法监听是否输入内容,从而控制清除图标的显示与隐藏
其中用到的textWatcher 和textWatcher2方法如下
 private TextWatcher textWatcher = new TextWatcher() {
        @Override
        public void onTextChanged(CharSequence s, int start, int before,
                                  int count) {
            if(s.length()>0) {
                clearQQ.setVisibility(View.VISIBLE);
            }
            else
            {
                clearQQ.setVisibility(View.GONE);
            }
        }
        //如果有输入值就显示图标,没有就隐藏
        @Override
        public void beforeTextChanged(CharSequence s, int start, int count,
                                      int after) {
        }
        @Override
        public void afterTextChanged(Editable s) {
        }
    };
    private TextWatcher textWatcher2 = new TextWatcher() {
        @Override
        public void onTextChanged(CharSequence s, int start, int before,
                                  int count) {
            if(s.length()>0) {
                clearpw.setVisibility(View.VISIBLE);
            }
            else
            {
                clearpw.setVisibility(View.GONE);
            }
        }
        @Override
        public void beforeTextChanged(CharSequence s, int start, int count,
                                      int after) {
        }
        @Override
        public void afterTextChanged(Editable s) {
        }
    };
这里我们使用自定义dialog,xml就不贴了
dialogshow方法
 Dialog dia;
    private void dialogshow() {
        LayoutInflater layoutInflater=LayoutInflater.from(this);    //设置反射器
        View my=layoutInflater.inflate(R.layout.qq_login_dialog,null);
        //创建反射器视图my,(采用了反射器的inflate方法)
        AlertDialog.Builder builder=new AlertDialog.Builder(this);
        //创建对话框实例
        builder.setView(my);
        //设置好视图
        dia=builder.create();    //显示出来
        Window dialogWindow = dia.getWindow();
        WindowManager.LayoutParams lp = dialogWindow.getAttributes();
        dialogWindow.setGravity( Gravity.TOP);
        //设置显示位置
        dia.show();
        dia.setCanceledOnTouchOutside(false);   //点击屏幕不消失
    }
线程结束信息接收
Handler方法
 private Handler handler=new Handler()
    {
        @Override
        public void handleMessage(Message msg) {
            switch (msg.what)
            {
                case 1:
                    dia.dismiss();
                    Intent intent=new Intent(Login_Activty.this,QQActivity.class);
                    startActivity(intent);
                    finish();
                    //启动新活动,结束本活动
                    break;
                case 0:
                    dia.dismiss();
                    Toast toast = Toast.makeText(getApplicationContext(),
                            "帐号或密码输入错误", Toast.LENGTH_LONG);
                    toast.setGravity(Gravity.TOP, 0, 20);
                    toast.show();

                    break;
                default:break;
            }
        }
    };
好了,Login_Activity里的所有添加的方法就写完了
最后梳理一下,贴出onCreate方法
  protected void onCreate(Bundle savedInstanceState) {
        super.onCreate(savedInstanceState);
        setContentView(R.layout.qq_login);
        initView();
        initlistener();

    }
现在可以从oncreate进去一步一步的找到相应的方法,dialog布局就不贴出来了,很简单的一个progressbar和textview
三.广播发出与接收
通过登录界面进入新界面后,需要执行的是发送与接收广播,于是广播发送写在了新活动里
public class QQActivity extends BaseActivity  {
    Button button;
    @Override
    protected void onCreate(Bundle savedInstanceState) {
        super.onCreate(savedInstanceState);
       setContentView(R.layout.qqactivity);
        button= (Button) findViewById(R.id.buttonx);
        button.setOnClickListener(new View.OnClickListener() {
            @Override
            public void onClick(View view) {
                Intent intent=new Intent("com.surine.android_su.OFFLINE");
                sendBroadcast(intent);
                //发送广播
            }
        });
    }
}
布局就不贴了,就一个按钮而已
有了发送器我们需要接收器
public class OffReceiver extends BroadcastReceiver {
    Button button;
    @Override
    public void onReceive(final Context context, Intent intent) {
        LayoutInflater layoutInflater=LayoutInflater.from(context);    //设置反射器
        View my=layoutInflater.inflate(R.layout.offdialog,null);
        //创建反射器视图my,(采用了反射器的inflate方法)
        AlertDialog.Builder builder=new AlertDialog.Builder(context);
        //创建对话框实例
        builder.setView(my);
        //设置好视图

        builder.setCancelable(false);
        //不可取消
        final AlertDialog alertDialog=builder.create();

        alertDialog.getWindow().setType(WindowManager.LayoutParams.TYPE_SYSTEM_ALERT);
        alertDialog.show();
        my.findViewById(R.id.dialog_confirm2).setOnClickListener(new View.OnClickListener() {
            @Override
            public void onClick(View view) {
                alertDialog.dismiss();
                //消失
                ActivityCollector.finishAll();
                Intent intent=new Intent(context,Login_Activty.class);
                intent.addFlags(Intent.FLAG_ACTIVITY_NEW_TASK);
                context.startActivity(intent);
            //启动新活动
            }
        });
    }
}
这里先说用到的布局dialog
<?xml version="1.0" encoding="utf-8"?>
<LinearLayout xmlns:android="http://schemas.android.com/apk/res/android"
    xmlns:tools="http://schemas.android.com/tools"
    android:layout_width="320dp"
    android:layout_height="wrap_content"
    android:layout_gravity="center"
    android:orientation="vertical"
    android:background="@drawable/qqshape"
    tools:context=".MainActivity">
    <TextView
        android:layout_width="wrap_content"
        android:layout_height="50dip"
        android:layout_gravity="center"
        android:gravity="center"
        android:focusable="false"
        android:text="下线通知"
        android:textColor="#0e0e0e"
        android:textSize="18sp"
        android:textStyle="bold"
        />
    <TextView
        android:layout_width="wrap_content"
        android:layout_height="60sp"
        android:paddingLeft="10dip"
        android:focusable="false"
        android:paddingRight="10dip"
        android:gravity="center_vertical"
        android:text="您已通过QQ安全中心退出手机QQ"
        android:textColor="#0e0e0e"
        android:textSize="16sp"
        />
    <View
        android:layout_width="match_parent"
        android:layout_height="1dp"
        android:background="#c3c1c1"

        />
    <LinearLayout
        android:layout_width="match_parent"
        android:layout_height="40dp"
        android:layout_alignParentBottom="true">
        <Button
            android:id="@+id/dialog_confirm2"
            android:layout_width="wrap_content"
            android:layout_height="wrap_content"
            android:layout_weight="1"
            android:text="确定"
            android:textColor="#2a78ed"
       android:background="@drawable/off_dialog_selector"
            />
    </LinearLayout>
</LinearLayout>
所需要的drawable资源
qqshape
<?xml version="1.0" encoding="utf-8"?>
<shape xmlns:android="http://schemas.android.com/apk/res/android"
    android:shape="rectangle"
    >
    <corners
        android:bottomLeftRadius="20px"
        android:bottomRightRadius="20px"
        android:topLeftRadius="20px"
        android:topRightRadius="20px" />
    <solid android:color="#e8e9e9"/>
</shape>
按钮背景选择器
off_dialog_selector
<?xml version="1.0" encoding="utf-8"?>
<selector xmlns:android="http://schemas.android.com/apk/res/android">
    <item android:state_pressed="true" android:drawable="@drawable/off_dialog_button_press"/>
    <item android:drawable="@drawable/off_dialog_button_shape"/>
</selector>
按下颜色
off_dialog_button_press
<?xml version="1.0" encoding="UTF-8"?>
<shape
    xmlns:android="http://schemas.android.com/apk/res/android"
    android:shape="rectangle">
    <solid android:color="#bbbaba"/>
    <corners android:bottomLeftRadius="20px"
        android:bottomRightRadius="20px"/>

</shape>
初始颜色
off_dialog_button_shape
<?xml version="1.0" encoding="UTF-8"?>
<shape
xmlns:android="http://schemas.android.com/apk/res/android"
android:shape="rectangle">
<solid android:color="#e8e9e9"/>
<corners android:bottomLeftRadius="20px"
android:bottomRightRadius="20px"
/>
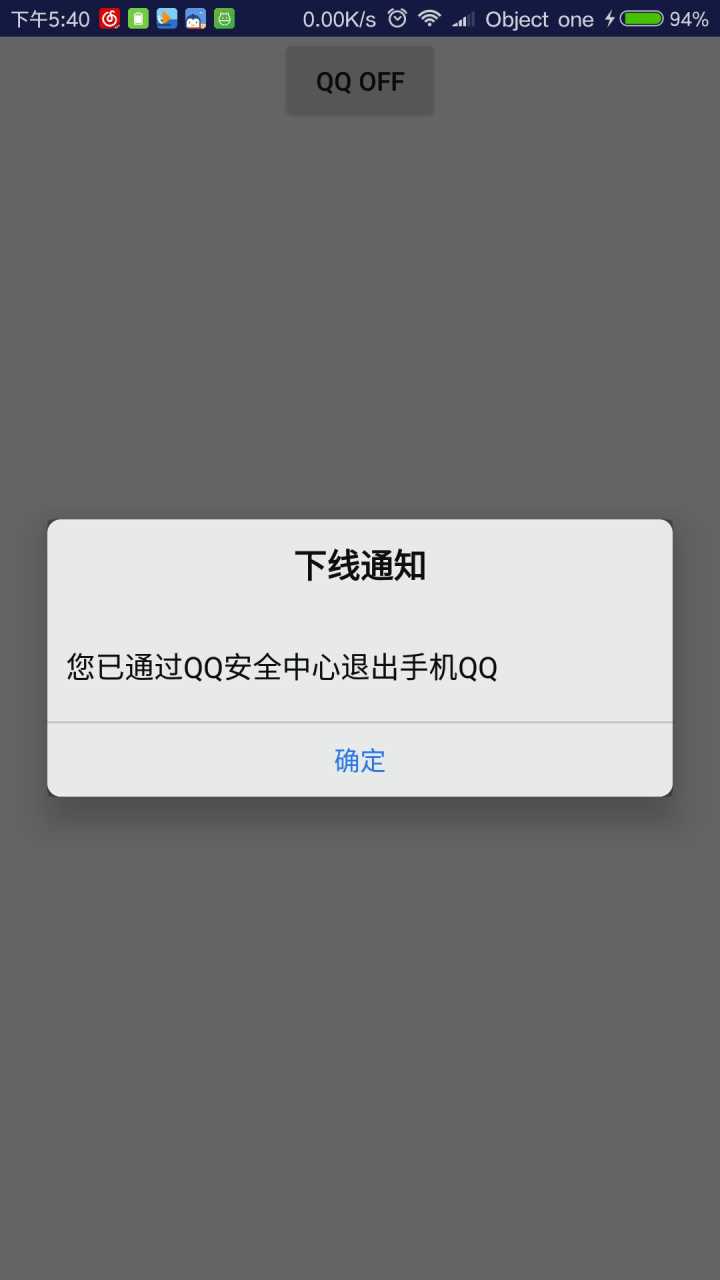
</shape>布局就这么多,当我们接收到广播后,显示出dialog,监听按钮事件,关闭dialog并启动新活动,注意设置dialog不可取消以屏蔽其它动作
四.注册权限与总结
悬浮窗
<uses-permission android:name="android.permission.SYSTEM_ALERT_WINDOW"/>接收器注册
   <receiver android:name=".OffReceiver">
            <intent-filter>
                <action android:name="com.surine.android_su.OFFLINE"/>
            </intent-filter>
        </receiver>
全部的内容就是这么多啦
最后看看效果图吧
写在最后:
1.注意悬浮窗权限是需要我们手动给的,去手机的安全中心给予应用权限才能显示
2.注册的接收器要写在application标签内部……为什么要说这个呢,因为不是很理解呢,所以把他写在了标签外……接下来就是”激动人心“的找错时间……
3.半个小时前我在这篇博客的结束地方加入了郭神的博客,我很惊奇markdown编辑器自动识别了连接,试着点击了一下……回退回来的时候……文章的3/4都没了……从上午保存那块地方再敲下来,如果有什么错误还请评论区指出,还要提醒一下宝宝们……记得保存再离开。
4.写这些文章的原因是,我要为我的Android入门做笔记,由于刚学Android,很多东西都不知道,碰见了不一定能记住,所以借助网络来帮我记住它们,如果有看的我的博客,希望对大家有所帮助。
5.最后还是加入郭神的博客地址 http://guolin.tech,作为Android入门的指导大神,他的《第一行代码》还是很值得阅读的。本篇内容实现是参考本书来的。
6.广播接收器也算告一段落啦,当然我研究的比较浅显,哈哈,大家结合上一篇内容读吧!http://blog.csdn.net/su_ling/article/details/52205846


 304
304

 被折叠的 条评论
为什么被折叠?
被折叠的 条评论
为什么被折叠?
 到【灌水乐园】发言


