


目录[-]
一、什么是VFL?
VFL是 Visual format language (可视格式语言)的缩写,是Apple针对 AutoLayout 设计的一种语言。通过VFL,我们能在代码中灵活的使用AutoLayout而做到真正的不受设备控制!
二、VFL的图形表示
先看一个图形:

它代表了有两个button ,cancel 和 accept,他们的位置关系是左右相隔一段距离。
将他们用简单的方式画出来,变成了下述图:

将其再次简化,变成了如下一种格式:

而VFL正正是用上图这样的一种直观的格式来展现约束的。
不妨先看一下上述布局用VFL的代码实现,假设cancelButton和acceptButton相隔30像素,那么为两个button添加约束的代码为:
|
1
2
3
|
NSDictionary* views = NSDictionaryOfVariableBindings( cancelButton,acceptButton);
//确定约束成员
NSArray *constraint = [NSLayoutConstraint constraintsWithVisualFormat:@
"[cancelButton]-30-[acceptButton]"
options:0 metrics:nil views:views]];
//添加布局
[self.view addConstraints:constraint];
//在视图上添加约束
|
这样的一个代码就实现了上述约束的布局。有些人肯定会说,太麻烦了,还不如在sb上随便点两下。这个,确实是的。但是,当用sb无法一次性满足N个设备时,VFL就发挥出它的顽强精神了!
三、VFL的使用规则
/****************************************************************/
“|: ”表示父视图 eg:
|
1
|
@
"|-[cancelButton]-30-[acceptButton]"
|
表示 cancelButton在父视图的左边缘(与父视图的相对位置是 x = 0),常见的有:
1.|-[view]-|: 视图处在父视图的左右边缘内
2.|-[view] : 视图处在父视图的左边缘
3.|[view] : 视图和父视图左边对齐;
/****************************************************************/
“-:”表示距离,eg:
|
1
|
@
"[cancelButton(50)]-30-[acceptButton]"
|
表示cancelButton长50像素 和acceptButton的间隔是30像素
|
1
|
@
"|-50-[cancelButton]"
|
表示cancelButton 离superView的左边缘为50个像素;
/****************************************************************/
V: :表示垂直
|
1
|
@
"V:|-100-[cancelButton]-20-[acceptButton]"
|
表示cancelButton离父视图顶端100个像素点,离accpetButton20个像素点
|
1
|
@
"V:[acceptButton(300)]-20-|"
|
表示acceptButton高300像素,离superView底端有20个像素点;
/****************************************************************/
H: 表示水平(可以不写,默认的话就是水平位置);
/****************************************************************/
>= :表示视图间距、宽度和高度必须大于或等于某个值;
<= :表示视图间距、宽度和高度必须小宇或等于某个值;
== :表示视图间距、宽度或者高度必须等于某个值 ;
|
1
|
@
"V:|-(==padding)-[imageView]->=0-[button]-(==padding)-|"
|
表示离父视图的距离为Padding,这两个视图间距必须大于或等于0并且距离底部父视图为 padding。
|
1
|
@
"[wideView(>=30@500)]"
|
表示视图的宽度为至少为30 不能超过 500
四、VFL使用的前提和方法
1、设置translatesAutoresizingMaskIntoConstraints属性
如果想用autolayout,那么必须先设置translatesAutoresizingMaskIntoConstraints为NO
例如初始化一个UIButton类对象,那么:
|
1
2
|
UIButton* cancelButton = [[UIButton alloc] init];
cancelButton.translatesAutoresizingMaskIntoConstraints = NO;
|
2、两种常用的约束格式(NSArray、NSLayoutConstraint)
(1)NSArray方法(适用于添加水平和垂直的约束)
|
1
2
3
|
- (
void
)addConstraints:(NSArray *)constraints;
+ (NSArray *)constraintsWithVisualFormat:(NSString *)format options:(NSLayoutFormatOptions)opts metrics:(NSDictionary *)metrics views:(NSDictionary *)views;
|
参数介绍:
format:此参数为你的vfl语句,比如:@"H:|-[button]-|"
opts:枚举参数,默认写0,具体跟据你所实现的需求去选择你想要的枚举
metrics:这里是一个字典,当在format中使用了动态数据比如上现这句:@"H:|-[button(==width)]-|",表示这个button的宽度为width,那么这个参数去哪里找呢?就是在这个字典里面找到key对就的值,如果没有找到这个值,app就会crash.
views:顾名思义,这是传所有你在vfl中使用到的view,那在上面这句例子中的应该怎么传呢?结果是这样的:NSDictionaryOfVariableBindings(button).如果你使用到了多个view,就可以这样NSDictionaryOfVariableBindings(button,button1,button3...),这个名字也要跟参数format中的一一对应,缺一不可.
|
1
2
3
4
5
6
7
8
9
10
11
12
13
14
15
16
|
/*---------------------------初始化----------------------------------*/
UIButton* cancelButton = [[UIButton alloc] init];
cancelButton.translatesAutoresizingMaskIntoConstraints = NO;
UIButton* acceptButton = [UIButton
new
];
acceptButton.translatesAutoresizingMaskIntoConstraints = NO;
/*------------------------------添加水平和垂直约束-------------------------*/
NSDictionary* views = NSDictionaryOfVariableBindings(cancelButton, acceptButton);
NSString *vflString = [NSString stringWithFormat:@
"|-20-[cancelButton(>=%d)]-20-|"
, self.view.frame.size.width/3];
[self.view addConstraints:[NSLayoutConstraint constraintsWithVisualFormat:vflString options:0 metrics:nil views:views]];
vflString = @
"V:|-30-[cancelButton(150)]-15-[acceptButton(50)]"
;
[self.view addConstraints:[NSLayoutConstraint constraintsWithVisualFormat:vflString options:0 metrics:nil views:views]];
|
(2) NSLayoutConstraint (适用于添加居中的约束)
|
1
|
- (
void
)addConstraint:(NSLayoutConstraint *)constraint
|
|
1
|
+(instancetype)constraintWithItem:(id)view1 attribute:(NSLayoutAttribute)attr1 relatedBy:(NSLayoutRelation)relation toItem:(id)view2 attribute:(NSLayoutAttribute)attr2 multiplier:(CGFloat)multiplier constant:(CGFloat)c;
|
|
1
2
3
4
5
6
7
8
|
/*---------------------------初始化----------------------------------*/
UIButton* acceptButton = [UIButton
new
];
acceptButton.translatesAutoresizingMaskIntoConstraints = NO;
NSDictionary* views = NSDictionaryOfVariableBindings(acceptButton);
/*------------------------------acceptButton水平居中-------------------------*/
[self.view addConstraint:[NSLayoutConstraint constraintWithItem:acceptButton attribute:NSLayoutAttributeCenterX relatedBy:NSLayoutRelationEqual toItem:self.view attribute:NSLayoutAttributeCenterX multiplier:1 constant:0]];
[self.view addConstraint:[NSLayoutConstraint constraintWithItem:acceptButton attribute:NSLayoutAttributeCenterY relatedBy:NSLayoutRelationEqual toItem:self.view attribute:NSLayoutAttributeCenterY multiplier:1 constant:0]];
|
注意:在上述例子中,acceptButton.attribute = self.view.attribute * multiplier + constant
五、代码实现上篇博客中storyboard的布局(AutoLayout 使用之storyboard演示)
附上两张图来回忆一下:
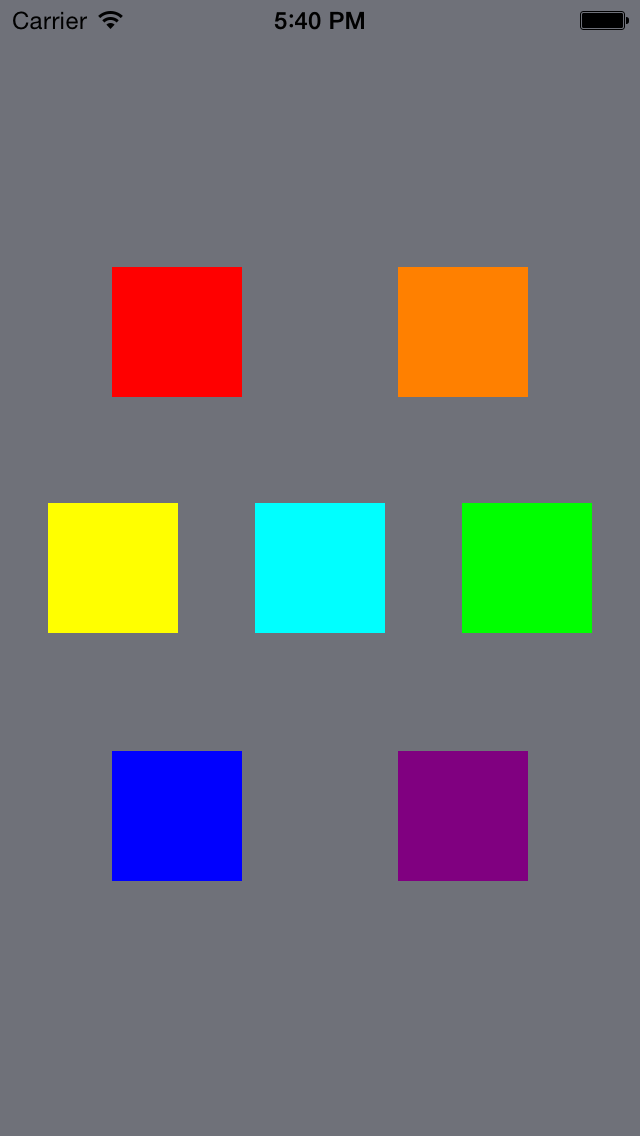

下面用代码实现:
|
1
2
3
4
5
6
7
8
9
10
11
12
13
14
15
16
17
18
19
20
21
22
23
24
25
26
27
28
29
30
31
32
33
34
35
36
37
38
39
40
41
42
43
44
45
46
47
48
49
50
51
52
53
54
55
56
57
58
59
60
61
62
63
64
65
66
67
68
69
70
71
72
73
74
75
76
77
78
79
80
81
82
83
|
- (
void
)viewDidLoad {
[super viewDidLoad];
UIView *view1 = [UIView
new
];
view1.translatesAutoresizingMaskIntoConstraints = NO;
view1.backgroundColor = [UIColor redColor];
[self.view addSubview:view1];
UIView *view2 = [UIView
new
];
view2.translatesAutoresizingMaskIntoConstraints = NO;
view2.backgroundColor = [UIColor orangeColor];
[self.view addSubview:view2];
UIView *view3 = [UIView
new
];
view3.translatesAutoresizingMaskIntoConstraints = NO;
view3.backgroundColor = [UIColor yellowColor];
[self.view addSubview:view3];
UIView *view4 = [UIView
new
];
view4.translatesAutoresizingMaskIntoConstraints = NO;
view4.backgroundColor = [UIColor cyanColor];
[self.view addSubview:view4];
UIView *view5 = [UIView
new
];
view5.translatesAutoresizingMaskIntoConstraints = NO;
view5.backgroundColor = [UIColor greenColor];
[self.view addSubview:view5];
UIView *view6 = [UIView
new
];
view6.translatesAutoresizingMaskIntoConstraints = NO;
view6.backgroundColor = [UIColor blueColor];
[self.view addSubview:view6];
UIView *view7 = [UIView
new
];
view7.translatesAutoresizingMaskIntoConstraints = NO;
view7.backgroundColor = [UIColor purpleColor];
[self.view addSubview:view7];
NSDictionary *views = NSDictionaryOfVariableBindings(view1,view2,view3,view4,view5,view6,view7);
/*---------------------view4居中显示,长度以及宽度为65-------------------------*/
[self.view addConstraint:[NSLayoutConstraint constraintWithItem:view4 attribute:NSLayoutAttributeCenterX relatedBy:NSLayoutRelationEqual toItem:self.view attribute:NSLayoutAttributeCenterX multiplier:1 constant:0]];
[self.view addConstraint:[NSLayoutConstraint constraintWithItem:view4 attribute:NSLayoutAttributeCenterY relatedBy:NSLayoutRelationEqual toItem:self.view attribute:NSLayoutAttributeCenterY multiplier:1 constant:0]];
[self.view addConstraints:[NSLayoutConstraint constraintsWithVisualFormat:@
"[view4(65)]"
options:0 metrics:nil views:views]];
[self.view addConstraints:[NSLayoutConstraint constraintsWithVisualFormat:@
"V:[view4(65)]"
options:0 metrics:nil views:views]];
/*---------------------View3长度宽度为65,垂直居中,且它离容器左边的距离为一个固定值-------------------------*/
[self.view addConstraints:[NSLayoutConstraint constraintsWithVisualFormat:@
"V:[view3(65)]"
options:0 metrics:nil views:views]];
[self.view addConstraints:[NSLayoutConstraint constraintsWithVisualFormat:@
"|-13-[view3(65)]"
options:0 metrics:nil views:views]];
[self.view addConstraint:[NSLayoutConstraint constraintWithItem:view3 attribute:NSLayoutAttributeCenterY relatedBy:NSLayoutRelationEqual toItem:self.view attribute:NSLayoutAttributeCenterY multiplier:1 constant:0]];
/*---------------------view5长度宽度为65,垂直居中,且它离容器右边的距离为一个固定值-------------------------*/
[self.view addConstraints:[NSLayoutConstraint constraintsWithVisualFormat:@
"V:[view5(65)]"
options:0 metrics:nil views:views]];
[self.view addConstraints:[NSLayoutConstraint constraintsWithVisualFormat:@
"[view5(65)]-13-|"
options:0 metrics:nil views:views]];
[self.view addConstraint:[NSLayoutConstraint constraintWithItem:view5 attribute:NSLayoutAttributeCenterY relatedBy:NSLayoutRelationEqual toItem:self.view attribute:NSLayoutAttributeCenterY multiplier:1 constant:0]];
/*---------view1和view2 让他离下面的最近的view 的距离以及根视图的左边或右边的位置成固定值-------------*/
//view1
[self.view addConstraints:[NSLayoutConstraint constraintsWithVisualFormat:@
"V:[view1(==65)]-69-[view3]"
options:0 metrics:nil views:views]];
[self.view addConstraints:[NSLayoutConstraint constraintsWithVisualFormat:@
"|-52-[view1(65)]"
options:0 metrics:nil views:views]];
//view2
[self.view addConstraints:[NSLayoutConstraint constraintsWithVisualFormat:@
"V:[view2(==65)]-69-[view5]"
options:0 metrics:nil views:views]];
[self.view addConstraints:[NSLayoutConstraint constraintsWithVisualFormat:@
"[view2(65)]-52-|"
options:0 metrics:nil views:views]];
/*---------view6和view7 让他离上面的最近的view 的距离以及根视图的左边或右边的位置成固定值-------------*/
//view6
[self.view addConstraints:[NSLayoutConstraint constraintsWithVisualFormat:@
"V:[view3]-69-[view6(==65)]"
options:0 metrics:nil views:views]];
[self.view addConstraints:[NSLayoutConstraint constraintsWithVisualFormat:@
"|-52-[view6(65)]"
options:0 metrics:nil views:views]];
//view7
[self.view addConstraints:[NSLayoutConstraint constraintsWithVisualFormat:@
"V:[view5]-69-[view7(65)]"
options:0 metrics:nil views:views]];
[self.view addConstraints:[NSLayoutConstraint constraintsWithVisualFormat:@
"[view7(65)]-52-|"
options:0 metrics:nil views:views]];
}
|
一、什么是VFL?
VFL是 Visual format language (可视格式语言)的缩写,是Apple针对 AutoLayout 设计的一种语言。通过VFL,我们能在代码中灵活的使用AutoLayout而做到真正的不受设备控制!
二、VFL的图形表示
先看一个图形:
它代表了有两个button ,cancel 和 accept,他们的位置关系是左右相隔一段距离。
将他们用简单的方式画出来,变成了下述图:
将其再次简化,变成了如下一种格式:
而VFL正正是用上图这样的一种直观的格式来展现约束的。
不妨先看一下上述布局用VFL的代码实现,假设cancelButton和acceptButton相隔30像素,那么为两个button添加约束的代码为:
|
1
2
3
|
NSDictionary* views = NSDictionaryOfVariableBindings( cancelButton,acceptButton);
//确定约束成员
NSArray *constraint = [NSLayoutConstraint constraintsWithVisualFormat:@
"[cancelButton]-30-[acceptButton]"
options:0 metrics:nil views:views]];
//添加布局
[self.view addConstraints:constraint];
//在视图上添加约束
|
这样的一个代码就实现了上述约束的布局。有些人肯定会说,太麻烦了,还不如在sb上随便点两下。这个,确实是的。但是,当用sb无法一次性满足N个设备时,VFL就发挥出它的顽强精神了!
三、VFL的使用规则
/****************************************************************/
“|: ”表示父视图 eg:
|
1
|
@
"|-[cancelButton]-30-[acceptButton]"
|
表示 cancelButton在父视图的左边缘(与父视图的相对位置是 x = 0),常见的有:
1.|-[view]-|: 视图处在父视图的左右边缘内
2.|-[view] : 视图处在父视图的左边缘
3.|[view] : 视图和父视图左边对齐;
/****************************************************************/
“-:”表示距离,eg:
|
1
|
@
"[cancelButton(50)]-30-[acceptButton]"
|
表示cancelButton长50像素 和acceptButton的间隔是30像素
|
1
|
@
"|-50-[cancelButton]"
|
表示cancelButton 离superView的左边缘为50个像素;
/****************************************************************/
V: :表示垂直
|
1
|
@
"V:|-100-[cancelButton]-20-[acceptButton]"
|
表示cancelButton离父视图顶端100个像素点,离accpetButton20个像素点
|
1
|
@
"V:[acceptButton(300)]-20-|"
|
表示acceptButton高300像素,离superView底端有20个像素点;
/****************************************************************/
H: 表示水平(可以不写,默认的话就是水平位置);
/****************************************************************/
>= :表示视图间距、宽度和高度必须大于或等于某个值;
<= :表示视图间距、宽度和高度必须小宇或等于某个值;
== :表示视图间距、宽度或者高度必须等于某个值 ;
|
1
|
@
"V:|-(==padding)-[imageView]->=0-[button]-(==padding)-|"
|
表示离父视图的距离为Padding,这两个视图间距必须大于或等于0并且距离底部父视图为 padding。
|
1
|
@
"[wideView(>=30@500)]"
|
表示视图的宽度为至少为30 不能超过 500
四、VFL使用的前提和方法
1、设置translatesAutoresizingMaskIntoConstraints属性
如果想用autolayout,那么必须先设置translatesAutoresizingMaskIntoConstraints为NO
例如初始化一个UIButton类对象,那么:
|
1
2
|
UIButton* cancelButton = [[UIButton alloc] init];
cancelButton.translatesAutoresizingMaskIntoConstraints = NO;
|
2、两种常用的约束格式(NSArray、NSLayoutConstraint)
(1)NSArray方法(适用于添加水平和垂直的约束)
|
1
2
3
|
- (
void
)addConstraints:(NSArray *)constraints;
+ (NSArray *)constraintsWithVisualFormat:(NSString *)format options:(NSLayoutFormatOptions)opts metrics:(NSDictionary *)metrics views:(NSDictionary *)views;
|
参数介绍:
format:此参数为你的vfl语句,比如:@"H:|-[button]-|"
opts:枚举参数,默认写0,具体跟据你所实现的需求去选择你想要的枚举
metrics:这里是一个字典,当在format中使用了动态数据比如上现这句:@"H:|-[button(==width)]-|",表示这个button的宽度为width,那么这个参数去哪里找呢?就是在这个字典里面找到key对就的值,如果没有找到这个值,app就会crash.
views:顾名思义,这是传所有你在vfl中使用到的view,那在上面这句例子中的应该怎么传呢?结果是这样的:NSDictionaryOfVariableBindings(button).如果你使用到了多个view,就可以这样NSDictionaryOfVariableBindings(button,button1,button3...),这个名字也要跟参数format中的一一对应,缺一不可.
|
1
2
3
4
5
6
7
8
9
10
11
12
13
14
15
16
|
/*---------------------------初始化----------------------------------*/
UIButton* cancelButton = [[UIButton alloc] init];
cancelButton.translatesAutoresizingMaskIntoConstraints = NO;
UIButton* acceptButton = [UIButton
new
];
acceptButton.translatesAutoresizingMaskIntoConstraints = NO;
/*------------------------------添加水平和垂直约束-------------------------*/
NSDictionary* views = NSDictionaryOfVariableBindings(cancelButton, acceptButton);
NSString *vflString = [NSString stringWithFormat:@
"|-20-[cancelButton(>=%d)]-20-|"
, self.view.frame.size.width/3];
[self.view addConstraints:[NSLayoutConstraint constraintsWithVisualFormat:vflString options:0 metrics:nil views:views]];
vflString = @
"V:|-30-[cancelButton(150)]-15-[acceptButton(50)]"
;
[self.view addConstraints:[NSLayoutConstraint constraintsWithVisualFormat:vflString options:0 metrics:nil views:views]];
|
(2) NSLayoutConstraint (适用于添加居中的约束)
|
1
|
- (
void
)addConstraint:(NSLayoutConstraint *)constraint
|
|
1
|
+(instancetype)constraintWithItem:(id)view1 attribute:(NSLayoutAttribute)attr1 relatedBy:(NSLayoutRelation)relation toItem:(id)view2 attribute:(NSLayoutAttribute)attr2 multiplier:(CGFloat)multiplier constant:(CGFloat)c;
|
|
1
2
3
4
5
6
7
8
|
/*---------------------------初始化----------------------------------*/
UIButton* acceptButton = [UIButton
new
];
acceptButton.translatesAutoresizingMaskIntoConstraints = NO;
NSDictionary* views = NSDictionaryOfVariableBindings(acceptButton);
/*------------------------------acceptButton水平居中-------------------------*/
[self.view addConstraint:[NSLayoutConstraint constraintWithItem:acceptButton attribute:NSLayoutAttributeCenterX relatedBy:NSLayoutRelationEqual toItem:self.view attribute:NSLayoutAttributeCenterX multiplier:1 constant:0]];
[self.view addConstraint:[NSLayoutConstraint constraintWithItem:acceptButton attribute:NSLayoutAttributeCenterY relatedBy:NSLayoutRelationEqual toItem:self.view attribute:NSLayoutAttributeCenterY multiplier:1 constant:0]];
|
注意:在上述例子中,acceptButton.attribute = self.view.attribute * multiplier + constant
五、代码实现上篇博客中storyboard的布局(AutoLayout 使用之storyboard演示)
附上两张图来回忆一下:
下面用代码实现:
|
1
2
3
4
5
6
7
8
9
10
11
12
13
14
15
16
17
18
19
20
21
22
23
24
25
26
27
28
29
30
31
32
33
34
35
36
37
38
39
40
41
42
43
44
45
46
47
48
49
50
51
52
53
54
55
56
57
58
59
60
61
62
63
64
65
66
67
68
69
70
71
72
73
74
75
76
77
78
79
80
81
82
83
|
- (
void
)viewDidLoad {
[super viewDidLoad];
UIView *view1 = [UIView
new
];
view1.translatesAutoresizingMaskIntoConstraints = NO;
view1.backgroundColor = [UIColor redColor];
[self.view addSubview:view1];
UIView *view2 = [UIView
new
];
view2.translatesAutoresizingMaskIntoConstraints = NO;
view2.backgroundColor = [UIColor orangeColor];
[self.view addSubview:view2];
UIView *view3 = [UIView
new
];
view3.translatesAutoresizingMaskIntoConstraints = NO;
view3.backgroundColor = [UIColor yellowColor];
[self.view addSubview:view3];
UIView *view4 = [UIView
new
];
view4.translatesAutoresizingMaskIntoConstraints = NO;
view4.backgroundColor = [UIColor cyanColor];
[self.view addSubview:view4];
UIView *view5 = [UIView
new
];
view5.translatesAutoresizingMaskIntoConstraints = NO;
view5.backgroundColor = [UIColor greenColor];
[self.view addSubview:view5];
UIView *view6 = [UIView
new
];
view6.translatesAutoresizingMaskIntoConstraints = NO;
view6.backgroundColor = [UIColor blueColor];
[self.view addSubview:view6];
UIView *view7 = [UIView
new
];
view7.translatesAutoresizingMaskIntoConstraints = NO;
view7.backgroundColor = [UIColor purpleColor];
[self.view addSubview:view7];
NSDictionary *views = NSDictionaryOfVariableBindings(view1,view2,view3,view4,view5,view6,view7);
/*---------------------view4居中显示,长度以及宽度为65-------------------------*/
[self.view addConstraint:[NSLayoutConstraint constraintWithItem:view4 attribute:NSLayoutAttributeCenterX relatedBy:NSLayoutRelationEqual toItem:self.view attribute:NSLayoutAttributeCenterX multiplier:1 constant:0]];
[self.view addConstraint:[NSLayoutConstraint constraintWithItem:view4 attribute:NSLayoutAttributeCenterY relatedBy:NSLayoutRelationEqual toItem:self.view attribute:NSLayoutAttributeCenterY multiplier:1 constant:0]];
[self.view addConstraints:[NSLayoutConstraint constraintsWithVisualFormat:@
"[view4(65)]"
options:0 metrics:nil views:views]];
[self.view addConstraints:[NSLayoutConstraint constraintsWithVisualFormat:@
"V:[view4(65)]"
options:0 metrics:nil views:views]];
/*---------------------View3长度宽度为65,垂直居中,且它离容器左边的距离为一个固定值-------------------------*/
[self.view addConstraints:[NSLayoutConstraint constraintsWithVisualFormat:@
"V:[view3(65)]"
options:0 metrics:nil views:views]];
[self.view addConstraints:[NSLayoutConstraint constraintsWithVisualFormat:@
"|-13-[view3(65)]"
options:0 metrics:nil views:views]];
[self.view addConstraint:[NSLayoutConstraint constraintWithItem:view3 attribute:NSLayoutAttributeCenterY relatedBy:NSLayoutRelationEqual toItem:self.view attribute:NSLayoutAttributeCenterY multiplier:1 constant:0]];
/*---------------------view5长度宽度为65,垂直居中,且它离容器右边的距离为一个固定值-------------------------*/
[self.view addConstraints:[NSLayoutConstraint constraintsWithVisualFormat:@
"V:[view5(65)]"
options:0 metrics:nil views:views]];
[self.view addConstraints:[NSLayoutConstraint constraintsWithVisualFormat:@
"[view5(65)]-13-|"
options:0 metrics:nil views:views]];
[self.view addConstraint:[NSLayoutConstraint constraintWithItem:view5 attribute:NSLayoutAttributeCenterY relatedBy:NSLayoutRelationEqual toItem:self.view attribute:NSLayoutAttributeCenterY multiplier:1 constant:0]];
/*---------view1和view2 让他离下面的最近的view 的距离以及根视图的左边或右边的位置成固定值-------------*/
//view1
[self.view addConstraints:[NSLayoutConstraint constraintsWithVisualFormat:@
"V:[view1(==65)]-69-[view3]"
options:0 metrics:nil views:views]];
[self.view addConstraints:[NSLayoutConstraint constraintsWithVisualFormat:@
"|-52-[view1(65)]"
options:0 metrics:nil views:views]];
//view2
[self.view addConstraints:[NSLayoutConstraint constraintsWithVisualFormat:@
"V:[view2(==65)]-69-[view5]"
options:0 metrics:nil views:views]];
[self.view addConstraints:[NSLayoutConstraint constraintsWithVisualFormat:@
"[view2(65)]-52-|"
options:0 metrics:nil views:views]];
/*---------view6和view7 让他离上面的最近的view 的距离以及根视图的左边或右边的位置成固定值-------------*/
//view6
[self.view addConstraints:[NSLayoutConstraint constraintsWithVisualFormat:@
"V:[view3]-69-[view6(==65)]"
options:0 metrics:nil views:views]];
[self.view addConstraints:[NSLayoutConstraint constraintsWithVisualFormat:@
"|-52-[view6(65)]"
options:0 metrics:nil views:views]];
//view7
[self.view addConstraints:[NSLayoutConstraint constraintsWithVisualFormat:@
"V:[view5]-69-[view7(65)]"
options:0 metrics:nil views:views]];
[self.view addConstraints:[NSLayoutConstraint constraintsWithVisualFormat:@
"[view7(65)]-52-|"
options:0 metrics:nil views:views]];
}
|


 81
81

 被折叠的 条评论
为什么被折叠?
被折叠的 条评论
为什么被折叠?
 到【灌水乐园】发言


