


这里主要以xml配置为例解析aop代理的具体生成过程。
aop是对目标对象的某个方法编入我们自定义的通知功能代码,这主要是通过代理(jdk or cglib)来实现的。那么这个代理对象什么时候生成的呢?其实就是在创建bean时,初始化完成后,进行后置处理得到的。
(AbstractAutowireCapableBeanFactory 579行 exposedObject = initializeBean(beanName, exposedObject, mbd);)
一路跟进这个方法,最终的初始化后置处理的具体代码为AbstractAutowireCapableBeanFactory类中的applyBeanPostProcessorsAfterInitialization方法
public Object applyBeanPostProcessorsAfterInitialization(Object existingBean, String beanName)
throws BeansException {
Object result = existingBean;
for (BeanPostProcessor beanProcessor : getBeanPostProcessors()) {
//初始化后置处理,result:目标对象
Object current = beanProcessor.postProcessAfterInitialization(result, beanName);
if (current ==
null) {
return result;
}
result = current;
}
return result;
}
如果我们在代码中定义了aop相关对象和通知的话,在解析配置时, spring就会生成一个AspectJAwareAdvisorAutoProxyCreator对象,该对象的具体继承
图见下:
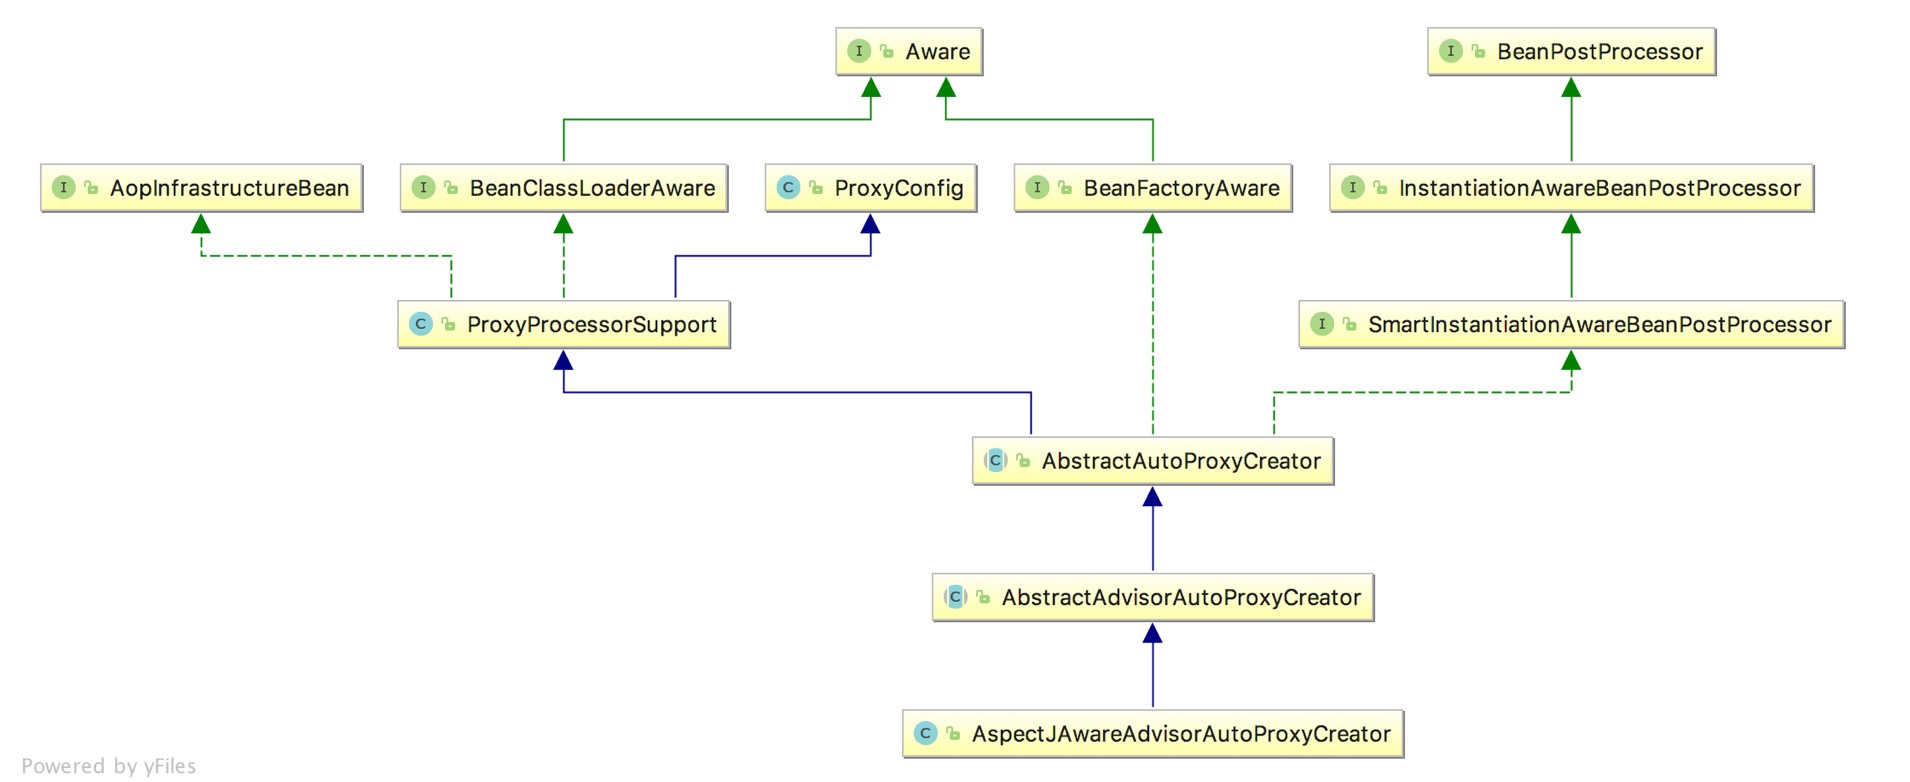
ProxyConfig: (C)代理配置类, 主要包含了一些创建代理对象时的一些配置属性
ProxyProcessorSupport: (C)具有代理处理器的通用功能的基类, 主要实现了classloader管理功能和计算代理实现方式(jdk or cglib)算法功能
AbstractAutoPorxyCreator: (A)自动代理创建器,定义了创建代理对象的操作,但是具体的代理创建过程委托给proxyFactory完成
AbstractAdvisorAutoProxyCreator: (A)在AbstractAdvisorAutoProxyCreator基础上,添加了一些添加了获取Advisors的接口
AspectJAwareAdvisorAutoProxyCreator: (C)重写了AbstractAdvisorAutoProxyCreator一些关于advisor的接口
经过AspectJAwareAdvisorAutoProxyCreator.postProcessAfterInitialization()方法的处理,我们就能得到最终的aop代理对象。AspectJAwareAdvisorAutoProxyCreator本身并没有定义或重写postProcessAfterInitialization()方法,该方法是接口BeanPostProcessor中的,
AspectJAwareAdvisorAutoProxyCreator的父类AbstractAutoProxyCreator实现了该方法,具体如下:
public Object postProcessAfterInitialization(
@Nullable Object bean, String beanName)
throws BeansException {
if (bean !=
null) {
Object cacheKey = getCacheKey(bean.getClass(), beanName);
if (!
this.
earlyProxyReferences.contains(cacheKey)) {
return wrapIfNecessary(bean, beanName, cacheKey);
}
}
return bean;
}
wrapIfNecessary方法会判断当前对象是否合适,如果合适的话会对目标对象进行包装,也就是代理
protected Object wrapIfNecessary(Object bean, String beanName, Object cacheKey) {
if (StringUtils.
hasLength(beanName) &&
this.
targetSourcedBeans.contains(beanName)) {
return bean;
}
if (Boolean.
FALSE.equals(
this.
advisedBeans.get(cacheKey))) {
return bean;
}
//
shouldSkip的判断逻辑主要是得到beanFactory中所有的advisors,然后将advisor强转为
//AspectJPointcutAdvisor类型,通过getAspectName方法该通知定义所在的对象的beanName,并与当前beanName比较,如果相等,则返回false
if (isInfrastructureClass(bean.getClass()) || shouldSkip(bean.getClass(), beanName)) {
this.
advisedBeans.put(cacheKey, Boolean.
FALSE);
return bean;
// Create proxy if we have advice.
//先得到beanFactory中的所有advisors,然后遍历,如果是PointcutAdvisor,则强转后得到Pointcut然后进行类匹配和静态的方法匹配
Object[] specificInterceptors = getAdvicesAndAdvisorsForBean(bean.getClass(), beanName,
null);
if (specificInterceptors !=
DO_NOT_PROXY) {
this.
advisedBeans.put(cacheKey, Boolean.
TRUE);
Object proxy = createProxy(
bean.getClass(), beanName, specificInterceptors,
new SingletonTargetSource(bean));
this.
proxyTypes.put(cacheKey, proxy.getClass());
return proxy;
}
this.
advisedBeans.put(cacheKey, Boolean.
FALSE);
return bean;
}
在这个方法中,前面的一些分支代码主要判断何种情况下不用构建代理对象,其中比较常见的一种场景就是如果当前bean名称如果和advisors中的aspectName一致,说明当前bean是一个切面对象,那么就可以直接忽略。接下来就是得到所有specificInterceptors,specificInterceptors指的是我们在代码中定义的通知(advice)所对应的持有者(advisor)对象,具体的获取策略如代码中注释所示。然后就是最关键的
createProxy方法,具体代码如下:
protected Object createProxy(Class<?> beanClass,
@Nullable String beanName,
@Nullable Object[] specificInterceptors, TargetSource targetSource) {
if (
this.
beanFactory
instanceof ConfigurableListableBeanFactory) {
AutoProxyUtils.
exposeTargetClass((ConfigurableListableBeanFactory)
this.
beanFactory, beanName, beanClass);
}
//ProxyFactory负责真正的代理对象的创建
ProxyFactory proxyFactory =
new ProxyFactory();
proxyFactory.copyFrom(
this);
//计算代理策略:jdk代理 or cglib代理
if (!proxyFactory.isProxyTargetClass()) {
if (shouldProxyTargetClass(beanClass, beanName)) {
proxyFactory.setProxyTargetClass(
true);
}
else {
evaluateProxyInterfaces(beanClass, proxyFactory);
}
}
Advisor[] advisors = buildAdvisors(beanName, specificInterceptors);
//将所有的advisors添加到代理配置中
proxyFactory.addAdvisors(advisors);
proxyFactory.setTargetSource(targetSource);
customizeProxyFactory(proxyFactory);
proxyFactory.setFrozen(
this.
freezeProxy);
if (advisorsPreFiltered()) {
proxyFactory.setPreFiltered(
true);
}
return proxyFactory.getProxy(getProxyClassLoader());
}
其中的proxyFactory负责真正的代理对象的创建,该类的具体继承线见下:
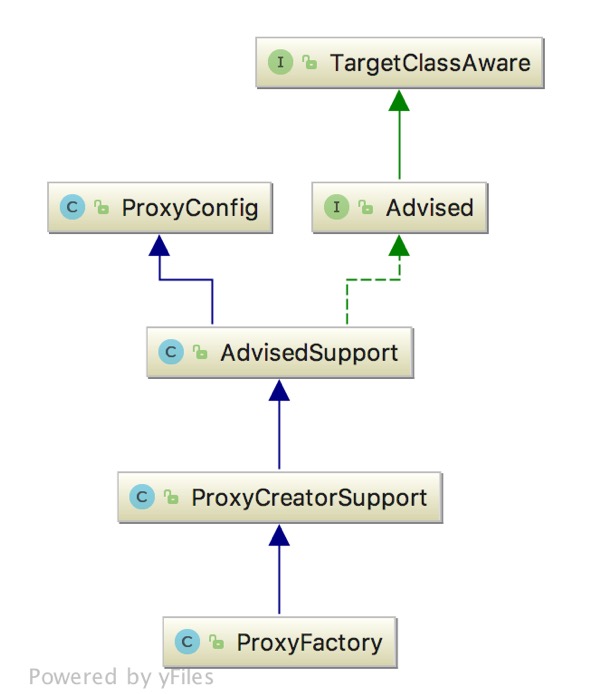
Advised: (I)定义如何访问和修改aop代理工厂一些配置的接口
AdvisedSupport: (C)aop代理配置管理基类,实现了比如管理advisor,advise等接口
ProxyCreatorSupport:(C)代理工厂基类,提供了对可配置的AopProxyFactory方便的访问
ProxyFactory: (C)代理工厂
接下来判断当前代理对象的创建应该使用何种代理模式,具体的方法是得到目标类的实现的所有接口得到一个接口数组,如果该接口数组为空,则说明应该使用cglib代理,否则使用jdk代理。接下来就是使用
buildAdvisors方法得到所有的拦截器,并将特有拦截器和公共的拦截器全部适配为advisor接口。接下来就是设置一些代理配置,最后proxyFactory根据指定的类加载器创建代理对象,具体代码如下:
public Object getProxy(
@Nullable ClassLoader classLoader) {
return createAopProxy().getProxy(classLoader);
}
主要看下
createAopProxyd的具体实现:
protected final synchronized AopProxy createAopProxy() {
if (!
this.
active) {
activate();
}
return getAopProxyFactory().createAopProxy(
this);
}
继续跟进:
public AopProxy createAopProxy(AdvisedSupport config)
throws AopConfigException {
if (config.isOptimize() || config.isProxyTargetClass() || hasNoUserSuppliedProxyInterfaces(config)) {
Class<?> targetClass = config.getTargetClass();
if (targetClass ==
null) {
throw new AopConfigException(
"TargetSource cannot determine target class: " +
"Either an interface or a target is required for proxy creation.");
}
if (targetClass.isInterface() || Proxy.
isProxyClass(targetClass)) {
return new JdkDynamicAopProxy(config);
}
return new ObjenesisCglibAopProxy(config);
}
else {
return new JdkDynamicAopProxy(config);
}
}
该方法最后得到是一个
AopProxy接口类型的对象,这是一个aop代理配置的委托接口,允许aop代理对象的真正的创建。它的两个主要子类为
JdkDynamicAopProxy和
ObjenesisCglibAopProxy, 分别代表以jdk代理方式和cglib代理方式创建代理对象。由于这里的config参数就是我们之前创建的proxyFactory对象,而我们在之前的代码中创建该对象时已经将一些代理配置(比如相关advisors)作为属性set进去。因此代理
JdkDynamicAopProxy对象在创建代理对象时,将根据这些配置进行相关处理。继续跟进
createAopProxy().getProxy(classLoader),代码如下(这里选择
JdkDynamicAopProxy
):
@Override
public Object getProxy(
@Nullable ClassLoader classLoader) {
if (
logger.isDebugEnabled()) {
logger.debug(
"Creating JDK dynamic proxy: target source is " +
this.
advised.getTargetSource());
}
Class<?>[] proxiedInterfaces = AopProxyUtils.
completeProxiedInterfaces(
this.
advised,
true);
findDefinedEqualsAndHashCodeMethods(proxiedInterfaces);
return Proxy.
newProxyInstance(classLoader, proxiedInterfaces,
this);
}
得到所有需要代理的接口后,然后调用jdk提供的代理生成方法代理对象就创建完毕了。回过头来看下我们aop的一些基础知识,我们一般在方法调用之前和返回之前或者返回之后进行一些额外的处理,这些额外的处理就是通知(advice), 现在代理对象已经成功了,而且
Proxy.
newProxyInstance
(classLoader, proxiedInterfaces,
this
)第三个参数为this,那么这部分功能肯定在该类的invoke方法中体现,具体代码如下:
public Object invoke(Object proxy, Method method, Object[] args)
throws Throwable {
MethodInvocation invocation;
Object oldProxy =
null;
boolean setProxyContext =
false;
TargetSource targetSource =
this.
advised.
targetSource;
Object target =
null;
try {
if (!
this.
equalsDefined && AopUtils.
isEqualsMethod(method)) {
// The target does not implement the equals(Object) method itself.
return equals(args[
0]);
}
else if (!
this.
hashCodeDefined && AopUtils.
isHashCodeMethod(method)) {
// The target does not implement the hashCode() method itself.
return hashCode();
}
else if (method.getDeclaringClass() == DecoratingProxy.
class) {
// There is only getDecoratedClass() declared -> dispatch to proxy config.
return AopProxyUtils.
ultimateTargetClass(
this.
advised);
}
else if (!
this.
advised.
opaque && method.getDeclaringClass().isInterface() &&
method.getDeclaringClass().isAssignableFrom(Advised.
class)) {
// Service invocations on ProxyConfig with the proxy config...
return AopUtils.
invokeJoinpointUsingReflection(
this.
advised, method, args);
}
Object retVal;
if (
this.
advised.
exposeProxy) {
// Make invocation available if necessary.
oldProxy = AopContext.
setCurrentProxy(proxy);
setProxyContext =
true;
}
// Get as late as possible to minimize the time we "own" the target,
// in case it comes from a pool.
target = targetSource.getTarget();
Class<?> targetClass = (target !=
null ? target.getClass() :
null);
// Get the interception chain for this method.
//得到该方法上的所有拦截器. 主要通过得到advisors,然后得到所有advice,如果该advice为interceptor类型,直接转换,如果
//不是,则通过合适的适配器AdvisorAdapter对象来适配advisor得到对应的拦截器
1. List<Object> chain =
this.
advised.getInterceptorsAndDynamicInterceptionAdvice(method, targetClass);
// Check whether we have any advice. If we don't, we can fallback on direct
// reflective invocation of the target, and avoid creating a MethodInvocation.
if (chain.isEmpty()) {
// We can skip creating a MethodInvocation: just invoke the target directly
// Note that the final invoker must be an InvokerInterceptor so we know it does
// nothing but a reflective operation on the target, and no hot swapping or fancy proxying.
Object[] argsToUse = AopProxyUtils.
adaptArgumentsIfNecessary(method, args);
retVal = AopUtils.
invokeJoinpointUsingReflection(target, method, argsToUse);
}
else {
// We need to create a method invocation...
invocation =
new ReflectiveMethodInvocation(proxy, target, method, args, targetClass, chain);
// Proceed to the joinpoint through the interceptor chain.
// 通过拦截器链进入连接点
retVal = invocation.proceed();
}
// Massage return value if necessary.
Class<?> returnType = method.getReturnType();
if (retVal !=
null && retVal == target &&
returnType != Object.
class && returnType.isInstance(proxy) &&
!RawTargetAccess.
class.isAssignableFrom(method.getDeclaringClass())) {
// Special case: it returned "this" and the return type of the method
// is type-compatible. Note that we can't help if the target sets
// a reference to itself in another returned object.
retVal = proxy;
}
else if (retVal ==
null && returnType != Void.
TYPE && returnType.isPrimitive()) {
throw new AopInvocationException(
"Null return value from advice does not match primitive return type for: " + method);
}
return retVal;
}
finally {
if (target !=
null && !targetSource.isStatic()) {
// Must have come from TargetSource.
targetSource.releaseTarget(target);
}
if (setProxyContext) {
// Restore old proxy.
AopContext.
setCurrentProxy(oldProxy);
}
}
}
前面主要是判断一些需要直接放行的方法等,功能代码从标记1开始,该步主要通过得到所有的advisors,遍历,首先根据advisor得到pointcut的
MethodMatcher
,然后得到advice,如果该advice为拦截器类型,则直接转化为拦截器,否则通过适配器AdvisorAdapter适配advisor得到合适的拦截器。最后通过
MethodMatcher静态的匹配当前方法,匹配成功,则该拦截器添加进返回的拦截器容器对象中(静态匹配成功后,还会判断下isRuntime,进行不同的处理,相关的代码在
DefaultAdvisorChainFactory.getInterceptorsAndDynamicInterceptionAdvice中)。这样我们就得到了当前方法调用的拦截器链了。接下来我们要构建一个连接点(JoinPoint),连接点是动态发生的事件,这里构建的是反射的方法调用,也就是ReflectiveMethodInvocation。该方法的具体继承线如下:
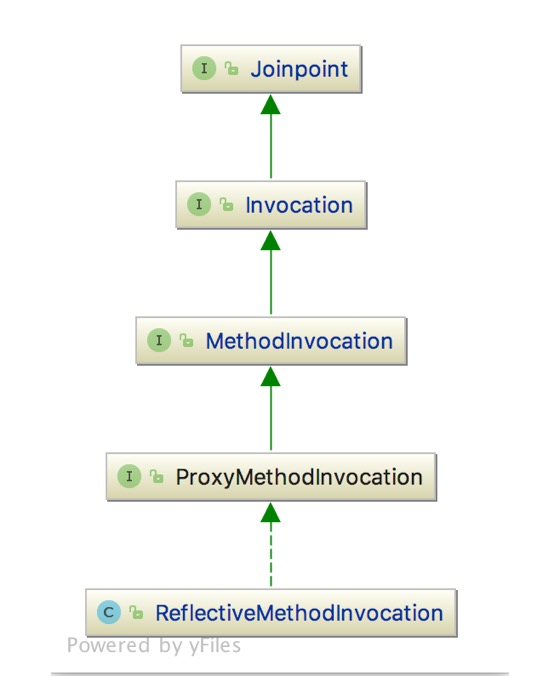
JoinPoint: (I)运行时连接点,可以认为是发生在静态连接点(具体代码)的事件,比如某个方法的调用,属性的访问,异常抛出等
Invocation: (I)该接口代表程序中的一次调用,一次调用就是一个运行时连接点,并且可以被拦截器拦截
MethodInvocation: (I)描述的是一个方法的调用。方法的调用时一个连接点,可以被拦截器拦截
ProxyMethodInvocation: (I)MethodInvocation的扩展接口,允许访问通过方法调用的代理对象
ReflectiveMethodInvocation: (C)使用反射调用目标对象,子类可以重写inokeJoinpoint()方法来改变行为
接下来就是要通过执行该连接点的proceed方法,该方法的实现如下:
public Object proceed()
throws Throwable {
// We start with an index of -1 and increment early.
if (
this.
currentInterceptorIndex ==
this.
interceptorsAndDynamicMethodMatchers.size() -
1) {
return invokeJoinpoint();
}
Object interceptorOrInterceptionAdvice =
this.
interceptorsAndDynamicMethodMatchers.get(++
this.
currentInterceptorIndex);
if (interceptorOrInterceptionAdvice
instanceof InterceptorAndDynamicMethodMatcher) {
// Evaluate dynamic method matcher here: static part will already have
// been evaluated and found to match.
InterceptorAndDynamicMethodMatcher dm =
(InterceptorAndDynamicMethodMatcher) interceptorOrInterceptionAdvice;
if (dm.
methodMatcher.matches(
this.
method,
this.
targetClass,
this.
arguments)) {
return dm.
interceptor.invoke(
this);
}
else {
// Dynamic matching failed.
// Skip this interceptor and invoke the next in the chain.
return proceed();
}
}
else {
// It's an interceptor, so we just invoke it: The pointcut will have
// been evaluated statically before this object was constructed.
return ((MethodInterceptor) interceptorOrInterceptionAdvice).invoke(
this);
}
}
该方法是一个递归方法,这里的interceptorOrInterceptionAdvice就是我们之前得到的拦截器链,我们会按照顺序首先执行拦截器链中的拦截器代码,也就是invoke方法,拦截器内部又会执行this.proceed()方法,继续进入该方法,执行链中的下一个拦截器,直到所有拦截器代码执行完毕,才通过
invokeJoinpoint方法执行目标方法,也就是说目标方法执行前后,拦截器(before, after,afterReturn)相关代码也会执行。正是通过这样的方法,切面类中的通知才动态的织入目标对象中。
总结:
spring根据配置生成advice(通知), advisor(通知持有者),pointcut(切入点)对象,在通过getBean方法获取对象时,spring会首先判断该对象是否已经创建,如果没有的话执行创建逻辑。创建对象并初始化完成后执行后置处理逻辑,该部分逻辑处理通过BeanPostProcessor中的相关接口来实现,如果我们在配置中声明了aop相关标签时,spring会在初始化时生成一个AspectJAwareAdvisorAutoProxyCreator对象,该类的父类实现了BeanPostProcessor中的相关接口,主要功能是负责aop代理对象的生成。生成逻辑就是获取所有的根据我们配置和代码创建的advisors,然后根据advisor中的pointcut对象中的相关接口判断该通知是否能应用在当前对象上,得到所有通知对象后,将所有对象强转或者适配为拦截器(Interceptor)类型,最后委托给ProxyFactory创建代理对象,创建成功后,该对象上的和pointcut切入点匹配的方法被调用时会被拦截器拦截,然后拦截器应用before,after,around等方法,拦截器链执行完毕后,通过反射执行目标方法。


 784
784

 被折叠的 条评论
为什么被折叠?
被折叠的 条评论
为什么被折叠?
 到【灌水乐园】发言


