


提示:文章写完后,目录可以自动生成,如何生成可参考右边的帮助文档
Hadoop集群搭建
基本环境配置
hadoop3.0版本,Cent-OS9,jdk1.8,安装三台虚拟机分别为hadoop1,hadoop2,hadoop3。
IP地址为别为192.168.121.160, 192.168.121.161, 192.168.121.162。
一、配置虚拟机
1.配置虚拟机的网络地址
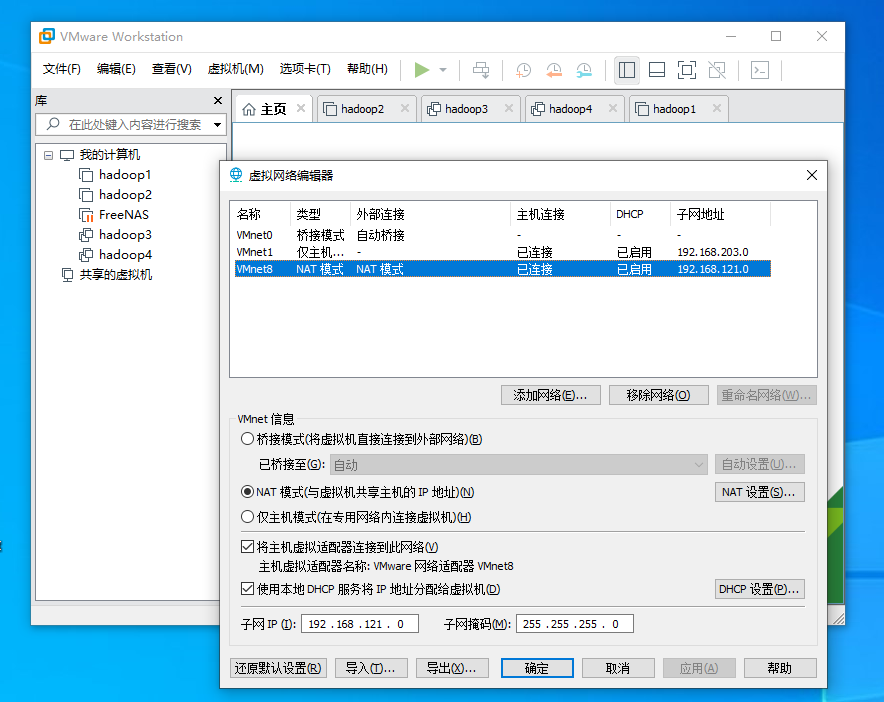 点击编辑—>虚拟网络编辑器,选择VMnet8把子网地址改为192.168.121.0,点击确定完成设置。
修改主机名,在三个虚拟机分别执行指令把主机名修改为hadoop1,hadoop2,hadoop3.
hostnamectl set-hostname hadoop1
hostnamectl set-hostname hadoop2
hostnamectl set-hostname hadoop3
然后修改三台主机的ip地址,vi打开centos9网络配置文件,修改网络配置参数,改成静态IP,同理把hadoop2和hadoop3的网络地址更改为192.168.121.160,192.168.121.162,
vi /etc/NetworkManager/system-connections/ens33.nmconnection
[connection]
id=ens33
uuid=7f70e736-0924-4769-868e-3b25e7e860e8
type=ethernet
autoconnect-priority=-999
interface-name=ens33
timestamp=1740039958

[ethernet]

[ipv4]
method=manual
address1=192.168.121.160/24,192.168.121.2
dns=114.114.114.114

[ipv6]
addr-gen-mode=eui64
method=auto
2.设置hosts文件
改好IP地址之后需要修改hosts文件让主机名与IP地址对应起来。
vi  /etc/hosts
192.168.121.160 hadoop1
192.168.121.161 hadoop2
192.168.121.162 hadoop3
二、设置免密登录
默认情况下centos9不允许root用户进行远程登录,需要修改ssh的配置文件
vi /etc/ssh/sshd_config
#在最后一行添加内容
PermitRootLogin yes
接着设置免密登录
#生成秘钥
ssh-keygen -t rsa
#把秘钥copy到hadoop1,hadoop2和hadoop3上,就不需要输入密码登陆了
ssh-copy-id hadoop1
ssh-copy-id hadoop2
ssh-copy-id hadoop3
三、安装JDK
#创建JDK安装目录
mkdir -p /export/servers
#解压并安装到servers文件夹
tar -zxvf jdk-8u241-linux-x64.tar.gz -C /export/servers/
#配置环境变量把java的安装目录加入到PATH中
vi /etc/profile
export JAVA_HOME=/export/servers/jdk1.8.0_241
export PATH=$PATH:$JAVA_HOME/bin
#重新加载环境变量
source /etc/profile
#在hadoop2和hadoop3创建servers文件后,把已经安装好的java传到hadoop2,hadoop3
scp -r /export/servers/jdk1.8.0_241/ root@hadoop2:/export/servers/
scp -r /export/servers/jdk1.8.0_241/ root@hadoop3:/export/servers/
#传送环境变量配置
scp /etc/profile root@hadoop2:/etc/
scp /etc/profile root@hadoop3:/etc/
#hadoop2,hadoop3重新加载环境变量
source /etc/profile
四、部署集群
#创建hadoop安装目录并解压hadoop压缩包
tar -zxvf hadoop-3.3.0.tar.gz -C /export/servers
#添加环境变量
vi /etc/profile
#在文件末尾加上
export HADOOP_HOME=/export/servers/hadoop-HA/hadoop-3.3.0
export PATH=$PATH:$HADOOP_HOME/bin:$HADOOP_HOME/sbin

#修改hadoop-env.sh文件在最后加上
export JAVA_HOME=/export/servers/jdk1.8.0_241  #java安装目录
export HDFS_NAMENODE_USER=root
export HDFS_DATANODE_USER=root
export HDFS_SECONDARYNAMENODE_USER=root
export YARN_RESOURCEMANAGER_USER=root
export YARN_NODEMANAGER_USER=root

#修改core-site.xml
<?xml version="1.0" encoding="UTF-8"?>
<?xml-stylesheet type="text/xsl" href="configuration.xsl"?>
<!--
  Licensed under the Apache License, Version 2.0 (the "License");
  you may not use this file except in compliance with the License.
  You may obtain a copy of the License at

    http://www.apache.org/licenses/LICENSE-2.0

  Unless required by applicable law or agreed to in writing, software
  distributed under the License is distributed on an "AS IS" BASIS,
  WITHOUT WARRANTIES OR CONDITIONS OF ANY KIND, either express or implied.
  See the License for the specific language governing permissions and
  limitations under the License. See accompanying LICENSE file.
-->

<!-- Put site-specific property overrides in this file. -->

<configuration>
<property>
    <name>fs.defaultFS</name>
    <value>hdfs://hadoop1:9000</value>
</property>
<property>
    <name>hadoop.tmp.dir</name>
    <value>/export/data/hadoop-3.3.0</value>
</property>
<property>
    <name>hadoop.http.staticuser.user</name>
    <value>root</value>
</property>
<property>
    <name>hadoop.proxyuser.root.hosts</name>
    <value>*</value>
</property>
<property>
    <name>hadoop.proxyuser.root.groups</name>
    <value>*</value>
</property>
<property>
    <name>fs.trash.interval</name>
    <value>1440</value>
</property>
</configuration>
#修改hdfs-site.xml
<?xml version="1.0" encoding="UTF-8"?>
<?xml-stylesheet type="text/xsl" href="configuration.xsl"?>
<!--
  Licensed under the Apache License, Version 2.0 (the "License");
  you may not use this file except in compliance with the License.
  You may obtain a copy of the License at

    http://www.apache.org/licenses/LICENSE-2.0

  Unless required by applicable law or agreed to in writing, software
  distributed under the License is distributed on an "AS IS" BASIS,
  WITHOUT WARRANTIES OR CONDITIONS OF ANY KIND, either express or implied.
  See the License for the specific language governing permissions and
  limitations under the License. See accompanying LICENSE file.
-->

<!-- Put site-specific property overrides in this file. -->

<configuration>
<property>
    <name>dfs.replication</name>
    <value>2</value>
</property>
<property>
    <name>dfs.namenode.secondary.http-address</name>
    <value>hadoop2:9868</value>
</property>
</configuration>
#修改mapred-site.xml
<?xml version="1.0"?>
<?xml-stylesheet type="text/xsl" href="configuration.xsl"?>
<!--
  Licensed under the Apache License, Version 2.0 (the "License");
  you may not use this file except in compliance with the License.
  You may obtain a copy of the License at

    http://www.apache.org/licenses/LICENSE-2.0

  Unless required by applicable law or agreed to in writing, software
  distributed under the License is distributed on an "AS IS" BASIS,
  WITHOUT WARRANTIES OR CONDITIONS OF ANY KIND, either express or implied.
  See the License for the specific language governing permissions and
  limitations under the License. See accompanying LICENSE file.
-->

<!-- Put site-specific property overrides in this file. -->

<configuration>
<property>
    <name>mapreduce.framework.name</name>
    <value>yarn</value>
</property>
<property>
    <name>mapreduce.jobhistory.address</name>
    <value>hadoop1:10020</value>
</property>
<property>
    <name>mapreduce.jobhistory.Webapp.address</name>
    <value>hadoop1:19888</value>
</property>
<property>
    <name>yarn.app.mapreduce.am.env</name>
    <value>HADOOP_MAPRED_HOME=${HADOOP_HOME}</value>
</property>
<property>
    <name>mapreduce.map.env</name>
    <value>HADOOP_MAPRED_HOME=${HADOOP_HOME}</value>
</property>
<property>
    <name>mapreduce.reduce.env</name>
    <value>HADOOP_MAPRED_HOME=${HADOOP_HOME}</value>
</property>
</configuration>
#修改yarn-site文件
<?xml version="1.0"?>
<!--
  Licensed under the Apache License, Version 2.0 (the "License");
  you may not use this file except in compliance with the License.
  You may obtain a copy of the License at

    http://www.apache.org/licenses/LICENSE-2.0

  Unless required by applicable law or agreed to in writing, software
  distributed under the License is distributed on an "AS IS" BASIS,
  WITHOUT WARRANTIES OR CONDITIONS OF ANY KIND, either express or implied.
  See the License for the specific language governing permissions and
  limitations under the License. See accompanying LICENSE file.
-->
<configuration>

<!-- Site specific YARN configuration properties -->
<property>
    <name>yarn.resourcemanager.hostname</name>
    <value>hadoop1</value>
</property>
<property>
    <name>yarn.nodemanager.aux-services</name>
    <value>mapreduce_shuffle</value>
</property>
<property>
    <name>yarn.nodemanager.pmem-check-enabled</name>
    <value>false</value>
</property>
<property>
    <name>yarn.nodemanager.vmem-check-enabled</name>
    <value>false</value>
</property>
<property>
    <name>yarn.log-aggregation-enable</name>
    <value>true</value>
</property>
<property>
    <name>yarn.log.server.url</name>
    <value>http://hadoop1:19888/jobhistory/logs</value>
</property>
<property>
    <name>yarn.log-aggregation.retain-seconds</name>
    <value>604800</value>
</property>
</configuration>
#修改workers文件
hadoop1
hadoop2
hadoop3
配置完成后把hadoop安装包和环境变量配置copy到hadoop2和hadoop3上
scp -r /export/servers/hadoop-3.3.0/ root@hadoop2:/export/servers/
scp -r /export/servers/hadoop-3.3.0/ root@hadoop3:/export/servers/
scp /etc/profile root@hadoop2:/etc/
scp /etc/profile root@hadoop3:/etc/
#hadoop2,hadoop3重新加载环境变量
source /etc/profile
# 五、启动集群

```bash
#集群初始化
hdfs namenode -format
#启动集群的hdfs服务和yarn服务
start-dfs.sh
start-yarn.sh
就可以成功启动集群了,输入jps可以查看相对应的进程
通过网页也可以访问集群的运行状态和存储情况,但是首先得把防火墙关掉
#关闭防火墙
systemctl stop firewalld
#禁止防火墙开机启动
systemctl disable firewalld
192.168.121.160:9870 hdfs的web访问地址
192.168.121.160:8088 yarn的web访问地址


 被折叠的 条评论
为什么被折叠?
被折叠的 条评论
为什么被折叠?
 到【灌水乐园】发言


