


MyBatis-Plus基础–入门
MyBatis-Plus(简称 MP)是一个 MyBatis 的增强工具,在 MyBatis 的基础上只做增强不做改变,为简化开发、提高效率而生。
快速入门


步骤
maven依赖
	<parent>
		<groupId>org.springframework.boot</groupId>
		<artifactId>spring-boot-starter-parent</artifactId>
		<version>2.1.7.RELEASE</version>
		<relativePath/>
    <!-- lookup parent from repository -->
	</parent>
	<dependencies>
		<dependency>
			<groupId>org.springframework.boot</groupId>
			<artifactId>spring-boot-starter-web</artifactId>
		</dependency>
		<dependency>
			<groupId>mysql</groupId>
			<artifactId>mysql-connector-java</artifactId>
			<scope>runtime</scope>
		</dependency>
		<dependency>
			<groupId>org.projectlombok</groupId>
			<artifactId>lombok</artifactId>
			<optional>true</optional>
		</dependency>
		<dependency>
			<groupId>org.springframework.boot</groupId>
			<artifactId>spring-boot-starter-test</artifactId>
			<scope>test</scope>
		</dependency>
		<!-- Mybatis-Plus启动器 -->
		<dependency>
			<groupId>com.baomidou</groupId>
			<artifactId>mybatis-plus-boot-starter</artifactId>
			<version>3.1.0</version>
		</dependency>
	</dependencies>
说明:我们使用 mybatis-plus 可以节省我们大量的代码,尽量不要同时导入 mybatis 和 mybatisplus! 版本的差异!
application.yml配置文件
配置数据库连接数据源,日志输出
# 配置名称(别名)
spring:
  application:
    name: student-puls
  # 配置数据库
  datasource:
    driver-class-name: com.mysql.cj.jdbc.Driver
    url: jdbc:mysql://localhost:3306/student?useUnicode=true&characterEncoding=UTF-8&serverTimezone=GMT%2B8
    username: root
    password: root
# 配置端口号
server:
  port: 8080

# 配置日志 输出SQL语句
mybatis-plus:
  configuration:
    log-impl: org.apache.ibatis.logging.stdout.StdOutImpl

# 注意: mysql数据是8.0以上的必须指定时区
#//北京时间东八区    serverTimezone=GMT%2B8
#或者使用上海时间    serverTimezone=Asia/Shanghai
# 加载驱动类  必须加cj
实体类
使用lombok注解
@Data  // 代替写set/get方法
@AllArgsConstructor  //有参构造方法
@NoArgsConstructor   //无参构造方法
public class Student {
    /**
     * 主键ID
     */
    private Long id;

    /**
     * 姓名
     */
    private String name;

    /**
     * 年龄
     */
    private Integer age;

    /**
     * 性别
     */
    private String gender;

    /**
     * 电话
     */
    private String telephone;

    /**
     * 邮箱
     */
    private String email;

    /**
     * 班级编号
     */
    @TableField(value = "classId")
    private Long classId;

}
Mapper接口
主要继承MP提供的BaseMapper<>接口,该接口里面包含增删改查方法。
@Repository  // 代表持久层

// 在对应的Mapper上面继承基本的类 BaseMapper
// Mapper 继承该接口后,无需编写 mapper.xml 文件,即可获得CRUD功能
public interface StudentMapper extends BaseMapper<Student> {

}
启动类
主要加上@MapperScan(“com.zzz.mapper”)注解扫描mapper接口包
@SpringBootApplication
@MapperScan("com.zzz.mapper")
public class StudentPlusApplication {

    public static void main(String[] args) {
        SpringApplication.run(StudentPlusApplication.class, args);
    }

}
测试类
@SpringBootTest
class StudentPlusApplicationTests {

    @Autowired
    private StudentMapper studentMapper;

    @Test
    void test(){
        System.out.println(("----- selectAll method test ------"));
        List<Student> students = studentMapper.selectList(null);
        //jdk8:支持的循环
        students.forEach(System.out::println);
    }
}
结果展示
[外链图片转存失败,源站可能有防盗链机制,建议将图片保存下来直接上传(img-lU2h1JrE-1616153572818)
注意 注意 注意
[外链图片转存失败,源站可能有防盗链机制,建议将图片保存下来直接上传(img-n4xrkWAS-1616153572819)
出现说找不到这个列、或者说你的列突然多出一个下划线。
数据库中却没有下划线
[外链图片转存失败,源站可能有防盗链机制,建议将图片保存下来直接上传(img-5CO0Qk09-1616153572821)
这是因为mybati-puls 没有对驼峰命名进行处理,需要自己配置

[外链图片转存失败,源站可能有防盗链机制,建议将图片保存下来直接上传(img-4kHH75m7-1616153572823)


.png)]
在实体类的字段上加上驼峰命名,即可解决问题。
BaseMapper 接口的所有方法。
public interface BaseMapper<T> {

    /**
     * 插入一条记录
     *
     * @param entity 实体对象
     */
    int insert(T entity);

    /**
     * 根据 ID 删除
     *
     * @param id 主键ID
     */
    int deleteById(Serializable id);

    /**
     * 根据 columnMap 条件,删除记录
     *
     * @param columnMap 表字段 map 对象
     */
    int deleteByMap(@Param(Constants.COLUMN_MAP) Map<String, Object> columnMap);

    /**
     * 根据 entity 条件,删除记录
     *
     * @param wrapper 实体对象封装操作类(可以为 null)
     */
    int delete(@Param(Constants.WRAPPER) Wrapper<T> wrapper);

    /**
     * 删除(根据ID 批量删除)
     *
     * @param idList 主键ID列表(不能为 null 以及 empty)
     */
    int deleteBatchIds(@Param(Constants.COLLECTION) Collection<? extends Serializable> idList);

    /**
     * 根据 ID 修改
     *
     * @param entity 实体对象
     */
    int updateById(@Param(Constants.ENTITY) T entity);

    /**
     * 根据 whereEntity 条件,更新记录
     *
     * @param entity        实体对象 (set 条件值,可以为 null)
     * @param updateWrapper 实体对象封装操作类(可以为 null,里面的 entity 用于生成 where 语句)
     */
    int update(@Param(Constants.ENTITY) T entity, @Param(Constants.WRAPPER) Wrapper<T> updateWrapper);

    /**
     * 根据 ID 查询
     *
     * @param id 主键ID
     */
    T selectById(Serializable id);

    /**
     * 查询(根据ID 批量查询)
     *
     * @param idList 主键ID列表(不能为 null 以及 empty)
     */
    List<T> selectBatchIds(@Param(Constants.COLLECTION) Collection<? extends Serializable> idList);

    /**
     * 查询(根据 columnMap 条件)
     *
     * @param columnMap 表字段 map 对象
     */
    List<T> selectByMap(@Param(Constants.COLUMN_MAP) Map<String, Object> columnMap);

    /**
     * 根据 entity 条件,查询一条记录
     *
     * @param queryWrapper 实体对象封装操作类(可以为 null)
     */
    T selectOne(@Param(Constants.WRAPPER) Wrapper<T> queryWrapper);

    /**
     * 根据 Wrapper 条件,查询总记录数
     *
     * @param queryWrapper 实体对象封装操作类(可以为 null)
     */
    Integer selectCount(@Param(Constants.WRAPPER) Wrapper<T> queryWrapper);

    /**
     * 根据 entity 条件,查询全部记录
     *
     * @param queryWrapper 实体对象封装操作类(可以为 null)
     */
    List<T> selectList(@Param(Constants.WRAPPER) Wrapper<T> queryWrapper);

    /**
     * 根据 Wrapper 条件,查询全部记录
     *
     * @param queryWrapper 实体对象封装操作类(可以为 null)
     */
    List<Map<String, Object>> selectMaps(@Param(Constants.WRAPPER) Wrapper<T> queryWrapper);

    /**
     * 根据 Wrapper 条件,查询全部记录
     * <p>注意: 只返回第一个字段的值</p>
     *
     * @param queryWrapper 实体对象封装操作类(可以为 null)
     */
    List<Object> selectObjs(@Param(Constants.WRAPPER) Wrapper<T> queryWrapper);

    /**
     * 根据 entity 条件,查询全部记录(并翻页)
     *
     * @param page         分页查询条件(可以为 RowBounds.DEFAULT)
     * @param queryWrapper 实体对象封装操作类(可以为 null)
     */
    IPage<T> selectPage(IPage<T> page, @Param(Constants.WRAPPER) Wrapper<T> queryWrapper);

    /**
     * 根据 Wrapper 条件,查询全部记录(并翻页)
     *
     * @param page         分页查询条件
     * @param queryWrapper 实体对象封装操作类
     */
    IPage<Map<String, Object>> selectMapsPage(IPage<T> page, @Param(Constants.WRAPPER) Wrapper<T> queryWrapper);
}
内置Mapper CRUD
实体类Student
@Data
@AllArgsConstructor
@NoArgsConstructor
//描述:表名注解,当实体类的表名和数据库中的表名不一致的时候会出错,此注解可以使用表名保持一致。
@TableName(value="student")
public class Student {
    /**
     * 主键ID
     */
    private Long id;

    /**
     * 姓名
     */
    private String name;

    /**
     * 年龄
     */
    private Integer age;

    /**
     * 性别
     */
    private String gender;

    /**
     * 电话
     */
    private String telephone;

    /**
     * 邮箱
     */
    private String email;

    /**
     * 班级编号
     */
    //解决数据库和实体类中驼峰命名问题
    @TableField(value = "classId")
    private Long classId;

    //描述:字段注解(非主键),false表示实体类中有该属性,但是数据库中可以没有该字段,默认值true
    @TableField(exist = false)
    private String className;
}
CRUD操作
**1,Insert ** 增加
	/**
     * 插入一条数据
     * int insert(T entity);
     */
    @Test
    void AddStudent(){
        Student student = new Student();
        student.setName("若贞");
        student.setAge(320);
        student.setGender("男");
        student.setTelephone("13545678945");
        student.setEmail("1131270557@qq.com");
        student.setClassId(4L);
        int insert = studentMapper.insert(student);
        System.out.println(insert);
    }
结果
[外链图片转存失败,源站可能有防盗链机制,建议将图片保存下来直接上传(img-44fR6PXT-1616153572824)(Y:\ \MyBatis-Plus基础–入门程序.assets\image-20201118104344964.png)]
主键生成策略
默认 ID_WORKER 全局唯一id
分布式系统唯一id生成:https://www.cnblogs.com/haoxinyue/p/5208136.html
雪花算法:
snowflake是Twitter开源的分布式ID生成算法,结果是一个long型的ID。其核心思想是:使用41bit作为 毫秒数,10bit作为机器的ID(5个bit是数据中心,5个bit的机器ID),12bit作为毫秒内的流水号(意味 着每个节点在每毫秒可以产生 4096 个 ID),最后还有一个符号位,永远是0。可以保证几乎全球唯 一!
主键自增
我们需要配置主键自增:
1、实体类字段上 @TableId(type = IdType.AUTO)
2、数据库字段一定要是自增!
[外链图片转存失败,源站可能有防盗链机制,建议将图片保存下来直接上传(img-AGzyF1mP-1616153572825)(Y:\ \MyBatis-Plus基础–入门程序.assets\image-20201119095836287.png)]
3、再次测试插入即可!
结果
[外链图片转存失败,源站可能有防盗链机制,建议将图片保存下来直接上传(img-uT6EaF8A-1616153572826)(Y:\ \MyBatis-Plus基础–入门程序.assets\image-20201119101350757.png)]
注意:如果未能成功 请重置表主键
truncate table student; //重置后数据就没了
其与的源码解释
public enum IdType {
	AUTO(0), // 数据库id自增
	NONE(1), // 未设置主键
	INPUT(2), // 手动输入
	ID_WORKER(3), // 默认的全局唯一id
	UUID(4), // 全局唯一id uuid
	ID_WORKER_STR(5); //ID_WORKER 字符串表示法
}
**2,Delete ** 删除
    /**
     *删除,(1)根据id删除
     *(2)根据map删除
     *(3)根据条件构造器删除
     */
    @Test
    public void bDelete() {
        /**
         * (1)sql:DELETE FROM student WHERE id=?
         */
        studentMapper.deleteById(1328890985682128898L);

        /**
         * (2)sql:DELETE FROM student WHERE name = ? AND age = ?
         */
        Map<String, Object> columnMap=new HashMap<String, Object>();
        //key为数据库字段名,value为数据库字段值
        columnMap.put("name", "若贞");
        columnMap.put("age", "66");
        studentMapper.deleteByMap(columnMap);

        /**
         * (3)sql:DELETE FROM student WHERE name = ? AND age = ?
         * QueryWrapper条件构造器,QueryWrapper:Entity 对象封装操作类,Wrapper接口实现类
         */
        QueryWrapper<Student> wrapper=new QueryWrapper<Student>();
        //eq表示等于。
        wrapper.eq("name", "若贞2").eq("age", "12");
        studentMapper.delete(wrapper);
    }
结果
[外链图片转存失败,源站可能有防盗链机制,建议将图片保存下来直接上传(img-f2hF6EN1-1616153572827)(Y:\ \MyBatis-Plus基础–入门程序.assets\image-20201118105034214.png)]
**3,Update ** 修改
	/**
     * (1)根据id修改
     * (2)根据updateWrapper条件构造器修改
     */
    @Test
    public void cUpdate() {

        //(1)sql:UPDATE student SET name=?, age=? WHERE id=?
        Student student1 = new Student();
        student1.setName("若贞");
        student1.setAge(22);
        student1.setId(6L);
        studentMapper.updateById(student1);

        /**
         * (2-1)uupdateWrapper 实体对象封装操作类允许null,里面的 entity 用于生成 where 语句
         *      sql:UPDATE student SET age=? WHERE id = ?
         */
        UpdateWrapper<Student> studentUpdateWrapper = new UpdateWrapper<>();
        studentUpdateWrapper.set("age",20).eq("id","4L");
        //加条件1,可以设置为null,逗号后面加条件2
        studentMapper.update(null,studentUpdateWrapper);

        /**
         * (2-2)updateWrapper 实体对象封装操作类not null,里面的 entity 用于生成 where 语句
         *  	sql:UPDATE student SET name=?, age=? WHERE id = ?
         */
        //加条件1
        Student student2 = new Student();
        student2.setName("like loyal");
        //加条件2
        UpdateWrapper<Student> studentUpdateWrapper2 = new UpdateWrapper<>();
        studentUpdateWrapper2.set("age",25).eq("id","3L");
        studentMapper.update(student2,studentUpdateWrapper2);
    }
结果
[外链图片转存失败,源站可能有防盗链机制,建议将图片保存下来直接上传(img-jMDLkv1r-1616153572827)(Y:\ \MyBatis-Plus基础–入门程序.assets\image-20201118110436639.png)]
4,Select 查询
(1)基本查询
    /**
     * 查询
     */
    @Test
    public void dSelect() {

        /**
         * (1)T selectById(Serializable id);根据 ID 查询,主键
         *      sql:SELECT id,name,age,email FROM student WHERE id=?
         */
        studentMapper.selectById(6L);

        /**
         * (2)selectOne:根据 entity 条件,只能查询一条记录,如果数据库中存在多条,那么查询出错。
         *    sql:SELECT id,name,age,email FROM student WHERE name LIKE ? AND age = ?
         *    Parameters: %m%(String), 25(String)
         */
        QueryWrapper<Student> queryWrapper = new QueryWrapper<>();
        queryWrapper.like("name","o");
        queryWrapper.eq("age","25");
        studentMapper.selectOne(queryWrapper);

        /**
         * (3)selectList: 根据 entity 条件,查询全部记录
         *    sql:SELECT id,name FROM student
         */
        QueryWrapper<Student> queryWrapper1 = new QueryWrapper<>();
        //设置查询字段,查询全部数据
        queryWrapper1.select("id","name");
        studentMapper.selectList(queryWrapper1);
        //查询全部字段+全部数据
        //studentMapper.selectList(new QueryWrapper<User>());
        //查询全部字段+全部数据
        //studentMapper.selectList(null);

        /**
         * (4)selectMaps:根据 Wrapper 条件,查询全部记录,得到一个Map集合。
         * List<Map<String, Object>> mapList = studentMapper.selectMaps(Wrappers.<Student>query().orderByAsc("age"));
         */
        QueryWrapper<Student> queryWrapper2 = new QueryWrapper<>();
        // orderByDesc() 排序
        queryWrapper2.orderByDesc("id");
        List<Map<String, Object>> mapList2 = studentMapper.selectMaps(queryWrapper2);
        // 输出的形式 [{key,value},...]
        System.out.println(mapList2);

        /**
         * (5) 排序order by; condition 执行条件是否有效,treu表示有效。isAsc 是否是 ASC排序。columns 字段数组
         *         sql:SELECT id,name,age,email FROM student ORDER BY id DESC
         *         List<Student> users = studentMapper.selectList(Wrappers.<User>query().orderByAsc("id"));
         *         studentMapper.selectList(new QueryWrapper<User>().orderByDesc("id"));//查询全部字段+全部数据
         */
        QueryWrapper<Student> queryWrapper3 = new QueryWrapper<>();
        //查询全部字段+全部数据
        //condition 执行条件是否有效,treu表示有效。isAsc 是否是 ASC排序。columns 字段数组
        queryWrapper3.orderBy(true,false,"id");
        studentMapper.selectList(queryWrapper3);
    }
结果
[外链图片转存失败,源站可能有防盗链机制,建议将图片保存下来直接上传(img-J4EHyTNw-1616153572828)(Y:\ \MyBatis-Plus基础–入门程序.assets\image-20201118113223331.png)]
[外链图片转存失败,源站可能有防盗链机制,建议将图片保存下来直接上传(img-tnMRjbbU-1616153572829)(Y:\ \MyBatis-Plus基础–入门程序.assets\image-20201118113434454.png)]
注意:**selectOne()**方法只能查询出一条数据 多条数据会报错
(1-1)通过多个id批量查询,完成了动态sql的foreach的功能
	@Test
    public void selectBatchIdstt(){
        List<Student> students = studentMapper.selectBatchIds(Arrays.asList(4L, 5L, 6L));
        students.forEach(System.out::println);
    }
(1-2)通过map封装查询条件
    @Test
    public void SelectByMaptt(){
        HashMap<String, Object> map = new HashMap<>();
        //map中的key对应的是数据库中的列名。
        //如数据库中的字段为user_id,map的key也需要填写user_id。
        map.put("name", "若贞");
        map.put("age", 22);
        List<Student> users = studentMapper.selectByMap(map);
        users.forEach(System.out::println);
    }
(2)聚合函数
    @Test
    public void eSelect() {
        /**
         * (1)最大值max    最小值min      数量count     总数sum
         *  sql:SELECT max(id) as id FROM student //聚合函数
         */
        QueryWrapper<Student> wrapper = new QueryWrapper<>();
        wrapper.select("count(id) as id");//查询id单列总记录数
        Student student = studentMapper.selectOne(wrapper);
        System.out.println("maxId=" + student.getId());

        /**
         * (2-1)分组,sql:SELECT age, count(*) FROM student GROUP BY age
         */
        QueryWrapper<Student> wrapper2 = new QueryWrapper<>();
        wrapper2.select("age, count(*)").groupBy("age");
        List<Student> lis2t = studentMapper.selectList(wrapper2);
        lis2t.forEach(System.out::println);
        //结果:Student(id=null, name=null, age=18, email=null, count=null)

        /**
         * (2-2)分组,sql: SELECT age, count(age) as count FROM student GROUP BY age
         */
        QueryWrapper<Student> wrapper3 = new QueryWrapper<>();
        wrapper3.select("age, count(age) as count").groupBy("age");
        List<Student> list = studentMapper.selectList(wrapper3);
        list.forEach(System.out::println);
        //结果:Student(id=null, name=null, age=18, email=null, count=1)

    }
(3)分页查询(PaginationInterceptor)
MyBatis-Plus 提供了物理分页的功能,使用前我们需要要进行相关的插件配置:
逻辑分页与物理分页比较:
-
逻辑分页:内存开销比较大,在数据量比较小的情况下效率比物理分页高;在数据量很大的情况下,内存开销过大,容易内存溢出,不建议使用。
-
物理分页:内存开销比较小,在数据量比较小的情况下效率比逻辑分页还是低;在数据量很大的情况下,建议使用物理分页。
a,使用前先配置分页插件
@Configuration
public class MybatisPlusConfig {
    //分页插件
    @Bean
    public PaginationInterceptor paginationInterceptor() {
        PaginationInterceptor paginationInterceptor = new PaginationInterceptor();
        // paginationInterceptor.setLimit(你的最大单页限制数量,默认 500 条,小于 0 如 -1 不受限制);
        return paginationInterceptor;
    }
}
b,Mapper接口提供了2个分页方法selectPage()和selectMapsPage()
1、selectPage()
IPage<T> selectPage(IPage<T> page, @Param(Constants.WRAPPER) Wrapper<T> queryWrapper);
    /**
     * 返回IPage<User>
     参数1:实体类,参数2:条件构造器
     */
    @Test
    public void selectPage() {

        //  sql:SELECT id,name,age,email FROM user LIMIT ?,?
        QueryWrapper<Student> queryWrapper = new QueryWrapper<Student>();
        //当为true的时候条件生效,false不生效。
        Page<Student> page = new Page<Student>(1, 3,true);

        IPage<Student> ipage = studentMapper.selectPage(page, queryWrapper);
        //查询分页数据列表
        System.out.println(ipage.getRecords());
        //查询总数
        System.out.println(ipage.getTotal());
        //分页总页数
        System.out.println(ipage.getPages());
        //当前页
        System.out.println(ipage.getCurrent());
        //当前分页数量
        System.out.println(ipage.getSize());
    }
2、selectMapsPage()
IPage<Map<String, Object>> selectMapsPage(IPage<T> page, @Param(Constants.WRAPPER) Wrapper<T> queryWrapper);
    /**
     * 返回 IPage<Map<String, Object>> page
     参数1:实体类,参数2:条件构造器
     */
    @Test
    public void selectMapsPage() {

        // sql:SELECT id,name,age,email FROM user ORDER BY age ASC LIMIT ?,?
        QueryWrapper<Student> queryWrapper = new QueryWrapper<>();
        queryWrapper.orderByDesc("age");
        IPage<Map<String, Object>> page = studentMapper.selectMapsPage(new Page<>(0, 2), queryWrapper);

        //IPage<Map<String, Object>> page = userMapper.selectMapsPage(new Page<>(1, 2), new QueryWrapper<User>());
        //查询分页数据列表
        System.out.println(page.getRecords());
        //查询总数
        System.out.println(page.getTotal());
        //分页总页数
        System.out.println(page.getPages());
        //当前页
        System.out.println(page.getCurrent());
        //当前分页数量
        System.out.println(page.getSize());
    }
区别:selectMapsPage 的用法和上面的 selectPage 很像,都是传入分页查询条件、以及查询构造器进行查询,然后返回一个 List。不同在于 selectMapsPage 返回的结果里面是 Map:
Service的CRUD
准备工作
StudentMapper 接口,并继承 BaseMapper 接口,就可以使用 Mapper 的各种 CRUD 方法了
@Repository
public interface StudentMapper extends BaseMapper<Student> {

}
继承 IService 创建 Service 接口,并创建对应的实现类,这样便可以使用 Service 的各种 CRUD 方法了:
- StudentService 接口代码如下:
public interface StudentService extends IService<Student> {

}
-
StudentServiceImpl 实现类代码如下:
// @Service 注入到ico容器中
@Service
public class StudentServiceImpl extends ServiceImpl<StudentMapper, Student> implements StudentService {

}
1、Select 查询
getById(根据 id 查询一条记录)
    @Test
    void getById(){

        /**
         * (1)getById(根据 id 查询一条记录)
         * sql:  SELECT id,name,age,gender,telephone,email,classId FROM student WHERE id=?
         */
        Student byId = studentService.getById(6L);
    }
getOne(使用查询构造器,查询一条记录)
	@Test
    void getOne(){
        // 查询条件:名字中包含'like'并且年龄小于40
        //sql:SELECT id,name,age,gender,telephone,email,classId FROM student WHERE (name LIKE ? AND age > ?)
        QueryWrapper<Student> queryWrapper = new QueryWrapper<>();
        queryWrapper.like("name","like");
        queryWrapper.gt("age",24);
        // **开始查询符合的单条记录(如果满足条件的记录有多条,那就不能用这个方法,会报错。)**
        Student one = studentService.getOne(queryWrapper);
    }
getMap(使用查询构造器,查询一条记录,返回的是 Map)
getMap 的用法和上面的 getOne 很像,都是传入一个查询构造器进行查询。不同的是 getMap 返回的是一个 Map,而不是实体类对象:
注意: Map 里的 key 为表字段名,而不是对应实体类的属性名。
    @Test
    void getMap(){
        // 查询条件:名字中包含'like'并且年龄大于24
        //sql:SELECT id,name,age,gender,telephone,email,classId FROM student WHERE (name LIKE ? AND age > ?)
        QueryWrapper<Student> queryWrapper = new QueryWrapper<>();
        queryWrapper.like("name","like");
        queryWrapper.gt("age",24);
        // 开始查询符合的单条记录(如果满足条件的记录有多条,那就不能用这个方法,会报错。)
        Map<String, Object> user = studentService.getMap(queryWrapper);
    }
getObj(使用查询构造器,查询一条记录,返回这条记录的第一个字段值)
getObj 的用法和上面的 getOne 很像,都是传入一个查询构造器进行查询。不同的是 getObj 返回的是一个字段值(该方法第二个参数是转换函数,必填)
 	@Test
    void getObj(){
        // 查询条件:名字中包含'like'并且年龄大于24
        //sql:SELECT id,name,age,gender,telephone,email,classId FROM student WHERE (name LIKE ? AND age > ?)
        QueryWrapper<Student> queryWrapper = new QueryWrapper<>();
        queryWrapper.like("name","like");
        queryWrapper.gt("age",24);
        // 开始查询符合的单条记录的第一个字段值
        Integer id = studentService.getObj(queryWrapper, (o) -> {
            return Integer.parseInt(o.toString());
        });
        System.out.println(id);
    }
listByIds(根据 ID 批量查询,返回一个 List)
	// 注意主键id 的数据类型。
	List<Student> student = studentService.listByIds(Arrays.asList(4L,5L,6L));
listByMap(通过 Map 封装的条件查询,返回一个 List)
注意:map 写的是数据表中的列名,而非实体类的属性名。比如属性名为 userName,数据表中字段为 user_name,这里应该写的是 user_name。
		Map<String,Object> columnMap = new HashMap<>();
        columnMap.put("name", "若贞");
        columnMap.put("age", 22);
        List<Student> students = studentService.listByMap(columnMap);
list(使用查询构造器,返回一个 List)
1、list 方法如果参数为空,则查询所有的数据:
		// 查询所有数据
        List<Student> students = studentService.list();
2、list 方法也可以传入查询条件构造器进行查询:
		// 查询条件:名字中包含'like'并且年龄大于24
        //sql: SELECT id,name,age,gender,telephone,email,classId FROM student WHERE (name LIKE ? AND age > ?)
        //     Parameters: %like%(String), 20(Integer)
        QueryWrapper<Student> queryWrapper = new QueryWrapper<>();
        queryWrapper.like("name","like");
        queryWrapper.gt("age",20);
		//可以查询多条数据
        List<Student> students = studentService.list(queryWrapper);
listMaps(使用查询构造器,返回一个 List)
listMaps 的用法和上面的 list 很像,都是传入一个查询构造器进行查询,然后返回一个 List。不同在于 listMaps 返回的 List 里面是 Map。
注意: Map 里的 key 为表字段名,而不是对应实体类的属性名。
1、listMaps 方法如果参数为空,则查询所有的数据:
 		List<Map<String, Object>> mapList = studentService.listMaps();
        System.out.println(mapList);
2、listMaps 方法也可以传入查询条件构造器进行查询:
		// 查询条件:名字中包含'like'并且年龄大于20
        //sql: SELECT id,name,age,gender,telephone,email,classId FROM student WHERE (name LIKE ? AND age > ?)
        //     Parameters: %like%(String), 20(Integer)
        QueryWrapper<Student> queryWrapper = new QueryWrapper<>();
        queryWrapper.like("name","like");
        queryWrapper.gt("age",20);
        // 开始查询
        List<Map<String, Object>> mapList = studentService.listMaps(queryWrapper);
count(使用查询构造器,查询总记录数)
1、count 方法如果参数为空,则查询所有数据的记录数:
		Integer count = studentService.count();
        System.out.println(count);
2、count 方法也可以传入查询条件构造器进行查询
		// 查询条件:名字中包含'like'并且年龄大于20
        //sql: SELECT COUNT( 1 ) FROM student WHERE (name LIKE ? AND age > ?)
        //     Parameters: %like%(String), 20(Integer)
        QueryWrapper<Student> queryWrapper = new QueryWrapper<>();
        queryWrapper.like("name","like");
        queryWrapper.gt("age",20);
        //开始根据条件查询总记录
        Integer count = studentService.count(queryWrapper);
        System.out.println(count);
2、Page分页查询
添加配置
MyBatis-Plus 提供了物理分页的功能,使用前我们需要要进行相关的插件配置:
逻辑分页与物理分页比较:
- 逻辑分页:内存开销比较大,在数据量比较小的情况下效率比物理分页高;在数据量很大的情况下,内存开销过大,容易内存溢出,不建议使用。
- 物理分页:内存开销比较小,在数据量比较小的情况下效率比逻辑分页还是低;在数据量很大的情况下,建议使用物理分页。
@Configuration
public class MybatisPlusConfig {
    //mybatis-plus分页插件
    @Bean
    public PaginationInterceptor paginationInterceptor() {
        PaginationInterceptor paginationInterceptor = new PaginationInterceptor();
        // 设置请求的页面大于最大页后操作, true调回到首页,false 继续请求  默认false
        // paginationInterceptor.setOverflow(false);
        // 设置最大单页限制数量,默认 500 条,-1 不受限制
        // paginationInterceptor.setLimit(500);
        // 开启 count 的 join 优化,只针对部分 left join
        paginationInterceptor.setCountSqlParser(new JsqlParserCountOptimize(true));
        return paginationInterceptor;
    }
}
IService 接口提供了 page 方法实现分页查询,比如下面我们查询第一页的数据(每页两条记录):
	@Test
    void page(){
        // 查询条件:名字中包含'like'并且年龄大于20
        //sql: SELECT id,name,age,gender,telephone,email,classId FROM student WHERE (name LIKE ? AND age > ?) LIMIT ?,?
        //     Parameters: %like%(String), 20(Integer), 1(Long), 2(Long)
        QueryWrapper<Student> queryWrapper = new QueryWrapper<>();
        queryWrapper.like("name","like");
        queryWrapper.gt("age",20);
        // 开始查询
        IPage<Student> page = studentService.page(new Page<>(1,2), queryWrapper);
    }
自定义 SQL 语句的分页查询
MyBatis-Plus 也支持对自定义的查询语句进行分页
1、mapper 只需要传递参数 Page 即自动会实现分页:
注意:递参数 Page 即自动分页,必须放在第一位(我们也可以继承 Page 实现自己的分页对象)
@Repository
public interface StudentMapper extends BaseMapper<Student> {

    /**
     * 自定义分页
     * @param page 分页对象
     * @param age 查询条件
     * @return
     */
    IPage<Student> selectPage2(Page<?> page, @Param("age") Integer age);
}
2、mapper.xml 写好sql语句
<?xml version="1.0" encoding="UTF-8" ?>
<!DOCTYPE mapper PUBLIC "-//mybatis.org//DTD Mapper 3.0//EN"
        "http://mybatis.org/dtd/mybatis-3-mapper.dtd">
<mapper namespace="com.zzz.mapper.StudentMapper">
    <select id="selectPage2" resultType="Student">
        SELECT * FROM student
            WHERE age > #{age}
    </select>
</mapper>
3、StudentService 接口中也添加相应的方法:
public interface StudentService extends IService<Student> {

    /**
     * 根据条件自定义分页
     * @param page page对象
     * @param age 查询参数
     * @return
     */
    IPage<Student> selectPage2(Page<?> page, Integer age);

}
4、StudentServiceImpl.java 里调用 mapper 自定义的分页方法:
@Service
public class StudentServiceImpl extends ServiceImpl<StudentMapper, Student> implements StudentService {

    @Override
    public IPage<Student> selectPage2(Page<?> page, Integer age) {
        // 不进行 count sql 优化,解决 MP 无法自动优化 SQL 问题,这时候你需要自己查询 count 部分
        // page.setOptimizeCountSql(false);
        // 当 total 为小于 0 或者设置 setSearchCount(false) 分页插件不会进行 count 查询
        // 要点!! 分页返回的对象与传入的对象是同一个
        return baseMapper.selectPage2(page, age);
    }
}
5、我们调用一下这个自定义方法进行测试:
    @Test
    void page2(){
        // 查询条件:年龄大于20
        //sql: SELECT * FROM student WHERE age > ? LIMIT ?,?
        //     Parameters: 20(Integer), 0(Long), 2(Long)
        //Page<Student> page = new Page<>(1, 2);
        studentService.selectPage2(new Page<>(1,2),20);
    }
结果
[外链图片转存失败,源站可能有防盗链机制,建议将图片保存下来直接上传(img-qXgwicfW-1616153572830)(Y:\ \MyBatis-Plus基础–入门程序.assets\image-20201118152453103.png)]
3、Insert 新增数据
save 方法可以将一个实体对象插入到对应的数据表中
注意:插入成功后,当前插入对象在数据库中的 id 会写回到该实体中。
    @Test
    void serviceAddStudent(){
        Student student = new Student();
        student.setName("若贞");
        student.setAge(320);
        student.setGender("男");
        student.setTelephone("13545678945");
        student.setEmail("1131270557@qq.com");
        student.setClassId(4L);
        boolean save = studentService.save(student);
        System.out.println(save);
    }
saveBatch 方法可以批量插入数据
	@Test
    void serviceBatchStudent(){
        Student student = new Student();
        student.setName("若贞");
        student.setAge(25);
        student.setGender("男");
        student.setTelephone("13545678945");
        student.setEmail("1131270557@qq.com");
        student.setClassId(1L);

        Student student1 = new Student();
        student1.setName("若贞1");
        student1.setAge(20);
        student1.setGender("男");
        student1.setTelephone("13545678945");
        student1.setEmail("1131270557@qq.com");
        student1.setClassId(3L);

        Student student2 = new Student();
        student2.setName("若贞2");
        student2.setAge(18);
        student2.setGender("男");
        student2.setTelephone("13545678945");
        student2.setEmail("1131270557@qq.com");
        student2.setClassId(2L);
        //批量插入数据
        studentService.saveBatch(Arrays.asList(student, student1, student2));
    }
结果:
[外链图片转存失败,源站可能有防盗链机制,建议将图片保存下来直接上传(img-xZUkRzwH-1616153572831)(Y:\ \MyBatis-Plus基础–入门程序.assets\image-20201118154121381.png)]
saveBatch 方法还可以设置每个批次的插入数量:
		//批量插入数据  每次插入两条数据
        studentService.saveBatch(Arrays.asList(student, student1, student2),2);
[外链图片转存失败,源站可能有防盗链机制,建议将图片保存下来直接上传(img-FgcJNx7P-1616153572831)(Y:\ \MyBatis-Plus基础–入门程序.assets\image-20201118154405605.png)]
4、Update修改数据
updateById 方法根据实体对象中的 ID 进行修改:
注意:如果实体对象中某个属性为 null,不会更新该属性(即不会把对应的数据库字段值设置为 null)
 	@Test
    void sUpdate(){
        Student student = new Student();
        student.setName("樱花");
        student.setAge(66);
        student.setId(1328966765497917443L);
        studentService.updateById(student);
    }
结果
[外链图片转存失败,源站可能有防盗链机制,建议将图片保存下来直接上传(img-AjCsybxe-1616153572832)(Y:\ \MyBatis-Plus基础–入门程序.assets\image-20201118154942341.png)]
updateBatchById 方法根据实体对象中的 ID 进行批量修改:跟添加一样的 只需要把方法名 换成updateBatchById()
updateBatchById 方法还可以设置每个批次的修改的数量:跟添加一样的 只需要把方法名 换成updateBatchById() 传入三个参数
5、Delete删除数据
removeById 方法可以根据 id 删除一条记录
    @Test
    void sDelete(){
        // 返回删除结果
        Boolean success = studentService.removeById(1328966765497917443L);
    }
结果
[外链图片转存失败,源站可能有防盗链机制,建议将图片保存下来直接上传(img-zN9NE8Lb-1616153572832)(Y:\ \MyBatis-Plus基础–入门程序.assets\image-20201118155355188.png)]
removeByIds 方法根据 id 批量删除:
    @Test
    void removeByIds(){
        // 返回删除结果
        Boolean success = studentService.removeByIds(Arrays.asList(7L,8L,9L,10L));
    }
结果
[外链图片转存失败,源站可能有防盗链机制,建议将图片保存下来直接上传(img-J0CQikwF-1616153572833)(Y:\ \MyBatis-Plus基础–入门程序.assets\image-20201118155618820.png)]
removeByMap 方法通过 Map 封装的条件删除记录
注意:map 写的是数据表中的列名,而非实体类的属性名。比如属性名为 userName,数据表中字段为 user_name,这里应该写的是 user_name。
    @Test
    void removeByMap(){
        Map<String,Object> columnMap = new HashMap<>();
        columnMap.put("name", "若贞1");
        columnMap.put("age", 20);
        // 返回删除结果
        studentService.removeByMap(columnMap);
    }
结果
[外链图片转存失败,源站可能有防盗链机制,建议将图片保存下来直接上传(img-kaXRX4pF-1616153572834)(Y:\ \MyBatis-Plus基础–入门程序.assets\image-20201118155915705.png)]
Service CRUD 接口 跟Mapper CRUD 接口区别
Service CRUD 接口
说明:
- 通用 Service CRUD 封装IService接口,进一步封装 CRUD 采用
get 查询单行remove 删除list 查询集合page 分页前缀命名方式区分Mapper层避免混淆, - 泛型
T为任意实体对象 - 建议如果存在自定义通用 Service 方法的可能,请创建自己的
IBaseService继承Mybatis-Plus提供的基类 - 对象
Wrapper为 条件构造器
Mapper CRUD 接口
说明:
- 通用 CRUD 封装BaseMapper接口,为
Mybatis-Plus启动时自动解析实体表关系映射转换为Mybatis内部对象注入容器 - 泛型
T为任意实体对象 - 参数
Serializable为任意类型主键Mybatis-Plus不推荐使用复合主键约定每一张表都有自己的唯一id主键 - 对象
Wrapper为 条件构造器
两者区别
Service CRUD 返回的boolean的值
Mapper CRUD 返回的是int值
扩展
乐观锁
基本介绍
乐观锁的应用场景是当要更新一条记录的时候,希望这条记录没有被别人更新。
注意:
- 目前乐观锁仅支持 updateById(id) 与 update(entity, wrapper) 方法
- 在 update(entity, wrapper) 方法下,wrapper 不能复用!!!
乐观锁实现方式如下:
- 取出记录时,获取当前 version
- 执行更新时,带上这个 version,即 set version = new Version where version = old Version
- 如果 version 不对,就更新失败
原理:通俗的说, 就是查询的时候拿出一个值,跟更改时拿出同一个值 进行对比。如果一样表示在你这查询期间每一修改,如果不一样就是别人已经修改了
准备工作
1、首先在项目中添加乐观锁插件配置:
@Configuration
public class MybatisPlusOptLockerConfig {

    @Bean
    public OptimisticLockerInterceptor optimisticLockerInterceptor() {
        return new OptimisticLockerInterceptor();
    }
}
2、接着数据库表中增加一个字段用于记录版本,我这里使用 int 类型,默认值为 0(默认值不能为 null,否则乐观锁无效)
提示:
- 支持的数据类型只有:int,Integer,long,Long,Date,Timestamp,LocalDateTime
- 整数类型下 newVersion = oldVersion + 1
- newVersion 会回写到 entity 中
[外链图片转存失败,源站可能有防盗链机制,建议将图片保存下来直接上传(img-jdcXPhaB-1616153572834)(Y:\ \MyBatis-Plus基础–入门程序.assets\image-20201118165055474.png)]
3、最后在对应的实体类字段上添加 @Version 注解
	/**
     * 乐观锁
     */
    @Version
    private Integer version;
测试
    /**
     * 测试乐观锁
     * 一定要注意,  这前提条件是在同一条的数据下
     */
    @Test
    void versionTest() {
        Student student1 = studentMapper.selectById(5L);
        Student student2 = studentMapper.selectById(5L);
        student1.setAge(111);
        if (studentMapper.updateById(student1) > 0) {
            System.out.println("student1 更新成功");
        } else {
            System.out.println("student1 更新失败,该记录已被其他人修改!");
        }

        student2.setAge(222);
        if (studentMapper.updateById(student2) > 0) {
            System.out.println("student2 更新成功");
        } else {
            System.out.println("student2 更新失败,该记录已被其他人修改!");
        }

    }
结果
[外链图片转存失败,源站可能有防盗链机制,建议将图片保存下来直接上传(img-7QeWc3r5-1616153572835)(Y:\ \MyBatis-Plus基础–入门程序.assets\image-20201119093906203.png)]
字段数据自动填充
创建时间、修改时间! 这些个操作一遍都是自动化完成的,我们不希望手动更新!
阿里巴巴开发手册:所有的数据库表:gmt_create、gmt_modified几乎所有的表都要配置上!而且需 要自动化!
方式一:数据库级别(工作中不允许你修改数据库)
1、在表中新增字段 create_time, update_time
[外链图片转存失败,源站可能有防盗链机制,建议将图片保存下来直接上传(img-qy1kmeLH-1616153572836)(Y:\ \MyBatis-Plus基础–入门程序.assets\image-20201119111332273.png)]
2、再次测试插入方法,我们需要先把实体类同步!
    /**
     * 添加时间
     */
    private Date createTime;

    /**
     * 修改时间
     */
    private Date updateTime;
3、再次更新查看结果即可
    @Test
    void update(){
        //(1)sql:UPDATE student SET name=?, age=? WHERE id=?
        Student student1 = new Student();
        student1.setName("若贞");
        student1.setAge(22);
        student1.setId(3L);
        studentMapper.updateById(student1);
    }
结果
[外链图片转存失败,源站可能有防盗链机制,建议将图片保存下来直接上传(img-Yj3WMSXp-1616153572837)(Y:\ \MyBatis-Plus基础–入门程序.assets\image-20201119111846473.png)]
方式二:代码级别
1、删除数据库的默认值、更新操作!
[外链图片转存失败,源站可能有防盗链机制,建议将图片保存下来直接上传(img-jLIzTozG-1616153572837)(Y:\ \MyBatis-Plus基础–入门程序.assets\image-20201119112112067.png)]
说明:如果无法删除默认值,请把非空的选项也去除掉
2、实体类字段属性上需要增加注解 @TableField
FieldFill 是一个枚举,用于指定在何种情况下会自动填充,有如下几种可选值:
- DEFAULT:默认不处理
- INSERT:插入填充字段
- UPDATE:更新填充字段
- INSERT_UPDATE:插入和更新填充字段
    /**
     * 添加时间
     * 插入时要填充时间
     */
    @TableField(fill = FieldFill.INSERT)
    private Date createTime;

    /**
     * 修改时间
     * 插入和修改都填充时间,因为添加的时候也要加上时间
     */
    @TableField(fill = FieldFill.INSERT_UPDATE)
    private Date updateTime;
3、接着编写公共字段填充处理器类,该类继承了 MetaObjectHandler 类,重写 insertFill 和 updateFill 方法,我们在这两个方法中获取需要填充的字段以及默认填充的值。()
注意:
- 填充处理器 MyMetaObjectHandler 在 Spring Boot 中需要声明 @Component 或 @Bean 注入
- strictInsertFill 和 strictUpdateFill 方法第二个参数写的是实体类里的属性名,不是对应数据库字段名。
package com.zzz.config;

import com.baomidou.mybatisplus.core.handlers.MetaObjectHandler;
import lombok.extern.slf4j.Slf4j;
import org.apache.ibatis.reflection.MetaObject;
import org.springframework.stereotype.Component;

import java.util.Date;

@Slf4j   // 日志注解
@Component //一定不要忘记把处理器加到IOC容器中!
public class MyMetaObjectHandler implements MetaObjectHandler {

    /**
     * 插入时的填充策略
     * @param metaObject
     */
    @Override
    public void insertFill(MetaObject metaObject) {
        //log日志输出
        log.info("start insert fill.....");
        //添加时间的策略
        this.setFieldValByName("createTime",new Date(),metaObject);
        //修改时间的策略
        this.setFieldValByName("updateTime",new Date(),metaObject);

    }

    /**
     * 更新时的填充策略
     * @param metaObject
     */
    @Override
    public void updateFill(MetaObject metaObject) {
        //log日志输出
        log.info("start update fill.....");
        //修改时间策略
        this.setFieldValByName("updateTime",new Date(),metaObject);
    }
}
4、测试
添加
    /**
     * 插入一条数据
     * int insert(T entity);
     */
    @Test
    void AddStudent() {
        Student student = new Student();
        student.setName("若贞");
        student.setAge(11);
        student.setGender("男");
        student.setTelephone("13545678945");
        student.setEmail("1131270557@qq.com");
        student.setClassId(4L);
        int insert = studentMapper.insert(student);
        System.out.println(insert);
        System.out.println(student);
    }
结果:观察时间 自动帮我们填充了
[外链图片转存失败,源站可能有防盗链机制,建议将图片保存下来直接上传(img-edupysdI-1616153572838)(Y:\ \MyBatis-Plus基础–入门程序.assets\image-20201119113849266.png)]
修改
    @Test
    void update(){
        //(1)sql:UPDATE student SET name=?, age=? WHERE id=?
        Student student1 = new Student();
        student1.setName("若小贞");
        student1.setAge(22);
        student1.setId(10L);
        studentMapper.updateById(student1);
    }
结果:观察时间 添加的时间没用变 而修改的时间变化了
[外链图片转存失败,源站可能有防盗链机制,建议将图片保存下来直接上传(img-O0ySSQfa-1616153572838)(Y:\ \MyBatis-Plus基础–入门程序.assets\image-20201119114200998.png)]
逻辑删除
物理删除 :从数据库中直接移除
逻辑删除 :逻辑删除并不会真正的从数据库中将数据删除掉,而是将当前被删除的这条数据中的一个逻辑删除字段置为删除状态。
比如该数据有一个字段 deleted,当其值为 0 表示未删除,值为 1 表示删除。那么逻辑删除就是将 0 变成 1。
逻辑删除字段说明:
- 字段支持所有数据类型(推荐使用 Integer、Boolean、LocalDateTime)
- 如果使用 LocalDateTime,建议逻辑未删除值设置为字符串 null,逻辑删除值只支持数据库函数例如 now()
管理员可以查看被删除的记录!防止数据的丢失,类似于回收站!
步骤
1、在数据表中增加一个 deleted 字段
[外链图片转存失败,源站可能有防盗链机制,建议将图片保存下来直接上传(img-wL2W73lF-1616153572838)(Y:\ \MyBatis-Plus基础–入门程序.assets\image-20201119115122831.png)]
2、实体类中增加属性
    /**
     * 逻辑删除
     * 给对应的实体类字段上加上 @TableLogic 注解
     */
    @TableLogic
    private Integer deleted;
3、配置!
mybatis-plus:
  #配置逻辑删除
  global-config:
    db-config:
      logic-delete-value: 1
      logic-not-delete-value: 0
4、测试
[外链图片转存失败,源站可能有防盗链机制,建议将图片保存下来直接上传(img-kItD0ykO-1616153572840)(Y:\ \MyBatis-Plus基础–入门程序.assets\image-20201119120337603.png)]
记录依旧在数据库,但是值确已经变化了!
[外链图片转存失败,源站可能有防盗链机制,建议将图片保存下来直接上传(img-aj9cxiLd-1616153572840)(Y:\ \MyBatis-Plus基础–入门程序.assets\image-20201119120417573.png)]
测试查询:
    @Test
    void test() {
        System.out.println(("----- selectAll method test ------"));
        List<Student> students = studentMapper.selectList(null);
        //jdk8:支持的循环
        students.forEach(System.out::println);
    }
[外链图片转存失败,源站可能有防盗链机制,建议将图片保存下来直接上传(img-nqSoE4pw-1616153572840)(Y:\ \MyBatis-Plus基础–入门程序.assets\image-20201119120643294.png)]
性能分析插件
我们在平时的开发中,会遇到一些慢sql。测试! druid,
作用:性能分析拦截器,用于输出每条 SQL 语句及其执行时间,如果超过这个时间就停止运行!
性能分析拦截器,用于输出每条 SQL 语句及其执行时间
该插件
3.2.0以上版本移除 推荐使用第三方扩展执行 SQL 分析打印功能使用性能分析插件,可以帮助我们提高效率!
1、导入插件
注意:我们mybatis_plus插件不要太高,不然它会不识别
    /**
     * SQL执行效率插件
     * 在工作中,不允许用户等待超过多长时间,这样我们根据这个进行sql优化
     */
    @Bean
    @Profile({"dev","test"})// 设置 dev test 环境开启,保证我们的效率
    public PerformanceInterceptor performanceInterceptor() {
        PerformanceInterceptor performanceInterceptor = new PerformanceInterceptor();
        //(1表示为1豪秒ms)设置sql执行的最大时间,如果超过了则不执行
        performanceInterceptor.setMaxTime(100);
        // 是否格式化代码
        performanceInterceptor.setFormat(true);
        return performanceInterceptor;
    }
记住,要在SpringBoot中配置环境为dev或者 test 环境!
# 配置环境为de
spring:
  profiles:
    active: dev
2、测试使用!
[外链图片转存失败,源站可能有防盗链机制,建议将图片保存下来直接上传(img-iQ1sC0t2-1616153572841)(Y:\ \MyBatis-Plus基础–入门程序.assets\image-20201119123115316.png)]
条件构造器 Wrapper
1、相等、不相等
- allEq 表示全部 eq(或个别 isNull)
方法最后一个参数 null2IsNull是可选的(默认为true),为 true时则在map的value为null时调用isNull方法,为false时则忽略:
- allEq({id:1,user_name:“xxname”,age:null}) — 生成的sql为 —> id = 1 and user_name = ‘xxname’ and age is null
- allEq({id:1,user_name:“xxname”,age:null}, false) — 生成的sql为 —> id = 1 and user_name = 'xxname’
Map<SFunction<UserInfo, ?>, Object> map = new HashMap<>();
map.put(UserInfo::getId, 3);
map.put(UserInfo::getUserName, "xxname");
map.put(UserInfo::getAge, null);

List<UserInfo> userInfos = new LambdaQueryChainWrapper<>(userInfoMapper)
        .allEq(map)
        .list();
- eq 表示等于(=),ne 表示不等于(<>)
List<UserInfo> userInfos = new LambdaQueryChainWrapper<>(userInfoMapper)
        .eq(UserInfo::getId, 1) // id = 1
        .ne(UserInfo::getAge, 22) // age <> 22
        .list();
2、大于、小于
- gt 表示大于(>)、ge 表示大于等于(>=)、lt 表示小于(<)、le 表示小于等于(<=)
List<UserInfo> userInfos = new LambdaQueryChainWrapper<>(userInfoMapper)
        .gt(UserInfo::getId, 1) // id > 1
        .ge(UserInfo::getAge, 22) // age >=18
        .lt(UserInfo::getId, 3) // id < 3
        .le(UserInfo::getAge, 50) // age <=50
        .list();
- between 表示(BETWEEN 值1 AND 值2),notBetween 表示(NOT BETWEEN 值1 AND 值2)
List<UserInfo> userInfos = new LambdaQueryChainWrapper<>(userInfoMapper)
        .between(UserInfo::getId, 1,3) // id between 1 and 3
        .notBetween(UserInfo::getAge, 40, 50) // age not between 40 and 50
        .list();
3、模糊查询
- like 表示包含指定的值(like ‘%值%’),likeLeft 表示以指定的值结尾(like ‘%值’),likeRight 表示以指定的值开头(like ‘值%’)
List<UserInfo> userInfos = new LambdaQueryChainWrapper<>(userInfoMapper)
        .like(UserInfo::getUserName, "ha") // user_name like '%ha%'
        .likeLeft(UserInfo::getUserName, "ha") // user_name like '%ha'
        .likeRight(UserInfo::getUserName, "ha") // user_name like 'ha%'
        .list();
- notLike 表示不包含指定的值(not like ‘%值%’)
List<UserInfo> userInfos = new LambdaQueryChainWrapper<>(userInfoMapper)
        .notLike(UserInfo::getUserName, "xxname") // user_name not like '%xxname%'
        .list();
4、是否为 null
isNull 表示字段是否为 null(is null),isNotNull 表示字段是否不为 null(is not null)
List<UserInfo> userInfos = new LambdaQueryChainWrapper<>(userInfoMapper)
        .isNull(UserInfo::getUserName) // user_name is null
        .isNotNull(UserInfo::getAge) // age is not null
        .list();
5、in、notIn
List<UserInfo> userInfos = new LambdaQueryChainWrapper<>(userInfoMapper)
        .in(UserInfo::getId, Arrays.asList(1, 2, 3)) // id in (1,2,3)
        .notIn(UserInfo::getAge, Arrays.asList(22, 33)) // age not in (22,33)
        .list();
6、带子查询(sql 注入)
- 下面是 inSql 的用法:
List<UserInfo> userInfos = new LambdaQueryChainWrapper<>(userInfoMapper)
        .inSql(UserInfo::getAge, "22,33") // age in (22,33)
        // id in (select id from vip where level > 3)
        .inSql(UserInfo::getId, "select id from vip where level > 3")
        .list();
- 下面是 notInSql 的用法:
List<UserInfo> userInfos = new LambdaQueryChainWrapper<>(userInfoMapper)
        .notInSql(UserInfo::getAge, "22,33") // age not in (22,33)
        // id not in (select id from vip where level > 3)
        .notInSql(UserInfo::getId, "select id from vip where level > 3")
        .list();
7、排序
orderByAsc 表示升序(ASC),orderByDesc 表示降序(DESC)
List<UserInfo> userInfos = new LambdaQueryChainWrapper<>(userInfoMapper)
        .orderByAsc(UserInfo::getId, UserInfo::getUserName) // ORDER BY id ASC,user_name ASC
        .orderByDesc(UserInfo::getAge) // ORDER BY age DESC
        .list();
8、分组、筛选
下面是 groupBy 和 having 的用法:
List<UserInfo> userInfos = new LambdaQueryChainWrapper<>(userInfoMapper)
        .groupBy(UserInfo::getUserName, UserInfo::getAge) // group by user_name,age
        .having("sum(age) > 20") // HAVING sum(age) > 20
        .having("sum(age) > {0}", 30) // HAVING sum(age) > 30
        .select(UserInfo::getUserName, UserInfo::getAge)
        .list();
9、or、 and、nested
- 主动调用 or 表示紧接着下一个方法是用 or 连接(不调用 or 则默认为使用 and 连接)
// WHERE age = 22 or age = 33
List<UserInfo> userInfos = new LambdaQueryChainWrapper<>(userInfoMapper)
        .eq(UserInfo::getAge, 22)
        .or()
        .eq(UserInfo::getAge, 33)
        .list();
- or、 and、nested 可以实现带嵌套的查询:
- or 为 OR 嵌套
- and 为 AND 嵌套
- nested 为正常嵌套(不带 AND 或者 OR)
// WHERE age IS NOT NULL AND ((id = 1 AND user_name = 'xxname') OR (id = 2 AND user_name = 'xxname'))
List<UserInfo> userInfos = new LambdaQueryChainWrapper<>(userInfoMapper)
        .isNotNull(UserInfo::getAge)
        .and(i -> i.nested(
                j -> j.eq(UserInfo::getId,1).eq(UserInfo::getUserName,"xxname")
                )
                .or(j -> j.eq(UserInfo::getId,2).eq(UserInfo::getUserName,"xxname"))
        )
        .list();
10、拼接 sql(sql 注入)
- apply 方法可以直接将自定义的 sql 拼接到查询条件中:
// WHERE age IS NOT NULL AND id = 3 AND user_name = 'xxname'
List<UserInfo> userInfos = new LambdaQueryChainWrapper<>(userInfoMapper)
        .isNotNull(UserInfo::getAge)
        .apply("id = 3") // 有sql注入的风险
        .apply("user_name = {0}", "xxname") //无sql注入的风险
        .list();
- last 无视优化规则直接拼接到 sql 的最后:
注意: last 只能调用一次,多次调用以最后一次为准。该方法有 sql 注入的风险,请谨慎使用。
// WHERE age IS NOT NULL limit 2
List<UserInfo> userInfos = new LambdaQueryChainWrapper<>(userInfoMapper)
        .isNotNull(UserInfo::getAge)
        .last("limit 2")
        .list();
11、exists、notExists
- exists 方法可以拼接 EXISTS ( sql 语句 ),比如下面查询底下有用户的所有区域:
// SELECT id,area_name FROM area WHERE
//         (EXISTS (select * from user_info where user_info.area_id = area.id))
List<Area> areas = new LambdaQueryChainWrapper<>(areaMapper)
        .exists("select * from user_info where user_info.area_id = area.id")
        .list();
- notExists 方法用于拼接 NOT EXISTS ( sql 语句 ),比如下面查询底下没有用户的所有区域:
// SELECT id,area_name FROM area WHERE
//         (NOT EXISTS (select * from user_info where user_info.area_id = area.id))
List<Area> areas = new LambdaQueryChainWrapper<>(areaMapper)
        .notExists("select * from user_info where user_info.area_id = area.id")
        .list();
12、设置查询字段(select)
select 方法可以设置最终查询返回的字段:
        List<Student> userInfos = new LambdaQueryChainWrapper<>(studentMapper)
                .select(Student::getName, Student::getAge)
                .list();
代码自动生成器
AutoGenerator 是 MyBatis-Plus 的代码生成器,通过 AutoGenerator 可以快速生成 Entity、Mapper、Mapper XML、Service、Controller 等
各个模块的代码,极大的提升了开发效率。
1、添加依赖
		<!--
			添加muybatis-plus的依赖
            如果之前添加了就不用添加这个依赖了。
        -->
        <dependency>
            <groupId>com.baomidou</groupId>
            <artifactId>mybatis-plus-boot-starter</artifactId>
            <version>3.3.0</version>
        </dependency>
        <!-- 代码生成器依赖 -->
        <dependency>
            <groupId>com.baomidou</groupId>
            <artifactId>mybatis-plus-generator</artifactId>
            <version>3.3.1.tmp</version>
        </dependency>
        <!-- 模板引擎依赖 -->
        <dependency>
            <groupId>org.apache.velocity</groupId>
            <artifactId>velocity-engine-core</artifactId>
            <version>2.2</version>
        </dependency>
2、开始生成代码
public void startGenerator() {

        /**
         * 1、全局配置
         */
        GlobalConfig config = new GlobalConfig();
        String projectPath = System.getProperty("user.dir");
        //开启AR模式
        config.setActiveRecord(true);
        //设置作者
        config.setAuthor("若贞");
        //生成路径(一般在此项目的src/main/java下)
        config.setOutputDir(projectPath + "/src/main/java");
        //第二次生成会把第一次生成的覆盖掉
        config.setFileOverride(true);
        //生成完毕后是否自动打开输出目录
        config.setOpen(true);
        //实体属性 Swagger2 注解
        //config.setSwagger2(true)
        //设置主键生成策略 自动增长
        config.setIdType(IdType.AUTO);
        //生成的service接口名字首字母是否为I,这样设置就没有I
        config.setServiceName("%sService");
        //生成resultMap
        config.setBaseResultMap(true);
        //在xml中生成基础列
        config.setBaseColumnList(true);

        /**
         * 2、数据源配置
         */
        DataSourceConfig dsc = new DataSourceConfig();
        //数据库类型
        dsc.setDbType(DbType.MYSQL);
        //加载驱动
        dsc.setDriverName("com.mysql.jdbc.Driver");
        //数据库url路径
        dsc.setUrl("jdbc:mysql://localhost:3306/student?useUnicode=true&characterEncoding=UTF-8&serverTimezone=GMT%2B8");
        //用户名
        dsc.setUsername("root");
        //密码
        dsc.setPassword("root");

        /**
         * 3、策略配置
         */
        StrategyConfig strategy = new StrategyConfig();
        //开启全局大写命名
        strategy.setCapitalMode(true);
        //表名映射到实体的命名策略(下划线到驼峰)
        strategy.setNaming(NamingStrategy.underline_to_camel);
        //表字段映射属性名策略(未指定按naming)
        strategy.setColumnNaming(NamingStrategy.underline_to_camel);
        //表名前缀
        //strategy.setTablePrefix("tb_")
        //strategy.setSuperEntityClass("你自己的父类实体,没有就不用设置!")
        //写于父类中的公共字段
        //strategy.setSuperEntityColumns("id");
        //strategy.setSuperControllerClass("自定义继承的Controller类全称,带包名,没有就不用设置!")
        //生成 @RestController 控制器
        strategy.setRestControllerStyle(true);
        //使用lombok
        strategy.setEntityLombokModel(true);
        //设置要映射的表名
        strategy.setInclude("", "");

        //4、包名策略配置
        PackageConfig pc = new PackageConfig();
        //设置版块名字
        pc.setParent("com.zzz.student");
        //设置数据访问层文件的目录
        pc.setMapper("mapper");
        //设置逻辑业务文件的目录
        pc.setService("service");
        //设置控制层文件的目录
        pc.setController("controller");
        //设置实体类文件的目录
        pc.setEntity("entity");
        //设置mapper.xml文件的目录
        pc.setXml("mapper");//设置xml文件的目录


        /**
         * 5、整合配置
         */
        // 需要构建一个 代码自动生成器 对象
        AutoGenerator autoGenerator = new AutoGenerator();
        autoGenerator.setGlobalConfig(config);
        autoGenerator.setDataSource(dsc);
        autoGenerator.setStrategy(strategy);
        autoGenerator.setPackageInfo(pc);

        /**
         * 6、执行
         */
        autoGenerator.execute();
    }
多表关联查询
一、多表关联查询(使用注解)
1、自定义 sql
- 假设我们有如下两张表:用户表(User)、区域表(Area),其中用户表里通过 area_id 字段关联区域表的 id 主键:

- 假设我们希望查询 User 时也能获取其所属的区域名称,这里对 User 实体类增加 areaName 属性:
提示:由于 area_name 不是 User 数据库表里的字段,因此需要添加 @TableField 注解,并将 exist 属性设置为 false。
@Data
public class User {
    //指定主键使用数据库ID自增策略
    @TableId(type = IdType.AUTO)
    private Integer id;
    private String userName;
    private String passWord;
    private Integer areaId;
    @TableField(exist = false)
    private String areaName;
}
- 然后在 UserMapper 中添加相关查询方法以及关联查询语句
public interface UserMapper extends BaseMapper<User> {
    @Select("SELECT user.*, area.area_name FROM user, area " +
            "WHERE user.area_id = area.id and user.id = #{id}")
    User getUserById(int id);
}
2、使用 @One 注解实现一对一关联
- 这里我们对 User 实体类稍作修改,这次不再是增加 areaName 属性,而是直接增加 area 关联对象:
@Data
public class User {
    //指定主键使用数据库ID自增策略
    @TableId(type = IdType.AUTO)
    private Integer id;
    private String userName;
    private String passWord;
    private Integer areaId;
    @TableField(exist = false)
    private Area area;
}
- 我们对 UserMapper 做如下修改,使用 @Results 注解来映射查询结果集到实体类属性:
提示:
- 当我们需要通过查询到的一个字段值作为参数,去执行另外一个方法来查询关联的内容,而且两者是一对一关系时,可以使用 @One 注解来便捷的实现
- selectById 方法是 BaseMapper 就提供的,所以我们不需要在 AreaMapper 中手动定义。
- @Result(column = “area_id”, property = “areaId”) 可以不写,也不会报错。但是会导致我们查询结果(User 实体)的 areaId 属性没有值(因为第二个 Result 将 area_id 值作为查询条件传入子查询)。
public interface UserMapper extends BaseMapper<User> {
    @Results({
            @Result(column = "area_id", property = "areaId"),
            @Result(column = "area_id", property = "area",
                    one = @One(select = "com.example.demo.mapper.AreaMapper.selectById"))
    })
    @Select("SELECT * FROM user WHERE id = #{id}")
    User getUserById(int id);
}
3、使用 @Many 注解实现一对多关联
- 假设我们需要查询一个区域及其下面的所有用户,首先对 Area 实体类稍作修改,增加 users 集合属性:
@Data
public class Area {
    //指定主键使用数据库ID自增策略
    @TableId(type = IdType.AUTO)
    private Integer id;
    private String areaName;
    @TableField(exist = false)
    private List<User> users;
}
- 我们对 AreaMapper 做如下修改,使用 @Results 注解来映射查询结果集到实体类属性:
提示:
- @Many 的用法与 @One 类似,只不过如果使用 @One 查询到的结果是多行,会抛出 TooManyResultException 异常,这种时候应该使用的是 @Many 注解,实现一对多的查询。
- @Result(column = “id”, property = “id”) 可以不写,也不会报错。但是会导致我们查询结果(Area 实体)的 id 属性没有值(因为第二个 Result 将 id 值作为查询条件传入子查询)。
public interface AreaMapper extends BaseMapper<Area> {
    @Results({
            @Result(column = "id", property = "id"),
            @Result(column = "id", property = "users",
                    many = @Many(select =="com.example.demo.mapper.UserMapper.selectByAreaId"))
    })
    @Select("SELECT * FROM area WHERE id = #{id}")
    Area getAreaById(int id);
}
- 由于上面调用了 UserMapper 的 selectByAreaId 方法进行嵌套查询,因此 UserMapper 中要添加该方法:
public interface UserMapper extends BaseMapper<User> {
    @Select("SELECT * FROM user WHERE area_id = #{areaId}")
    User selectByAreaId(int areaId);
}
二、多表关联查询(使用 xml 文件)
1、自定义 sql
- 假设我们有如下两张表:用户表(User)、区域表(Area),其中用户表里通过 area_id 字段关联区域表的 id 主键:
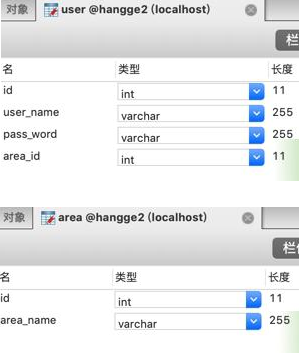
- 假设我们希望查询 User 时也能获取其所属的区域名称,这里对 User 实体类增加 areaName 属性:
提示:由于 area_name 不是 User 数据库表里的字段,因此需要添加 @TableField 注解,并将 exist 属性设置为 false。
@Data
public class User {
    //指定主键使用数据库ID自增策略
    @TableId(type = IdType.AUTO)
    private Integer id;
    private String userName;
    private String passWord;
    private Integer areaId;
    @TableField(exist = false)
    private String areaName;
}
- 然后在 UserMapper 中添加相关查询方法:
public interface UserMapper extends BaseMapper<User> {
    User getUserById(int id);
}
- 接着在 UserMapper 同一个文件夹下创建一个 UserMapper.xml,在里面编写对应的 sql 语句:
<?xml version="1.0" encoding="UTF-8" ?>
<!DOCTYPE mapper PUBLIC "-//mybatis.org//DTD Mapper 3.0//EN"
        "http://mybatis.org/dtd/mybatis-3-mapper.dtd">
<mapper namespace="com.example.demo.mapper.UserMapper">
    <resultMap type="com.example.demo.model.User" id="BaseResultMap">
    </resultMap>
    <select id="getUserById" resultMap="BaseResultMap">
            SELECT user.*, area.area_name FROM user, area
            WHERE user.area_id = area.id and user.id = #{id}
    </select>
</mapper>
2、实现一对一关联
- 这里我们对 User 实体类稍作修改,这次不再是增加 areaName 属性,而是直接增加 area 关联对象:
@Data
public class User {
    //指定主键使用数据库ID自增策略
    @TableId(type = IdType.AUTO)
    private Integer id;
    private String userName;
    private String passWord;
    private Integer areaId;
    @TableField(exist = false)
    private Area area;
}
- UserMapper 里代码同上面一样,主要对 UserMapper.xml 稍作修改,使用子查询来查询关联的区域:
提示:
- selectById 方法是 BaseMapper 本身就提供的,所以我们不需要在 AreaMapper 中手动定义。
- resultMap 中的第一个 result 可以不写,也不会报错。但是会导致我们查询结果(User 实体)的 areaId 属性没有值(因为后面将 area_id 值作为查询条件传入子查询)。
<?xml version="1.0" encoding="UTF-8" ?>
<!DOCTYPE mapper PUBLIC "-//mybatis.org//DTD Mapper 3.0//EN"
        "http://mybatis.org/dtd/mybatis-3-mapper.dtd">
<mapper namespace="com.example.demo.mapper.UserMapper">

    <resultMap type="com.example.demo.model.User" id="BaseResultMap">
        <result property="areaId" column="area_id"/>
        <association property="area" column="area_id"
                     select="com.example.demo.mapper.AreaMapper.selectById"/>
    </resultMap>

    <select id="getUserById" resultMap="BaseResultMap">
        SELECT * FROM user WHERE id = #{id}
    </select>

</mapper>
- 当然我们也可以使用嵌套结果集来实现相同的效果(嵌套结果集这种方式是单纯使用注解没法做到的):
<?xml version="1.0" encoding="UTF-8" ?>
<!DOCTYPE mapper PUBLIC "-//mybatis.org//DTD Mapper 3.0//EN"
        "http://mybatis.org/dtd/mybatis-3-mapper.dtd">
<mapper namespace="com.example.demo.mapper.UserMapper">

    <resultMap type="com.example.demo.model.User" id="BaseResultMap">
        <result property="id" column="id"/>
        <result property="userName" column="user_name"/>
        <result property="passWord" column="pass_word"/>
        <result property="areaId" column="area_id"/>
        <association property="area">
            <id property="id" column="area_id"/>
            <result property="areaName" column="area_name"/>
        </association>
    </resultMap>

    <select id="getUserById" resultMap="BaseResultMap">
        SELECT user.*, area.area_name, area.id as area_id
        FROM user, area
        WHERE user.area_id = area.id and user.id = #{id}
    </select>

</mapper>
3、实现一对多关联
- 假设我们需要查询一个区域及其下面的所有用户,首先对 Area 实体类稍作修改,增加 users 集合属性:
@Data
public class Area {
    //指定主键使用数据库ID自增策略
    @TableId(type = IdType.AUTO)
    private Integer id;
    private String areaName;
    @TableField(exist = false)
    private List<User> users;
}
- 我们对 AreaMapper 做如下修改,增加一个查询方法:
public interface AreaMapper extends BaseMapper<Area> {
    Area getAreaById(int id);
}

1234
- 接着在 AreaMapper 同一个文件夹下创建一个 AreaMapper.xml,在里面编写对应的 sql 语句,这里我们使用嵌套查询来实现:
提示: 可以不写,也不会报错。但是会导致我们查询结果(Area 实体)的 id 属性没有值(因为后面将 id 值作为查询条件传入子查询)。
<?xml version="1.0" encoding="UTF-8" ?>
<!DOCTYPE mapper PUBLIC "-//mybatis.org//DTD Mapper 3.0//EN"
        "http://mybatis.org/dtd/mybatis-3-mapper.dtd">
<mapper namespace="com.example.demo.mapper.AreaMapper">

    <resultMap type="com.example.demo.model.Area" id="BaseResultMap">
        <result property="id" column="id"/>
        <collection property="users" column="id"
                    select="com.example.demo.mapper.UserMapper.selectByAreaId"/>
    </resultMap>

    <select id="getAreaById" resultMap="BaseResultMap">
        SELECT * FROM area WHERE id = #{id}
    </select>

</mapper>
- 由于上面调用了 UserMapper 的 selectByAreaId 方法进行嵌套查询,因此 UserMapper 中要添加该方法:
public interface UserMapper extends BaseMapper<User> {
    User selectByAreaId(int id);
}
- 对应的 UserMapper.xml 中也要增加相应的 SQL 语句:
<mapper namespace="com.example.demo.mapper.UserMapper">

    <resultMap type="com.example.demo.model.User" id="BaseResultMap">
    </resultMap>

    <select id="selectByAreaId" resultMap="BaseResultMap">
        SELECT * FROM user WHERE area_id = #{areaId}
    </select>

</mapper>
- 当然,我还可以使用嵌套结果集来实现相同的效果(嵌套结果集这种方式是单纯使用注解没法做到的),AreaMapper.xml 代码如下(而 UserMapper 就不用像上面一样增加接口了):
<?xml version="1.0" encoding="UTF-8" ?>
<!DOCTYPE mapper PUBLIC "-//mybatis.org//DTD Mapper 3.0//EN"
        "http://mybatis.org/dtd/mybatis-3-mapper.dtd">
<mapper namespace="com.example.demo.mapper.AreaMapper">

    <resultMap type="com.example.demo.model.Area" id="BaseResultMap">
        <id property="id" column="id"/>
        <id property="areaName" column="area_name"/>
        <collection property="users" ofType="com.example.demo.model.User">
            <id property="id" column="user_id"/>
            <result property="userName" column="user_name"/>
            <result property="passWord" column="pass_word"/>
            <result property="areaId" column="area_id"/>
        </collection>
    </resultMap>

    <select id="getAreaById" resultMap="BaseResultMap">
        SELECT area.*, user.id as user_id, user.user_name, user.pass_word, user.area_id
        FROM area, user
        WHERE area.id = user.area_id AND area.id = #{id}
    </select>

</mapper>
语句,这里我们使用嵌套查询来实现:

> **提示**: 可以不写,也不会报错。但是会导致我们查询结果(**Area** 实体)的 **id** 属性没有值(因为后面将 **id** 值作为查询条件传入子查询)。

```xml
<?xml version="1.0" encoding="UTF-8" ?>
<!DOCTYPE mapper PUBLIC "-//mybatis.org//DTD Mapper 3.0//EN"
        "http://mybatis.org/dtd/mybatis-3-mapper.dtd">
<mapper namespace="com.example.demo.mapper.AreaMapper">

    <resultMap type="com.example.demo.model.Area" id="BaseResultMap">
        <result property="id" column="id"/>
        <collection property="users" column="id"
                    select="com.example.demo.mapper.UserMapper.selectByAreaId"/>
    </resultMap>

    <select id="getAreaById" resultMap="BaseResultMap">
        SELECT * FROM area WHERE id = #{id}
    </select>

</mapper>
- 由于上面调用了 UserMapper 的 selectByAreaId 方法进行嵌套查询,因此 UserMapper 中要添加该方法:
public interface UserMapper extends BaseMapper<User> {
    User selectByAreaId(int id);
}
- 对应的 UserMapper.xml 中也要增加相应的 SQL 语句:
<mapper namespace="com.example.demo.mapper.UserMapper">

    <resultMap type="com.example.demo.model.User" id="BaseResultMap">
    </resultMap>

    <select id="selectByAreaId" resultMap="BaseResultMap">
        SELECT * FROM user WHERE area_id = #{areaId}
    </select>

</mapper>
- 当然,我还可以使用嵌套结果集来实现相同的效果(嵌套结果集这种方式是单纯使用注解没法做到的),AreaMapper.xml 代码如下(而 UserMapper 就不用像上面一样增加接口了):
<?xml version="1.0" encoding="UTF-8" ?>
<!DOCTYPE mapper PUBLIC "-//mybatis.org//DTD Mapper 3.0//EN"
        "http://mybatis.org/dtd/mybatis-3-mapper.dtd">
<mapper namespace="com.example.demo.mapper.AreaMapper">

    <resultMap type="com.example.demo.model.Area" id="BaseResultMap">
        <id property="id" column="id"/>
        <id property="areaName" column="area_name"/>
        <collection property="users" ofType="com.example.demo.model.User">
            <id property="id" column="user_id"/>
            <result property="userName" column="user_name"/>
            <result property="passWord" column="pass_word"/>
            <result property="areaId" column="area_id"/>
        </collection>
    </resultMap>

    <select id="getAreaById" resultMap="BaseResultMap">
        SELECT area.*, user.id as user_id, user.user_name, user.pass_word, user.area_id
        FROM area, user
        WHERE area.id = user.area_id AND area.id = #{id}
    </select>

</mapper>


 1267
1267


 被折叠的 条评论
为什么被折叠?
被折叠的 条评论
为什么被折叠?
 到【灌水乐园】发言


