


一、使用wsimport生成webService客户端
wsimport是JDK自带的解析wsdl文件生成本地客户端代码的工具。
1.生成本地客户端代码首先需要有一个wsdl结尾的访问地址或wsdl文件,如:
http://localhost:8080/hello/service/hello?wsdl
wsimport的命令常用参数:
| 命令 | 作用 | 举例 |
|---|---|---|
| -keep | 生成java源文件 | -keep |
| –encoding | 指定编码格式 | -encoding utf-8 |
| -d | 指定.class文件的输出目录 | -d 路径 |
| -p | 定义生成类的包名,不定义的话有默认包名 | -p 路径 |
| -s | 指定.java文件的输出目录, 此目录必须存在 | -s 路径 |
示例:
wsimport –s . http://localhost/hello?wsdl
-s . .为当前目录
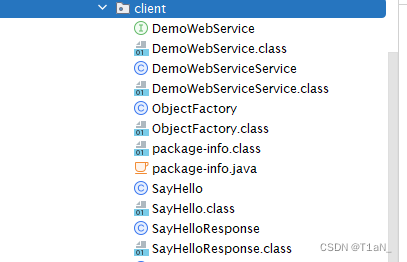
把生成的代码放到项目目录中:
创建测试类,调用服务:
public class testApp {
    public static void main(String[] args) {
        DemoWebServiceService demoWebServiceService = new DemoWebServiceService();
        DemoWebService demoWebServicePort = demoWebServiceService.getDemoWebServicePort();
        String testabs = demoWebServicePort.sayHello("webservice");
        System.out.println(testabs);

    }
}
二、使用CXF生成webService本地客户端
1.使用cxf框架生成webservice客户端代码 首先需要下载Apache CXF
http://cxf.apache.org/download.html
下载后配置系统环境变量,在cmd中输入 wsdl2java -h命令测试是否配置成功
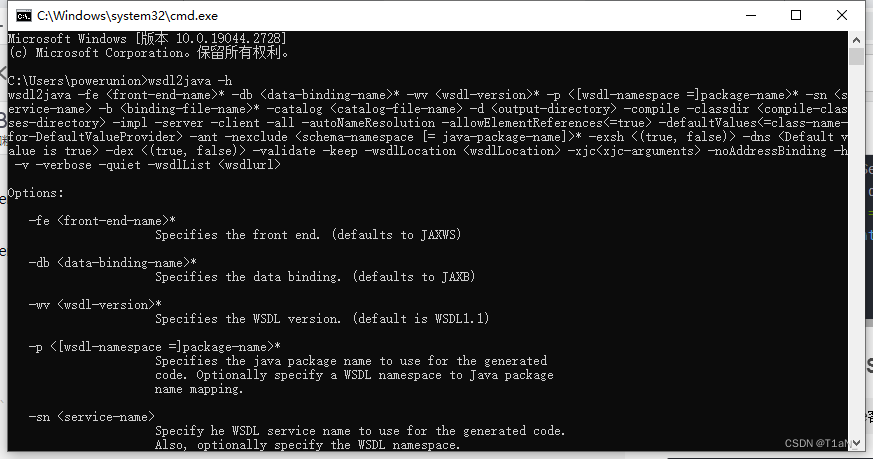
进入下载好的Apache CXF的bin目录下输入cmd命令在黑窗口输入解析wsdl的命令
wsdl2java -d. -p com.xxx.xxx http://localhost:8080/hello/service/hello?wsdl
把解析后生成的客户端代码,放在项目目录下.
<?xml version="1.0" encoding="UTF-8"?>
<beans xmlns="http://www.springframework.org/schema/beans"
       xmlns:xsi="http://www.w3.org/2001/XMLSchema-instance"
       xmlns:jaxws="http://cxf.apache.org/jaxws"
       xmlns:soap="http://cxf.apache.org/bindings/soap"
       xsi:schemaLocation="http://www.springframework.org/schema/beans
					http://www.springframework.org/schema/beans/spring-beans.xsd
					http://cxf.apache.org/bindings/soap
					http://cxf.apache.org/schemas/configuration/soap.xsd
					http://cxf.apache.org/jaxws
					http://cxf.apache.org/schemas/jaxws.xsd">
    <!-- 引入CXF Bean定义如下,早期的版本中使用 -->
    <import resource="classpath:META-INF/cxf/cxf.xml" />
    <import resource="classpath:META-INF/cxf/cxf-extension-soap.xml" />
    <import resource="classpath:META-INF/cxf/cxf-servlet.xml" />

    <!-- 注册cxf客户端的代理对象,通过spring创建代理对象,通过代理对象调用远程服务 -->
    <jaxws:client id="myClient" address="http://localhost:8080/hello/service/hello" serviceClass="com.T1aN.cxfClient.HelloService"></jaxws:client>
</beans>
测试:
public class TestApp {
    public static void main(String[] args) {
        ClassPathXmlApplicationContext classPathXmlApplicationContext = new ClassPathXmlApplicationContext("cxf.xml");
        HelloService myClient = (HelloService) classPathXmlApplicationContext.getBean("myClient");
        String cxf = myClient.sayHello("cxf");
        System.out.println(cxf);
    }
}


 1919
1919


 被折叠的 条评论
为什么被折叠?
被折叠的 条评论
为什么被折叠?
 到【灌水乐园】发言


