


Redis安装
redis:可基于内存亦可持久化的非关系型Key-Value数据库,作为缓存存在
- 内存型:内存读写速度极快,目前市面还找不出比内存读写还快的媒介
- 数据持久化:将数据保存到硬盘上,永久的保存起来(所有的关系型数据库都会进行持久化动作)
- key-value:键值对,(java中的map集合,就是键值对)map.put(key,value)
- 非关系型数据库:跟mysql相比,mysql是关系型数据(表与表之间是有一对一、一对多、多对多的关系的),而redis中没有表的概念,没有关系的概念
1、redis
NoSQL:泛指非关系型数据库,英文:Not Only SQL (不仅仅是SQL)
![[外链图片转存失败,源站可能有防盗链机制,建议将图片保存下来直接上传(img-COsb21Si-1638437550905)(assets/wpsA761.tmp.jpg)]](https://img-blog.csdnimg.cn/179f9c9ff4284e6b83294a903a9c95fa.jpg?x-oss-process=image/watermark,type_d3F5LXplbmhlaQ,shadow_50,text_Q1NETiBAVElNX1poYW5nMTEyMg==,size_14,color_FFFFFF,t_70,g_se,x_16)
目前使用比较多的,Redis(key-value数据库,缓存)、MongoDB(海量存储数据)
需求:注册时的短信验证码在redis中存储
Redis:内存数据库 (key-value存储结构)
redis作为缓存适用场景
1 短信验证码
2 读多改少的数据:电商的三级分类、省市区级联数据
1.1、Redis 下载安装
官网下载: http://redis.io/download
使用资料安装包

解压到D盘的software目录下。

使用对应位数操作系统文件夹下面命令启动redis
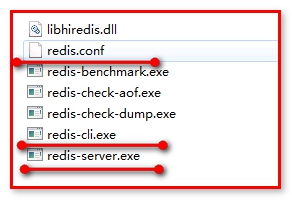
其中:
redis-server.exe 服务启动程序

redis-cli.exe 客户端命令行工具

redis.conf 服务配置文件
通过redis-server.exe启动服务,默认端口 6379
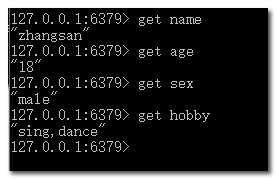
通过redis-cli.exe 启动客户端工具

表示连接成功!
1.2、Redis注册服务
如果每次启动服务,比较麻烦,能否把redis服务注册到windows上?

- 注册服务:一定要进入redis-server所在的目录下执行命令
redis-server --service-install redis.windows.conf --loglevel verbose
- 卸载服务:
redis-server --service-uninstall
- 启动Redis:
redis-server --service-start
停止Redis:
redis-server --service-stop

1.3、Redis基本命令


1.4、Redis数据类型之字符串


1.5、Redis之生存时间


剩余生存时间: ttl key
-1:永久生效
-2:键不存在
1.6、Jedis 使用和redis图形界面工具
1.6.1 jedis的基本使用
通过java程序操作redis, 使用jedis 工具。
网址: https://github.com/xetorthio/jedis

根据上面的案例编写测试代码:
第一步:在youpingou-web-parent中导入坐标
<!-- https://mvnrepository.com/artifact/redis.clients/jedis -->
<dependency>
    <groupId>redis.clients</groupId>
    <artifactId>jedis</artifactId>
    <version>2.9.0</version>
</dependency>
第二步:JedisTest.java
public class JedisTest {

	public static void main(String[] args) {
		//连接localhost,默认端口是6379。
		Jedis jedis = new Jedis("localhost");
		jedis.set("school", "传智大学");
		System.out.println(jedis.get("school"));
	}
}
第三步:其他使用
-
取值
Jedis jedis=new Jedis("127.0.0.1"); String info= jedis.get("student"); -
删除
Jedis jedis=new Jedis("127.0.0.1"); jedis.del("student"); -
使用jedis连接池
public static void main(String[] args) { //1 创建连接池config配置对象 JedisPoolConfig config = new JedisPoolConfig(); config.setMaxTotal(50);//设置最大连接数 config.setMaxIdle(10);//设置空闲时间最大连接数 config.setMinIdle(2);//设置空闲时间最小连接数 //2 基于配置对象创建连接池 // 第一个参数:配置对象config // 第二个参数:远程redis服务器地址 // 第三个参数:远程reids服务器开放端口 JedisPool pool = new JedisPool(config,"127.0.0.1",6379); //3 从池中取出jedis连接 Jedis jedis = pool.getResource(); //4 操作:存、取、删 String school = jedis.get("school"); System.out.println(school); //5 关闭连接--将连接丢进池里 jedis.close(); System.out.println("执行end"); } -
设置key有效周期
//jedis.set("school", "传智大学"); jedis.setex("school", 30 , "传智大学");//30:表示30秒钟后过期 -
使用redis-cli.exe查看测试

1.6.2 安装redis图形化界面
类似SQLyog/navicat操作mysql数据库

打开:“RedisDesktopManager”添加连接

添加信息

查下key和value
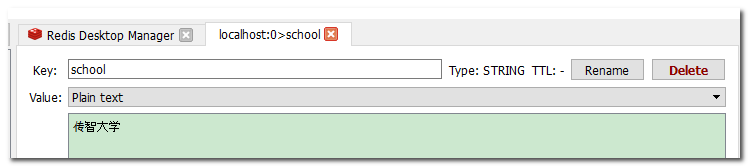
其中:TTL 是redis的key 有效时间,显示- ,说明没有设置key的有效期 ,那么如何设置key的有效期呢?


1.7、Spring Data Redis 使用
SprignBoot Data家族是Spring中专业的跟数据打交道的一系列技术。
Redis是一种nosql数据库,在开发中常用做缓存。Jedis是Redis在Java中的redis- client。spring把专门的数据操作独立封装在spring-data系列中,spring-data-redis自然是针对Redis的独立封装了,而且Spring Data Redis是对redis客户端(如jedis)的高度封装,支持多种客户端。

官网: http://projects.spring.io/spring-data-redis/
2、SpringBoot整合spring data Redis(掌握)

-
redis-sb-demo02:pom.xml中添加redis坐标
<!-- 配置使用redis启动器 --> <dependency> <groupId>org.springframework.boot</groupId> <artifactId>spring-boot-starter-data-redis</artifactId> </dependency> -
配置信息
######################################################## ###REDIS (RedisProperties) redis基本配置; ######################################################## # database name spring.redis.database=0 # server host1 spring.redis.host=127.0.0.1 # server password #spring.redis.password= #connection port spring.redis.port=6379 # pool settings ... spring.redis.jedis.pool.max-idle=8 spring.redis.jedis.pool.min-idle=0 spring.redis.jedis.pool.max-active=8 spring.redis.jedis.pool.max-wait=-1 # name of Redis server #spring.redis.sentinel.master= # comma-separated list of host:port pairs #spring.redis.sentinel.nodes= -
当SpringBoot整合SpringDataRedis之后,我们使用的对象的是RedisTemplate

第一步:pom
<dependencies>
        <dependency>
            <groupId>org.springframework.boot</groupId>
            <artifactId>spring-boot-starter-web</artifactId>
        </dependency>
        <!-- 配置使用redis启动器 -->
        <dependency>
            <groupId>org.springframework.boot</groupId>
            <artifactId>spring-boot-starter-data-redis</artifactId>
        </dependency>
        <dependency>
            <groupId>org.springframework.boot</groupId>
            <artifactId>spring-boot-starter-test</artifactId>
            <scope>test</scope>
            <exclusions>
                <exclusion>
                    <groupId>org.junit.vintage</groupId>
                    <artifactId>junit-vintage-engine</artifactId>
                </exclusion>
            </exclusions>
        </dependency>
    </dependencies>
第二步:创建UserController类

package com.youpingou.controller;

import org.springframework.beans.factory.annotation.Autowired;
import org.springframework.data.redis.core.StringRedisTemplate;
import org.springframework.http.ResponseEntity;
import org.springframework.web.bind.annotation.GetMapping;
import org.springframework.web.bind.annotation.RequestBody;
import org.springframework.web.bind.annotation.RequestMapping;
import org.springframework.web.bind.annotation.RestController;

@RestController
@RequestMapping("/user")
public class UserController {

    //只需要导入springboot-data-redis的启动器,就可以使用当前这个目标,所有的初始化都由Spring帮你完成
    @Autowired
    private StringRedisTemplate stringRedisTemplate;


    @GetMapping
    public ResponseEntity<Object> testReids(){
        //存值
        stringRedisTemplate.opsForValue().set("rt","SpringBoot整合SpringDataRedis案例");
        //取值
        String school = stringRedisTemplate.opsForValue().get("school");
        System.out.println(school);
        return ResponseEntity.ok(school);
    }


}
第三步:启动测试,ok


 9935
9935


 被折叠的 条评论
为什么被折叠?
被折叠的 条评论
为什么被折叠?
 到【灌水乐园】发言


