


上一篇通过整合RMI 和 SPRING ,及简单的封装,基本已经实现了SERVICE层,也就是说RMI的服务端已经可以跑起来了,那么接下来lz 继续把客户端的代码及配置介绍一下
1、 首先还是要在客户端所在的应用下面的 src/ 下面 建立context.xml文件,这是RMI的服务的主要配置
<?xml version="1.0" encoding="UTF-8"?>
    <beans xmlns="http://www.springframework.org/schema/beans"
    xmlns:p="http://www.springframework.org/schema/p" xmlns:xsi="http://www.w3.org/2001/XMLSchema-instance"
    xsi:schemaLocation="http://www.springframework.org/schema/beans
        http://www.springframework.org/schema/beans/spring-beans.xsd">


    <bean id="accountService" class="com.vshop.sys.rmi.RmiProxyFactoryBeanNew">
        <property name="serviceUrl" value="/MessageService" />
        <property name="serviceInterface" value="com.vshop.busi.rmi.interfaces.AccountService" />
    </bean>

</beans>
2、 另外,也要把 context.xml 注册到 web.xml 中,以便在应用启动的时候去启动RMI服务
<context-param>
<param-name>contextConfigLocation</param-name>
<param-value>
classpath*:/applicationContext.xml,classpath*:cxf-server.xml,classpath*:context.xml
</param-value>
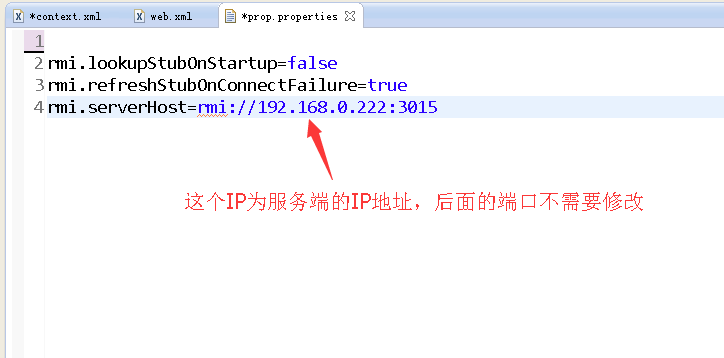
</context-param>3、 然后也是要在/src/下面增加prop.properties文件,用来配置 context.xml中的常用参数的
4、 另外呢,在客户端中也是同服务端一样,需要 重写一个类RmiProxyFactoryBean
为RmiProxyFactoryBeanNew,也是在类中 读取了 prop.properties 文件中的配置项
package com.vshop.sys.rmi;

import java.io.IOException;
import java.util.Properties;

import org.springframework.aop.framework.ProxyFactory;
import org.springframework.beans.factory.BeanClassLoaderAware;
import org.springframework.beans.factory.FactoryBean;
import org.springframework.remoting.rmi.RmiClientInterceptor;

import com.vshop.utils.PropUtils;

public class RmiProxyFactoryBeanNew extends RmiClientInterceptor implements FactoryBean<Object>, BeanClassLoaderAware {

    private Object serviceProxy;

    Properties props;
     {
        try {
            props = PropUtils.getProps();
        } catch (IOException e) {
            e.printStackTrace();
        }

        super.setLookupStubOnStartup(Boolean.parseBoolean(props.getProperty("rmi.lookupStubOnStartup")));
        super.setRefreshStubOnConnectFailure(Boolean.parseBoolean(props.getProperty("rmi.refreshStubOnConnectFailure")));
    }

    @Override
    public void afterPropertiesSet() {

        setServiceUrlByRmiServer(super.getServiceUrl());

        super.afterPropertiesSet();
        if (getServiceInterface() == null) {
            throw new IllegalArgumentException("Property 'serviceInterface' is required");
        }
        this.serviceProxy = new ProxyFactory(getServiceInterface(), this).getProxy(getBeanClassLoader());
    }


    public Object getObject() {
        return this.serviceProxy;
    }

    public Class<?> getObjectType() {
        return getServiceInterface();
    }

    public boolean isSingleton() {
        return true;
    }

    public void setServiceUrlByRmiServer(String url){

        Properties props;
            try {
                props = PropUtils.getProps();

                if(url.startsWith("/")){

                    super.setServiceUrl(props.getProperty("rmi.serverHost")+url);

                }else{
                    super.setServiceUrl(props.getProperty("rmi.serverHost")+"/"+url);
                }


            } catch (IOException e) {
                e.printStackTrace();
            }

    }

}
5、 客户端中接口的定义及所在的包名是要和 服务端中一模一样的,所以就是干脆从服务端中复制到客户端中就可以了
package com.vshop.busi.rmi.interfaces;


public interface AccountService {
    public int queryBalance(String mobileNo);
    public String shoopingPayment(String mobileNo, byte protocol);
}
6、 最后就是在 你的CONTROL类中调用 RMI服务了
package com.vshop.speLine.control;


import javax.annotation.Resource;
import org.slf4j.Logger;
import org.slf4j.LoggerFactory;
import org.springframework.stereotype.Controller;
import org.springframework.web.bind.annotation.RequestMapping;
import org.springframework.web.servlet.ModelAndView;
import com.vshop.busi.rmi.interfaces.AccountService;


@Controller
@RequestMapping("testControl")
public class testControl {
    private static final Logger LOG = LoggerFactory.getLogger(testControl.class);


    @Resource(name = "accountService")
    private AccountService accountService;


    @RequestMapping("/test")
    public ModelAndView speLineList() {


        String result = accountService.shoopingPayment("13800138000", (byte) 5);


        ModelAndView model = new ModelAndView();
        model.setViewName("/test/testPage");
        return model;
    }


}
至此,一个完整的基于 SSM的RMI服务就已经搭建完成了,如果有什么问题,可以加lz 的QQ:631416605,大家可以相互学习


 317
317


 被折叠的 条评论
为什么被折叠?
被折叠的 条评论
为什么被折叠?
 到【灌水乐园】发言


