


①. 商品SPU和SKU管理
-
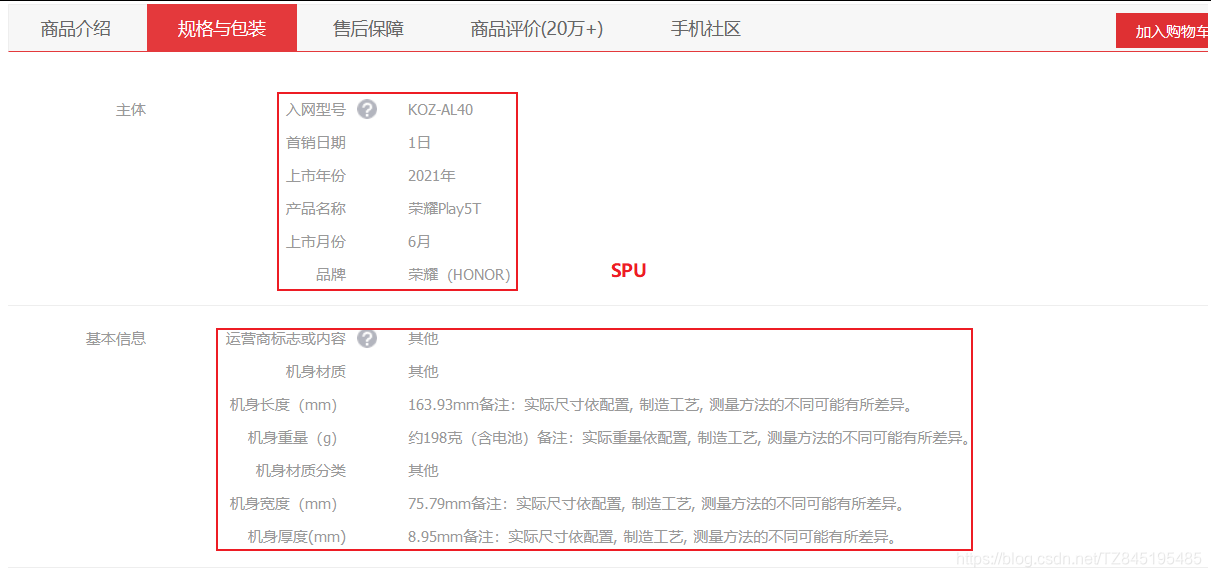
①. SPU:standard product unit(标准化产品单元):是商品信息聚合的最小单位,是一组可复用、易检索的标准化信息的集合,该集合描述了一个产品的特性
如iphoneX是SPU(相当于面向对象的类)
-
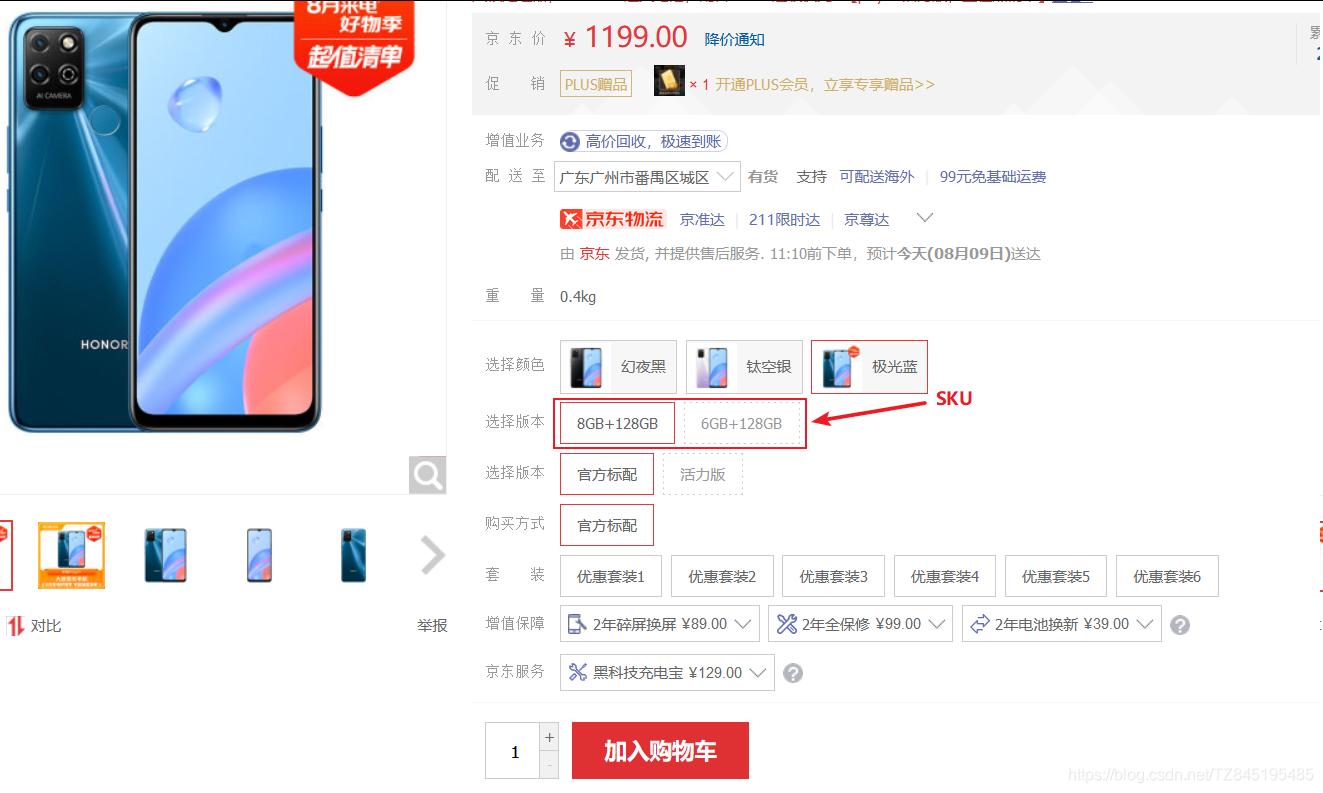
②. SKU:stock keeping unit(库存量单位):库存进出计量的基本单元,可以是件/盒/托盘等单位。SKU是对于大型连锁超市DC配送中心物流管理的一个必要的方法。现在已经被引申为产品统一编号的简称,每种产品对应有唯一的SKU号
如iphoneX 64G黑色是SKU,iphoneX 32G白色是SKU(相当于面向对象的具体实现)
-
③. 基础属性:同一个SPU拥有的特性叫基本属性。如机身长度,这个是手机共用的属性。而每款手机的属性值不同,也可以叫规格参数
-
④. 销售属性:能决定库存量的叫销售属性。如颜色
-
⑤. 基本属性(规格参数)与销售属性
每个分类下的商品共享规格参数,与销售属性。只是有些商品不一定要用这个分类下全部的属性
- 属性是以三级分类组织起来的
- 规格参数中有些是可以提供检索的
- 规格参数也是基本属性,他们具有自己的分组
- 属性的分组也是以三级分类组织起来的
- 属性名确定的,但是值是每一个商品不同来决定的
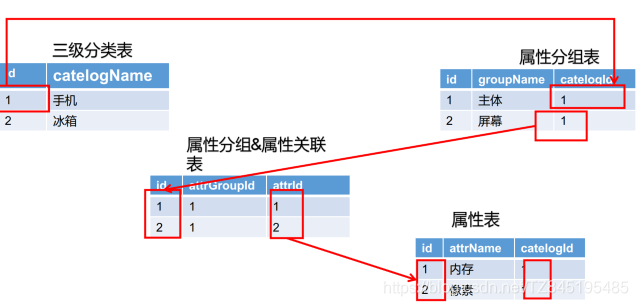
②. 详解SPU、SKU表结构
- ①. 数据库表结构大概情况如下图所示:
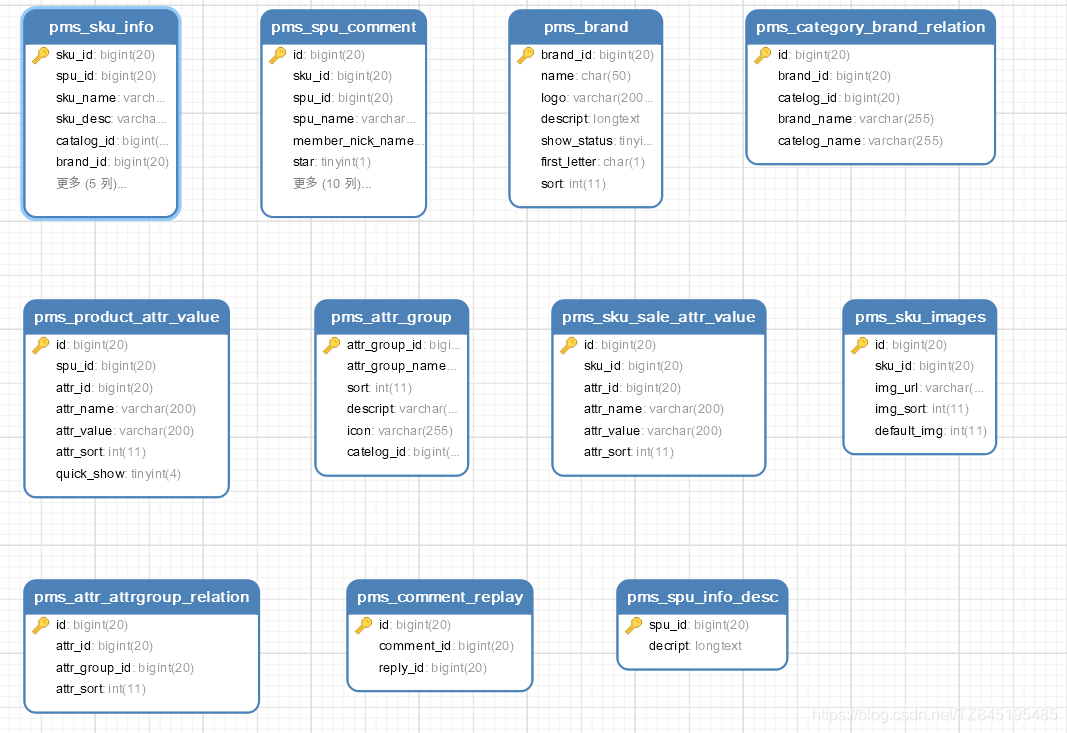
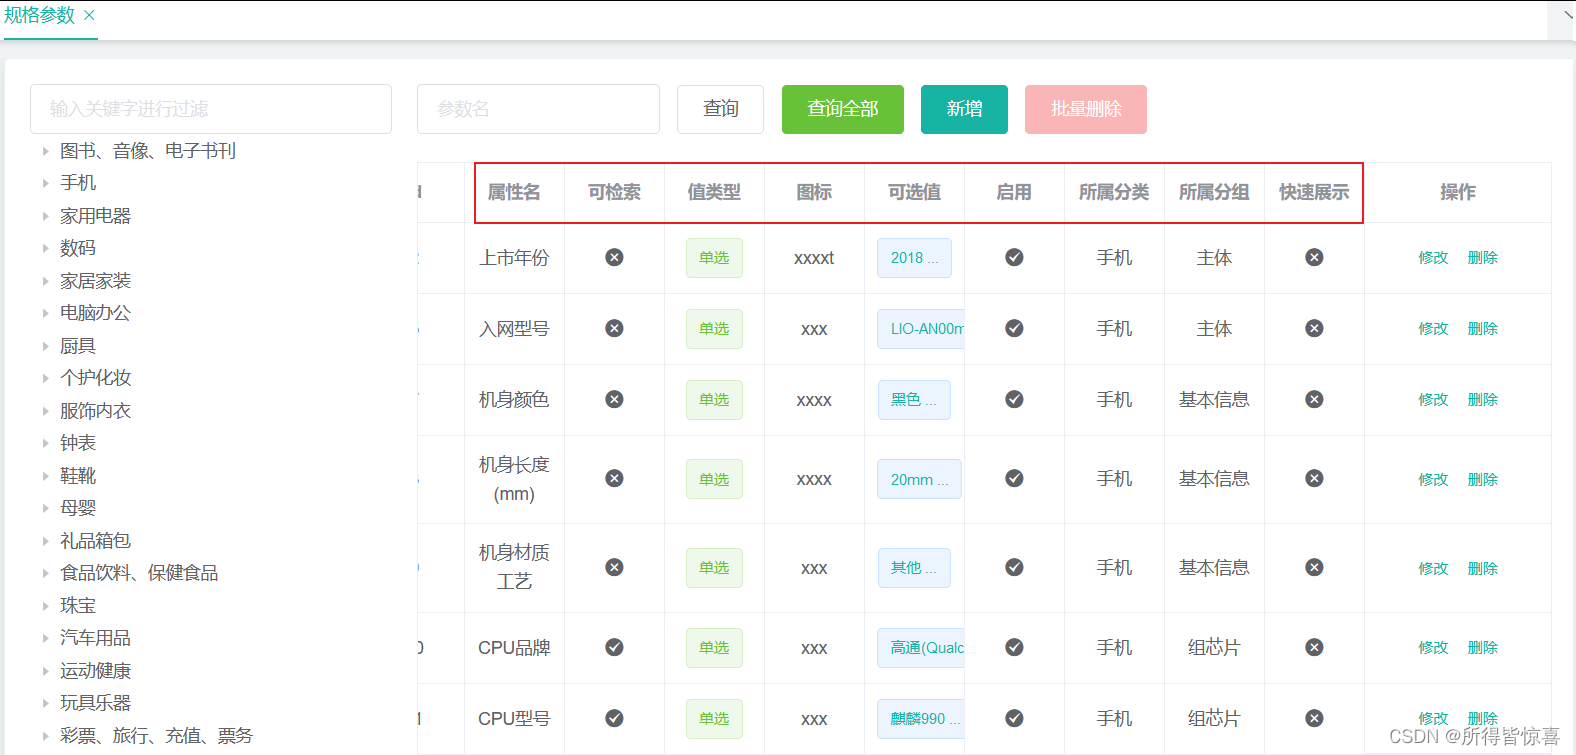
- ②. pms_attr:属性表,这个表里面有attr_name(属性名)、attr_type(属性类型)、catelog_id(分类ID)、search_type(代表这个属性是否可以被检索)
比如在基本信息(分组)里面有一个叫机身颜色,那么这个机身颜色就是属性名,它是和分组关联起来的,这个机身颜色属性属于哪一组?
CREATE TABLE `pms_attr` (
  `attr_id` bigint(20) NOT NULL AUTO_INCREMENT COMMENT '属性id',
  `attr_name` char(30) DEFAULT NULL COMMENT '属性名',
  `search_type` tinyint(4) DEFAULT NULL COMMENT '是否需要检索[0-不需要,1-需要]',
  `icon` varchar(255) DEFAULT NULL COMMENT '属性图标',
  `value_select` char(255) DEFAULT NULL COMMENT '可选值列表[用逗号分隔]',
  `attr_type` tinyint(4) NOT NULL COMMENT '属性类型[0-销售属性,1-基本属性]',
  `enable` bigint(20) DEFAULT NULL COMMENT '启用状态[0 - 禁用,1 - 启用]',
  `catelog_id` bigint(20) DEFAULT NULL COMMENT '所属分类',
  `show_desc` tinyint(4) DEFAULT NULL COMMENT '快速展示【是否展示在介绍上;0-否 1-是】,在sku中仍然可以调整',
  `value_type` tinyint(4) DEFAULT NULL COMMENT '值类型[0-为单个值,1-可以选择多个值]',
  PRIMARY KEY (`attr_id`)
) ENGINE=InnoDB AUTO_INCREMENT=13 COMMENT='商品属性';
- ③. psm_attr_group:属性分组表,attr_group_id、attr_group_name、category_id 在手机类下,我们就可以查询到所有的手机类下的分组,分组和属性怎么关联起来的?
CREATE TABLE `pms_attr_group` (
  `attr_group_id` bigint(20) NOT NULL AUTO_INCREMENT COMMENT '分组id',
  `attr_group_name` char(20) DEFAULT NULL COMMENT '组名',
  `sort` int(11) DEFAULT NULL COMMENT '排序',
  `descript` varchar(255) DEFAULT NULL COMMENT '描述',
  `icon` varchar(255) DEFAULT NULL COMMENT '组图标',
  `catelog_id` bigint(20) DEFAULT NULL COMMENT '所属分类id',
  PRIMARY KEY (`attr_group_id`)
) ENGINE=InnoDB COMMENT='属性分组';
- ④. pms_attr_attrgroup_relation:分组和属性的关联关系表,attr_id、attr_group_id 比如说主体分组关联了入网型号、上市年份等信息
(这些属性的值是什么,我们要根据选择的哪个商品来的,我们有一张叫商品属性值表来维护)
CREATE TABLE `pms_attr_attrgroup_relation` (
  `id` bigint(20) NOT NULL AUTO_INCREMENT COMMENT 'id',
  `attr_id` bigint(20) DEFAULT NULL COMMENT '属性id',
  `attr_group_id` bigint(20) DEFAULT NULL COMMENT '属性分组id',
  `attr_sort` int(11) DEFAULT NULL COMMENT '属性组内排序',
  PRIMARY KEY (`id`)
) ENGINE=InnoDB AUTO_INCREMENT=18 COMMENT='属性&属性分组关联';
- ⑤. pms_product_attr_value:商品属性值表,spu_id、attr_id(属性ID)、attr_value(属性ID对应的具体值) 具体的spu的详细信息在pms_spu_info里面
CREATE TABLE `pms_product_attr_value` (
  `id` bigint(20) NOT NULL AUTO_INCREMENT COMMENT 'id',
  `spu_id` bigint(20) DEFAULT NULL COMMENT '商品id',
  `attr_id` bigint(20) DEFAULT NULL COMMENT '属性id',
  `attr_name` varchar(200) DEFAULT NULL COMMENT '属性名',
  `attr_value` varchar(200) DEFAULT NULL COMMENT '属性值',
  `attr_sort` int(11) DEFAULT NULL COMMENT '顺序',
  `quick_show` tinyint(4) DEFAULT NULL COMMENT '快速展示【是否展示在介绍上;0-否 1-是】',
  PRIMARY KEY (`id`)
) ENGINE=InnoDB COMMENT='spu属性值';
- ⑥. pms_sku_info:sku的详细信息,有主副标题、商品的图片信息(图片可能有很多个)等
CREATE TABLE `pms_sku_info` (
  `sku_id` bigint(20) NOT NULL AUTO_INCREMENT COMMENT 'skuId',
  `spu_id` bigint(20) DEFAULT NULL COMMENT 'spuId',
  `sku_name` varchar(255) DEFAULT NULL COMMENT 'sku名称',
  `sku_desc` varchar(2000) DEFAULT NULL COMMENT 'sku介绍描述',
  `catalog_id` bigint(20) DEFAULT NULL COMMENT '所属分类id',
  `brand_id` bigint(20) DEFAULT NULL COMMENT '品牌id',
  `sku_default_img` varchar(255) DEFAULT NULL COMMENT '默认图片',
  `sku_title` varchar(255) DEFAULT NULL COMMENT '标题',
  `sku_subtitle` varchar(2000) DEFAULT NULL COMMENT '副标题',
  `price` decimal(18,4) DEFAULT NULL COMMENT '价格',
  `sale_count` bigint(20) DEFAULT NULL COMMENT '销量',
  PRIMARY KEY (`sku_id`)
) ENGINE=InnoDB AUTO_INCREMENT=9 DEFAULT CHARSET=utf8mb4 COMMENT='sku信息';
- ⑦. pms_sku_images:很多个图片都存在图片表中
CREATE TABLE `pms_sku_images` (
  `id` bigint(20) NOT NULL AUTO_INCREMENT COMMENT 'id',
  `sku_id` bigint(20) DEFAULT NULL COMMENT 'sku_id',
  `img_url` varchar(255) DEFAULT NULL COMMENT '图片地址',
  `img_sort` int(11) DEFAULT NULL COMMENT '排序',
  `default_img` int(11) DEFAULT NULL COMMENT '默认图[0 - 不是默认图,1 - 是默认图]',
  PRIMARY KEY (`id`)
) ENGINE=InnoDB AUTO_INCREMENT=25 DEFAULT CHARSET=utf8mb4 COMMENT='sku图片';
- ⑧. pms_sku_sale_attr_value:比如我们要选择白色+128G或者黑色+64G这些信息属性名确定的,但是值是每一个商品不同来决定的
CREATE TABLE `pms_sku_sale_attr_value` (
  `id` bigint(20) NOT NULL AUTO_INCREMENT COMMENT 'id',
  `sku_id` bigint(20) DEFAULT NULL COMMENT 'sku_id',
  `attr_id` bigint(20) DEFAULT NULL COMMENT 'attr_id',
  `attr_name` varchar(200) DEFAULT NULL COMMENT '销售属性名',
  `attr_value` varchar(200) DEFAULT NULL COMMENT '销售属性值',
  `attr_sort` int(11) DEFAULT NULL COMMENT '顺序',
  PRIMARY KEY (`id`)
) ENGINE=InnoDB AUTO_INCREMENT=17 DEFAULT CHARSET=utf8mb4 COMMENT='	&值';

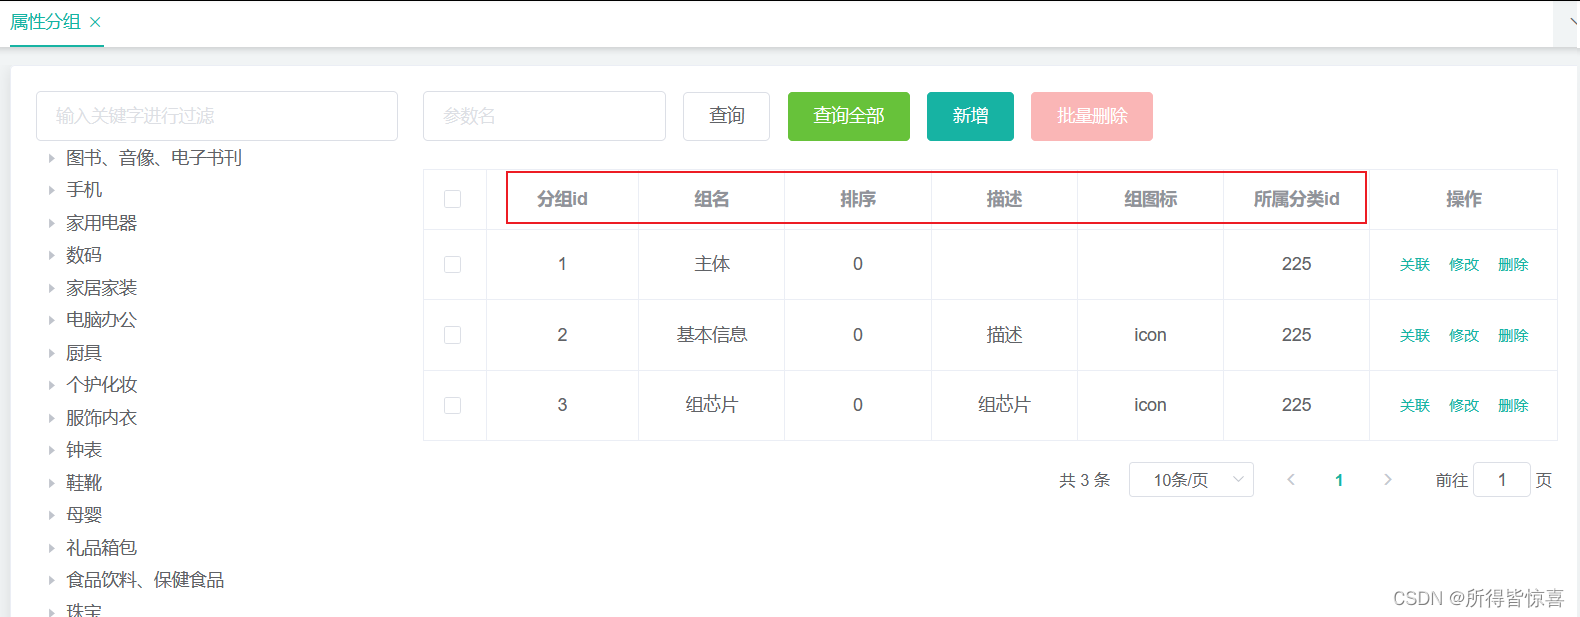
③. 属性分组 - 列表展示
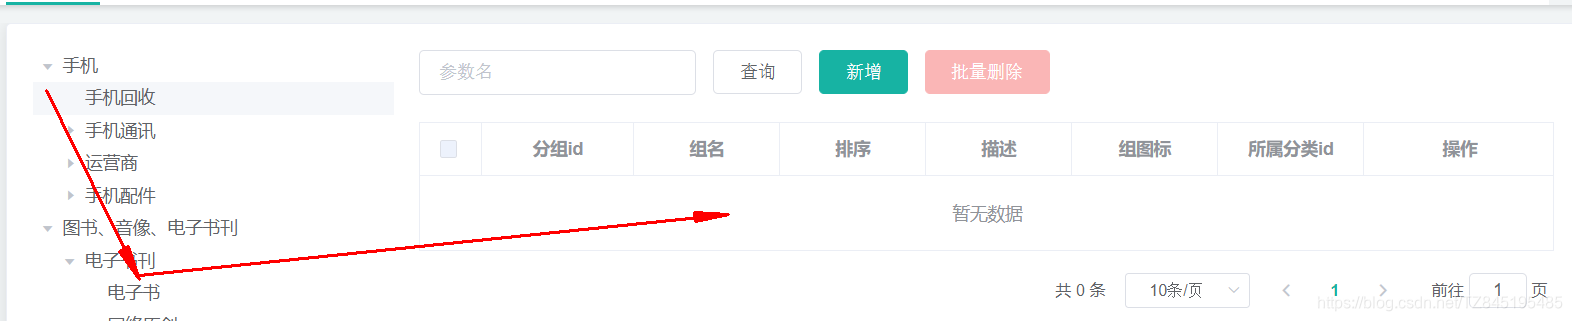
- ①. 需求:
后台:商品系统/平台属性/属性分组
现在想要实现点击菜单的左边,能够实现在右边展示数据
- ②. 树状结构代码抽取
<template>
  <div>
    <!--
	(1). 过滤:在需要对节点进行过滤时,调用 Tree 实例的filter方法,参数为关键字。
	需要注意的是,此时需要设置filter-node-method,值为过滤函数。
	:filter-node-method="filterNode"
	(2). node-key:每个树节点用来作为唯一标识的属性,整棵树应该是唯一的
	(3). @node-click:当我们点击树的事件时触发的函数
	(4). :highlight-current:是否高亮当前选中节点,默认值是false。
	(5). 向父组件发送事件: this.$emit("tree-node-click", data, node, component);
	-->
    <el-input placeholder="输入关键字进行过滤" v-model="filterText"></el-input>
    <el-tree
      :data="menus"
      :props="defaultProps"
      node-key="catId"
      ref="menuTree"
      @node-click="nodeclick"
      :filter-node-method="filterNode"
      :highlight-current = "true"
    ></el-tree>
  </div>
</template>

<script>
//这里可以导入其他文件(比如:组件,工具js,第三方插件js,json文件,图片文件等等)
//例如:import 《组件名称》 from '《组件路径》';

export default {
  //import引入的组件需要注入到对象中才能使用
  components: {},
  props: {},
  data() {
    //这里存放数据
    return {
      filterText: "",
      menus: [],
      expandedKey: [],
      defaultProps: {
        children: "children",
        label: "name"
      }
    };
  },
  //计算属性 类似于data概念
  computed: {},
  //监控data中的数据变化
  watch: {
    filterText(val) {
      this.$refs.menuTree.filter(val);
    }
  },
  //方法集合
  methods: {
    //树节点过滤
    filterNode(value, data) {
      if (!value) return true;
      return data.name.indexOf(value) !== -1;
    },
    getMenus() {
      this.$http({
        url: this.$http.adornUrl("/product/category/list/tree"),
        method: "get"
      }).then(({ data }) => {
        this.menus = data.data;
      });
    },
    nodeclick(data, node, component) {
      console.log("子组件category的节点被点击", data, node, component);
      //向父组件发送事件;
      this.$emit("tree-node-click", data, node, component);
    }
  },
  //生命周期 - 创建完成(可以访问当前this实例)
  created() {
    this.getMenus();
  },
  //生命周期 - 挂载完成(可以访问DOM元素)
  mounted() {},
  beforeCreate() {}, //生命周期 - 创建之前
  beforeMount() {}, //生命周期 - 挂载之前
  beforeUpdate() {}, //生命周期 - 更新之前
  updated() {}, //生命周期 - 更新之后
  beforeDestroy() {}, //生命周期 - 销毁之前
  destroyed() {}, //生命周期 - 销毁完成
  activated() {} //如果页面有keep-alive缓存功能,这个函数会触发
};
</script>
<style scoped>

</style>
- ③. 属性分组前台代码展示
先要el-row进行布局处理,左边是树状结构,右边是表格
<template>
  <el-row :gutter="20">
    <el-col :span="6">
      <Category @tree-node-click="treenodeclick"></Category>
    </el-col>
    <el-col :span="18">
      <div class="mod-config">
        <el-form
          :inline="true"
          :model="dataForm"
          @keyup.enter.native="getDataList()"
        >
          <el-form-item>
            <el-input
              v-model="dataForm.key"
              placeholder="参数名"
              clearable
            ></el-input>
          </el-form-item>
          <el-form-item>
            <el-button @click="getDataList()">查询</el-button>
            <el-button
              v-if="isAuth('product:attrgroup:save')"
              type="primary"
              @click="addOrUpdateHandle()"
              >新增</el-button
            >
            <el-button
              v-if="isAuth('product:attrgroup:delete')"
              type="danger"
              @click="deleteHandle()"
              :disabled="dataListSelections.length <= 0"
              >批量删除</el-button
            >
          </el-form-item>
        </el-form>
        <el-table
          :data="dataList"
          border
          v-loading="dataListLoading"
          @selection-change="selectionChangeHandle"
          style="width: 100%;"
        >
          <el-table-column
            type="selection"
            header-align="center"
            align="center"
            width="50"
          >
          </el-table-column>
          <el-table-column
            prop="attrGroupId"
            header-align="center"
            align="center"
            label="分组id"
          >
          </el-table-column>
          <el-table-column
            prop="attrGroupName"
            header-align="center"
            align="center"
            label="组名"
          >
          </el-table-column>
          <el-table-column
            prop="sort"
            header-align="center"
            align="center"
            label="排序"
          >
          </el-table-column>
          <el-table-column
            prop="descript"
            header-align="center"
            align="center"
            label="描述"
          >
          </el-table-column>
          <el-table-column
            prop="icon"
            header-align="center"
            align="center"
            label="组图标"
          >
          </el-table-column>
          <el-table-column
            prop="catelogId"
            header-align="center"
            align="center"
            label="所属分类id"
          >
          </el-table-column>
          <el-table-column
            fixed="right"
            header-align="center"
            align="center"
            width="150"
            label="操作"
          >
            <template slot-scope="scope">
              <el-button
                type="text"
                size="small"
                @click="addOrUpdateHandle(scope.row.attrGroupId)"
                >修改</el-button
              >
              <el-button
                type="text"
                size="small"
                @click="deleteHandle(scope.row.attrGroupId)"
                >删除</el-button
              >
            </template>
          </el-table-column>
        </el-table>
        <el-pagination
          @size-change="sizeChangeHandle"
          @current-change="currentChangeHandle"
          :current-page="pageIndex"
          :page-sizes="[10, 20, 50, 100]"
          :page-size="pageSize"
          :total="totalPage"
          layout="total, sizes, prev, pager, next, jumper"
        >
        </el-pagination>
        <!-- 弹窗, 新增 / 修改 -->
        <add-or-update
          v-if="addOrUpdateVisible"
          ref="addOrUpdate"
          @refreshDataList="getDataList"
        ></add-or-update>
      </div>
    </el-col>
  </el-row>
</template>

<script>
/**
 * 父子组件传递数据
 * 1)、子组件给父组件传递数据,事件机制;
 *    子组件给父组件发送一个事件,携带上数据。
 * // this.$emit("事件名",携带的数据...)
 */
//这里可以导入其他文件(比如:组件,工具js,第三方插件js,json文件,图片文件等等)
//例如:import 《组件名称》 from '《组件路径》';
import Category from "@/views/modules/common/category";
import AddOrUpdate from "./attrgroup-add-or-update";
export default {
  //import引入的组件需要注入到对象中才能使用
  components: { Category, AddOrUpdate },
  data() {
    return {
      catId: 0,
      dataForm: {
        key: ""
      },
      dataList: [],
      pageIndex: 1,
      pageSize: 10,
      totalPage: 0,
      dataListLoading: false,
      dataListSelections: [],
      addOrUpdateVisible: false,
      relationVisible: false
    };
  },
  //监听属性 类似于data概念
  computed: {},
  //监控data中的数据变化
  watch: {},
  //方法集合
  methods: {
    //感知树节点被点击
    treenodeclick(data, node, component) {
      //只有点击三级分类的时候才会进行查询
      if (node.level == 3) {
        this.catId = data.catId;
        this.getDataList(); //重新查询
      }
    },
    // 获取数据列表
    getDataList() {
      this.dataListLoading = true;
      this.$http({
        url: this.$http.adornUrl(`/product/attrgroup/list/${this.catId}`),
        method: "get",
        params: this.$http.adornParams({
          page: this.pageIndex,
          limit: this.pageSize,
          key: this.dataForm.key //搜索字段
        })
      }).then(({ data }) => {
        if (data && data.code === 0) {
          this.dataList = data.page.list;
          this.totalPage = data.page.totalCount;
        } else {
          this.dataList = [];
          this.totalPage = 0;
        }
        this.dataListLoading = false;
      });
    },
    // 每页数
    sizeChangeHandle(val) {
      this.pageSize = val;
      this.pageIndex = 1;
      this.getDataList();
    },
    // 当前页
    currentChangeHandle(val) {
      this.pageIndex = val;
      this.getDataList();
    },
    // 多选
    selectionChangeHandle(val) {
      this.dataListSelections = val;
    },
    // 新增 / 修改
    addOrUpdateHandle(id) {
      this.addOrUpdateVisible = true;
      this.$nextTick(() => {
        this.$refs.addOrUpdate.init(id);
      });
    },
    // 删除
    deleteHandle(id) {
      var ids = id
        ? [id]
        : this.dataListSelections.map(item => {
            return item.attrGroupId;
          });
      this.$confirm(
        `确定对[id=${ids.join(",")}]进行[${id ? "删除" : "批量删除"}]操作?`,
        "提示",
        {
          confirmButtonText: "确定",
          cancelButtonText: "取消",
          type: "warning"
        }
      ).then(() => {
        this.$http({
          url: this.$http.adornUrl("/product/attrgroup/delete"),
          method: "post",
          data: this.$http.adornData(ids, false)
        }).then(({ data }) => {
          if (data && data.code === 0) {
            this.$message({
              message: "操作成功",
              type: "success",
              duration: 1500,
              onClose: () => {
                this.getDataList();
              }
            });
          } else {
            this.$message.error(data.msg);
          }
        });
      });
    }
  },
  //生命周期 - 创建完成(可以访问当前this实例)
  created() {},
  //生命周期 - 挂载完成(可以访问DOM元素)
  mounted() {},
  beforeCreate() {}, //生命周期 - 创建之前
  beforeMount() {}, //生命周期 - 挂载之前
  beforeUpdate() {}, //生命周期 - 更新之前
  updated() {}, //生命周期 - 更新之后
  beforeDestroy() {}, //生命周期 - 销毁之前
  destroyed() {}, //生命周期 - 销毁完成
  activated() {} //如果页面有keep-alive缓存功能,这个函数会触发
};
</script>
<style scoped></style>
- ④. 后台接口对应
    @RequestMapping("/list/{catelogId}")
    public R list(@RequestParam Map<String, Object> params,
                  @PathVariable("catelogId")Long catelogId){
        //PageUtils page = attrGroupService.queryPage(params);
        PageUtils page = attrGroupService.queryPage(params,catelogId);

        return R.ok().put("page", page);
    }
	@Override
    public PageUtils queryPage(Map<String, Object> params, Long catelogId) {
        if(catelogId==0){
            IPage<AttrGroupEntity> page = this.page(
                    new Query<AttrGroupEntity>().getPage(params),
                    new QueryWrapper<AttrGroupEntity>()
            );
            return new PageUtils(page);
        }else{
            //select * from pms_attr_group where catelog_id=? and (attr_group_id=key or attr_group_name like %key%)
            String key=(String) params.get("key");
            QueryWrapper<AttrGroupEntity> wrapper = new QueryWrapper<>();
            wrapper.eq("catelog_id",catelogId);
            //isNotBlank:会去除前后的空格进行判断
            //if(StringUtils.isNotBlank(key)){
            if(!StringUtils.isEmpty(key)){
                wrapper.and((obj)->{
                    obj.eq("attr_group_id",key).or().like("attr_group_name",key);
                });
            }
            IPage<AttrGroupEntity> page = this.page(
                    new Query<AttrGroupEntity>().getPage(params),
                    wrapper
            );
            return new PageUtils(page);
        }
    }
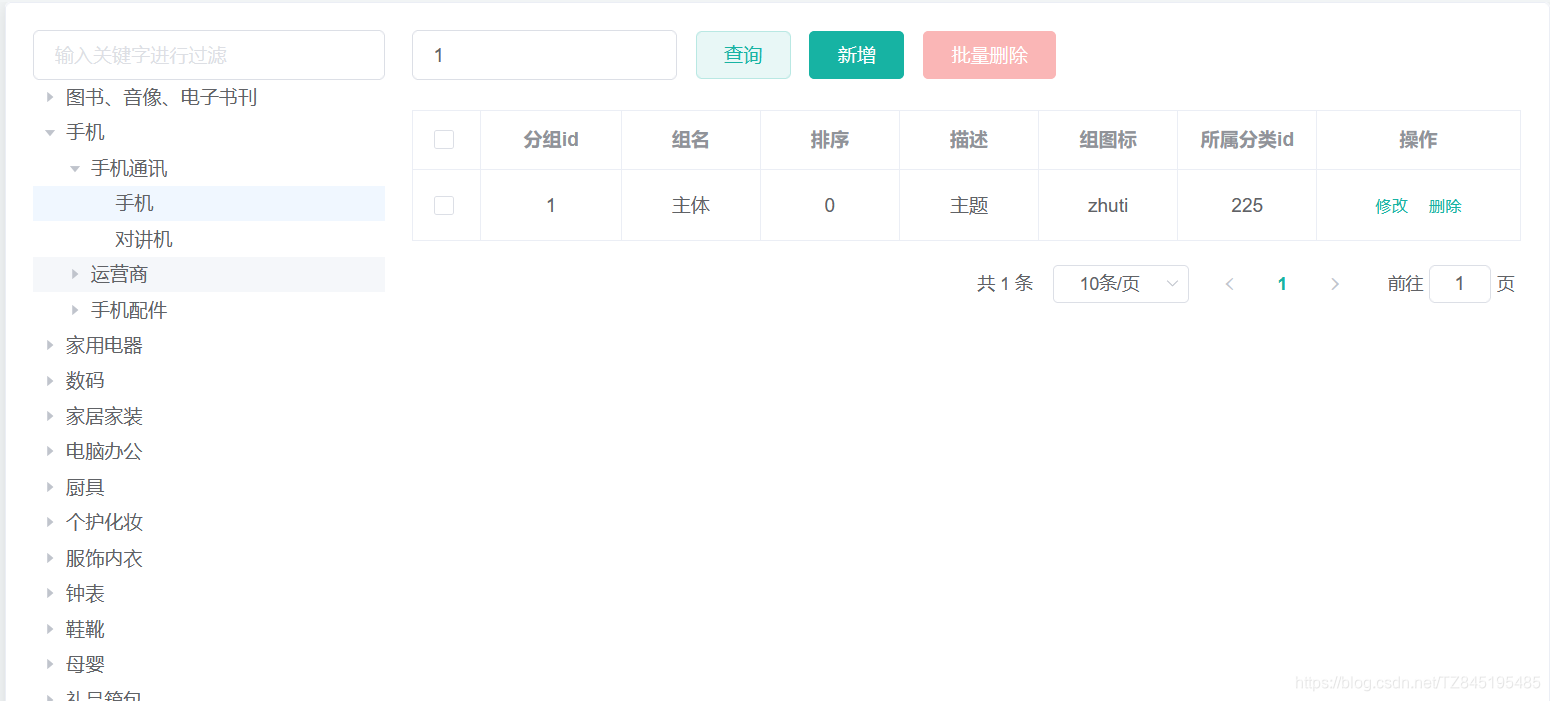
- ⑤. 测试:localhost:88/api/product/attrgroup/list/1?page=1&key=1
④. 属性分组 - 新增修改
- ①. 因为分类可以对应多个属性分组,所以我们新增的属性分组时要指定分类
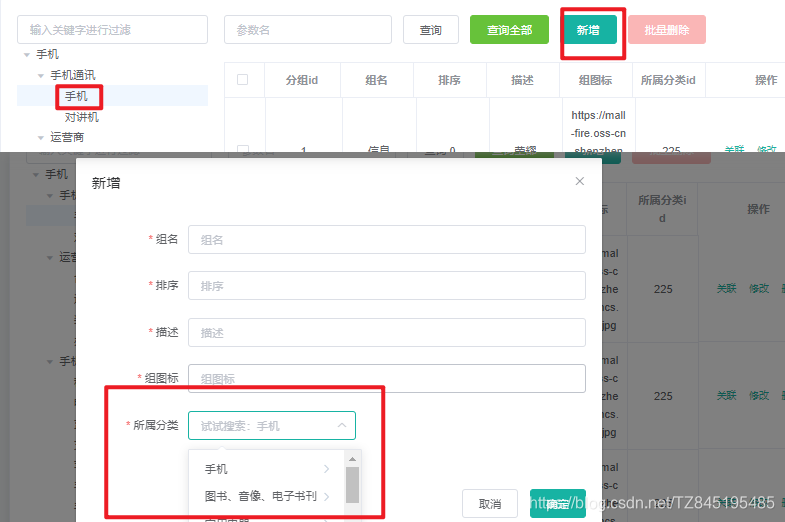
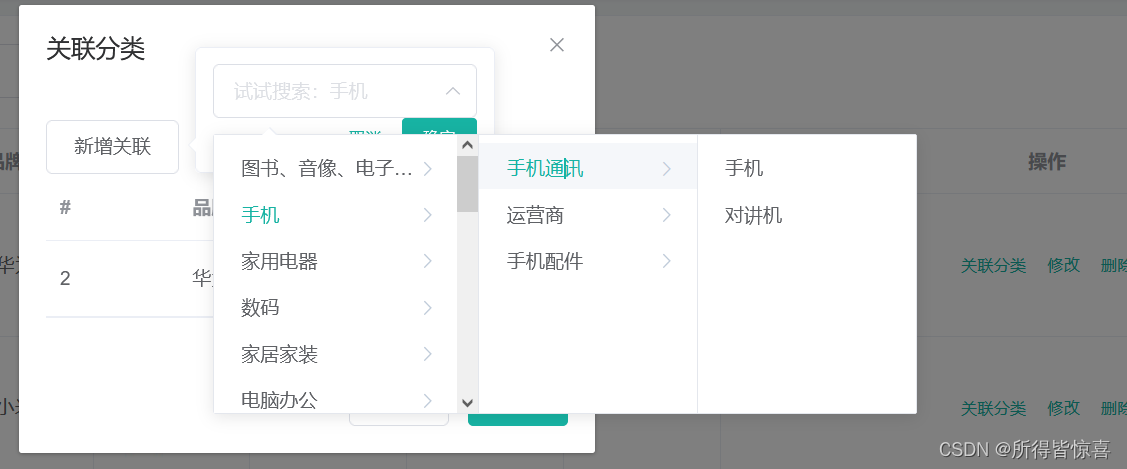
- ②. el-cascader
      <el-form-item label="所属分类id" prop="catelogPath">
        <!-- <el-input v-model="dataForm.catelogId" placeholder="所属分类id"></el-input> -->
        <el-cascader
          v-model="dataForm.catelogPath"
          :options="categorys"
          :props="props"
          filterable
          placeholder="试试搜索:手机"
        ></el-cascader>
      </el-form-item>
      props: {
        value: "catId",
        label: "name",
        children: "children"
      },
      categorys: [],
      dataForm: {
        attrGroupId: 0,
        attrGroupName: "",
        sort: "",
        descript: "",
        icon: "",
        catelogPath: [], //这个是数组的形式显示
        catelogId: ""
      },
- ③. 通过子id去查找所有的父ID
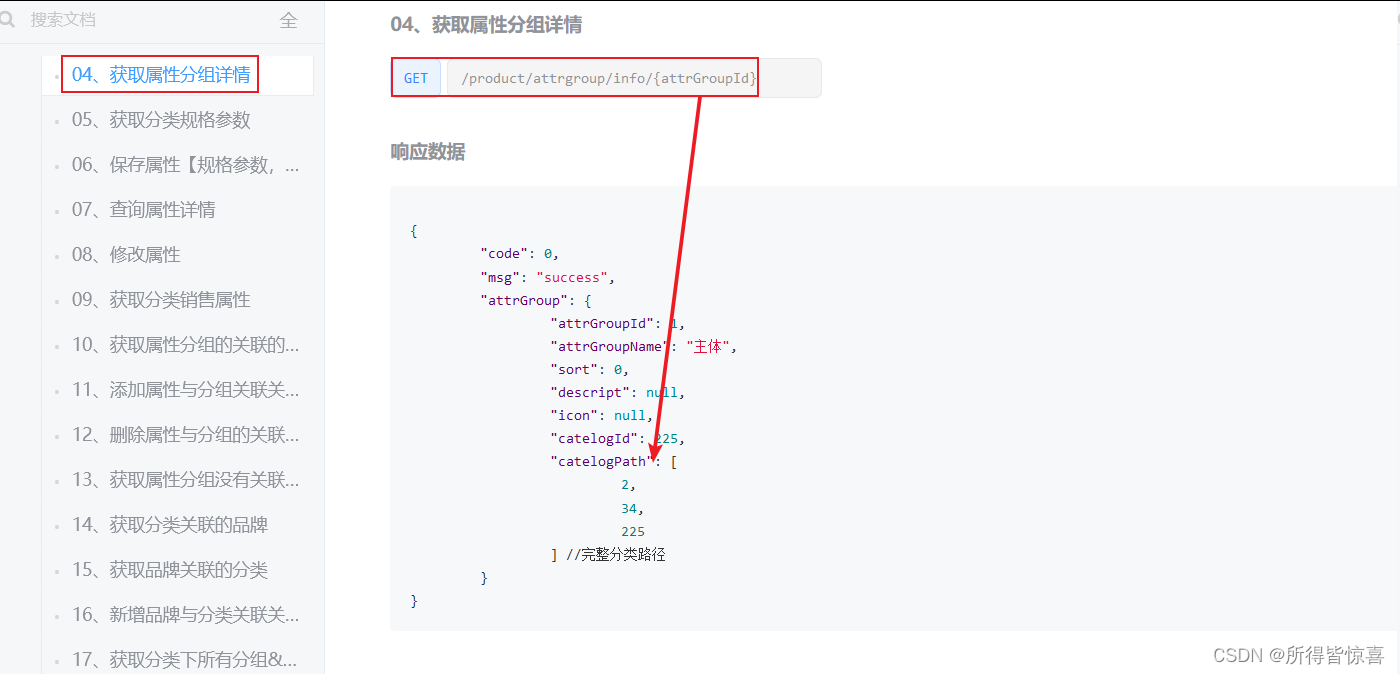
   @RequestMapping("/info/{attrGroupId}")
   //@RequiresPermissions("product:attrgroup:info")
   public R info(@PathVariable("attrGroupId") Long attrGroupId){
	AttrGroupEntity attrGroup = attrGroupService.getById(attrGroupId);
       Long catelogId = attrGroup.getCatelogId();
       Long[]path=categoryService.findCategoryPath(catelogId);
       attrGroup.setCatelogPath(path);
       return R.ok().put("attrGroup", attrGroup);
   }
  @Override
   public Long[] findCategoryPath(Long catelogId) {
       List<Long> paths = new ArrayList<>();
       paths = findParentPath(catelogId, paths);
       // 收集的时候是顺序 前端是逆序显示的 所以用集合工具类给它逆序一下
       // 子父 转 父子
       Collections.reverse(paths);
       return paths.toArray(new Long[paths.size()]); // 1级  2级  3级
   }
   /**
    * 递归收集所有父分类
    */
   private List<Long> findParentPath(Long catlogId, List<Long> paths) {
       // 1、收集当前节点id
       paths.add(catlogId);// 比如父子孙层级,返回的是 孙 子 父
       CategoryEntity categoryEntity = this.getById(catlogId);
       if (categoryEntity.getParentCid() != 0) {
           // 递归
           findParentPath(categoryEntity.getParentCid(), paths);
       }
       return paths;
   }
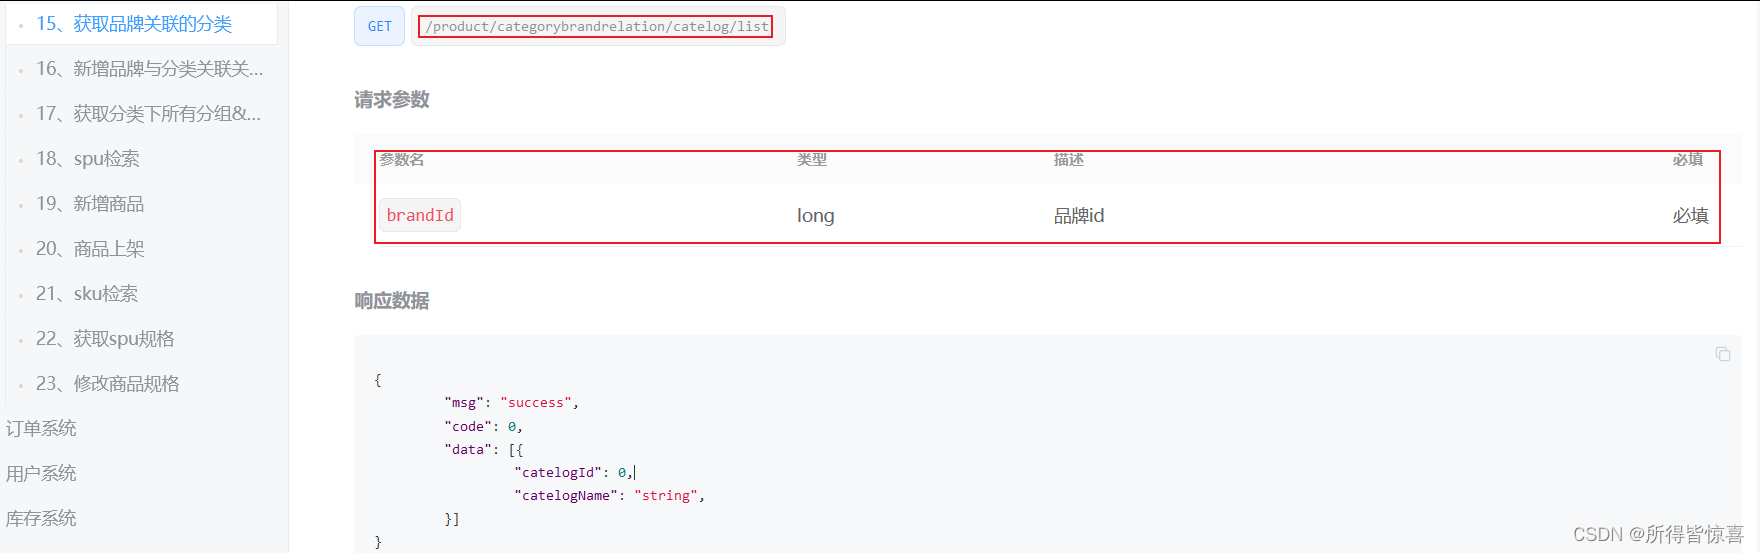
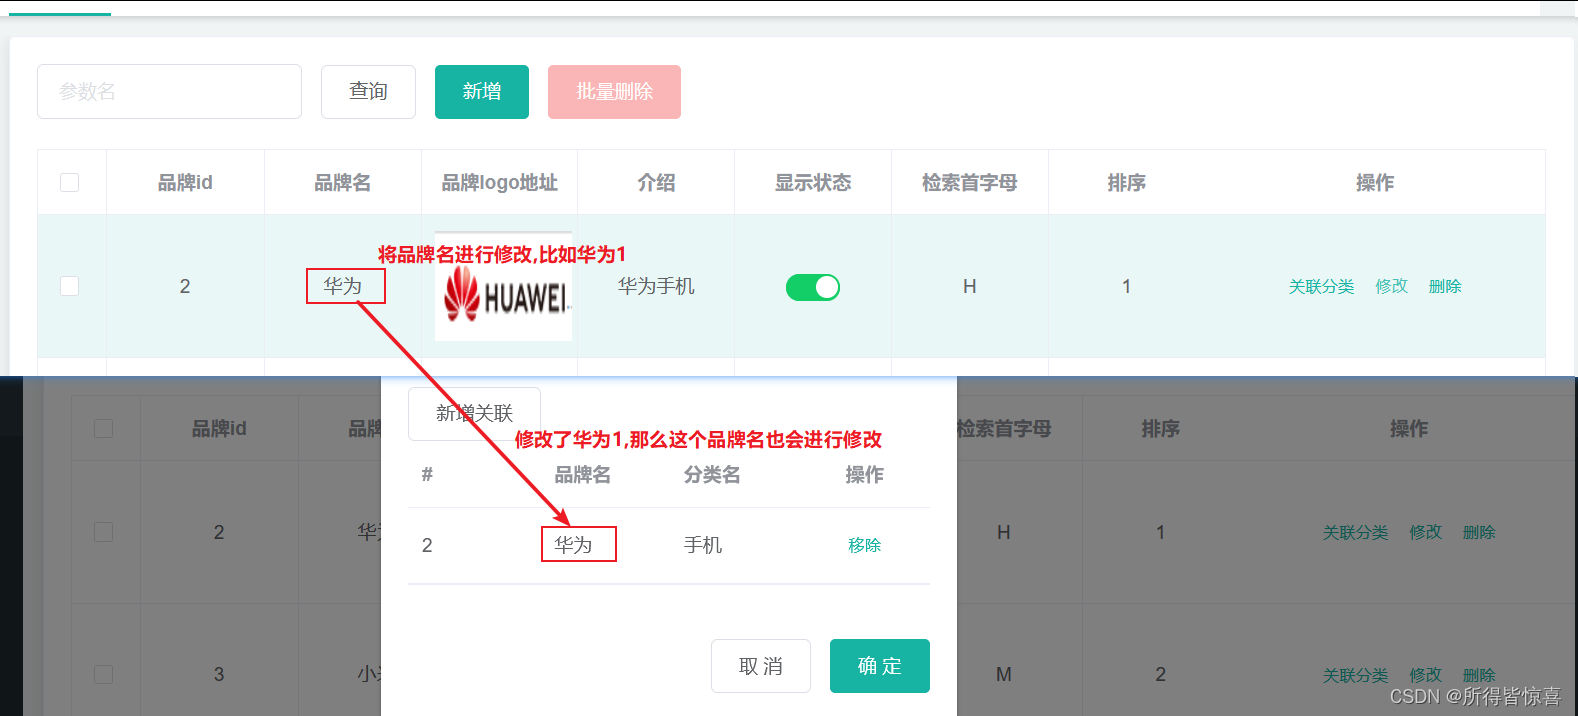
⑤. 品牌分类关联与级联更新
-
①. 这里有两个接口的编写
第一个是新增品牌的关联分类,这个时候需要把数据库表的品牌名称和分类名称添加进数据库
第二个是当我们点击分类管理,将分类名称修改后,品牌管理 - 关联分类这里也需要同步更新
第三个是当我们点击品牌管理,将品牌名称修改后,品牌管理 - 关联品牌名称这里也需要同步更新
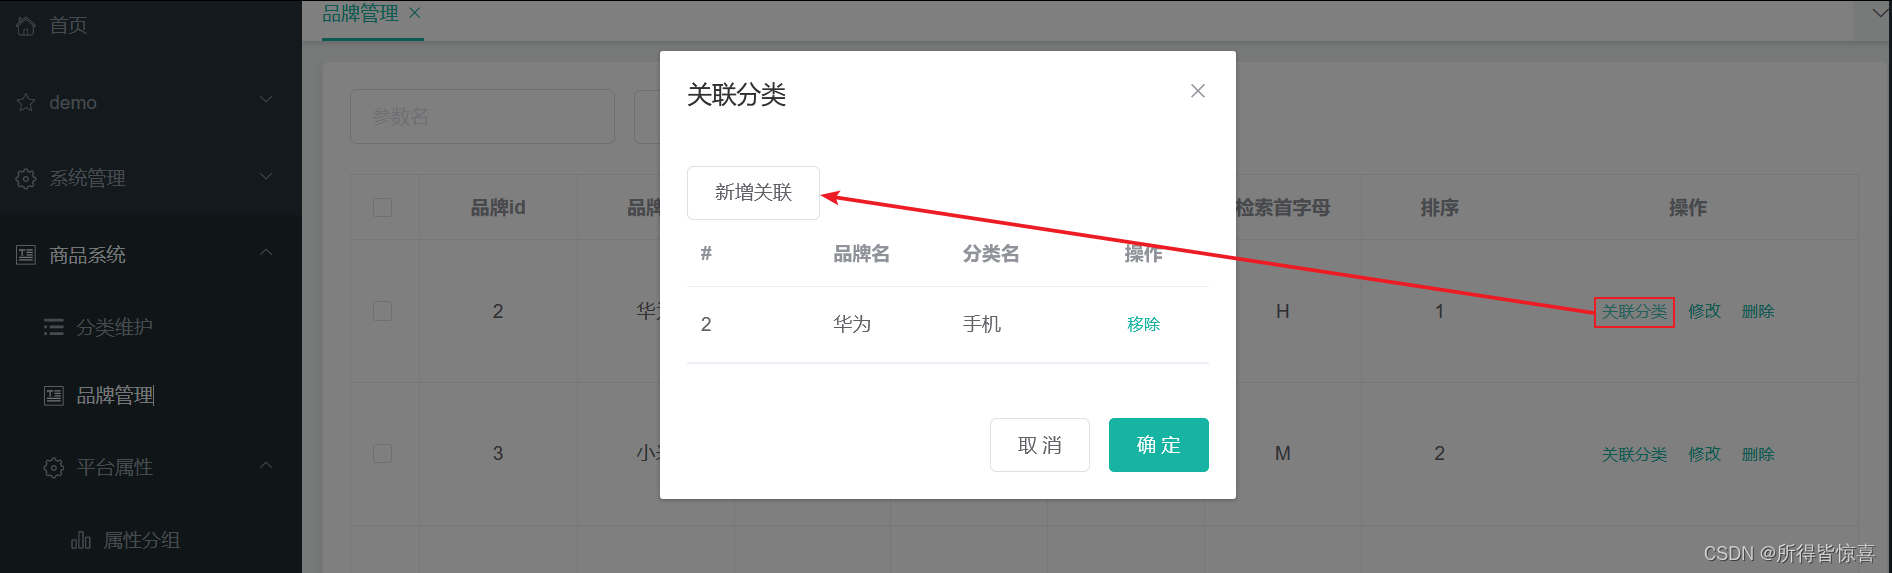
-
②. 新增品牌的关联分类,这个时候需要把数据库表的品牌名称和分类名称添加进数据库
    /**
     * 后台接口这块只传了{"brandId":1,"catelogId":2}
     * 数据库中有品牌的名字和分类的名字
     * id、brand_id、catelog_id、brand_name、catelog_name
     * @param categoryBrandRelation
     */
    @Override
    public void saveDetail(CategoryBrandRelationEntity categoryBrandRelation) {
        //获取到brandId和catelogId
        Long brandId = categoryBrandRelation.getBrandId();
        Long catelogId = categoryBrandRelation.getCatelogId();
        if(brandId!=null){
            BrandEntity brandEntity = brandDao.selectById(brandId);
            categoryBrandRelation.setBrandName(brandEntity.getName());
        }
        if(catelogId!=null){
            CategoryEntity categoryEntity = categoryDao.selectById(catelogId);
            categoryBrandRelation.setCatelogName(categoryEntity.getName());
        }
        this.save(categoryBrandRelation);
    }
- ③. 当我们点击分类管理,将分类修改后,关联分类这里也需要同步更新
(分类修改是在pms_category表、关联的分类表是在pms_category_brand_relation)

/**
 * 修改
 */
@RequestMapping("/update")
public R update(@Validated({UpdateGroup.class})@RequestBody BrandEntity brand){
	brandService.updateDetail(brand);
    return R.ok();
}

/**
 * 级联更新
 * @param brand
 */
@Override
public void updateDetail(BrandEntity brand) {
    // 保证冗余字段的数据一致
    this.updateById(brand);
    if(!StringUtils.isEmpty(brand.getName())){
        UpdateWrapper<CategoryBrandRelationEntity>updateWrapper=new UpdateWrapper<>();
        updateWrapper.eq("brand_id",brand.getBrandId());
        updateWrapper.set("brand_name",brand.getName());
        categoryBrandRelationDao.update(null,updateWrapper);
        //TODO 更新其他关联
    }
}
/**
 * 修改
 */
@RequestMapping("/update")
//@RequiresPermissions("product:category:update")
public R update(@RequestBody CategoryEntity category){
categoryService.updateCascade(category);
    return R.ok();
}
@Override
public void updateCascade(CategoryEntity category) {
    // 保证冗余字段的数据一致
    this.updateById(category);
    if(!StringUtils.isEmpty(category.getName())){
        UpdateWrapper<CategoryBrandRelationEntity>updateWrapper=new UpdateWrapper<>();
        updateWrapper.eq("catelog_id",category.getCatId());
        updateWrapper.set("catelog_name",category.getName());
        categoryBrandRelationDao.update(null,updateWrapper);
        //TODO 更新其他关联
    }
⑥. 商品服务 - 分页配置
- ①. 按照mybatis-plus配置好分页信息
@EnableTransactionManagement
@Configuration
@MapperScan("com.atguigu.gulimall.product.dao")
public class MybatisConfig {
    @Bean
    public PaginationInterceptor paginationInterceptor() {
        PaginationInterceptor paginationInterceptor = new PaginationInterceptor();
        return paginationInterceptor;
    }
}


 1049
1049

 被折叠的 条评论
为什么被折叠?
被折叠的 条评论
为什么被折叠?
 到【灌水乐园】发言


