


提示:本篇文章旨在记录个人学习笔记,如有错误欢迎各位大佬指出。
文章目录
前言
提示:欢迎评论留言补充不足的地方
本人主要研习的是Windows驱动,对Linux驱动相关知识理解的比较浅显,该文章也只是记录一下,怎么写一个简单的字符设备驱动。
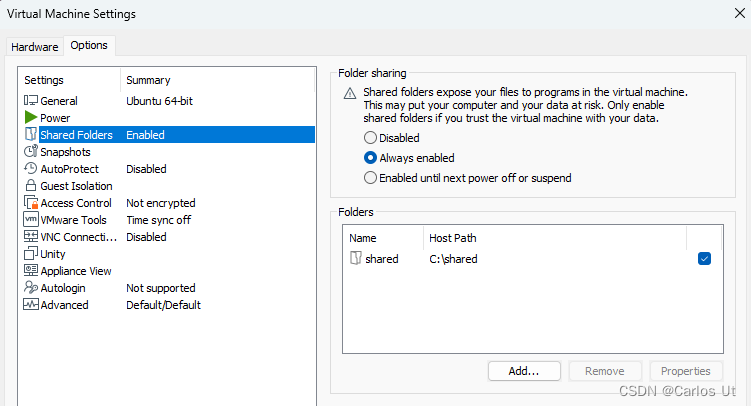
一、创建共享文件夹
因为用的虚拟机开发,修改代码相对来说比较熟悉Windows系统,也不想另开新篇章记录,所以就在本篇文章介绍了。
Note: 系统版本Ubuntu 22.04.4 LTS
1.安装工具
#安装vmtools
sudo apt install open-vm-tools-desktop
#如果上面这个命令行不通,试试这个
sudo apt install open-vm-tools
2.设置共享文件夹
3.挂载共享文件
#查询是否有共享文件夹
vmware-hgfsclient

#如果没有挂载文件夹(单次挂载,重启无效)
sudo vmhgfs-fuse -o allow_other -o auto_unmount .host:/ /mnt/hgfs

#自动挂载,打开下面的文件
sudo vim /etc/fstab
#文件末尾添加如下命令,重启生效
.host:/ /mnt/hgfs fuse.vmhgfs-fuse allow_other,auto_unmount 0 0
二、Sample Driver
1.写入数据
代码如下(示例):
static ssize_t device_write(struct file *filp, const char __user *buf, size_t count, loff_t *f_pos) {
    unsigned long missing;

    printk(KERN_WARNING "%s: Device write.\n",DEVICE_NAME);

    if (count > BUF_LEN)
        count = BUF_LEN;

    missing = copy_from_user(buffer, buf, count);
    if (missing) {
        printk(KERN_ALERT "%s:copy_from_user failed, wrote %zd bytes.\n", DEVICE_NAME, count - missing);
        return -EFAULT;
    }

    memcpy(write_buffer, buffer, count);
    write_buffer[count] = '\0';

    printk(KERN_WARNING "%s: %s - Wrote %zd bytes to device.\n", DEVICE_NAME, write_buffer, count);
    return count;
}
写入用户请求的数据。保留用户的数据于write_buffer数组中,其中“ write_buffer[count] = ‘\0’”可以确保输出正确的字符数据,在用户调用read时再传回去。
2.读取数据
代码如下(示例):
static ssize_t device_read(struct file *filp, char *buffer, size_t length, loff_t * offset) {
    int bytes_read = 0;

    printk(KERN_WARNING "%s: Device read.\n",DEVICE_NAME);

    if (*offset >= BUF_LEN)
        return 0;

    if (length > BUF_LEN - *offset)
        length = BUF_LEN - *offset;

    if (copy_to_user(buffer, write_buffer + *offset, length))
        return -EFAULT;

    *offset += length;
    bytes_read = length;

    printk(KERN_WARNING "%s: %s - read %d bytes to device.\n", DEVICE_NAME, write_buffer, bytes_read);

    return bytes_read;
}
读取用户请求的数据。当用户调用read函数读取数据时,我们将应用层发给内核层的数据转发回去。
3.Makefile
# Makefile for simple_driver
obj-m += simple_driver.o

all:
	make -C /lib/modules/$(shell uname -r)/build M=$(PWD) modules

clean:
	make -C /lib/modules/$(shell uname -r)/build M=$(PWD) clean
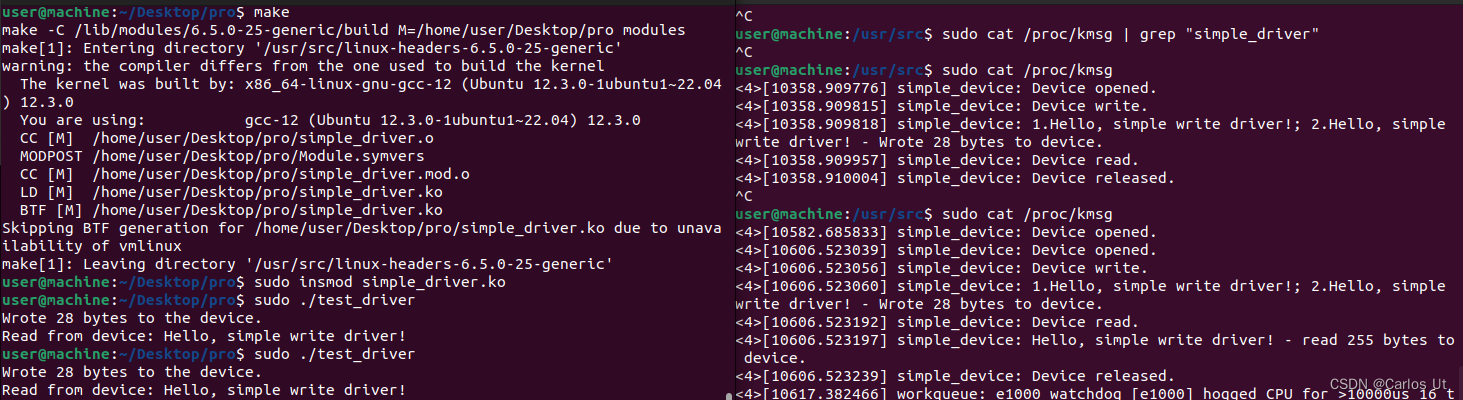
4.安装驱动
make编译完后,会在当前路径下生成simple_driver.ko的文件,这也是我们需要的内核二进制文件。
# install driver
sudo insmod simple_driver.ko

# view driver
lsmod

# remove driver
sudo rmmod simple_driver.ko
使用“ls /dev/”可以看到目录下存在“simple_driver”这个设备,如果找不到,那可能是没有创建设备节点,本文代码已创建设备节点。
5.查看驱动日志
在查看驱动日志前可以看一下当前的日志打印等级:
cat /proc/sys/kernel/printk
#result: 4        4        1        7

#change print level
echo 8 > /proc/sys/kernel/printk
dmesg -n 5
“4 4 1 7” 分别对应console_loglevel、default_message_loglevel、minimum_c onsole_loglevel、default_console_loglevel,意味着只有优先级高于KERN_WARNING(4)的打印消息才能输出到终端。听说可以修改打印等级,但我试了,好像行不通,所以我在代码中用的是KERN_WARNING级别的。打印级别如下:
| Micro | Value | Explanation |
|---|---|---|
| KERN_EMERG | “0” | system is unusable |
| KERN_ALERT | “1” | action must be taken immediately |
| KERN_CRIT | “2” | critical conditions |
| KERN_ERR | “3” | error conditions |
| KERN_WARNING | “4” | warning conditions |
| KERN_NOTICE | “5” | normal but significant condition |
| KERN_INFO | “6” | informational |
| KERN_DEBUG | “7” | debug-level messages |
| KERN_DEFAULT | “” | the default kernel log level |
可以通过下面的命令查看驱动的日志信息。
# view kernel driver information
sudo cat /proc/kmsg
# add filter info
sudo cat /proc/kmsg | grep "simple_driver"

# another way
sudo dmesg | grep "simple_driver"
运行结果:
6.Source Code
// simple_driver.c
#include <linux/module.h>
#include <linux/kernel.h>
#include <linux/fs.h>
#include <linux/cdev.h>
#include <asm/uaccess.h>

#define DEVICE_NAME "simple_device"
#define BUF_LEN 1024

static dev_t first_dev;
static struct cdev cdev;
static struct class *simple_class;
static char buffer[BUF_LEN] = {0};
static char write_buffer[BUF_LEN+1] = {0};
//static char msg[BUF_LEN] = "Hello from simple device driver!";

static int device_open(struct inode *inode, struct file *file) {
    printk(KERN_WARNING "%s: Device opened.\n",DEVICE_NAME);
    return 0;
}

static int device_release(struct inode *inode, struct file *file) {
    printk(KERN_WARNING "%s: Device released.\n",DEVICE_NAME);  //KERN_INFO
    return 0;
}

static ssize_t device_read(struct file *filp, char *buffer, size_t length, loff_t * offset) {
    int bytes_read = 0;

    printk(KERN_WARNING "%s: Device read.\n",DEVICE_NAME);

    if (*offset >= BUF_LEN)
        return 0;

    if (length > BUF_LEN - *offset)
        length = BUF_LEN - *offset;

    if (copy_to_user(buffer, write_buffer + *offset, length))    //msg + *offset
        return -EFAULT;

    *offset += length;
    bytes_read = length;

    printk(KERN_WARNING "%s: %s - read %d bytes to device.\n", DEVICE_NAME, write_buffer, bytes_read);

    return bytes_read;
}

static ssize_t device_write(struct file *filp, const char __user *buf, size_t count, loff_t *f_pos) {
    unsigned long missing;

    printk(KERN_WARNING "%s: Device write.\n",DEVICE_NAME);

    if (count > BUF_LEN)
        count = BUF_LEN;

    //if (!access_ok(VERIFY_READ, buf, count)) {
        // If the access is illegal, error handling can be performed
        //return -EFAULT;
    //}

    missing = copy_from_user(buffer, buf, count);
    if (missing) {
        printk(KERN_ALERT "%s:copy_from_user failed, wrote %zd bytes.\n", DEVICE_NAME, count - missing);
        return -EFAULT;
    }

    memcpy(write_buffer, buffer, count);
    write_buffer[count] = '\0';

    printk(KERN_WARNING "%s: 1.%s; 2.%s - Wrote %zd bytes to device.\n",DEVICE_NAME,buffer,write_buffer, count);
    return count;
}

static struct file_operations fops = {
    .read = device_read,
    .write = device_write,
    .open = device_open,
    .release = device_release
};

int init_module(void) {
    int result;
    dev_t dev_no;

    result = alloc_chrdev_region(&first_dev, 0, 1, DEVICE_NAME);
    if (result < 0) {
        printk(KERN_ALERT "%s:Failed to allocate char device region.\n", DEVICE_NAME);
        return result;
    }

    dev_no = MKDEV(MAJOR(first_dev), 0);

    cdev_init(&cdev, &fops);
    cdev_add(&cdev, dev_no, 1);

    printk(KERN_WARNING "I was assigned major number %d. To talk to\n"
           "the driver, create a dev file with\n"
           "'mknod /dev/%s: c %d 0'.\n"
           "Try various minor numbers. Don't forget to\n"
           "rm the dev files and module when you're done.\n",
           MAJOR(first_dev), DEVICE_NAME, MAJOR(first_dev));

    simple_class = class_create(DEVICE_NAME);
    device_create(simple_class, NULL, first_dev, NULL, DEVICE_NAME);

    return 0;
}

void cleanup_module(void) {
    cdev_del(&cdev);
	class_destroy(simple_class);
    unregister_chrdev_region(first_dev, 1);
}

MODULE_LICENSE("Dual BSD/GPL");
三、Test Application
测试的应用程序
在Linux环境下,以下是一个示例,展示了如何创建一个简单的测试程序。
// test_driver.c
#include <stdio.h>
#include <stdlib.h>
#include <string.h>
#include <fcntl.h>
#include <unistd.h>
#include <errno.h>
#include <sys/types.h>
#include <sys/stat.h>

#define DEVICE_FILE "/dev/simple_device"
#define BUF_LEN 256

int main() {
    int fd;
    char buffer[BUF_LEN];
    ssize_t bytesRead;
    char write_buf[BUF_LEN] = "Hello, simple write driver!";
    ssize_t bytes_written;

    // 尝试以只读方式打开设备文件
    fd = open(DEVICE_FILE, O_RDWR);
    if (fd == -1) {
        perror("Error opening device file");
        exit(EXIT_FAILURE);
    }

    // 向设备文件写入数据
    bytes_written = write(fd, write_buf, strlen(write_buf));
    if (bytes_written == -1) {
        perror("Error writing to device");
        close(fd);
        exit(EXIT_FAILURE);
    }

    printf("Wrote %zd bytes to the device.\n", bytes_written);

    // 读取设备文件的内容
    memset(buffer, 0, BUF_LEN);
    bytesRead = read(fd, buffer, BUF_LEN - 1);
    if (bytesRead == -1) {
        perror("Error reading from device");
        close(fd);
        exit(EXIT_FAILURE);
    }

    // 打印从设备读取的数据
    printf("Read from device: %s\n", buffer);

    // 关闭设备文件
    close(fd);

    return 0;
}
编译代码:gcc test_driver.c -o test_driver
在这个简单的例子中,我们通过open函数打开设备,获得设备句柄(不太严谨,暂且这么说),然后调write函数用向设备文件写入数据,接着调用read函数读取设备文件的内容。
总结
以上就是今天要讲的内容,本文仅仅简单介绍了字符设备虚拟驱动,而实际情况会更复杂,还有块设备和网络设备这两大类没有介绍,也不打算开坑了。对于ioctl的通信方式本文没有给出,看看以后有没有空再填补吧。


 被折叠的 条评论
为什么被折叠?
被折叠的 条评论
为什么被折叠?
 到【灌水乐园】发言


