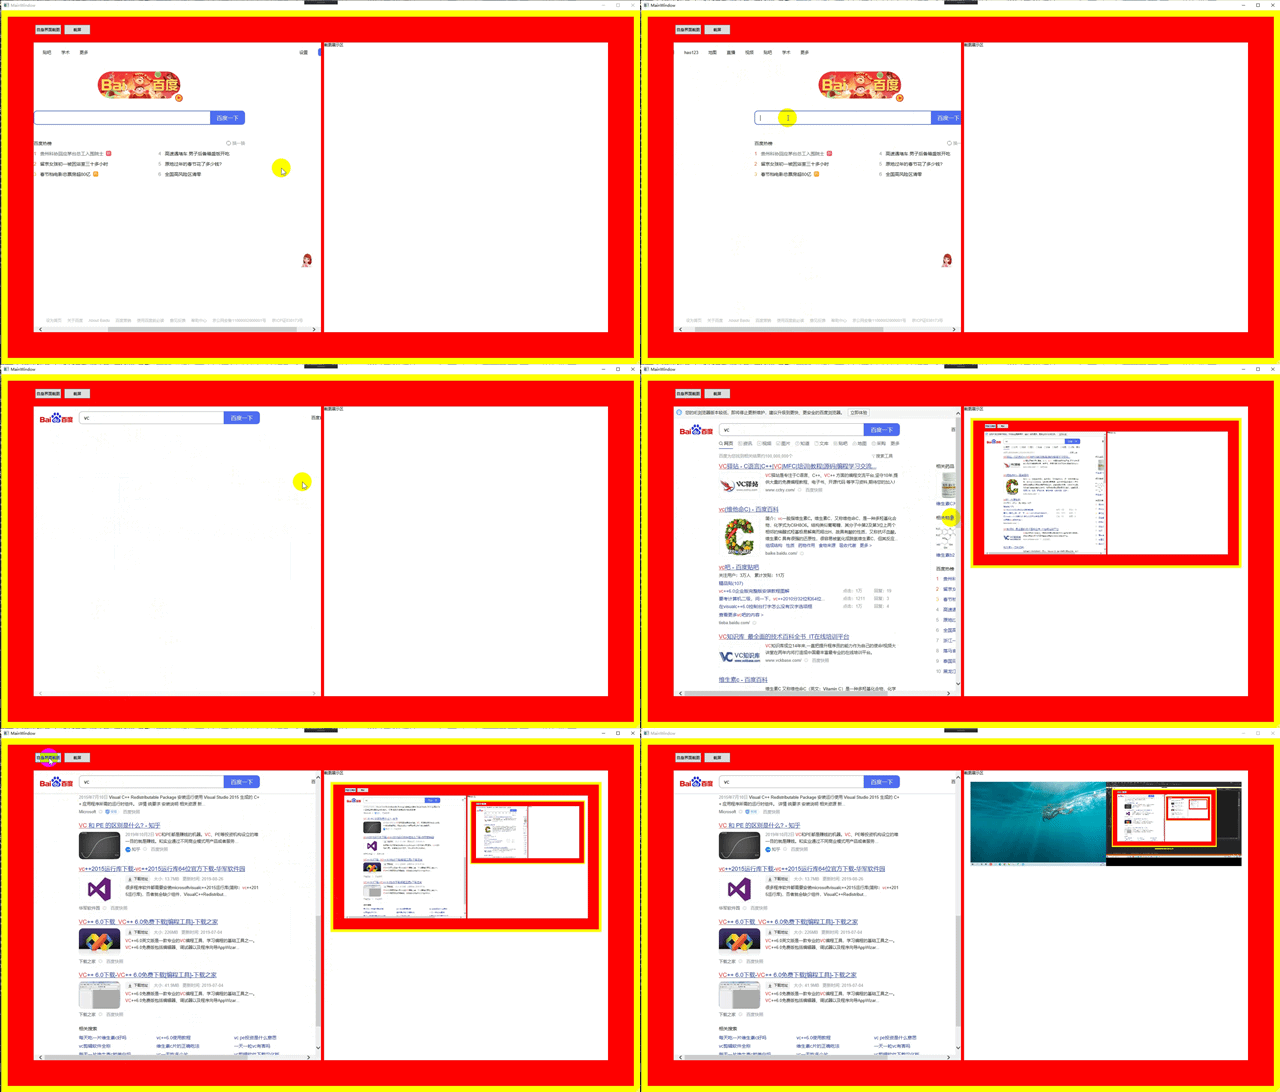
先看效果,后面附代码
1、自身界面截图:将截取主界面黄色框中的界面;截屏:将截取所有显示器的界面(黄色边框是为了验证截图是否精准,无偏移)
2、中间左边是个网页,右边为截图展示区

动图如下:

截图会受到系统显示设置的影响,如多个显示器,每个显示器的大小不一,每个显示器的缩放布局,以及哪个显示器为主显示器等影响。(我的电脑2显示器为主显示器,且两个显示器为左右放置上对齐,故电脑左上角的坐标为(-2560,0))

为了适应电脑的这些显示设置,请参考以下主要代码:
xaml没什么好说的(如有需要请评论留言或私信),直接上cs代码。
- 主界面的后台代码如下:
 public partial class MainWindow : Window
    {

        public MainWindow()
        {
            InitializeComponent();
        }

        /// <summary>
        /// 单击自身界面截图按钮
        /// </summary>
        /// <param name="sender"></param>
        /// <param name="e"></param>
        private void ButtonBase_OnClick(object sender, RoutedEventArgs e)
        {
            CreateBitmapFromVisual(this);
        }

        public void CreateBitmapFromVisual(Visual target)
        {
            if (target == null)
            {
                return;
            }

            // 获取指定控件的大小
            Rect bounds = VisualTreeHelper.GetDescendantBounds(target);
            // var size = this.RenderSize;

            // 此窗体最小化或最大化之前获取的大小和窗口的位置
            var resort = this.RestoreBounds;
            resort.Width = bounds.Width;
            resort.Height = bounds.Height;

            BitmapSource caputredBmp;
            if (this.WindowState == WindowState.Maximized)
            {
                // 获取显示设置中主屏幕的缩放比例
                double dpixRatio = (double)PrimaryScreen.DpiX / (double)96;
                //double dpiyRatio = (double)PrimaryScreen.DpiY / (double)96;

                // 获取虚拟屏幕边界
                Rectangle rc = SystemInformation.VirtualScreen;

                // 坐标系转换统一,左上角坐标统一使用虚拟屏幕左上角坐标
                var a = this.PointFromScreen(new Point(rc.X, rc.Y));
                a.X *= dpixRatio;
                a.Y *= dpixRatio;
                resort.Width *= dpixRatio;
                resort.Height *= dpixRatio;
                resort.X = 0 - a.X + rc.X;
                resort.Y = 0 - a.Y + rc.Y;

                // 截图
                caputredBmp = CopyFromScreenSnapshotMaxWindow(resort);
            }
            else
            {
                // 去掉窗体边框的大小
                resort.X += 8;
                resort.Y += 30;

                // 截图
                caputredBmp = CopyFromScreenSnapshot(resort);
            }

            this.img.Source = caputredBmp;

        }

        private static BitmapSource CopyFromScreenSnapshot(Rect region)
        {
            var sourceRect = ToRectangle(region);
            Rectangle rc = SystemInformation.VirtualScreen;
            var destRect = new Rectangle(0, 0, sourceRect.Width, sourceRect.Height);
            var bitmap = new Bitmap(sourceRect.Width, sourceRect.Height, System.Drawing.Imaging.PixelFormat.Format32bppArgb);
            var screenSnapshot = GetScreenSnapshot(sourceRect);
            using (Graphics g = Graphics.FromImage(bitmap))
            {
                sourceRect.X = 0;
                sourceRect.Y = 0;
                g.DrawImage(screenSnapshot, destRect, sourceRect, GraphicsUnit.Pixel);
            }

            return ToBitmapSource(bitmap);
        }

        /// <summary>
        /// 最大化使用该方法,由于调用前已经将坐标根据显示设置缩放比例设置过了,所以无需调用ToRectangle
        /// </summary>
        /// <param name="region"></param>
        /// <returns></returns>
        private static BitmapSource CopyFromScreenSnapshotMaxWindow(Rect region)
        {
            var sourceRect = new Rectangle((int)(region.X), (int)(region.Y), (int)(region.Width), (int)(region.Height)); ;
            Rectangle rc = SystemInformation.VirtualScreen;
            var destRect = new Rectangle(0, 0, sourceRect.Width, sourceRect.Height);
            var bitmap = new Bitmap(sourceRect.Width, sourceRect.Height, System.Drawing.Imaging.PixelFormat.Format32bppArgb);
            var screenSnapshot = GetScreenSnapshot(sourceRect);
            using (Graphics g = Graphics.FromImage(bitmap))
            {
                sourceRect.X = 0;
                sourceRect.Y = 0;
                g.DrawImage(screenSnapshot, destRect, sourceRect, GraphicsUnit.Pixel);
            }

            return ToBitmapSource(bitmap);
        }

        /// <summary>
        /// 获取屏幕快照
        /// </summary>
        /// <param name="region"></param>
        /// <returns></returns>
        public static Bitmap GetScreenSnapshot(Rectangle region)
        {
            try
            {
                Rectangle rc = SystemInformation.VirtualScreen;
                var bitmap = new Bitmap(rc.Width, rc.Height, System.Drawing.Imaging.PixelFormat.Format32bppArgb);

                using (Graphics memoryGrahics = Graphics.FromImage(bitmap))
                {
                    memoryGrahics.CopyFromScreen((int)region.X, (int)region.Y, 0, 0, rc.Size, CopyPixelOperation.SourceCopy);
                }

                return bitmap;
            }
            catch (Exception)
            {

            }

            return null;


        }

        public static BitmapSource ToBitmapSource(Bitmap bmp)
        {
            BitmapSource returnSource;

            try
            {
                returnSource = Imaging.CreateBitmapSourceFromHBitmap(bmp.GetHbitmap(), IntPtr.Zero, Int32Rect.Empty, BitmapSizeOptions.FromEmptyOptions());
            }
            catch
            {
                returnSource = null;
            }

            return returnSource;

        }

        static Rectangle ToRectangle(Rect rect)
        {
            // 获取显示设置中主屏幕的缩放比例
            double dpixRatio = (double)PrimaryScreen.DpiX / (double)96;
            return new Rectangle((int)(rect.X * dpixRatio), (int)(rect.Y * dpixRatio), (int)(rect.Width * dpixRatio), (int)(rect.Height * dpixRatio));
        }

        /// <summary>
        /// 单击截屏按钮
        /// </summary>
        /// <param name="sender"></param>
        /// <param name="e"></param>
        private void ButtonBase1_OnClick(object sender, RoutedEventArgs e)
        {
            // 获取虚拟屏幕的界限(包括左上角的坐标,长和高)
            Rectangle rc = SystemInformation.VirtualScreen;

            // 截全屏
            var caputredBmp = CopyFromScreenSnapshot(new Rect(rc.X, rc.Y, rc.Width, rc.Height));

            // 截图展示(img为界面截图展示的控件)
            this.img.Source = caputredBmp;
        }
}- 辅助类PrimaryScreen代码如下:
    public class PrimaryScreen
    {
        #region Win32 API
        [DllImport("user32.dll")]
        static extern IntPtr GetDC(IntPtr ptr);

        [DllImport("gdi32.dll")]
        static extern int GetDeviceCaps(
            IntPtr hdc,
            // handle to DC
            int nIndex
            // index of capability
            );

        [DllImport("user32.dll", EntryPoint = "ReleaseDC")]
        static extern IntPtr ReleaseDC(IntPtr hWnd, IntPtr hDc);

        #endregion

        #region DeviceCaps常量
        const int HORZRES = 8;
        const int VERTRES = 10;
        const int LOGPIXELSX = 88;
        const int LOGPIXELSY = 90;
        const int DESKTOPVERTRES = 117;
        const int DESKTOPHORZRES = 118;
        #endregion

        #region 属性
        /// <summary>
        /// 获取屏幕分辨率当前物理大小
        /// </summary>
        public static Size WorkingArea
        {
            get
            {
                IntPtr hdc = GetDC(IntPtr.Zero);
                Size size = new Size();
                size.Width = GetDeviceCaps(hdc, HORZRES);
                size.Height = GetDeviceCaps(hdc, VERTRES);
                ReleaseDC(IntPtr.Zero, hdc);
                return size;
            }
        }
        /// <summary>
        /// 当前系统DPI_X 大小 一般为96
        /// </summary>
        public static int DpiX
        {
            get
            {
                IntPtr hdc = GetDC(IntPtr.Zero);
                int DpiX = GetDeviceCaps(hdc, LOGPIXELSX);
                ReleaseDC(IntPtr.Zero, hdc);
                return DpiX;
            }
        }
        /// <summary>
        /// 当前系统DPI_Y 大小 一般为96
        /// </summary>
        public static int DpiY
        {
            get
            {
                IntPtr hdc = GetDC(IntPtr.Zero);
                int DpiX = GetDeviceCaps(hdc, LOGPIXELSY);
                ReleaseDC(IntPtr.Zero, hdc);
                return DpiX;
            }
        }
        /// <summary>
        /// 获取真实设置的桌面分辨率大小
        /// </summary>
        public static Size DESKTOP
        {
            get
            {
                IntPtr hdc = GetDC(IntPtr.Zero);
                Size size = new Size();
                size.Width = GetDeviceCaps(hdc, DESKTOPHORZRES);
                size.Height = GetDeviceCaps(hdc, DESKTOPVERTRES);
                ReleaseDC(IntPtr.Zero, hdc);
                return size;
            }
        }
        /// <summary>
        /// 获取宽度缩放百分比
        /// </summary>
        public static float ScaleX
        {
            get
            {
                IntPtr hdc = GetDC(IntPtr.Zero);
                int t = GetDeviceCaps(hdc, DESKTOPHORZRES);
                int d = GetDeviceCaps(hdc, HORZRES);
                float ScaleX = (float)GetDeviceCaps(hdc, DESKTOPHORZRES) / (float)GetDeviceCaps(hdc, HORZRES);
                ReleaseDC(IntPtr.Zero, hdc);
                return ScaleX;
            }
        }
        /// <summary>
        /// 获取高度缩放百分比
        /// </summary>
        public static float ScaleY
        {
            get
            {
                IntPtr hdc = GetDC(IntPtr.Zero);
                float ScaleY = (float)(float)GetDeviceCaps(hdc, DESKTOPVERTRES) / (float)GetDeviceCaps(hdc, VERTRES);
                ReleaseDC(IntPtr.Zero, hdc);
                return ScaleY;
            }
        }
        #endregion

}- 添加应用程序清单文件app.manifest(PerMonitor当前进程设置为屏幕级 DPI 感知)
 <!-- 指示该应用程序可以感知 DPI 且 Windows 在 DPI 较高时将不会对其进行
       自动缩放。Windows Presentation Foundation (WPF)应用程序自动感知 DPI,无需
       选择加入。选择加入此设置的 Windows 窗体应用程序(目标设定为 .NET Framework 4.6 )还应
       在其 app.config 中将 "EnableWindowsFormsHighDpiAutoResizing" 设置设置为 "true"。-->
<application xmlns="urn:schemas-microsoft-com:asm.v3">
    <windowsSettings>
      <dpiAware xmlns="http://schemas.microsoft.com/SMI/2005/WindowsSettings">true</dpiAware>
      <dpiAwareness xmlns="http://schemas.microsoft.com/SMI/2016/WindowsSettings">PerMonitor</dpiAwareness>
    </windowsSettings>
  </application>
至此就可以实现多屏幕截图啦。


 这篇博客详细介绍了如何在多显示器系统中实现精准截图,考虑了显示器大小、缩放比例和主显示器设置等因素。代码示例展示了如何利用C#进行窗口截图,包括自身界面截图和全屏截图,确保截图无偏移。此外,还提到了应用程序清单文件的设置以实现DPI感知。


 253
253

 被折叠的 条评论
为什么被折叠?


