


一、XML
1.读写XML文件的内容
切记进行该实验前要先导入dom4j-1.6.1.jar,否则无法运行成功
1.1 定义一个Xml文件,读出里面的内容
<?xml version="1.0" encoding="UTF-8"?>
<emps>

	<emp id="0001">   <!-- id为emp节点的属性节点,获取值的方式为getValue() -->
		<name>tao</name>
		<age>18</age>     <!-- name、age、salary为emp节点的文本节点,获取值的方式为getText() -->
		<salary>9000</salary>
	</emp>

	<emp id="0002">
		<name>zhang</name>
		<age>17</age>
		<salary>8000</salary>
	</emp>

</emps>
package com.rjxy.tao19.Test1;

import java.io.Serializable;

public class Emp implements Serializable {

	private static final long serialVersionUID = 3874398224216783106L;

	private String id;
	private String name;
	private int age;
	private int salary;

	public Emp(String id, String name, int age, int salary) {
		super();
		this.id = id;
		this.name = name;
		this.age = age;
		this.salary = salary;
	}

	public Emp() {
		super();
	}

	@Override
	public int hashCode() {
		final int prime = 31;
		int result = 1;
		result = prime * result + age;
		result = prime * result + ((id == null) ? 0 : id.hashCode());
		result = prime * result + ((name == null) ? 0 : name.hashCode());
		result = prime * result + salary;
		return result;
	}

	@Override
	public boolean equals(Object obj) {
		if (this == obj)
			return true;
		if (obj == null)
			return false;
		if (getClass() != obj.getClass())
			return false;
		Emp other = (Emp) obj;
		if (age != other.age)
			return false;
		if (id == null) {
			if (other.id != null)
				return false;
		} else if (!id.equals(other.id))
			return false;
		if (name == null) {
			if (other.name != null)
				return false;
		} else if (!name.equals(other.name))
			return false;
		if (salary != other.salary)
			return false;
		return true;
	}

	public String getId() {
		return id;
	}

	public void setId(String id) {
		this.id = id;
	}

	public String getName() {
		return name;
	}

	public void setName(String name) {
		this.name = name;
	}

	public int getAge() {
		return age;
	}

	public void setAge(int age) {
		this.age = age;
	}

	public int getSalary() {
		return salary;
	}

	public void setSalary(int salary) {
		this.salary = salary;
	}

	@Override
	public String toString() {
		return "Emp [id=" + id + ", name=" + name + ", age=" + age + ", salary=" + salary + "]";
	}

}
package com.rjxy.tao19.Test1;

import java.io.File;
import java.util.ArrayList;
import java.util.Iterator;
import java.util.List;

import org.dom4j.Document;
import org.dom4j.Element;
import org.dom4j.io.SAXReader;

//读出XML文件里面的内容
public class ReadXML {

	public static void main(String[] args) throws Exception {

		//定义一个Emp集合,把节点数据都存放到集合中
		List<Emp> emps = new ArrayList<>();

		//1.确认输入流
		SAXReader reader = new SAXReader();

		//2.获取Document对象
		Document document = reader.read(new File("config/TestEmp.xml"));

		//3.获取根节点
		Element rootElement = document.getRootElement();

		//可进行测试,是否获得了根节点,直接get
		System.out.println(rootElement.getName());

		//4.通过迭代器遍历emps接节点下的子节点
		Iterator<Element> it = rootElement.elementIterator();
			while(it.hasNext()) {

				//创建一个Emp对象
				Emp emp = new Emp();

				Element element1 = it.next();
				//5.获取子节点的属性节点attribute("id"),获取节点对象的属性值getValue()
				//或者使用  attributeValue() 可以直接获得属性节点的值
				String id = element1.attribute("id").getValue();
				System.out.println(element1.attribute("id").getValue());

				//把id值存到对象中
				emp.setId(id);

				//6.迭代emp节点下的子节点
				Iterator<Element> it2 = element1.elementIterator();
				while(it2.hasNext()) {
					//getText()获取节点的值(文本节点)
					Element element2 = it2.next();
					element2.getText();
					System.out.println("\t" + element2.getText());

					//存放对应的数据
					if(element2.getName().equals("name")) {
						emp.setName(element2.getText());
					}
					if(element2.getName().equals("age")) {
						emp.setAge(Integer.parseInt(element2.getText()));
					}
					if(element2.getName().equals("age")) {
						emp.setAge(Integer.parseInt(element2.getText()));
					}
				}
				emps.add(emp);
			}

		//最后,可以把数据都存到Emp里面(使用集合)
		System.out.println(emps);

	}
}
1.2 给XML文件写内容
注意:重用上面的Emp类
package com.rjxy.tao19.Test1;

import java.io.FileOutputStream;
import java.util.ArrayList;
import java.util.List;

import org.dom4j.Document;
import org.dom4j.DocumentHelper;
import org.dom4j.Element;
import org.dom4j.io.OutputFormat;
import org.dom4j.io.XMLWriter;

public class WriterXML {

	public static void main(String[] args) throws Exception {

		//1.准备数据
		//创建一个Arraylist集合,把数据以对象的方式存放到集合中
		List<Emp> empList = new ArrayList<>();
		empList.add(new Emp("0001", "tao", 21, 8000));
		empList.add(new Emp("0002", "zhang", 29, 7000));

		//2.获得Document对象
		Document document = DocumentHelper.createDocument();

		//3.Document对象去添加Element
		//添加根节点
		Element rootElement = document.addElement("emps");
		//添加emp节点,根据list集合元素的个数
		for(Emp emp : empList) {

			Element element = rootElement.addElement("emp");
			//为根节点添加属性节点
			element.addAttribute("id", emp.getId());

			//为根节点添加文本节点
			Element nameElement = element.addElement("name");
			nameElement.addText(emp.getName());
			Element ageElement = element.addElement("age");
			ageElement.addText(emp.getAge() + "");
			Element salaryElement = element.addElement("salary");
			salaryElement.addText(emp.getSalary() + "");

		}

		//4.输出流,把Document对象写到数据文件中
		XMLWriter writer = new XMLWriter(
				new FileOutputStream("config/TestEmp2.xml"),
				OutputFormat.createPrettyPrint());
		writer.write(document);

		//5.关闭流
		writer.close();
	}
}
最后,会在指定文件下生成特定的xml文件(本次代码输出结果即为1中的xml文件)
2.模拟Spring容器IO原理(即不用new 创建对象,使用XML文件间接完成对象的创建)
package com.rjxy.tao19.Test2;

public class EmpDao {

	public void insert() {
		System.out.println("aaaaa");
	}

}
package com.rjxy.tao19.Test2;

public class EmpService {
	//定义了EmpDao类的对象,但没有进行实例化,通过BeanFactory.java和XML文件进行实例化
	private EmpDao empDao;

	public void addEmp() {
		empDao.insert();
	}
}
bean.xml
<?xml version="1.0" encoding="UTF-8"?>
<beans>
	<!-- 实例化一个EmpDao的对象 -->
	<bean id = "empDao" class = "com.rjxy.tao19.Test2.EmpDao">
	</bean>
	<bean id = "empService" class = "com.rjxy.tao19.Test2.EmpService">
		<property name="empDao" ref="empDao"></property>
	</bean>
</beans>
BeanFactory.java用于进行对象的实例化:
package com.rjxy.tao19.Test2;

import java.io.File;
import java.lang.reflect.Field;
import java.util.HashMap;
import java.util.Iterator;
import java.util.Map;

import org.dom4j.Document;
import org.dom4j.Element;
import org.dom4j.io.SAXReader;

public class BeanFactory {

	private static Map<String, Object> map = new HashMap<>();

	static {
		try {
			init();
		} catch (Exception e) {
			// TODO Auto-generated catch block
			e.printStackTrace();
		}
	}
	public static void init() throws Exception {

		// 1.解析xml文件
		SAXReader reader = new SAXReader();
		Document document = reader.read(new File("bean/bean.xml"));
		//获取根节点
		Element rootElement = document.getRootElement();

		Iterator<Element> it = rootElement.elementIterator();
		while(it.hasNext()) {
			Element beanElement = it.next();
			String id = beanElement.attributeValue("id");
			String iclass = beanElement.attributeValue("class");

			// 2.通过反射创建两个对象
			Class<?> zclass = Class.forName(iclass);
			//实例化对象
			Object obj = zclass.newInstance();
			// 3.设置到map集合
			map.put(id, obj); //第一次遍历此时map存放的格式为: empDao, new EmpDao()
							  //第二次遍历                                         empService, new EmpService()

			// 4.给Service类的属性赋值
			Iterator<Element> it2 = beanElement.elementIterator();
			while(it2.hasNext()) {
				Element propertyElement = it2.next();

				String name1 = propertyElement.attributeValue("name");
				String ref = propertyElement.attributeValue("ref");

				//获取EmpService类中的成员属性
				Field f = zclass.getDeclaredField(name1);
				f.setAccessible(true);

				f.set(obj, map.get(ref)); //此时 map.get(ref)中的ref即为  empDao,
										  //map.get(empDao),输出的是它的value,即上面存放的 new EmpDao()
			}
		}
	}

	public static Object getBean(String key) {
		// 返回map集合key的值
		return map.get(key);
	}
}
测试类:
package com.rjxy.tao19.Test2;

public class Test {

	public static void main(String[] args) {

		EmpService service = (EmpService)new BeanFactory().getBean("empService");
		service.addEmp();
	}
}
课堂练习:
有如下Student.java 和Teacher.java,仿照上面的进行代码编写,完成Student对象的实例化,调用方法并输出:
package com.rjxy.tao19.Test3;

public class Student {

	public String study(String str) {
		return str;
	}
}
package com.rjxy.tao19.Test3;

public class Teacher {

	private Student student;
	private String name;

	public void teach() {
		System.out.println(name + "教大家学习" + student.study("java"));
	}
}
完成代码的编写,BeanFactory.java、XML文件、Test.java
🔺答案:
<?xml version="1.0" encoding="UTF-8"?>
<beans>
	<bean id="student" class="com.rjxy.tao19.Test3.Student"></bean>
	<bean id="teacher" class="com.rjxy.tao19.Test3.Teacher">
		<property name="student" ref="student"></property>
		<property name="name" value="王老师"></property>
	</bean>
</beans>
package com.rjxy.tao19.Test3;

import java.io.File;
import java.lang.reflect.Field;
import java.util.HashMap;
import java.util.Iterator;
import java.util.Map;

import org.dom4j.Document;
import org.dom4j.DocumentException;
import org.dom4j.Element;
import org.dom4j.io.SAXReader;

public class BeanFactory {
	private static Map<String, Object> map =
			new HashMap<>();
	static {
		try {
			init();
		} catch (Exception e) {
			// TODO Auto-generated catch block
			e.printStackTrace();
		}
	}
	public static void init() throws Exception {
		//1.解析xml文件
		SAXReader reader = new SAXReader();
		Document document = reader.read(new File("bean/bean3.xml"));
		//获取根节点
		Element rootElement = document.getRootElement();

		Iterator<Element> it = rootElement.elementIterator();
		while(it.hasNext()) {
			Element beanElement = it.next();

			String id = beanElement.attributeValue("id");
			String className = beanElement.attributeValue("class");

			Class<?> zclass = Class.forName(className);
			Object obj = zclass.newInstance();

			map.put(id, obj);

			Iterator<Element> it2 = beanElement.elementIterator();
			while(it2.hasNext()) {

				Element propertyElement = it2.next();

				Field field = null;
				String name = null;
				String value = null;
				String ref = null;

				name = propertyElement.attributeValue("name");
				field = zclass.getDeclaredField(name);

				if(propertyElement.attributeValue("value") != null) {
					value = propertyElement.attributeValue("value");
					field.setAccessible(true);
					field.set(obj, value);
				}
				if(propertyElement.attributeValue("ref") != null) {
					ref = propertyElement.attributeValue("ref");
					field.setAccessible(true);
					field.set(obj, map.get(ref));
				}
			}
		}

	}

	public static Object getBean(String key) {
		return map.get(key);
	}
}
package com.rjxy.tao19.Test3;
public class Test {
	public static void main(String[] args) {
		Teacher teacher = (Teacher)new BeanFactory().getBean("teacher");
		teacher.teach();
	}
}
**
二、注解Annotation
**
1. java中元注解(用来标识注解的注解)有四个:
@Target @Retention @Document @Inherited;
1.1@Target:注解的作用目标
@Target(ElementType.TYPE)
    可以作用在接口、类、枚举、注解
@Target(ElementType.FIELD)
	字段、枚举的常量
@Target(ElementType.METHOD)
	方法
@Target(ElementType.PARAMETER)
	方法参数
@Target(ElementType.CONSTRUCTOR)
	构造函数
@Target(ElementType.LOCAL_VARIABLE)
	局部变量
@Target(ElementType.ANNOTATION_TYPE)
	注解
@Target(ElementType.PACKAGE)
	包
1.2 @Retention:注解的保留位置
@Retention(RetentionPolicy.SOURCE)
    注解仅存在于源码中,在class字节码文件中不包含@Retention(RetentionPolicy.CLASS)
    默认的保留策略,注解会在class字节码文件中存在,但运行时无法获得,
@Retention(RetentionPolicy.RUNTIME)
	注解会在class字节码文件中存在,在运行时可以通过反射获取到
1.3 @Document:说明该注解将被包含在javadoc中
1.4 @Inherited:说明子类可以继承父类中的该注解
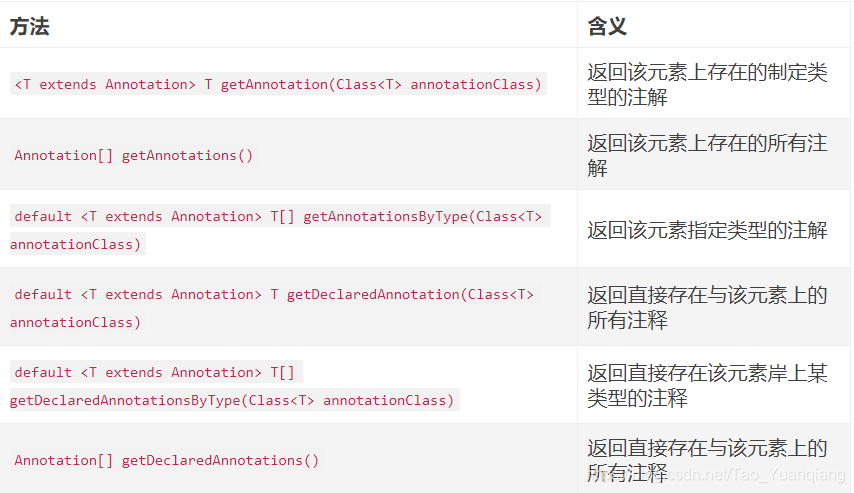
2.运行时注解处理器
熟悉java反射机制的同学一定对java.lang.reflect包非常熟悉,该包中的所有api都支持读取运行时Annotation的能力,即属性为@Retention(RetentionPolicy.RUNTIME)的注解.
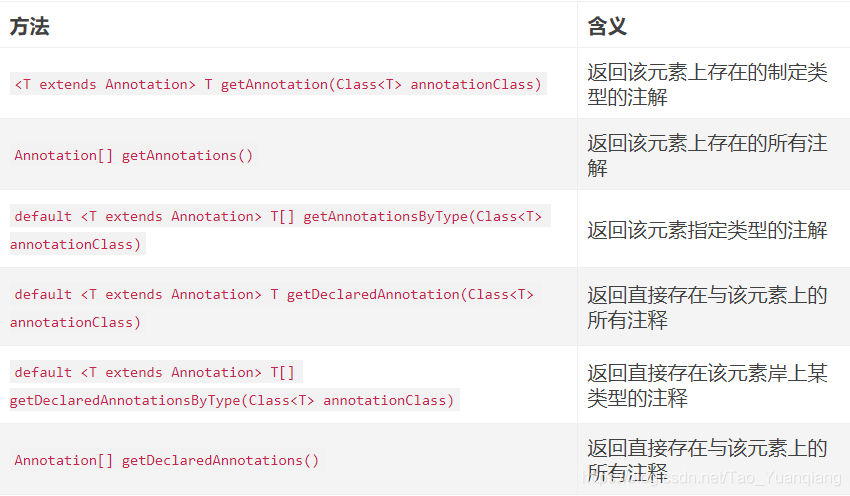
在java.lang.reflect中的AnnotatedElement接口是所有程序元素的(Class,Method)父接口,我们可以通过反射获取到某个类的AnnotatedElement对象,进而可以通过该对象提供的方法访问Annotation信息,常用的方法如下:
🔺简单示例:
package com.rjxy.tao19.Test4;

import java.lang.annotation.ElementType;
import java.lang.annotation.Retention;
import java.lang.annotation.RetentionPolicy;
import java.lang.annotation.Target;

//创建@Bean注释
@Target(ElementType.TYPE)
@Retention(RetentionPolicy.RUNTIME)
public @interface Bean {

	public String id();

}
package com.rjxy.tao19.Test4;

import java.lang.annotation.ElementType;
import java.lang.annotation.Retention;
import java.lang.annotation.RetentionPolicy;
import java.lang.annotation.Target;

//创建@Methods注释
@Target(ElementType.METHOD)
@Retention(RetentionPolicy.RUNTIME)
public @interface Methods {
	public String me();
}
package com.rjxy.tao19.Test4;

import java.lang.annotation.ElementType;
import java.lang.annotation.Retention;
import java.lang.annotation.RetentionPolicy;
import java.lang.annotation.Target;

//创建@Property注释
@Target(ElementType.FIELD)
@Retention(RetentionPolicy.RUNTIME)
public @interface Property {

	public String value() default "";
	public String ref() default "aaa";
	public int age();
}
创建Test.java类,使用刚创建的注释:
package com.rjxy.tao19.Test4;

@Bean(id = "test")
public class Test {

	@Property(value = "tao", age = 99)
	private String name;

	@Methods(me = "testMe")
	public void test() {
		System.out.println("aaa");
	}
}

@Bean(id ="a")
class A{

	@Property(ref = "test", age = 67)
	private Test test;
}
创建类TestAnnotation.java,在这个类中使用Annotation注解的方法对注解进行使用:
package com.rjxy.tao19.Test4;

import java.lang.reflect.Field;
import java.lang.reflect.Method;
import java.util.HashMap;
import java.util.Map;

public class TestAnnotation {

	//测试Test类上的Bean注解
	public static void test1() throws Exception {
		Map<String, Object> map = new HashMap<>();

		// 因为注解都是 @Retention(RetentionPolicy.RUNTIME),所以可以通过反射获得
		Class<Test> zclass = Test.class;

		// zclass.isAnnotationPresent(Bean.class)
		// 判断@Bean类型的注解是否在Test类上,如果在,返回true,不在,则返回true
		if (zclass.isAnnotationPresent(Bean.class)) {

			// zclass.getAnnotation(Bean.class)
			// 该方法用法:返回程序元素上存在的、指定类型的注解,如果该类型注解不存在,则返回null
			Bean bean = zclass.getAnnotation(Bean.class);
			// 返回注解内bean的id值
			System.out.println(bean.id()); //test

			map.put(bean.id(), zclass.newInstance());
			System.out.println(map);  //{test=com.rjxy.tao19.Test4.Test@677327b6}
		}
	}

	//测试A类上的bean注解
	public static void test2() throws Exception {
		Map<String, Object> map = new HashMap<>();

		Class<A> zclass = A.class;
		if(zclass.isAnnotationPresent(Bean.class)) {
			Bean bean = zclass.getAnnotation(Bean.class);
			System.out.println(bean.id());

			map.put(bean.id(), zclass.newInstance());
			System.out.println(map);
		}
	}

	//测试Test类属性name上的注解
	public static void test3() throws Exception {

		Class<Test> zclass = Test.class;
		//先获取到Test类中的属性
		Field f = zclass.getDeclaredField("name");
		f.setAccessible(true);
		if(f.isAnnotationPresent(Property.class)) {
			Property p = f.getAnnotation(Property.class);
			System.out.println(p.age());
			System.out.println(p.ref());
			System.out.println(p.value());

		}
	}

	//测试Test类中方法上的注解
	public static void test4() throws Exception {

		Class<Test> zclass = Test.class;

		//获取到指定的方法
		Method method = zclass.getDeclaredMethod("test");

		if(method.isAnnotationPresent(Methods.class)) {
			Methods m = method.getAnnotation(Methods.class);
			System.out.println(m.me());
		}
	}

	public static void main(String[] args) throws Exception {
		test4();
	}
}


 67
67


 被折叠的 条评论
为什么被折叠?
被折叠的 条评论
为什么被折叠?
 到【灌水乐园】发言


