


平时大家的工作中应该会遇到较多需要在某个时间点执行某个任务,比如对运维来说,定时数据库的备份,日志和监控信息的抓取;比如业务系统,某个时间点给某个人群用户发放优惠券,甚至从操作系统角度,人机交互进程、视频播放的实时进程、批处理的后台进程等进程间的调度。。。
所以如何将这些任务高效、精准的调度?是任务调度系统中最重要的命题,当然在业务系统中一个完善的任务调度系统是很复杂的,需要具备能调度、可视化管理、过程可追溯、结果可分析、持久化、高可用等特性,这篇文章主要讨论任务调度逻辑,其余的内容我们后面文章探讨。
背景
最近的一次招聘面试中,候选人介绍了他基于时间轮算法实现的一套任务调度系统,在我的个人历史工作中简单的场景会直接使用java自带的工具类,如Timer、 ScheduledThreadPool、DelayQueue 配合线程池等方法 ,复杂的一些场景用开源工具包Quartz、集团的SchedulerX等,但一直没有对这些工具的底层实现逻辑做过深入的学习,此次的沟通引起了我的兴趣。
我们可以将业务系统中需要使用定时任务调度的总结成以下三种场景:
时间驱动处理场景:如整点发送优惠券,每天定时更新收益,每天定时刷新标签数据和人群数据
批量处理数据:如按月批量统计报表数据,批量更新某些数据状态,实时性要求不高
异步执行解耦:如先反馈用户操作状态,后台异步执行较耗时的数据操作,以实现异步逻辑解耦
所以从时间维度可以分为定时或者延迟一定时间两个维度,而时间轮就是一种高效的利用线程资源来进行批量化调度的一种调度模型,把大批量的调度任务全部都绑定到同一个的调度器上面,使用这一个调度器来进行所有任务的管理,触发以及运行,能够高效的管理各种延时任务,周期任务。
这篇文章主要有三块内容:
1.JAVA自带的工具类的内部实现逻辑是什么?
2.时间轮算法原理?
3.时间轮算法有哪些应用案例?(Netty、Kafka案例)
Timer、ScheduledThreadPool、DelayQueue实现逻辑
▐ Timer
Timer 可以实现延时任务,也可以实现周期性任务。我们先来看看 Timer 核心属性和构造器。
private final TaskQueue queue = new TaskQueue();//基于数组实现的优先队列,用作存放任务


private final TimerThread thread = new TimerThread(queue);//执行任务线程


public Timer(String name) {
        thread.setName(name);
        thread.start(); //构造时默认启动线程
    }
Timer核心就是一个优先队列和封装的执行任务的线程,从这我们也可以看到一个 Timer 只有一个线程执行任务,再来看看是如何实现延时和周期性任务的。
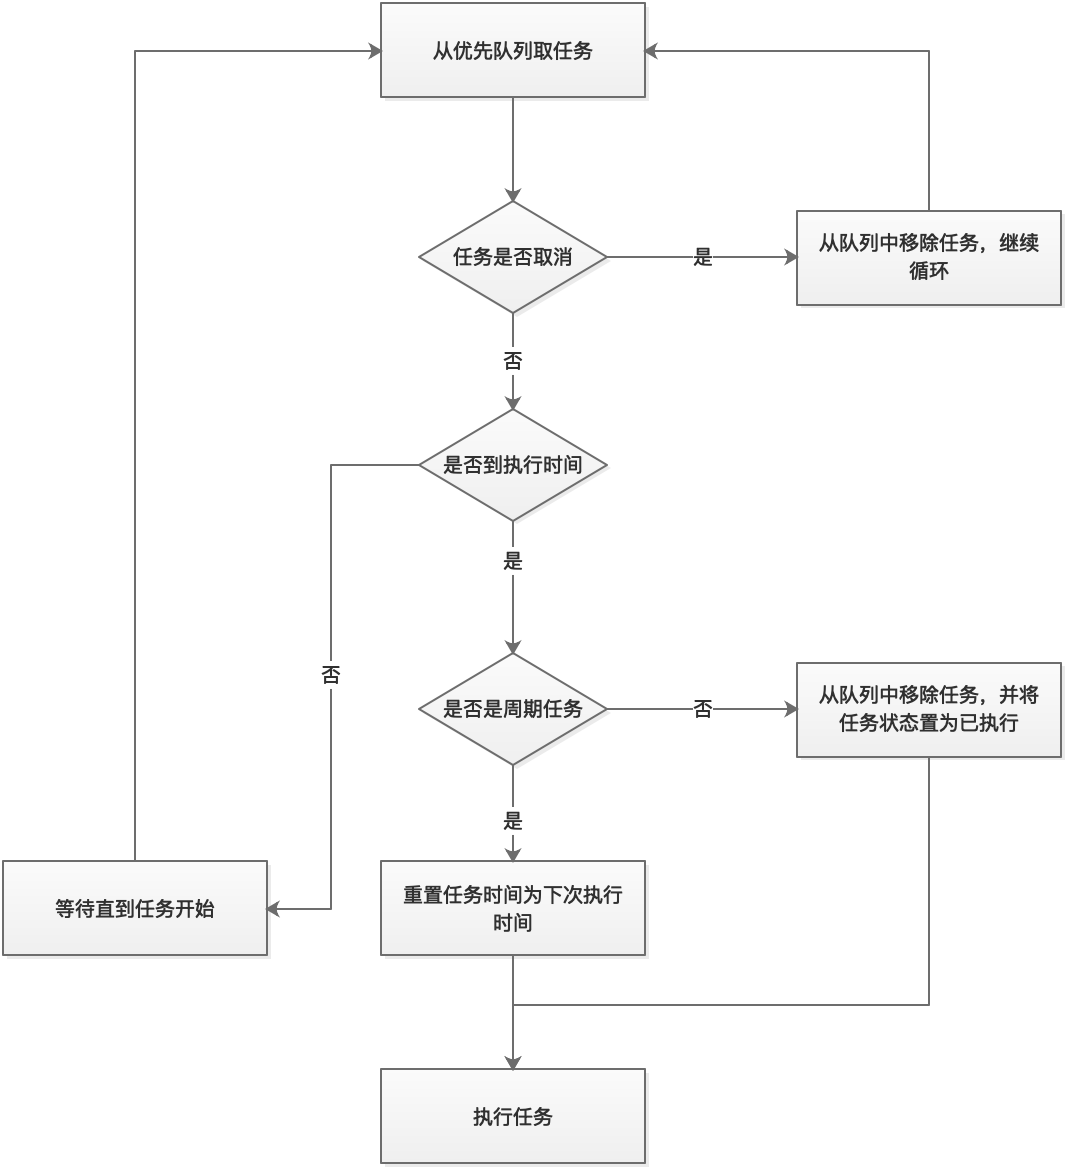
我先简单的概括一下:首先维持一个小顶堆,即最快需要执行的任务排在优先队列的第一个,根据堆的特性我们知道插入和删除的时间复杂度都是 O(logn),然后TimerThread不断地拿排在第一个任务的执行时间和当前时间做对比,如果时间到了先看看这个任务是不是周期性执行的任务?如果是则修改当前任务时间为下次执行的时间,如果不是周期性任务则将任务从优先队列中移除,最后执行任务。如果时间还未到则调用 wait() 等待(参考以下流程图)。
再看下代码逻辑,先来看下 TaskQueue,主要看下插入任务的过程,特别是插入时间复杂度部分。
class TaskQueue {
    private TimerTask[] queue = new TimerTask[128];
    void add(TimerTask task) {
        // Grow backing store if necessary
        if (size + 1 == queue.length)
            queue = Arrays.copyOf(queue, 2*queue.length); //扩容


        queue[++size] = task; //先将任务添加到数组最后面
        fixUp(size); //调整堆
    }
    private void fixUp(int k) { //时间复杂度为O(logn)
        while (k > 1) {
            int j = k >> 1;
            if (queue[j].nextExecutionTime <= queue[k].nextExecutionTime)//通过任务执行时间对比,调整顺序
                break;
            TimerTask tmp = queue[j];  queue[j] = queue[k]; queue[k] = tmp;
            k = j;
        }
    }
  /**
     * Return the "head task" of the priority queue.  (The head task is an
     * task with the lowest nextExecutionTime.)
     */
    TimerTask getMin() {
        return queue[1]; //返回最接近执行时间的任务
    }
     //.......
}
再来看看 TimerThread 的 run 操作。
public void run() {
        try {
            mainLoop();//无异常捕获
        } finally {
            // Someone killed this Thread, behave as if Timer cancelled
            synchronized(queue) {
                newTasksMayBeScheduled = false;
                queue.clear();  // Eliminate obsolete references
            }
        }
    }


    /**
     * The main timer loop.  (See class comment.)
     */
    private void mainLoop() {
        while (true) {
            try {
                TimerTask task;
                boolean taskFired;
                synchronized(queue) {
                    // Wait for queue to become non-empty
                    while (queue.isEmpty() && newTasksMayBeScheduled)
                        queue.wait();
                    if (queue.isEmpty())
                        break; // Queue is empty and will forever remain; die


                    // Queue nonempty; look at first evt and do the right thing
                    long currentTime, executionTime;
                    task = queue.getMin(); //获取任务
                    synchronized(task.lock) {
                        if (task.state == TimerTask.CANCELLED) { //取消泽移除并继续循环
                            queue.removeMin();
                            continue;  // No action required, poll queue again
                        }
                        currentTime = System.currentTimeMillis();
                        executionTime = task.nextExecutionTime;
                        if (taskFired = (executionTime<=currentTime)) { //执行时间到了
                            if (task.period == 0) { // 不是周期任务
                                queue.removeMin(); //移除任务
                                task.state = TimerTask.EXECUTED;//变更任务状态为已执行
                            } else { // 周期任务,更新时间为下次执行时间
                                queue.rescheduleMin(
                                  task.period<0 ? currentTime   - task.period
                                                : executionTime + task.period);
                            }
                        }
                    }
                    if (!taskFired) // 还未到达执行时间等待
                        queue.wait(executionTime - currentTime);
                }
                if (taskFired)  // 执行任务,无异常捕获
                    task.run();
            } catch(InterruptedException e) {
            }
        }
    }
小结:
可以看出Timer实际就是根据任务的执行时间维护了一个优先队列,并且起了一个线程不断地拉取任务执行,根据代码可以看到有三个问题:
优先队列的插入和删除的时间复杂度是O(logn),当任务量大的时候,频繁的入堆出堆性能有待考虑
单线程执行,如果一个任务执行的时间过久则会影响下一个任务的执行时间(当然你任务的run要是异步执行也行)
从代码中可以看到对异常没有做什么处理,那么一个任务出错的时候会导致之后的任务都无法执行
▐ ScheduledThreadPoolExecutor
在看Timer源码时,看到了以下一段注释:
/**
 * .......
 * <p>Java 5.0 introduced the {@code java.util.concurrent} package and
 * one of the concurrency utilities therein is the {@link
 * java.util.concurrent.ScheduledThreadPoolExecutor
 * ScheduledThreadPoolExecutor} which is a thread pool for repeatedly
 * executing tasks at a given rate or delay.  It is effectively a more
 * versatile replacement for the {@code Timer}/{@code TimerTask}
 * combination, as it allows multiple service threads, accepts various
 * time units, and doesn't require subclassing {@code TimerTask} (just
 * implement {@code Runnable}).  Configuring {@code
 * ScheduledThreadPoolExecutor} with one thread makes it equivalent to
 * {@code Timer}.
 * ......
 */
public class Timer {
  //。。。。
}
简单翻译下:ScheduledThreadPoolExecutor是一个具有更多功能的Timer的替代品,允许多个服务线程,如果设置一个服务线程和Timer没啥差别。其实从这段注释中已经能看出ScheduledThreadPoolExecutor的定位,通过注释看出相对于Timer,可能就是单线程跑任务和多线程跑任务的区别,我们从代码详细看下。
public class ScheduledThreadPoolExecutor
        extends ThreadPoolExecutor
        implements ScheduledExecutorService {
  // ...
  public ScheduledThreadPoolExecutor(int corePoolSize) {
        super(corePoolSize, Integer.MAX_VALUE, 0, NANOSECONDS,
              new DelayedWorkQueue());
    }
private class ScheduledFutureTask<V>
            extends FutureTask<V> implements RunnableScheduledFuture<V> {
//...
}
}
从核心属性和构造器看,它继承了 ThreadPoolExecutor,实现了 ScheduledExecutorService,基本确认是基于线程池实现了延迟任务操作,我们知道线程池流程中有两个重要角色:任务,阻塞队列,ScheduledThreadPoolExecutor实现方案也是将这两者进行了重新设计:一个是 ScheduledFutureTask ,一个是 DelayedWorkQueue。
private class ScheduledFutureTask<V>
            extends FutureTask<V> implements RunnableScheduledFuture<V> {
//...
   public void run() {
            boolean periodic = isPeriodic();
            if (!canRunInCurrentRunState(periodic))
                cancel(false);
            else if (!periodic)
                ScheduledFutureTask.super.run(); //如果不是周期任务,直接run
            else if (ScheduledFutureTask.super.runAndReset()) {//周期性任务,执行并重置任务状态为NEW
                setNextRunTime();//先设置下次任务执行时间
                reExecutePeriodic(outerTask); //任务重新入队列
            }
        }
//...
}
ScheduledFutureTask 继承自 FutureTask 重写了 run 方法,实现了周期性任务的场景。
static class DelayedWorkQueue extends AbstractQueue<Runnable>
        implements BlockingQueue<Runnable> {


 public RunnableScheduledFuture<?> take() throws InterruptedException {
            final ReentrantLock lock = this.lock;
            lock.lockInterruptibly();
            try {
                for (;;) {
                    RunnableScheduledFuture<?> first = queue[0];
                    if (first == null)
                        available.await(); //如果队列中没有任务,等待
                    else {
                        long delay = first.getDelay(NANOSECONDS);
                        if (delay <= 0)//有任务并且到执行时间了
                            return finishPoll(first);
                        first = null; // don't retain ref while waiting
                        if (leader != null)
                            available.await();
                        else {
                            Thread thisThread = Thread.currentThread();
                            leader = thisThread;
                            try {
                                available.awaitNanos(delay);//有任务,没有到执行时间
                            } finally {
                                if (leader == thisThread)
                                    leader = null;
                            }
                        }
                    }
                }
            } finally {
                if (leader == null && queue[0] != null)
                    available.signal();
                lock.unlock();
            }
        }


}
DelayedWorkQueue继承阻塞队列,实现了优先队列逻辑,本质也是利用数组实现的小顶堆,同时重写了take等方法,做了延迟阻塞处理。
现在我们来看下ScheduledThreadPoolExecutor提交一个任务后,整体的执行过程:
提交一个任务后,为了满足ScheduledThreadPoolExecutor能够延时执行任务和能周期执行任务的特性,会先将实现Runnable接口的类转换成ScheduledFutureTask。
然后会调用delayedExecute方法进行执行任务:先将任务放入到队列中,然后调用ensurePrestart方法,新建Worker类(此逻辑为线程池ThreadPoolExecutor实现)
当执行任务时,就会调用被Worker所重写的run方法,进而会继续执行runWorker方法。在runWorker方法中会调用getTask方法从阻塞队列中不断的去获取任务进行执行,直到从阻塞队列中获取的任务为null的话,线程结束终止。(此处逻辑都是线程池ThreadPoolExecutor的实现)
getTask方法会调用队列的poll和take方法,此处就调用到DelayedWorkQueue重写的poll和take逻辑,实现了延迟任务的阻塞
执行任务时,将调用ScheduledFutureTask重载的run方法,实现周期性任务的场景
小结:
ScheduledThreadPoolExecutor继承了ThreadPoolExecutor,通过重写任务、阻塞队列实现了延迟任务调度的实现
ScheduledThreadPoolExecutor大致的流程和Timer差不多,都是通过一个阻塞队列维护任务,能实现单次任务、周期性任务的执行,主要差别在于能多线程运行任务,不会单线程阻塞,并且Java线程池的底层runworker实现了异常的捕获,不会因为一个任务的出错而影响之后的任
在任务队列的维护上,与Timer一样,也是优先队列,插入和删除的时间复杂度是O(logn)
▐ DelayQueue
我们还可以通过DelayQueue配合线程池的方式实现延迟任务,看了下DelayQueue的源码,实现比较简单,实现逻辑和ScheduledThreadPoolExecutor中DelayedWorkQueue基本差不多,内部使用优先队列,队列元素为Delayed,Delayed接口继承了Comparable,优先队列通过Comparable进行排序。
//元素必须实现Delayed接口,也实现了阻塞队列public class DelayQueue<E extends Delayed> extends AbstractQueue<E>
    implements BlockingQueue<E> {


    private final transient ReentrantLock lock = new ReentrantLock();
    private final PriorityQueue<E> q = new PriorityQueue<E>();//优先队列,

   public E take() throws InterruptedException {
        final ReentrantLock lock = this.lock;
        lock.lockInterruptibly();
        try {
            for (;;) {
                E first = q.peek();
                if (first == null)
                    available.await();
                else {
                    long delay = first.getDelay(NANOSECONDS);
                    if (delay <= 0) //小于等于0,时间到了
                        return q.poll();
                    first = null; // don't retain ref while waiting
                    if (leader != null)
                        available.await();//没有抢到leader的线程进入等待,避免大量唤醒操作
                    else {
                        Thread thisThread = Thread.currentThread();
                        leader = thisThread;
                        try {
                            available.awaitNanos(delay);//leader线程,在等待一定时间后再次尝试获取
                        } finally {
                            if (leader == thisThread)//重置leader
                                leader = null;
                        }
                    }
                }
            }
        } finally {
            if (leader == null && q.peek() != null)
                available.signal();
            lock.unlock();
        }
    }
    //...
}
//继承了Comparable
public interface Delayed extends Comparable<Delayed> {


    long getDelay(TimeUnit unit);
}
小结:
延迟队列就是个容器,需要调用方获取任务和执行任务。整体实现比较简单,利用优先队列实现的,元素通过实现 Delayed 接口来返回延迟的时间。
▐ 总结
三者实现思想基本类似,都围绕三个要素:任务、任务的组织者(队列),执行者调度执行者。
Timer、ScheduledThreadPoolExecutor 完整的实现了这三个要素,DelayQueue只实现了任务组织者这个要素,需要与线程配合使用。其中任务组织者这个要素,它们都是通过优先队列来实现,因此插入和删除任务的时间复杂度都为O(logn),并且 Timer 、ScheduledThreadPool 的周期性任务是通过重置任务的下一次执行时间来完成的。
个人觉得在时间复杂度上存在较大的性能风险,插入删除时间复杂度是O(logn),如果面对大数量级的任务频繁的插入、删除,这种实现方式性能问题会比较严重。
时间轮算法


前面学习中基本可以总结出延迟任务有这几种调度:
约定一段时间后执行
约定某个时间点执行
周期性执行。
1、2,这两者之间可以相互转换,比如给你个任务,要求12点钟执行,你看了一眼时间,发现现在是9点钟,那么你可以认为这个任务过三个小时执行。同样的,给你个任务让你3个小时后执行,你看了一眼现在是9点钟,那么你当然可以认为这个任务12点钟执行。
对于3,需重复执行的任务,其实我们需要关心的只是下次执行时间,并不关心这个任务需要循环多少次,比如每天上午9点执行生成报表的任务,在当天9点任务执行时发现是周期性任务,只需要将该任务下次执行时间设置成明天9点即可,以此重复,直至到了结束时间,将任务移除。我们可以将这些场景抽象用时间轮管理,时间轮就是和钟表很相似的存在!

时间轮用环形数组实现,数组的每个元素可以称为槽,槽的内部用双向链表存着待执行的任务,添加和删除的链表操作时间复杂度都是 O(1),槽位本身也指代时间精度,比如一秒扫一个槽,那么这个时间轮的最高精度就是 1 秒。也就是说延迟 1.2 秒的任务和 1.5 秒的任务会被加入到同一个槽中,然后在 1 秒的时候遍历这个槽中的链表执行任务。
案例如图,从图中可以看到此时指针指向的是第2个槽(下标1),一共有八个槽0~7,假设槽的时间单位为 1 秒,现在要加入一个延时 4 秒的任务,计算方式就是 4 % 8 + 2 = 6,即放在槽位为 6,下标为 5 的那个槽中,就是拼到槽的双向链表的尾部。然后每秒指针顺时针移动一格,这样就扫到了下一格,遍历这格中的双向链表执行任务。然后再循环继续。可以看到插入任务从计算槽位到插入链表,时间复杂度都是O(1)。
那假设现在要加入一个50秒后执行的任务怎么办?这槽好像不够啊?难道要加槽嘛?和HashMap一样扩容?
常见有两种方式:
一种是通过增加轮次的概念,先计算槽位:50 % 8 + 2 = 4,即应该放在槽位是 4,下标是 3 的位置。然后计算轮次:(50 - 1) / 8 = 6,即轮数记为 6。也就是说当循环 6 轮之后扫到下标的 3 的这个槽位会触发这个任务。Netty 中的 HashedWheelTimer 使用的就是这种方式。
还有一种是通过多层次的时间轮,这个和我们的手表就更像了,像我们秒针走一圈,分针走一格,分针走一圈,时针走一格,多层次时间轮就是这样实现的。假设上图就是第一层,那么第一层走了一圈,第二层就走一格,可以得知第二层的一格就是8秒,假设第二层也是 8 个槽,那么第二层走一圈,第三层走一格,可以得知第三层一格就是 64 秒。那么一个三层,每层8个槽,一共24个槽时间轮就可以处理最多延迟 512 秒的任务。

而多层次时间轮还会有降级的操作,假设一个任务延迟500秒执行,那么刚开始加进来肯定是放在第三层的,当时间过了 436 秒后,此时还需要 64 秒就会触发任务的执行,而此时相对而言它就是个延迟64秒后的任务,因此它会被降低放在第二层中,第一层还放不下它。再过个 56 秒,相对而言它就是个延迟8秒后执行的任务,因此它会再被降级放在第一层中,等待执行。
降级是为了保证时间精度一致性,Kafka内部用的就是多层次的时间轮算法。
时间轮算法应用案例
很有需要延迟操作的应用场景中都有时间轮的身影,比如Netty、Kafka、Akka、Zookeeper等组件,我们挑选上面聊到的时间轮的两种实现方式的典型代表学习一下,轮次时间轮算法实现-Netty,多层次时间轮算法实现-Kafka。
▐ 轮次时间轮算法-Netty案例
在 Netty 中时间轮的实现类是 HashedWheelTimer,代码中的wheel就是时间轮循环数组,mask就是取余找槽位的逻辑,不过这里的设计通过限制槽位数组的大小为2的次方,然后利用位运算来替代取模运算,提高性能。
tickDuration就是每格的时间精度,可以看到配备了一个工作线程来处理任务的执行。以及双向链路的槽HashedWheelBucket。
public class HashedWheelTimer implements Timer {
//...
 public HashedWheelTimer(ThreadFactory threadFactory, long tickDuration, TimeUnit unit) {
        this(threadFactory, tickDuration, unit, 512);
    }
 public HashedWheelTimer(ThreadFactory threadFactory, long tickDuration, TimeUnit unit, int ticksPerWheel, boolean leakDetection, long maxPendingTimeouts) {
        this.worker = new HashedWheelTimer.Worker();
        this.workerState = 0;
        this.startTimeInitialized = new CountDownLatch(1);
        this.timeouts = PlatformDependent.newMpscQueue();
        this.cancelledTimeouts = PlatformDependent.newMpscQueue();
        this.pendingTimeouts = new AtomicLong(0L);
        if (threadFactory == null) {
            throw new NullPointerException("threadFactory");
        } else if (unit == null) {
            throw new NullPointerException("unit");
        } else if (tickDuration <= 0L) {
            throw new IllegalArgumentException("tickDuration must be greater than 0: " + tickDuration);
        } else if (ticksPerWheel <= 0) {
            throw new IllegalArgumentException("ticksPerWheel must be greater than 0: " + ticksPerWheel);
        } else {
            this.wheel = createWheel(ticksPerWheel);//默认512的槽数量
            this.mask = this.wheel.length - 1;//mask设计提高了“确定槽位下标”的性能,通过限制wheel.length为2的N次方,
            this.tickDuration = unit.toNanos(tickDuration);//时间精度,即每个槽位的时间跨度
            if (this.tickDuration >= 9223372036854775807L / (long)this.wheel.length) {
                throw new IllegalArgumentException(String.format("tickDuration: %d (expected: 0 < tickDuration in nanos < %d", tickDuration, 9223372036854775807L / (long)this.wheel.length));
            } else {
                this.workerThread = threadFactory.newThread(this.worker);//工作线程
                this.leak = !leakDetection && this.workerThread.isDaemon() ? null : leakDetector.track(this);
                this.maxPendingTimeouts = maxPendingTimeouts;
                if (INSTANCE_COUNTER.incrementAndGet() > 64 && WARNED_TOO_MANY_INSTANCES.compareAndSet(false, true)) {
                    reportTooManyInstances();
                }
            }
        }
    }
//...


//双向链表的bucket
private static final class HashedWheelBucket {
        private HashedWheelTimer.HashedWheelTimeout head;
        private HashedWheelTimer.HashedWheelTimeout tail;
//...
}
//链表元素,任务
private static final class HashedWheelTimeout implements Timeout {
  HashedWheelTimer.HashedWheelTimeout next;
        HashedWheelTimer.HashedWheelTimeout prev;
        HashedWheelTimer.HashedWheelBucket bucket;
//...
}
}
我们从任务的添加作为切入点,看下整体的逻辑。
  public Timeout newTimeout(TimerTask task, long delay, TimeUnit unit) {
        if (task == null) {
            throw new NullPointerException("task");
        } else if (unit == null) {
            throw new NullPointerException("unit");
        } else {
            long pendingTimeoutsCount = this.pendingTimeouts.incrementAndGet();
            if (this.maxPendingTimeouts > 0L && pendingTimeoutsCount > this.maxPendingTimeouts) {
                this.pendingTimeouts.decrementAndGet();
                throw new RejectedExecutionException("Number of pending timeouts (" + pendingTimeoutsCount + ") is greater than or equal to maximum allowed pending timeouts (" + this.maxPendingTimeouts + ")");
            } else {
                this.start();//启动工作线程,内部有判断状态
                long deadline = System.nanoTime() + unit.toNanos(delay) - this.startTime;//计算延迟时间
                HashedWheelTimer.HashedWheelTimeout timeout = new HashedWheelTimer.HashedWheelTimeout(this, task, deadline);//创建任务对象
                this.timeouts.add(timeout);//添加到队列中,这边标记问题,没看到添加到时间轮中?
                return timeout;
            }
        }
    }
我们可以看到,整体逻辑比较清晰:启动工作线程-》创建任务对象-》放入到队列中。此处有个疑问,任务没有直接添加到时间轮中,而是被添加到队列中?唯一的线索是启动了工作线程,我们看一下工作线程的逻辑。
private final class Worker implements Runnable {//工作线程
//...
        public void run() {
            HashedWheelTimer.this.startTime = System.nanoTime();//启动时间
            if (HashedWheelTimer.this.startTime == 0L) {
                HashedWheelTimer.this.startTime = 1L;
            }
            HashedWheelTimer.this.startTimeInitialized.countDown();


            int idx;
            HashedWheelTimer.HashedWheelBucket bucket;
            do {
                long deadline = this.waitForNextTick();//等待执行任务时间到来
                if (deadline > 0L) {
                    idx = (int)(this.tick & (long)HashedWheelTimer.this.mask);//或者槽位下标
                    this.processCancelledTasks();//先处理取消了的任务
                    bucket = HashedWheelTimer.this.wheel[idx];//获取对应的槽
                    this.transferTimeoutsToBuckets();//将添加到任务队列中的任务添加到时间轮中的槽中
                    bucket.expireTimeouts(deadline);//处理时间到了的任务
                    ++this.tick;//移动槽位
                }
            } while(HashedWheelTimer.WORKER_STATE_UPDATER.get(HashedWheelTimer.this) == 1);
        //...
        }
通过代码查阅,整体逻辑简单清晰:等待时间-》处理取消的任务-》队列中的任务入槽-》处理执行的任务。
主要看下这三个问题:
等待时间是如何计算的,这个跟时间精度相关
队列中的任务如何入槽的(对应上面的疑问)
任务如何执行的
等待时间是如何计算的?worker.waitForNextTick
private long waitForNextTick() {
            long deadline = HashedWheelTimer.this.tickDuration * (this.tick + 1L);//根据时间精度,算出需要下一次的检查时间
            while(true) {
                long currentTime = System.nanoTime() - HashedWheelTimer.this.startTime;
                long sleepTimeMs = (deadline - currentTime + 999999L) / 1000000L;
                if (sleepTimeMs <= 0L) {//不用睡了,时间已经到了,直接执行
                    if (currentTime == -9223372036854775808L) {//溢出了兜底?
                        return -9223372036854775807L;
                    }


                    return currentTime;
                }
                if (PlatformDependent.isWindows()) {//windows下的bug,sleep的时间需是10的整数倍
                    sleepTimeMs = sleepTimeMs / 10L * 10L;
                }
                try {
                    Thread.sleep(sleepTimeMs);//等待时间的到来
                } catch (InterruptedException var8) {
                    if (HashedWheelTimer.WORKER_STATE_UPDATER.get(HashedWheelTimer.this) == 2) {
                        return -9223372036854775808L;
                    }
                }
            }
        }
就是通过tickDuration和此时已经移动的tick算出下一次需要检查的时间,如果时间未到就sleep。
队列中的任务如何入槽的?worker.transferTimeoutsToBuckets
 private void transferTimeoutsToBuckets() {
            for(int i = 0; i < 100000; ++i) {//设置了一次性处理10w个任务入槽,可能考虑这块处理太多会影响后续任务的处理?
                HashedWheelTimer.HashedWheelTimeout timeout = (HashedWheelTimer.HashedWheelTimeout)HashedWheelTimer.this.timeouts.poll();//从队列中拿出任务
                if (timeout == null) {
                    break;
                }
                if (timeout.state() != 1) {
                    long calculated = timeout.deadline / HashedWheelTimer.this.tickDuration;
                    timeout.remainingRounds = (calculated - this.tick) / (long)HashedWheelTimer.this.wheel.length;//计算轮数
                    long ticks = Math.max(calculated, this.tick);//如果时间已经过了,放到当前即将执行的槽位中
                    int stopIndex = (int)(ticks & (long)HashedWheelTimer.this.mask);//计算槽位下标
                    HashedWheelTimer.HashedWheelBucket bucket = HashedWheelTimer.this.wheel[stopIndex];
                    bucket.addTimeout(timeout);//入槽
                }
            }
        }
任务如何执行的?hashedWheelBucket.expireTimeouts
  public void expireTimeouts(long deadline) {
            HashedWheelTimer.HashedWheelTimeout next;
            for(HashedWheelTimer.HashedWheelTimeout timeout = this.head; timeout != null; timeout = next) {
//循环链表
                next = timeout.next;
                if (timeout.remainingRounds <= 0L) {//处理轮数为0的任务
                    next = this.remove(timeout);
                    if (timeout.deadline > deadline) {
                        throw new IllegalStateException(String.format("timeout.deadline (%d) > deadline (%d)", timeout.deadline, deadline));
                    }
                    timeout.expire();//过期任务,就是执行任务的run防范
                } else if (timeout.isCancelled()) {
                    next = this.remove(timeout);//任务取消了
                } else {
                    --timeout.remainingRounds;//轮数减一
                }
            }
        }
就是通过轮数和时间双重判断,执行任务。
小结:
Netty中时间轮算法是基于轮次的时间轮算法实现,通过启动一个工作线程,根据时间精度TickDuration,移动指针找到槽位,根据轮次+时间来判断是否是需要处理的任务。
不足之处:
时间轮的推进是根据时间精度TickDuration来固定推进的,如果槽位中无任务,也需要移动指针,会造成无效的时间轮推进,比如TickDuration为1秒,此时就一个延迟500秒的任务,那就是有499次无用的推进。
任务的执行都是同一个工作线程处理的,并且工作线程的除了处理执行到时的任务还做了其他操作,因此任务不一定会被精准的执行,而且任务的执行如果不是新起一个线程执行,那么耗时的任务会阻塞下个任务的执行。
优势就是时间精度可控,并且增删任务的时间复杂度都是O(1)
▐ 多层次时间轮算法-Kafka案例
去kafka官网下载源码(http://kafka.apache.org/downloads ),在kafka.utils.timer中找到基于scala实现的时间轮。
主要有Timer接口--SystemTimer实现了该接口,是核心的调度逻辑;TimingWheel--时间轮数据结构的实现;TimerTaskList--槽位中的链表;TimerTaskEntry--链表元素,TimerTask的包装类,在TimerTaskList中定义;TimerTask--继承了Runnable,实际的任务执行线程。


老规矩,我们从添加任务、任务调度(工作线程)两个切入点看一下整体逻辑,添加任务逻辑在TimingWheel中,工作线程在SystemTimer中。
TimingWheel--时间轮数据结构的核心实现
@nonthreadsafe
private[timer] class TimingWheel(tickMs: Long, wheelSize: Int, startMs: Long, taskCounter: AtomicInteger, queue: DelayQueue[TimerTaskList]) {
//queue是一个TimerTaskList的延迟队列,每个槽的TimerTaskList都被加到这个延迟队列中,expireTime最小的槽会排在队列的最前面,此处要注意,这是kafka实现的一个特殊地方
  private[this] val interval = tickMs * wheelSize //该层级时间轮的时间跨度
  private[this] val buckets = Array.tabulate[TimerTaskList](wheelSize) { _ => new TimerTaskList(taskCounter) }


  private[this] var currentTime = startMs - (startMs % tickMs) //起始时间(startMs)都设置为创建此层时间轮时前面一轮的currentTime,每一层的currentTime都必须是tickMs的整数倍
  @volatile private[this] var overflowWheel: TimingWheel = null


  //当时间溢出时,需要新增上一级时间轮,通过overflowWheel引用上一级侧时间轮
  private[this] def addOverflowWheel(): Unit = {
    synchronized {
      if (overflowWheel == null) {
        overflowWheel = new TimingWheel(
          tickMs = interval,
          wheelSize = wheelSize,
          startMs = currentTime,
          taskCounter = taskCounter,
          queue
        )
      }
    }
  }


//添加任务
  def add(timerTaskEntry: TimerTaskEntry): Boolean = {
    val expiration = timerTaskEntry.expirationMs//获取任务延迟时间
    if (timerTaskEntry.cancelled) {
      false//取消
    } else if (expiration < currentTime + tickMs) {
      false      // 过期
    } else if (expiration < currentTime + interval) {
      //判断当前时间轮所能表示的时间范围是否可以容纳该任务
      //计算槽位
      val virtualId = expiration / tickMs
      val bucket = buckets((virtualId % wheelSize.toLong).toInt)
      bucket.add(timerTaskEntry)//将任务添加到槽位链表中
      if (bucket.setExpiration(virtualId * tickMs)) {//设置expiretime
        //将槽位的TimerTaskList添加到延迟队列中
        queue.offer(bucket)
      }
      true
    } else {
      //到此处,说明时间溢出了,应该讲任务丢给父时间轮处理
      if (overflowWheel == null) addOverflowWheel()//判断上一级时间轮是否存在,不存在创建
      overflowWheel.add(timerTaskEntry)//调用上一级时间轮的添加任务方法,递归处理,直至添加成功
    }
  }


  //时间轮的推进
  def advanceClock(timeMs: Long): Unit = {
    if (timeMs >= currentTime + tickMs) {
      currentTime = timeMs - (timeMs % tickMs)
      //调整当前时间
      if (overflowWheel != null) overflowWheel.advanceClock(currentTime)//递归推进上级时间轮
    }
  }
这是kafka对于时间轮最核心的实现部分,包含时间轮的数据结构、添加任务、时间溢出(添加上一级时间轮)、时间轮推进四个核心部分。大的逻辑是添加任务-》是否时间溢出?-》溢出时添加上一级时间轮,并调用上一级时间轮的添加任务方法 -》未溢出,直接添加到槽位 -》递归处理。所以时间轮的数据结构、时间溢出都通过添加任务的逻辑串联了起来。而时间轮推进方法主要由工作线程SystemTimer调用。
SystemTimer--核心的调度逻辑
trait Timer {
  def add(timerTask: TimerTask): Unit
  def advanceClock(timeoutMs: Long): Boolean
  def size: Int
  def shutdown(): Unit
}


@threadsafe
class SystemTimer(executorName: String,
                  tickMs: Long = 1,
                  wheelSize: Int = 20,
                  startMs: Long = Time.SYSTEM.hiResClockMs) extends Timer {


  // timeout timer
  private[this] val taskExecutor = Executors.newFixedThreadPool(1,
    (runnable: Runnable) => KafkaThread.nonDaemon("executor-" + executorName, runnable))
  private[this] val delayQueue = new DelayQueue[TimerTaskList]()//延迟队列,会传递到每个层级的时间轮中
  private[this] val taskCounter = new AtomicInteger(0)
  private[this] val timingWheel = new TimingWheel(
    tickMs = tickMs,
    wheelSize = wheelSize,
    startMs = startMs,
    taskCounter = taskCounter,
    delayQueue
  )
//...
//时间轮的推进
  def advanceClock(timeoutMs: Long): Boolean = {
    var bucket = delayQueue.poll(timeoutMs, TimeUnit.MILLISECONDS)//从延迟队列获取槽
    if (bucket != null) {
      writeLock.lock()
      try {
        while (bucket != null) {
          timingWheel.advanceClock(bucket.getExpiration())//时间轮的推进,具体看上面timingwheel中的advanceClock方法
          bucket.flush(reinsert)//把槽中所有任务都取出来,并重新add一遍,此时因为任务到期,并不会真正add进去,而是调用线程池运行任务,具体看下面的reinsert和TimingWheel.add方法
          bucket = delayQueue.poll()//获取下一个槽
        }
      } finally {
        writeLock.unlock()
      }
      true
    } else {
      false
    }
  }
private[this] val reinsert = (timerTaskEntry: TimerTaskEntry) => addTimerTaskEntry(timerTaskEntry)
private def addTimerTaskEntry(timerTaskEntry: TimerTaskEntry): Unit = {
    if (!timingWheel.add(timerTaskEntry)) {
//如果到执行时间或者取消会走到这
      if (!timerTaskEntry.cancelled)//到执行时间,执行任务
        taskExecutor.submit(timerTaskEntry.timerTask)
    }
  }
//....
}
kafka会启动一个线程去推动时间轮的转动,实现原理就是通过queue.poll()取出放在最前面的槽的TimerTaskList,在时间轮添加任务时,所有有任务元素的TimerTaskList都会被添加到queue中。由于queue是一个延迟队列,如果队列中的expireTime没有到达,该操作会阻塞,等待expireTime时间到达。如果poll取到了TimerTaskList,说明该槽里面的任务时间到达,会先推进时间轮的转动变更为当前时间,同时将到期的槽的所有任务都取出来,并通过TimingWheel重新add一遍,此时因为任务到期,并不会真正add进去,而是调用线程池运行任务,具体看下面的SystemTimer.reinsert和TimingWheel.add方法。
在前面分析DelayQueue时,DelayQueue明显不适合Kafka这种高性能要求的定时任务,为何这里还要引入DelayQueue呢?注意对于定时任务项TimerTaskEntry插入和删除操作而言,TimingWheel时间复杂度为O(1),性能高出DelayQueue很多,如果直接将TimerTaskEntry插入DelayQueue中,那么性能显然难以支撑,就算我们根据一定的规则将若干TimerTaskEntry划分到TimerTaskList这个组中,然后再将TimerTaskList插入到DelayQueue中,试想下如果这个TimerTaskList中又要多添加一个TimerTaskEntry该如何处理?对于DelayQueue而言,这类操作显然变得力不从心。
我们分析Netty中时间轮的推进,主要是通过固定的时间间隔扫描槽位,有可能槽位上没有任务,所以会有空推进的情况。Kafka用DelayQueue保存每个槽,通过每个槽的过期时间排序,这样拥有最早需要执行任务的槽会被优先获取。如果时候未到,那么delayQueue.poll就会阻塞着,这样就不会有空推进的情况发生,同时呢,任务组织结构仍由时间轮组织,也兼顾了任务插入、删除操作的高性能。
小结:
Kafka中时间轮算法是基于多层次的时间轮算法实现,并且是按需创建时间轮,采用任务的绝对时间来判断延期,空间换时间的思想,用DelayQueue存放每个槽,并以每个槽的过期时间排序,通过delayQueue.poll阻塞式进行时间轮的推进,杜绝了空推进的问题。
▐ 总结
Timer、DelayQueue 和 ScheduledThreadPool,它们都是基于优先队列实现的,O(logn) 的时间复杂度在任务数多的情况下频繁的插入、删除操作有性能问题,因此适合于任务数不多的情况。
Timer是单线程的会有任务阻塞的风险,并且对异常没有做处理,一个任务出错Timer就挂了。
ScheduledThreadPool相比于Timer引入了线程池,并且线程池对异常做了处理,使得任务之间不会有影响。
Timer和ScheduledThreadPool可以周期性执行任务,DelayQueue就是个具有优先级的阻塞队列,需要配合外部的工作线程使用。
时间轮的实现类似钟表的运作方式,它的任务插入和删除时间复杂度都为O(1),相对而言时间轮更适合任务数很大的延时场景。
对于延迟超过时间轮所能表示的范围有两种处理方式,一是通过增加一个字段-轮数(Netty),二是多层次时间轮(Kakfa)。
相比而言Netty的实现会有空推进的问题,而Kafka采用DelayQueue来保存有任务数据的槽,利用空间换时间的思想解决了空推进的问题。
PS:对时间轮算法有了初步的学习、理解,后面继续学习实现“基于时间轮算法的分布式任务调度系统”!
淘系技术天猫奢品团队
我们是一群服务天猫奢侈品,奢品折扣,品牌客户,淘宝心选,淘宝虾选等大店数据化经营解决方案的技术团队,依托阿里大中台推动品牌经营解决方案升级,不断提升客户经营的效率,持续提升技术方案赋能业务提升价值。
如果你感兴趣我们的业务或者转岗可以发送简历至 pingyong.py@alibaba-inc.com 24小时在线服务。(点击文末“阅读原文”了解详情)
✿ 拓展阅读


作者|平勇(润辰)
编辑|橙子君
出品|阿里巴巴新零售淘系技术


 2万+
2万+

 被折叠的 条评论
为什么被折叠?
被折叠的 条评论
为什么被折叠?
 到【灌水乐园】发言


