


目录
配置
创建逻辑卷并格式化
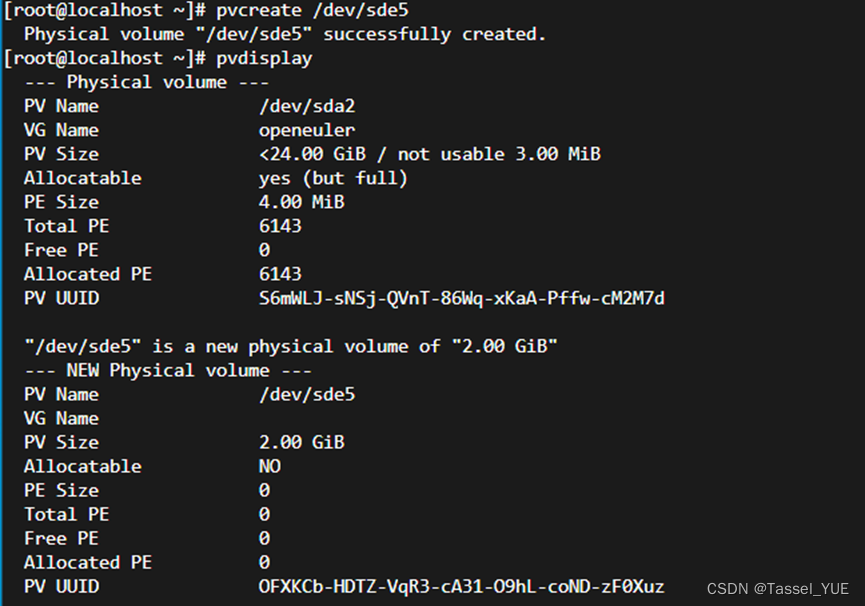
步骤 1 执行如下命令创建逻辑卷。
[root@openEuler ~]# pvcreate /dev/sde5
Physical volume “/dev/sde5” successfully created.
[root@openEuler ~]# pvdisplay
"/dev/sde5" is a new physical volume of "2.00 GiB"
  --- NEW Physical volume ---
  PV Name               	/dev/sde5
  VG Name
  PV Size               	2.00 GiB
  Allocatable           	NO
  PE Size               	0
  Total PE              	0
  Free PE               	0
  Allocated PE          	0
  PV UUID               wSgzbu-oFkH-rxL7-tt7e-QQA4-RZsX-rC2BSb
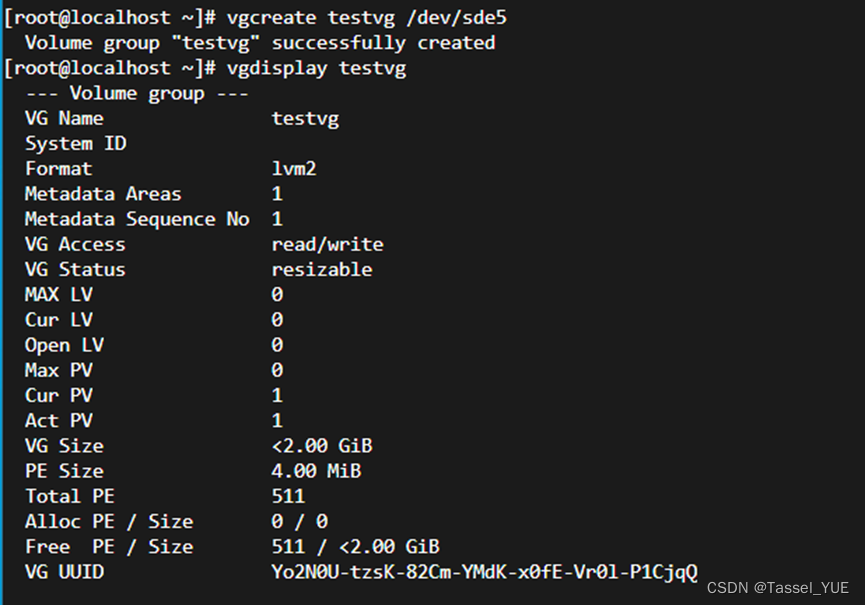
[root@openEuler ~]# vgcreate testvg /dev/sde5
  Volume group "testvg" successfully created
[root@openEuler ~]# vgdisplay testvg
  --- Volume group ---
  VG Name             	testvg
  System ID
  Format                	lvm2
  Metadata Areas        	1
  Metadata Sequence No  1
  VG Access             	read/write
  VG Status             	resizable
  MAX LV                	0
  Cur LV                	0
  Open LV               	0
  Max PV                	0
  Cur PV                	1
  Act PV                	1
  VG Size               	<2.00 GiB
  PE Size               	4.00 MiB
  Total PE              	767
  Alloc PE / Size       	0 / 0
  Free  PE / Size       	767 / <3.00 GiB
  VG UUID               	O63DUX-eojV-iUfw-75ib-yeZP-N0xx-JXyOeY
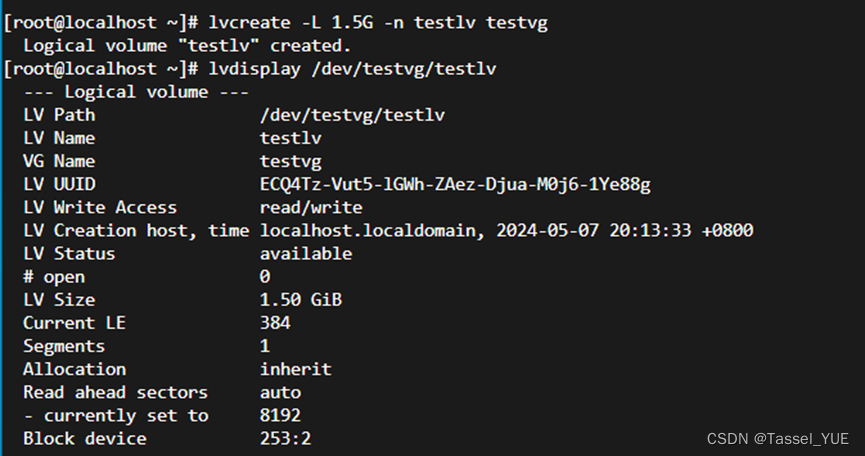
[root@openEuler ~]# lvcreate -L 1.5G -n testlv testvg
  Logical volume "testlv" created.
[root@openEuler ~]# lvdisplay /dev/testvg/testlv
  --- Logical volume ---
  LV Path                	/dev/testvg/testlv
  LV Name              	testlv
  VG Name              	testvg
  LV UUID                wfSItH-O3cf-9pxa-emMW-BSwI-ZfWQ-uS6vYL
  LV Write Access        	read/write
  LV Creation host, time openEuler, 2020-07-02 09:24:41 +0800
  LV Status              	available
  # open                 	0
  LV Size                	1.50 GiB
  Current LE             	384
  Segments               1
  Allocation             	inherit
  Read ahead sectors     	auto
  - currently set to     	8192
  Block device           	253:2
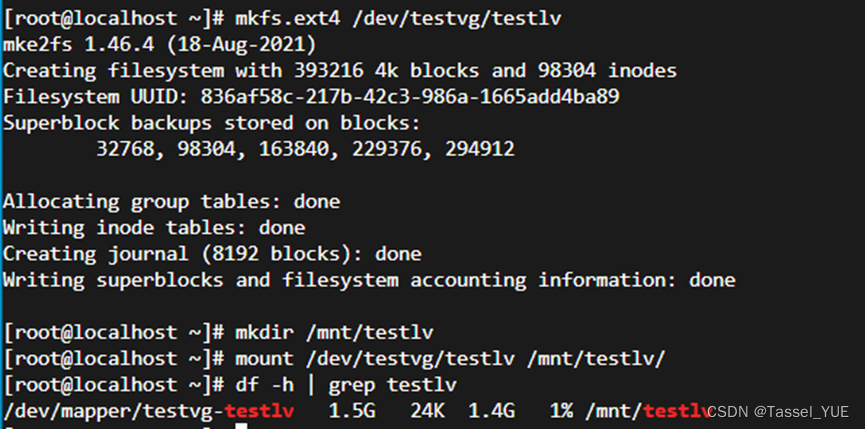
步骤 2 执行如下命令格式化LV并挂载。
[
root@openEuler ~]# mkfs.ext4 /dev/testvg/testlv
mke2fs 1.45.3 (14-Jul-2019)
Creating filesystem with 524288 4k blocks and 131072 inodes
Filesystem UUID: 59f52483-742c-41bd-b83b-3edb9c315611
Superblock backups stored on blocks:
        32768, 98304, 163840, 229376, 294912

Allocating group tables: done
Writing inode tables: done
Creating journal (16384 blocks): done
Writing superblocks and filesystem accounting information: done
[root@openEuler ~]# mkdir /mnt/testlv
[root@openEuler ~]# mount /dev/testvg/testlv /mnt/testlv/
[root@openEuler ~]# df -h | grep testvg
/dev/mapper/testvg-testlv   1.5G   24K  1.4G   1% /mnt/testlv
逻辑卷扩容与缩容
步骤 1 执行如下命令扩展逻辑卷与文件系统。
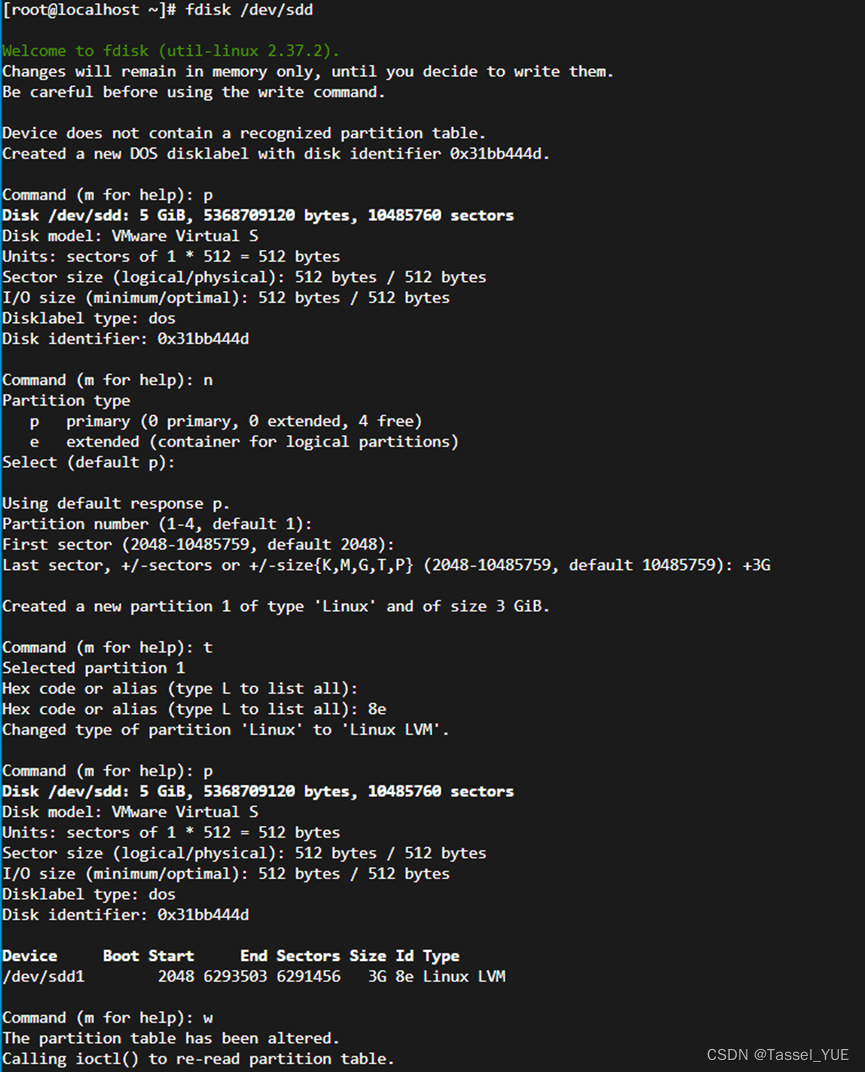
[root@openEuler ~]# fdisk /dev/sdd        #新建一个大小同样为3G的LVM分区

Welcome to fdisk (util-linux 2.34).
Changes will remain in memory only, until you decide to write them.
Be careful before using the write command.

Device does not contain a recognized partition table.
Created a new DOS disklabel with disk identifier 0xc5aa0a0a.

Command (m for help): n
Partition type
   p   primary (0 primary, 0 extended, 4 free)
   e   extended (container for logical partitions)
Select (default p):

Using default response p.
Partition number (1-4, default 1):
First sector (2048-20971519, default 2048):
Last sector, +/-sectors or +/-size{K,M,G,T,P} (2048-20971519, default 20971519): +3G

Created a new partition 1 of type 'Linux' and of size 3 GiB.

Command (m for help): t
Selected partition 1
Hex code (type L to list all codes): 8e
Changed type of partition 'Linux' to 'Linux LVM'.

Command (m for help): p
Disk /dev/sdd: 10 GiB, 10737418240 bytes, 20971520 sectors
Units: sectors of 1 * 512 = 512 bytes
Sector size (logical/physical): 512 bytes / 512 bytes
I/O size (minimum/optimal): 512 bytes / 512 bytes
Disklabel type: dos
Disk identifier: 0xc5aa0a0a

Device     Boot Start     End Sectors Size Id Type
/dev/sdd1        2048 6293503 6291456   3G 8e Linux LVM

Command (m for help): w
The partition table has been altered.
Calling ioctl() to re-read partition table.
Syncing disks.
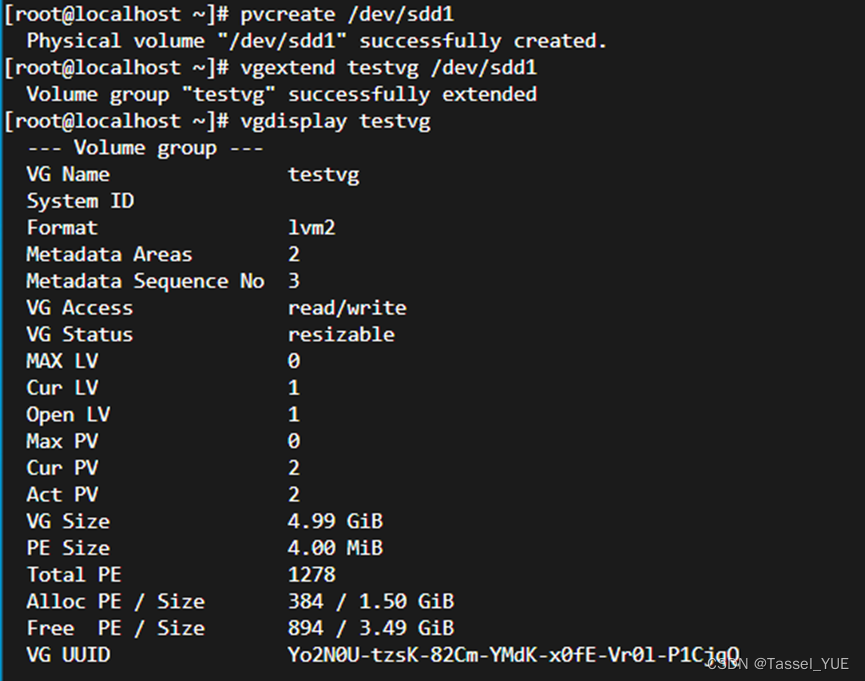
[root@openEuler ~]# pvcreate /dev/sdd1
  Physical volume "/dev/sdd1" successfully created.
[root@openEuler ~]# vgextend testvg /dev/sdd1		#仅有在PE大小一致时,才可以扩展
  Volume group "testvg" successfully extended

[root@openEuler ~]# vgdisplay testvg
  --- Volume group ---
  VG Name               	testvg
  System ID
  Format                	lvm2
  Metadata Areas        	2
  Metadata Sequence No  3
  VG Access            	read/write
  VG Status             	resizable
  MAX LV                	0
  Cur LV                	1
  Open LV               	1
  Max PV                	0
  Cur PV                	2
  Act PV                	2
  VG Size               	5.99 GiB
  PE Size               	4.00 MiB
  Total PE              	1534
  Alloc PE / Size       	512 / 2.00 GiB
  Free  PE / Size       	1022 / 3.99 GiB
  VG UUID               	O63DUX-eojV-iUfw-75ib-yeZP-N0xx-JXyOeY
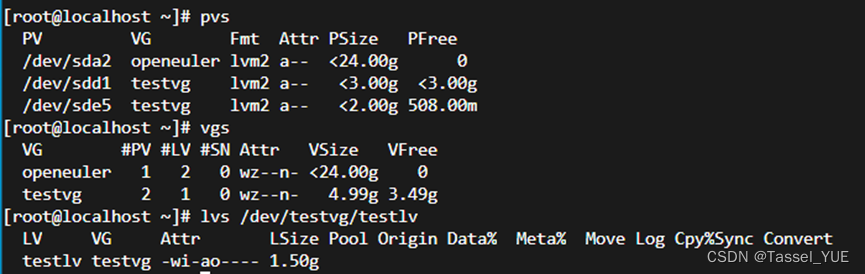
[root@openEuler ~]# pvs
  PV         VG        Fmt  Attr PSize  PFree
  /dev/sda3  openeuler lvm2 a--  9.80g       0
  /dev/sde5  testvg    lvm2 a--  <2.00g 1020.00m
  /dev/sdd1  testvg    lvm2 a--  <3.00g   <3.00g
[root@openEuler ~]# vgs
  VG        #PV #LV #SN Attr   VSize  VFree
  openeuler   1   2   0 wz--n-  9.80g    0
  testvg      2   1   0 wz--n-  4.99g   3.99g			#此处可以看到已经扩展到了6G
[root@openEuler ~]# lvs /dev/testvg/testlv			#查看testlv信息
  LV     VG     Attr       LSize Pool Origin Data%  Meta%  Move Log Cpy%Sync Convert
  testlv testvg  -wi-ao----    1.50g
[root@openEuler ~]# lvextend -L +3G /dev/testvg/testlv
  Size of logical volume testvg/testlv changed from 2.00 GiB (512 extents) to 5.00 GiB (1280 extents).
  Logical volume testvg/testlv successfully resized.
 [root@openEuler ~]# lvs /dev/testvg/testlv
  LV     VG     Attr       LSize Pool Origin Data%  Meta%  Move Log Cpy%Sync Convert
  testlv testvg  -wi-ao---- 	 4.50g

[root@openEuler ~]# resize2fs /dev/testvg/testlv
resize2fs 1.46.4 (18-Aug-2021)
Filesystem at /dev/testvg/testlv is mounted on /mnt/testlv; on-line resizing required
old_desc_blocks = 1, new_desc_blocks = 1
The filesystem on /dev/testvg/testlv is now 1179648 (4k) blocks long.
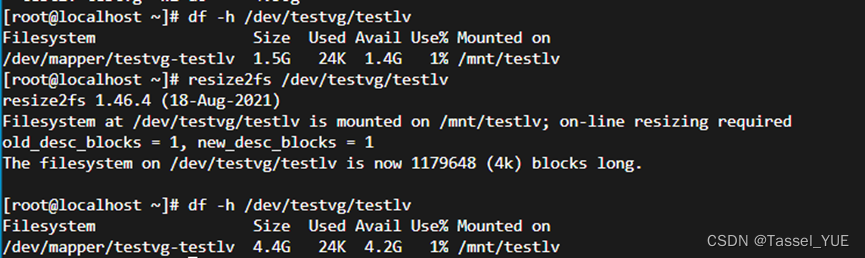
[root@openEuler ~]# df -h /dev/testvg/testlv
Filesystem Size Used Avail Use% Mounted on
/dev/mapper/testvg-testlv 4.4G 24K 4.2G 1% /mnt/testlv #可以看到文件系统扩展了
步骤 2 执行如下步骤缩容文件系统与LV。(此步骤是高危操作,在工作中请谨慎!)
[root@openEuler ~]# umount /mnt/testlv #卸载文件系统

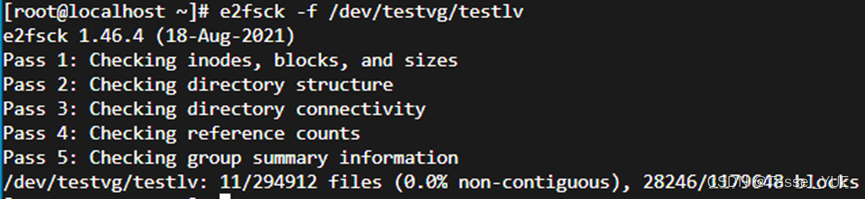
[root@openEuler ~]# e2fsck -f /dev/testvg/testlv		#检查文件系统使用情况
e2fsck 1.46.4 (18-Aug-2021)
Pass 1: Checking inodes, blocks, and sizes
Pass 2: Checking directory structure
Pass 3: Checking directory connectivity
Pass 4: Checking reference counts
Pass 5: Checking group summary information
/dev/testvg/testlv: 11/294912 files (0.0% non-contiguous), 28246/1179648 blocks
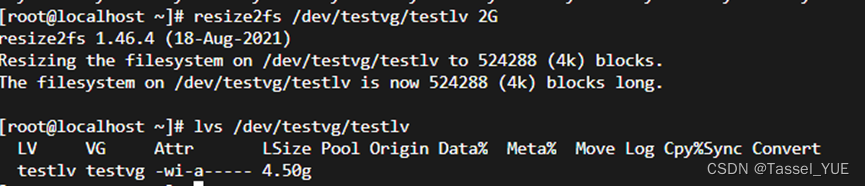
[root@openEuler ~]# resize2fs /dev/testvg/testlv 2G		#重新指定文件系统逻辑大小
resize2fs /dev/testvg/testlv 2G
[root@openEuler ~]# lvs /dev/testvg/testlv
  LV     VG     Attr       LSize Pool Origin Data%  Meta%  Move Log Cpy%Sync Convert
  testlv testvg   -wi-a-----   4.50g				#可以看到LV没有缩减
[root@openEuler ~]# lvchange -a n /dev/testvg/testlv		#将LV修改为不活动状态
[root@openEuler ~]# lvreduce -L 2G /dev/testvg/testlv		#缩减LV大小为2G
  Size of logical volume testvg/testlv changed from 4.50 GiB (1152 extents) to 2.00 GiB (512 extents).
  Logical volume testvg/testlv successfully resized.
[root@openEuler ~]# lvchange -a y /dev/testvg/testlv		#修改LV为活动状态
[root@openEuler ~]# lvs /dev/testvg/testlv				#查看LV大小
  LV     VG     Attr       LSize Pool Origin Data%  Meta%  Move Log Cpy%Sync Convert
  testlv testvg  -wi-a-----    2.00g

[root@openEuler ~]# e2fsck -f  /dev/testvg/testlv		#检查文件系统
e2fsck 1.46.4 (18-Aug-2021)
Pass 1: Checking inodes, blocks, and sizes
Pass 2: Checking directory structure
Pass 3: Checking directory connectivity
Pass 4: Checking reference counts
Pass 5: Checking group summary information
/dev/testvg/testlv: 11/131072 files (0.0% non-contiguous), 17580/524288 blocks
[root@openEuler ~]# mount /dev/testvg/testlv /mnt/testlv/		#重新挂载
[root@openEuler ~]# df -h /dev/testvg/testlv					#查看大小
Filesystem                 Size  Used Avail Use% Mounted on
/dev/mapper/testvg-testlv  2.0G  6.0M  1.9G   1% /mnt/testlv

步骤 3 执行如下步骤删除创建的LVM配置。
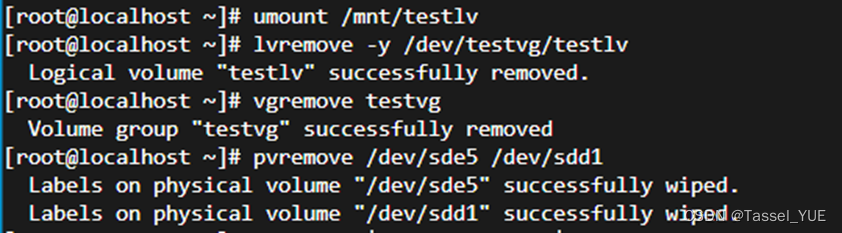
[root@openEuler ~]# umount /mnt/testlv
[root@openEuler ~]# lvremove -y /dev/testvg/testlv
  Logical volume "testlv" successfully removed
[root@openEuler ~]# vgremove testvg		#移除VG
 Volume group "testvg" successfully removed
[root@openEuler ~]# pvremove /dev/sde5 /dev/sdd1		#移除PV
  Labels on physical volume "/dev/sde5" successfully wiped.
  Labels on physical volume "/dev/sdd1" successfully wiped.
总结
先创建pv,再用一(多)个pv创建vg,使用一个vg的空间创建一(多)个lv
创建逻辑卷
#创建pv
 pvcreate /dev/LVM类型盘号
#创建vg
 vgcreate VG名 /dev/LVM类型盘号
#创建lv
 lvcreate -L LV大小 -n LV名 VG名
查看逻辑卷
#查看详细信息,[]为可选
 pvdisplay [/dev/LVM类型盘号]
 vgdisplay [VG名]
 lvdisplay [/dev/VG名/LV名]

#查看汇总信息
 pvs
 vgs
 lvs
扩容逻辑卷
#使用pv扩容vg
#使用vgdisplay可以看到Act PV为多个
 vgextend testvg /dev/其他的LVM类型盘号

#扩容lv
 lvextend -L 扩容大小 /dev/VG名/LV名

# 文件系统resize
 resize2fs /dev/VG名/LV名
缩容逻辑卷
#设置LV为不活动
 lvchange -a n /dev/testvg/testlv

#缩减LV
 lvreduce -L 2G /dev/testvg/testlv

#设置LV为活动
 lvchange -a y /dev/testvg/testlv

#检查文件系统
 e2fsck -f  /dev/testvg/testlv
删除逻辑卷
#删除LV
 lvremove -y /dev/testvg/testlv

#删除VG
 vgremove testvg

#删除PV
 pvremove /dev/sde5 /dev/sdd1


 1181
1181

 被折叠的 条评论
为什么被折叠?
被折叠的 条评论
为什么被折叠?
 到【灌水乐园】发言


