


实现了在两个屏幕显示不同的内容,并根据用户操作,使两个屏幕之间可以相互通信;可基于当前主客显代码实现一个基础的桌面端应用(一文读懂!)
具体文件结构
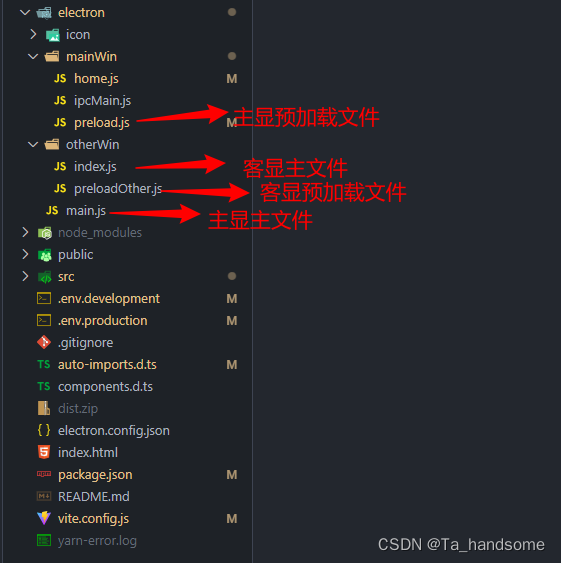
1.主显文件
electron/main主显中 app.whenReady() 挂载完毕之后启动副显 otherWin
const { app, BrowserWindow, ipcMain } = require("electron");
const path = require("path");
const otherWin = require("./otherWin/index.js"); //导入客显文件

// 映射页面
const env = app.isPackaged ? "production" : "development";
const indexHtml = {
  development: "http://127.0.0.1:5173/", // 开发环境
  production: path.join(__dirname, "../dist/index.html"), // 生产环境
};

// 主屏幕
const createWindow = () => {
  const mainWin = new BrowserWindow({
    width: 1920,
    height: 1080,
    frame: false,
    webPreferences: {
      preload: path.join(__dirname, "./mainWin/preload.js"), //预加载文件
      webSecurity: false,
    },
  });
  mainWin.webContents.openDevTools(); //调试工具
  mainWin.loadURL(indexHtml[env]); //加载不同路径
};


// 屏幕挂载
app.whenReady().then(() => {
  // 启动主显
  createWindow();
  // 启动客显
  otherWin(path, env, indexHtml);
  app.on("activate", () => {
    if (BrowserWindow.getAllWindows().length === 0) createWindow();
  });
});
app.on("window-all-closed", () => {
  if (process.platform !== "darwin") app.quit();
});
2.客显文件
electron/otherWin/index 这里把客显代码抽出来了、避免和主显混合
//外接屏幕
const { BrowserWindow, ipcMain, screen } = require("electron");
const createOtherWin = (path, env, indexHtml) => {
  const displays = screen.getAllDisplays();
  //寻找副屏幕、获取坐标位置
  const externalDisplay = displays.find((display) => {
    return display.bounds.x !== 0 || display.bounds.y !== 0;
  });

  if (externalDisplay) {
    otherWindow = new BrowserWindow({
      width: 1920,
      height: 1080,
      frame: false,
      x: externalDisplay.bounds.x,
      y: externalDisplay.bounds.y,
      webPreferences: {
        preload: path.join(__dirname, "preloadOther.js"),//客显预加载文件
        webSecurity: false,
      },
    });
    otherWindow.setFullScreen(true); //设置窗口是否全屏显示
    otherWindow.loadURL(indexHtml[env] + "#" + "/customerDisplay"); //加载vue项目中的路由文件作为客显展示
    otherWindow.on("closed", () => {
      //这一段放外面的话,如果你电脑没双屏会报错。
      otherWindow = null;
    });
  }
};

module.exports = createOtherWin;
到这里就可以实现双屏异显!接下来的内容主要实现主客显之间相互通讯
3.主客显之间的通讯
3.1 主显往客显传递数据
(1)electron/mainWin/preload.js 主显预加载文件中定义函数
const { contextBridge, ipcRenderer } = require("electron");

contextBridge.exposeInMainWorld("electronMainAPI", {
  sendData: (data) => ipcRenderer.send("send-data", data),
});
(2)src/home/index.vue 文件中定义触发函数、调用主显预加载文件暴露的函数
<template>
  <div>
    <button @click="send('我是主显')">往客显发送数据</button>
  </div>
</template>
<script setup>
// 数据发送
const send= (title) => {
  window.electronMainAPI.sendData(title)
};
</script>
(3)electron/otherWin/index.js 接下来需要在客显中监听主显 send-data 函数
//外接屏幕
const { BrowserWindow, ipcMain, screen } = require("electron");
const createOtherWin = (path, env, indexHtml) => {
  const displays = screen.getAllDisplays();
  //寻找副屏幕
  const externalDisplay = displays.find((display) => {
    return display.bounds.x !== 0 || display.bounds.y !== 0;
  });

  if (externalDisplay) {
    otherWindow = new BrowserWindow({
      width: 1920,
      height: 1080,
      frame: false,
      x: externalDisplay.bounds.x,
      y: externalDisplay.bounds.y,
      webPreferences: {
        preload: path.join(__dirname, "preloadOther.js"),
        webSecurity: false,
      },
    });
    otherWindow.setFullScreen(true);
    otherWindow.loadURL(indexHtml[env] + "#" + "/customerDisplay");
    otherWindow.on("closed", () => {
      otherWindow = null;
    });
    //监听主显 send-data 函数(用于双屏之间的通信)
    ipcMain.on("send-data", (event, data) => {
      otherWindow.webContents.send("receive-data", data);//客显定义receive-data函数接收数据(receive-data可自定义)
    });
  }
};

module.exports = createOtherWin;
(4) electron/otherWin/preloadOther.js 客显预加载文件中定义函数
const { contextBridge, ipcRenderer } = require("electron");

contextBridge.exposeInMainWorld("electronOtherAPI", {
  receiveData: (data) => ipcRenderer.send("receive-data", data),
});
(5)src/customerDisplay/index.vue 客显文件中获取主显传递过来的数据
<template>
  <div>
    客显
  </div>
</template>
<script setup>
// 接收主显发送过来的数据
electronOtherAPI.receiveData((event, val) => {
  console.log(val,'数据')
})
</script>
到此主显传递数据给客显就实现了,如果想要客显传递给主显也是相同的实现方式。


 4338
4338


 被折叠的 条评论
为什么被折叠?
被折叠的 条评论
为什么被折叠?
 到【灌水乐园】发言


