


listView第一种表现形式:
1.自带的一种格式
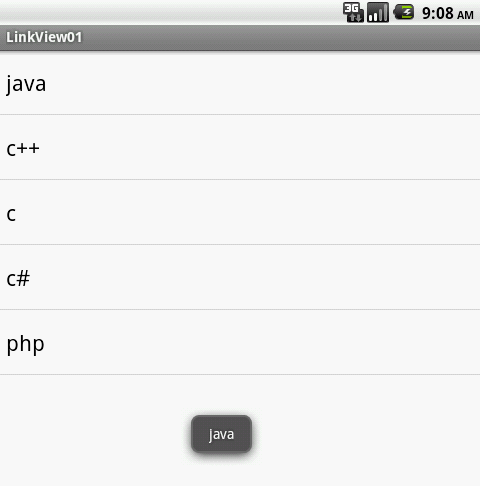
//创建ArrayAdapter装载数组数据
		ArrayAdapter<String> adapter=new ArrayAdapter<String>(this,android.R.layout.simple_list_item_1,objects);
		//将控件和数组适配器进行绑定
		setListAdapter(adapter);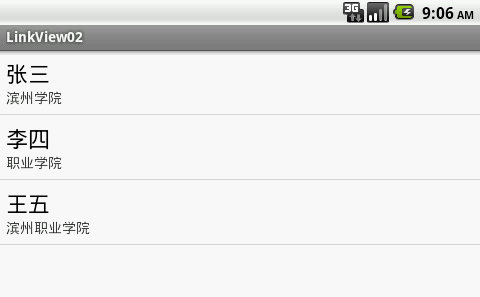
protected void onCreate(Bundle savedInstanceState) {
		super.onCreate(savedInstanceState);
		//setContentView(R.layout.activity_main);
		SimpleAdapter adapter=new SimpleAdapter(this, getData(), android.R.layout.simple_list_item_2,
				new String[]{"name","address"},
				new int[] { android.R.id.text1,
			android.R.id.text2 });
		this.setListAdapter(adapter);

	}

	public List<Map<String,String>> getData(){
		List<Map<String,String>> data=new ArrayList<Map<String,String>>();
		Map<String, String> item1 = new HashMap<String, String>();
		item1.put("name", "张三");
		item1.put("address", "滨州学院");
		data.add(item1);
		Map<String, String> item2 = new HashMap<String, String>();
		item2.put("name", "李四");
		item2.put("address", "职业学院");
		data.add(item2);
		Map<String, String> item3 = new HashMap<String, String>();
		item3.put("name", "王五");
		item3.put("address", "滨州职业学院");
		data.add(item3);
		return data;
	}
3.自定义格式:
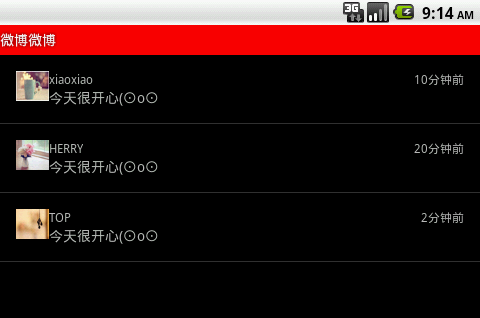
**********************************
这里的标题的样式是一个特殊的样式代码如下:
<?xml version="1.0" encoding="utf-8"?>
<resources xmlns:android="http://schemas.android.com/apk/res/android">
    <style name="myTitleBg">
        <item name="android:background">#FF0000</item>
    </style>
    <style name="myTheme" parent="android:Theme">
        <item name="android:windowNoTitle">false</item>
        <item name="android:windowTitleSize">30dp</item>
        <item name="android:windowTitleBackgroundStyle">@style/myTitleBg</item>
    </style>
</resources>
***********************************
自定义格式
1.首先设计出自定义的布局,即每一行需要的控件:
     <ImageView
         android:id="@+id/img"
         android:layout_width="wrap_content"
         android:layout_height="wrap_content"
        android:layout_alignParentLeft="true"
        android:layout_alignParentTop="true"
         android:src="@drawable/tu1"
         android:contentDescription="@string/images"/>

    <TextView
        android:id="@+id/name"
        android:layout_toRightOf="@+id/img"
        android:textSize="12sp"
        android:layout_width="wrap_content"
        android:layout_height="wrap_content"
        android:text="@string/hello_world" />
       <TextView
        android:id="@+id/time"
        android:layout_alignParentRight="true"
        android:layout_alignTop="@+id/name"
        android:layout_width="wrap_content"
        android:layout_height="wrap_content"
        android:textSize="12sp"
        android:text="@string/hello_world" />
     <TextView
        android:id="@+id/text"
        android:layout_below="@+id/name"
        android:layout_toRightOf="@+id/img"
        android:layout_width="wrap_content"
        android:layout_height="wrap_content"
        android:text="@string/hello_world" />
2.编写代码
protected void onCreate(Bundle savedInstanceState) {
		super.onCreate(savedInstanceState);
		SimpleAdapter adapter = new SimpleAdapter(this, getData(),
				R.layout.list_activity, new String[] { "image", "name", "time",
						"text" }, new int[] { R.id.img, R.id.name, R.id.time,
						R.id.text });
		this.setListAdapter(adapter);

	}

	private List< Map<String, ?>> getData() {
		List< Map<String, ?>> data=new ArrayList<Map<String,?>>();
		Map<String, Object> item1=new HashMap<String, Object>();
		item1.put("image", R.drawable.tu1);
		item1.put("name","xiaoxiao");
		item1.put("time", "10分钟前");
		item1.put("text", "今天很开心(⊙o⊙");
		data.add(item1);
		Map<String, Object> item2=new HashMap<String, Object>();
		item2.put("image", R.drawable.tu2);
		item2.put("name","HERRY");
		item2.put("time", "20分钟前");
		item2.put("text", "今天很开心(⊙o⊙");
		data.add(item2);
		Map<String, Object> item3=new HashMap<String, Object>();
		item3.put("image", R.drawable.tu3);
		item3.put("name","TOP");
		item3.put("time", "2分钟前");
		item3.put("text", "今天很开心(⊙o⊙");
		data.add(item3);
		return data;
	}


 6493
6493

 被折叠的 条评论
为什么被折叠?
被折叠的 条评论
为什么被折叠?
 到【灌水乐园】发言


