


此文章介绍了使用主机(Win10+IDEA+Java)访问虚拟机HDFS(Linux+Hadoop)的方法
0 前期准备
关闭防火墙:https://blog.csdn.net/Tiezhu_Wang/article/details/113861262
设置固定IP:https://blog.csdn.net/Tiezhu_Wang/article/details/113822362
1 修改配置文件
1.1 core-site.xml
gedit /usr/local/hadoop-3.2.1/etc/hadoop/core-site.xml
将fs.defaultFS的值修改为虚拟机的IP+端口:
<property>
	<name>fs.defaultFS</name>
	<value>hdfs://192.168.2.2:9000</value>
</property>

1.2 hdfs-site.xml
gedit /usr/local/hadoop-3.2.1/etc/hadoop/hdfs-site.xml
增加或修改属性:
<property>
	<name>dfs.permissions.enabled</name>
	<value>false</value>
</property>
2 依赖
在主机上新建工程,导入如下依赖:
<!-- https://mvnrepository.com/artifact/org.apache.hadoop/hadoop-common -->
<dependency>
    <groupId>org.apache.hadoop</groupId>
    <artifactId>hadoop-common</artifactId>
    <version>3.2.1</version>
</dependency>
<!-- https://mvnrepository.com/artifact/org.apache.hadoop/hadoop-client -->
<dependency>
    <groupId>org.apache.hadoop</groupId>
    <artifactId>hadoop-client</artifactId>
    <version>3.2.1</version>
</dependency>
<!-- https://mvnrepository.com/artifact/org.apache.hadoop/hadoop-hdfs -->
<dependency>
    <groupId>org.apache.hadoop</groupId>
    <artifactId>hadoop-hdfs</artifactId>
    <version>3.2.1</version>
</dependency>
3 准备文件
新建文件~/myfile/words.txt,随意写入几个单词:
hadoop
spark
java
spring
hive
hbase
python
C
在HDFS新建目录myfile,将文件上传到此目录下:
start-dfs.sh
hdfs dfs -mkdir myfile
hdfs dfs -put ~/myfile/words.txt myfile
查看上传的文件:
hdfs dfs -cat myfile/words.txt

4 Java代码
- 配置连接时地址指定为虚拟机IP,这里是192.168.2.2,可通过ip addr命令查看
- 新建目录名为hello
- 读取之前上传的文件words.txt并输出到控制台
- 直接将项目的pom.xml上传到hello目录下
import org.apache.hadoop.conf.Configuration;
import org.apache.hadoop.fs.FileSystem;
import org.apache.hadoop.fs.Path;

import java.io.*;

public class MainApp {
	public static void main(String[] args) throws Exception{
		// 配置连接
		Configuration conf = new Configuration();
		conf.set("fs.defaultFS","hdfs://192.168.2.2:9000");

		FileSystem fs = FileSystem.get(conf);

		// 1.新建目录
		Path path = new Path("/user/hadoop/hello");
		if (!fs.exists(path)){
			fs.mkdirs(path);
		}else{
			System.out.println("路径已存在");
		}

		// 2.读取文件
		InputStream in = fs.open(new Path("/user/hadoop/myfile/words.txt"));
		BufferedReader br = new BufferedReader(new InputStreamReader(in));
		String str;
		while ((str=br.readLine())!=null){
			System.out.println(str);
		}

		// 3.上传文件
		fs.copyFromLocalFile(new Path("D:\\Program Files (x86)\\WorkspaceIDEA\\HadoopStu\\pom.xml"),
				new Path("/user/hadoop/hello/pom.xml"));

		fs.close();
		System.out.println("Finished.");
	}
}
5 运行测试
控制台输出如下:
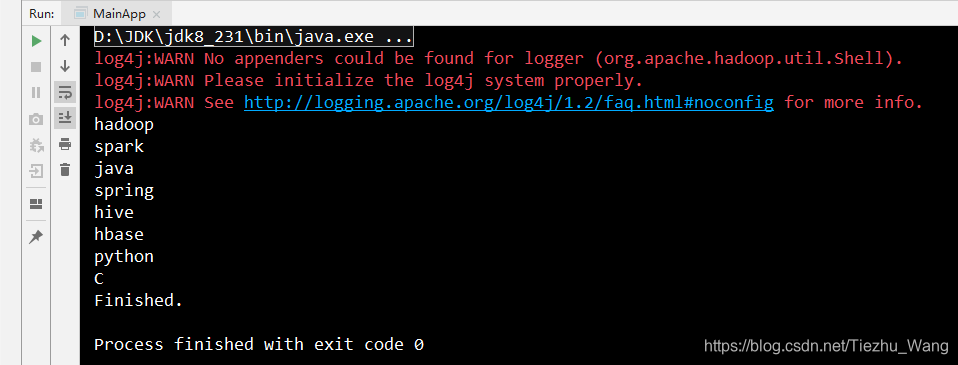
可见已读取到HDFS中hello目录下的文件,可以进入虚拟机查看一下:
hdfs dfs -ls hello

6 异常与解决办法
Exception 1:ConnectException
Exception in thread "main" java.net.ConnectException:
	Call From XXXX to 192.168.2.2:9000 failed on connection exception
Solution:将core-site.xml的“localhost”按照1.1修改为虚拟机的IP

Exception 2:AccessControlException或SafeModeException
Exception in thread "main" org.apache.hadoop.security.AccessControlException:
	Permission denied: user=Dell, access=WRITE, inode="/user/hadoop":hadoop:supergroup:drwxr-xr-x
或
Exception in thread "main" org.apache.hadoop.hdfs.server.namenode.SafeModeException:
	Cannot create file/user/hadoop/hello/pom.xml. Name node is in safe mode.
Solution:将hdfs-site.xml按照1.2修改。第二种情况还可能是hello目录下已经存在了pom.xml文件,删除HDFS中的文件即可。
20210429修改:也可以修改目录权限:见https://blog.csdn.net/Tiezhu_Wang/article/details/116275551


 552
552


 被折叠的 条评论
为什么被折叠?
被折叠的 条评论
为什么被折叠?
 到【灌水乐园】发言


