


目录
本篇文章主要讲解四种基本的布局:线性布局、相对布局、帧布局、百分比布局。
一、线性布局
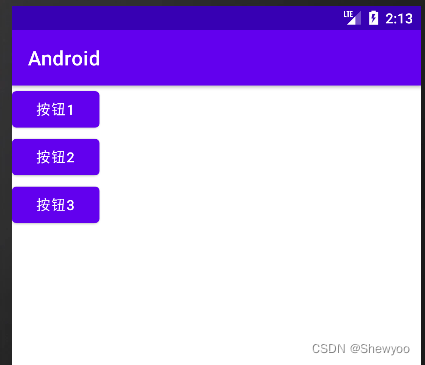
LinearLayout又称线性布局,是非常常用的布局,此布局将它所包含的控件在线性方向上依次排列,其android:orientation属性指明了排列方向,如果是vertical,则为竖直排列,如果是horizontal,则是水平排列。
下面尝试演示。
XML布局文件代码如下:
<?xml version="1.0" encoding="utf-8"?>
<LinearLayout xmlns:android="http://schemas.android.com/apk/res/android"
    android:orientation="vertical"
    android:layout_width="match_parent"
    android:layout_height="match_parent">

    <Button
        android:id="@+id/button1"
        android:layout_width="wrap_content"
        android:layout_height="wrap_content"
        android:text="按钮1"/>

    <Button
        android:id="@+id/button2"
        android:layout_width="wrap_content"
        android:layout_height="wrap_content"
        android:text="按钮2"/>

    <Button
        android:id="@+id/button3"
        android:layout_width="wrap_content"
        android:layout_height="wrap_content"
        android:text="按钮3"/>

</LinearLayout>
效果如下:
改变orientation属性为horizontal后效果如下:

1、 android:layout_gravity属性
下面加入新属性尝试一下。
XML布局文件代码如下:
android:layout_gravity用于指定控件在布局中的对齐方式,而android:gravity指定文字在控件中的对齐方式。
<?xml version="1.0" encoding="utf-8"?>
<LinearLayout xmlns:android="http://schemas.android.com/apk/res/android"
    android:orientation="horizontal"
    android:layout_width="match_parent"
    android:layout_height="match_parent">

    <Button
        android:id="@+id/button1"
        android:layout_width="wrap_content"
        android:layout_height="wrap_content"
        android:layout_gravity="top"
        android:text="按钮1"/>

    <Button
        android:id="@+id/button2"
        android:layout_width="wrap_content"
        android:layout_height="wrap_content"
        android:layout_gravity="center_vertical"
        android:text="按钮2"/>

    <Button
        android:id="@+id/button3"
        android:layout_width="wrap_content"
        android:layout_height="wrap_content"
        android:layout_gravity="bottom"
        android:text="按钮3"/>

</LinearLayout>
效果如下:

2、android:layout_weight属性
这个属性允许我们使用比例的方式来指定控件大小,在手机屏幕的适配性方面起到重要作用。
下面尝试实现:编写一个消息发送界面。
XML布局文件代码如下:
宽度属性都设置为0dp,因为宽度不再由android:layout_width指定;那么android:layout_weight属性该如何设置?系统会把LinearLayout下所有控件指定的layout_weight值相加,得到总值,然后每个控件所占的大小比例就是该控件的weight值除以刚才的总值,这里都为1,各占1/2比例。
<?xml version="1.0" encoding="utf-8"?>
<LinearLayout xmlns:android="http://schemas.android.com/apk/res/android"
    android:orientation="horizontal"
    android:layout_width="match_parent"
    android:layout_height="match_parent">

    <EditText
        android:id="@+id/input_message"
        android:layout_width="0dp"
        android:layout_height="wrap_content"
        android:layout_weight="1"
        android:hint="请输入"/>

    <Button
        android:id="@+id/send"
        android:layout_width="0dp"
        android:layout_height="wrap_content"
        android:layout_weight="1"
        android:text="发送"/>

</LinearLayout>
效果如下:

二、相对布局
RelativeLayout又称相对布局,也是非常常用的布局,此布局可通过相对定位的方式让控件出现在布局的任何位置。
下面尝试演示一下。
XML布局文件代码如下:
<?xml version="1.0" encoding="utf-8"?>
<RelativeLayout xmlns:android="http://schemas.android.com/apk/res/android"
    android:orientation="horizontal"
    android:layout_width="match_parent"
    android:layout_height="match_parent">

    <Button
        android:id="@+id/button1"
        android:layout_width="wrap_content"
        android:layout_height="wrap_content"
        android:layout_alignParentLeft="true"
        android:layout_alignParentTop="true"
        android:text="按钮1"/>

    <Button
        android:id="@+id/button2"
        android:layout_width="wrap_content"
        android:layout_height="wrap_content"
        android:layout_alignParentRight="true"
        android:layout_alignParentTop="true"
        android:text="按钮2"/>

    <Button
        android:id="@+id/button3"
        android:layout_width="wrap_content"
        android:layout_height="wrap_content"
        android:layout_centerInParent="true"
        android:text="按钮3"/>

    <Button
        android:id="@+id/button4"
        android:layout_width="wrap_content"
        android:layout_height="wrap_content"
        android:layout_alignParentBottom="true"
        android:layout_alignParentLeft="true"
        android:text="按钮4"/>

    <Button
        android:id="@+id/button5"
        android:layout_width="wrap_content"
        android:layout_height="wrap_content"
        android:layout_alignParentBottom="true"
        android:layout_alignParentRight="true"
        android:text="按钮5"/>


</RelativeLayout>
效果如下:
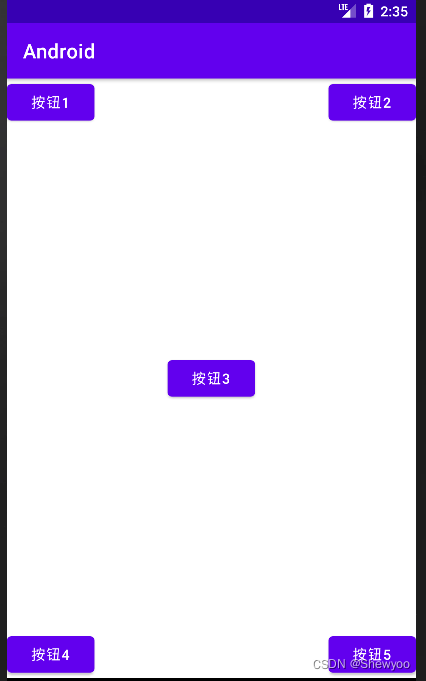
以上相对于父布局定位。
如何相对于控件定位?
XML布局文件代码如下:
<?xml version="1.0" encoding="utf-8"?>
<RelativeLayout xmlns:android="http://schemas.android.com/apk/res/android"
    android:orientation="horizontal"
    android:layout_width="match_parent"
    android:layout_height="match_parent">

    <Button
        android:id="@+id/button1"
        android:layout_width="wrap_content"
        android:layout_height="wrap_content"
        android:layout_above="@+id/button3"
        android:layout_toLeftOf="@+id/button3"
        android:text="按钮1"/>

    <Button
        android:id="@+id/button2"
        android:layout_width="wrap_content"
        android:layout_height="wrap_content"
        android:layout_above="@+id/button3"
        android:layout_toRightOf="@id/button3"
        android:text="按钮2"/>

    <Button
        android:id="@+id/button3"
        android:layout_width="wrap_content"
        android:layout_height="wrap_content"
        android:layout_centerInParent="true"
        android:text="按钮3"/>

    <Button
        android:id="@+id/button4"
        android:layout_width="wrap_content"
        android:layout_height="wrap_content"
        android:layout_below="@+id/button3"
        android:layout_toLeftOf="@+id/button3"
        android:text="按钮4"/>

    <Button
        android:id="@+id/button5"
        android:layout_width="wrap_content"
        android:layout_height="wrap_content"
        android:layout_below="@+id/button3"
        android:layout_toRightOf="@+id/button3"
        android:text="按钮5"/>


</RelativeLayout>
效果如下:

三、帧布局
FrameLayout又称帧布局,此布局下所有控件默认摆放在布局的左上角。
XML布局文件代码如下:
<?xml version="1.0" encoding="utf-8"?>
<FrameLayout xmlns:android="http://schemas.android.com/apk/res/android"
    android:orientation="horizontal"
    android:layout_width="match_parent"
    android:layout_height="match_parent">

      <TextView
        android:id="@+id/text_view"
        android:layout_width="wrap_content"
        android:layout_height="wrap_content"
        android:text="这是TextView"/>

    <ImageView
        android:id="@+id/image_view"
        android:layout_width="wrap_content"
        android:layout_height="wrap_content"
        android:src="@mipmap/ic_launcher"/>


</FrameLayout>
效果如下:

四、百分比布局
只有LinearLayout支持使用layout_weight属性实现按比例大小指定控件,而其他两个不支持,Android引入百分比布局解决此问题。
此布局不同于前面的布局,属于新增布局,如何让新增布局在所有版本中能够使用?百分比布局在support库中,只需要在build.gradle中添加百分比布局库的依赖,就能保证兼容性。
此布局后继文章实现。
希望本文章对你有帮助,如果你对Android开发感兴趣,请持续关注本专栏,帮助你从入门到项目实战,你将收获:Android基础开发、各种经典功能实现、项目实战、开发自己的APP、将APP上传应用商店、靠广告赚钱等等,持续更新ing......


 706
706


 被折叠的 条评论
为什么被折叠?
被折叠的 条评论
为什么被折叠?
 到【灌水乐园】发言


