


MyBatis-Plus介绍
- MyBatis-Plus (简称 MP)是一个 MyBatis (opens new window)的增强工具,在 MyBatis 的基础上只做增强不做改变,为简化开发、提高效率而生。
- MybatisPlus 可以节省大量时间,所有的 CRUD (增查改删)代码都可以自动化完成
特性:
- 无侵入:只做增强不做改变,引入它不会对现有工程产生影响,如丝般顺滑
- 损耗小:启动即会自动注入基本 CURD(不用自己写Mapper.xml文件),性能基本无损耗,直接面向对象操作
- 强大的 CRUD 操作:内置通用 Mapper、通用 Service,仅仅通过少量配置即可实现单表大部分 CRUD 操作,更有强大的条件构造器,满足各类使用需求
- 支持 Lambda 形式调用:通过 Lambda 表达式,方便的编写各类查询条件,无需再担心字段写错
- 支持主键自动生成:支持多达 4 种主键策略(内含分布式唯一 ID 生成器 - Sequence),可自由配置,完美解决主键问题
- 支持 ActiveRecord 模式:支持 ActiveRecord 形式调用,实体类只需继承 Model 类即可进行强大的 CRUD 操作
- 支持自定义全局通用操作:支持全局通用方法注入( Write once, use anywhere )
- 内置代码生成器:采用代码或者 Maven 插件可快速生成 Mapper 、 Model 、 Service 、 Controller 层代码,支持模板引擎,更有超多自定义配置等您来使用
- 内置分页插件:基于 MyBatis 物理分页,开发者无需关心具体操作,配置好插件之后,写分页等同于普通 List 查询
- 分页插件支持多种数据库:支持 MySQL、MariaDB、Oracle、DB2、H2、HSQL、SQLite、Postgre、SQLServer 等多种数据库
- 内置性能分析插件:可输出 SQL 语句以及其执行时间,建议开发测试时启用该功能,能快速揪出慢查询
- 内置全局拦截插件:提供全表 delete 、 update 操作智能分析阻断,也可自定义拦截规则,预防误操作
基础使用
下面采用的是 SpringBoot 框架:
Maven:
<dependency>
    <groupId>com.baomidou</groupId>
    <artifactId>mybatis-plus-boot-starter</artifactId>
    <version>3.5.1</version>
</dependency>
<dependency>
    <groupId>mysql</groupId>
    <artifactId>mysql-connector-java</artifactId>
</dependency>
- **注意:**尽量不要同时导入mybatis 和 mybatis_plus,避免版本差异
配置(连接数据库)
在 application.yml 配置文件中添加 MySQL 数据库的相关配置:
spring:
  datasource:
    username: root
    password: 123456?
    url: jdbc:mysql://mybatis_plus?userUnicode=true&characterEncoding=utf-8&useSSL=false&allowPublicKeyRetrieval=true
    driver-class-name: com.mysql.cj.jdbc.Driver
在 spring boot 启动类中添加 @MapperScan 注解,扫描Mapper文件夹:
@SpringBootApplication
@MapperScan("com.wen.mybatis_plus.mapper")  //扫描mapper
public class MybatisPlusApplication {
    public static void main(String[] args) {
        SpringApplication.run(MybatisPlusApplication.class, args);
    }
}
在对应的 mapper 上面添加 @Mapper 注解,并继承 BaseMapper<> 类:
@Mapper
public interface UserMapper extends BaseMapper<User> {
    //所有的CRUD都已经完成
    //不需要像以前一样配置一大堆文件:pojo-dao(连接mybatis,配置mapper.xml文件)==>service-controller
}
配置日志(可选)
所有的SQL都是不可见的,所以在后台是希望看到SQL是怎么执行的,就必须要配置日志。
在.yml配置文件中配置日志:
mybatis-plus:
  configuration:
    log-impl: org.apache.ibatis.logging.stdout.StdOutImpl
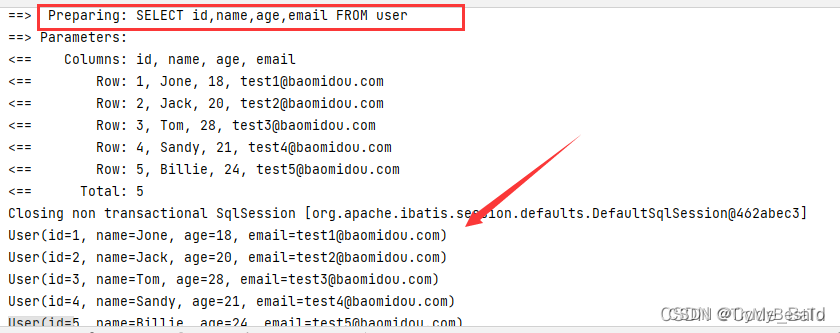
开始使用:
编写测试类:
@SpringBootTest
class MybatisPlusApplicationTests {

    //继承了BaseMapper所有的方法,可以编写自己的扩展方法
    @Autowired
    private UserMapper userMapper;

    @Test
    public void testSelect(){
        //查询全部用户,参数是一个Wrapper,条件构造器,先不使用为null
        List<User> userList = userMapper.selectList(null);
        userList.forEach(System.out::println);
    }
- 提示:UserMapper中的selectList()方法的参数为 MP内置的条件封装器Wrapper,所以不填写就是无任何条件。
自动填充
什么是自动填充
在常用业务中有些属性需要配置一些默认值,MyBatis-Plus 提供了实现此功能的插件,也就是自动填充功能。
比如创建时间、修改时间这些操作一般都是自动化完成的,是不用去手动更新的。
自动填充方式
方式一:数据库级别(不建议)
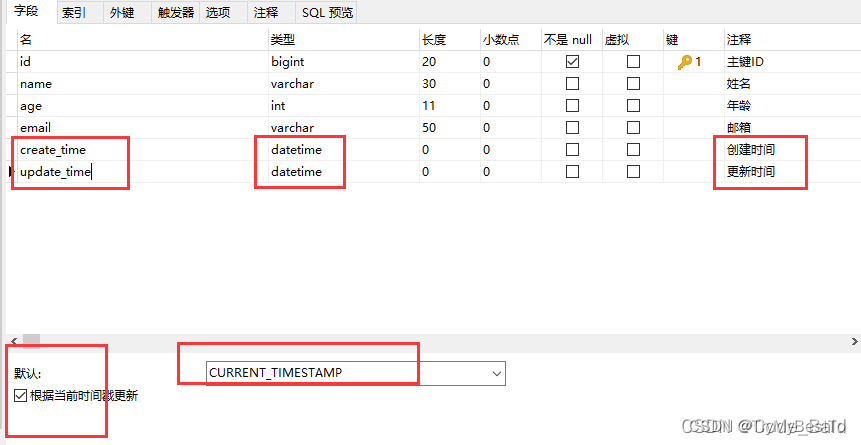
- 在使用的时候该字段留空即可。
方式二:代码级别(建议):
- 删除数据库的默认值,更新操作。
- 注解填充字段 @TableField(fill = FieldFill) 生成器策略部分也可以配置!
- FieldFill = INSERT:插入时
- FieldFill = INSERT_UPDATE:插入和更新时
@TableField(fill = FieldFill.INSERT)
private Data createTime;
@TableField(fill = FieldFill.INSERT_UPDATE)
private Data updateTime;
- 自定义实现类 实现 MetaObjectHandler 接口来 处理这个注解。
@Slf4j
@Component
public class MyMetaObjectHandler implements MetaObjectHandler {
    //插入时的填充策略
    @Override
    public void insertFill(MetaObject metaObject) {
        log.info("start intsert fill ....");
        //strictInsertFill(MetaObject metaObject, String fieldName, Class<T> fieldType, E fieldVal)
        this.strictInsertFill(metaObject,"createTime", LocalDateTime.class,LocalDateTime.now());// 起始版本 3.3.0(推荐使用)
    }

    //更新时的填充策略
    @Override
    public void updateFill(MetaObject metaObject) {
        log.info("start update fill ....");
        this.strictUpdateFill(metaObject, "updateTime", LocalDateTime.class, LocalDateTime.now()); // 起始版本 3.3.0(推荐)
    }
}
CRUD增查改删
增加
- insert(Object obj)
- 如果没有设置自增字段值,那么会自动生成该字段的值,并向传入的对象回填自动增长值。
自定义ID生成器:
生成的ID需要具备以下特点:
1.全局唯一性:不能出现重复的ID号,既然是唯一标识,这是最基本的要求。
1.趋势递增:在MySQL InnoDB引擎中使用的是聚集索引,由于多数RDBMS使用B-tree的数据结构来存储索引数据,在主键的选择上面我们应该尽量使用有序的主键保证写入性能。
1.单调递增:保证下一个ID一定大于上一个ID,例如事务版本号、IM增量消息、排序等特殊需求。
1.信息安全:如果ID是连续的,恶意用户的扒取工作就非常容易做了,直接按照顺序下载指定URL即可;如果是订单号就更危险了,甚至可以直接知道我们一天的单量。所以在一些应用场景下,会需要ID无规则、不规则。
上述 1 2 3 对应三类不同的场景,3和4需求还是互斥的,无法使用同一个方案满足。
@TableId(type = IdType)
- 在设置了自动增长字段对应的成员属性上添加@TableId注解,里面的值便是使用主键自动生成的方法。
- 自 3.3.0 开始,默认使用 SnowFlake雪花算法+UUID(不含中划线)
- IdType 生成ID类型枚举类
- 0、AUTO:数据库ID自增。
- 1、NONE:该类型为未设置主键类型(注解里等于跟随全局,全局里约等于 INPUT)。
- 2、INPUT:该类型可以通过自己注册自动填充插件进行填充。
- 3、以下3种类型、只有当插入对象ID 为空,才自动填充。
- 4、ASSIGN_ID:分配ID (主键类型为 number 或 string )
默认实现类 {@link com.baomidou.mybatisplus.core.incrementer.DefaultIdentifierGenerator}(雪花算法) - 5、ASSIGN_UUID:分配UUID (主键类型为 string)
默认实现类 {@link com.baomidou.mybatisplus.core.incrementer.DefaultIdentifierGenerator}(UUID.replace(“-”,“”))
@Data
public class User {
    //对应数据库中的主键(UUID、自增id、雪花算法、redis、zookeeper)
    @TableId(type = IdType.ASSIGN_ID)
    private Long id;
    private String name;
}
UUID:string 类型
- 优点:性能非常高:本地生成,没有网络消耗。
- 缺点:
- 没有排序,无法保证趋势递增。
- UUID 往往使用字符串存储,查询的效率比较低。
- 不易于存储:UUID太长,16字节128位,通常以36长度的字符串表示,很多场景不适用。
- 信息不安全:基于MAC地址生成UUID的算法可能会造成MAC地址泄露,这个漏洞曾被用于寻找梅丽莎病毒的制作者位置。
- ID作为主键时在特定的环境会存在一些问题,比如做DB主键的场景下,UUID就非常不适用:
- MySQL 官方有明确的建议主键要尽量越短越好[4],36个字符长度的UUID不符合要求。
- 对MySQL索引不利:如果作为数据库主键,在InnoDB引擎下,UUID的无序性可能会引起数据位置频繁变动,严重影响性能。
SnowFlake(雪花算法)number 或 string类型
- 使用41bit作为毫秒数,10bit作为机器的ID(5个bit是数据中心,5个bit的机器ID),12bit作为毫秒内的流水号(意味着每个节点在每毫秒可以产生4096个ID),最后还有一个符号位,永远是0。
- 优点:
- 毫秒数在高位,自增序列在低位,整个ID都是趋势递增的。
- 不依赖数据库等第三方系统,以服务的方式部署,稳定性更高,生成ID的性能也是非常高的。
- 可以根据自身业务特性分配bit位,非常灵活。
- 缺点:
- 强依赖机器时钟,如果机器上时钟回拨,会导致发号 重复 或者服务会处于 不可用状态。
查询
基础查询
通过 Id 查询用户:
selectById()
public void testSelectById(){
    User user = userMapper.selectById(1L);
    System.out.println(user);
}

批量查询:
selectBatchIds 方法,方法内放入的是集合,可以通过源码看
public void selectBatchIds(){
    List<User> users = userMapper.selectBatchIds(Arrays.asList(1, 2, 3));
    users.forEach(System.out::println);
}

条件查询:
- selectByMap(Map map):通过自定义条件查询
- Map 类的参数(字段名,参数)会被 MySQLPlus 自动组合成查询条件
public void selectByMap(){
    HashMap<String,Object> map = new HashMap<>();
    //自定义查询
    map.put("name","小文");
    map.put("age",20);
    List<User> users = userMapper.selectByMap(map);
    users.forEach(System.out::println);
}

- selectByList()
分页查询:
- 原始的 limit 进行分页
- pageHelper 第三方插件
- MyBatisPlus 内置分页插件
属性介绍:
| 属性名 | 类型 | 默认值 | 描述 |
|---|---|---|---|
| overflow | boolean | false | 溢出总页数后是否进行处理(默认不处理) |
| maxLimit | Long | 单页分页条数限制(默认无限制) | |
| dbType | DbType | 数据库类型(根据类型获取应使用的分页方言) | |
| dialect | IDialect | 方言实现类 |
建议单一数据库类型的均设置 dbType
使用 MyBatisPlus内置分页插件:
配置拦截器组件:
@Bean
public MybatisPlusInterceptor paginationInterceptor() {

    MybatisPlusInterceptor interceptor = new MybatisPlusInterceptor();
    // 添加分页插件
    PaginationInnerInterceptor pageInterceptor = new PaginationInnerInterceptor();
    // 设置请求的页面大于最大页后操作,true调回到首页,false继续请求。默认false
    pageInterceptor.setOverflow(false);
    // 单页分页条数限制,默认无限制
    pageInterceptor.setMaxLimit(500L);
    // 设置数据库类型
    pageInterceptor.setDbType(DbType.MYSQL);

    interceptor.addInnerInterceptor(pageInterceptor);
    return interceptor;
}
分页组件测试:
public void testMybatisPlus_Page(){
    // 两个参数:current的值默认是1,从1开始,不是0。size是每一页的条数。
    Page<User> page = new Page<>(1, 4);
    userMapper.selectPage(page,null);
    page.getRecords().forEach(System.out::println);
}

更改
- updateById(Object obj):根据主键进行更新。注意:updateById 参数是一个对象!而不是ID
public void testUpdate(){
    User user = new User();
    //可以通过条件自动拼接动态SQL
    user.setId(5L);
    user.setName("id:5,修改过后");
    //updateById 参数是一个对象!
    int i = userMapper.updateById(user);
    System.out.println(i);
}

删除
- deleteById():根据 id 删除
public void testDeleteById(){
    userMapper.deleteById(4L);
}
- deleteBatchIds():批量删除
public void testDeleteBatchId(){
    userMapper.deleteBatchIds(Arrays.asList(1L,2L));
}
- deleteByMap():根据 Map 删除
public void testdeleteByMap(){
    Map<String, Object> map = new HashMap<>();
    map.put("name","xiaotian");
    userMapper.deleteByMap(map);
}
逻辑删除
- 物理删除:从数据库中直接删除
- 逻辑删除:在数据库中没有被删除,而是通过一个变量来让它失效。
- deleted=0 ——》deleted=1
- 管理员可以查看被删除的记录,防止数据丢失,相当于回收站。
-
在数据表中增加一个 deleted 字段
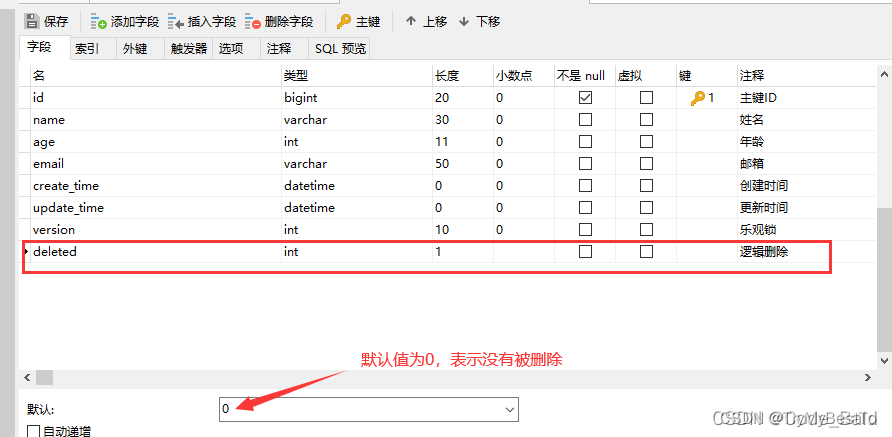
-
同步实体类,在实体类上加上 @TableLogic 注解
@TableLogic //逻辑删除
private Integer deleted;
- 配置 application.yml 文件
mybatis-plus:
  global-config:
    db-config:
      logic-delete-field: flag # 全局逻辑删除的实体字段名(since 3.3.0,配置后可以忽略不配置步骤2)
      logic-delete-value: 1 # 逻辑已删除值(默认为 1)
      logic-not-delete-value: 0 # 逻辑未删除值(默认为 0)
- 测试
public void testDeleteById(){
    userMapper.deleteById(4L);
}

- 对Id为4的用户进行查询
public void testSelectById(){
    User user = userMapper.selectById(4L);
    System.out.println(user);
}
 查看日志输出可以看到,seletc的语句以经发生了更改
 增加了deleted的判断语句,判断deleted是否为1,为1则能搜索,0则不能
- **注意:**只对自动注入的SQL有效:
- 插入: 不作限制
- 查找: 追加 where 条件过滤掉已删除数据,且使用 wrapper.entity 生成的 where 条件会忽略该字段
- select id,name,deleted from user where deleted=0
- 更新: 追加 where 条件防止更新到已删除数据,且使用 wrapper.entity 生成的 where 条件会忽略该字段
- 删除: 转变为 更新。
- update user set deleted=1 where id = 1 and deleted=0
- 逻辑删除是为了方便数据恢复和保护数据本身价值等等的一种方案,但实际就是删除。
- 如果你需要频繁查出来看就不应使用逻辑删除,而是以一个状态去表示。
条件构造器
Wrapper,可以通过其构造复杂的SQL
注意:
- 耦合性高
- 传输wrapper相当于conroller用map接收值,后期维护极为困难
- 所以只是使用一部分功能
代码演示
- isNotNull(String columnName):指定字段不为空
- ge(String columnName, value):指定字段值必须大于给定value
void WrapperTest(){
    //查询name、邮箱不为空且年龄大于等于20的用户
    QueryWrapper<User> wrapper = new QueryWrapper<>();
    wrapper
            .isNotNull("name")
            .isNotNull("email")
            .ge("age",12);
    userMapper.selectList(wrapper).forEach(System.out::println);
}

- eq(String columnName, value):指定字段值
- 查询一个数据出现多个结果就使用 List 或 Map 接收
void WrapperTest2(){
    //查询姓名为小文的用户
    QueryWrapper<User> wrapper = new QueryWrapper<>();
    wrapper.eq("name","小文");    //equals
    User user = userMapper.selectOne(wrapper);
    System.out.println(user);
}
- between(String columnName, v1, v2):指定字段值在 [v1, v2) 区间内
void WrapperTest3(){
    //查询年龄在19-23之间的用户
    QueryWrapper<User> wrapper = new QueryWrapper<>();
    wrapper.between("age", 19, 23);
    Long count = userMapper.selectCount(wrapper);//查询结果数
    System.out.println(count);
}
- orderByAsc(String columnName):通过 ID 进行排序。
void WrapperTest6(){
    //通过ID进行排序
    QueryWrapper<User> wrapper = new QueryWrapper<>();
    wrapper.orderByAsc("id");   //通过id升序
    List<User> users = userMapper.selectList(wrapper);
    users.forEach(System.out::println);
}
模糊查询
- like(String columnName, value):模糊查询,like %value%
- notLike():not like %value%
- likeRight()、likeLeft():左、右代表 % 存在的位置。
void WrapperTest4(){
    QueryWrapper<User> wrapper = new QueryWrapper<>();
    wrapper.notLike("name","a")    //查询姓名中不包含a的用户
            .likeRight("email","t");   //左和右是代表%的位置 两边都要匹配则为%e%,这里是email以t开头的 t%
    List<Map<String, Object>> maps = userMapper.selectMaps(wrapper);
    maps.forEach(System.out::println);
}
联表查询
- inSql(String keyColumnName, String sql):联合查询,选择与主查询关联的字段,并设置 字表的 sql
void WrapperTest5(){
    QueryWrapper<User> wrapper = new QueryWrapper<>();
    wrapper.inSql("id","select id from user where id < 4");
    List<Object> objects = userMapper.selectObjs(wrapper);
    objects.forEach(System.out::println);
}


执行SQL分析打印
可输出 SQL 语句以及其执行时间,建议开发测试时启⽤该功能,能快速揪出 慢查询。
注意:PerformanceInterceptor在3.2.0被移除了,如果想进⾏性能分析,⽤第三⽅的,官⽅这样写的“该插件 3.2.0 以上版本移除 推荐使⽤第三⽅扩展 执⾏SQL分析打印 功能”。也就是 p6spy。
p6spy 依赖引入:
<dependency>
  <groupId>p6spy</groupId>
  <artifactId>p6spy</artifactId>
  <version>最新版本</version> <!--这里用的是>3.9.1版本-->
</dependency>
application.yml配置
spring:
  datasource:
    username: root
    password: 123456
    driver-class-name: com.p6spy.engine.spy.P6SpyDriver
    url: jdbc:p6spy:mysql://mybatis_plus
- 注意: driver-class-name 为 p6spy 提供的驱动类;url 前缀为 jdbc:p6spy 跟着冒号为对应数据库连接地址。
spy.properties配置
# 3.2.1以上使用
modulelist=com.baomidou.mybatisplus.extension.p6spy.MybatisPlusLogFactory,com.p6spy.engine.outage.P6OutageFactory
# 3.2.1以下使用或者不配置
# modulelist=com.p6spy.engine.logging.P6LogFactory,com.p6spy.engine.outage.P6OutageFactory
# 自定义日志打印
logMessageFormat=com.baomidou.mybatisplus.extension.p6spy.P6SpyLogger
# 日志输出到控制台
appender=com.baomidou.mybatisplus.extension.p6spy.StdoutLogger
# 使用日志系统记录 sql
# appender=com.p6spy.engine.spy.appender.Slf4JLogger
# 设置 p6spy driver 代理
deregisterdrivers=true
# 取消JDBC URL前缀
useprefix=true
# 配置记录 Log 例外,可去掉的结果集有error,info,batch,debug,statement,commit,rollback,result,resultset.
excludecategories=info,debug,result,commit,resultset
# 日期格式
dateformat=yyyy-MM-dd HH:mm:ss
# 实际驱动可多个
#driverlist=org.h2.Driver
# 是否开启慢SQL记录
outagedetection=true
# 慢SQL记录标准 2 秒,若超过则抛出异常
outagedetectioninterval=2
测试
public void testMybatisPlus_Page(){
    // 两个参数:current的值默认是1,从1开始,不是0。size是每一页的条数。
    Page<User> page = new Page<>(2, 4);
    userMapper.selectPage(page,null);
    page.getRecords().forEach(System.out::println);
}
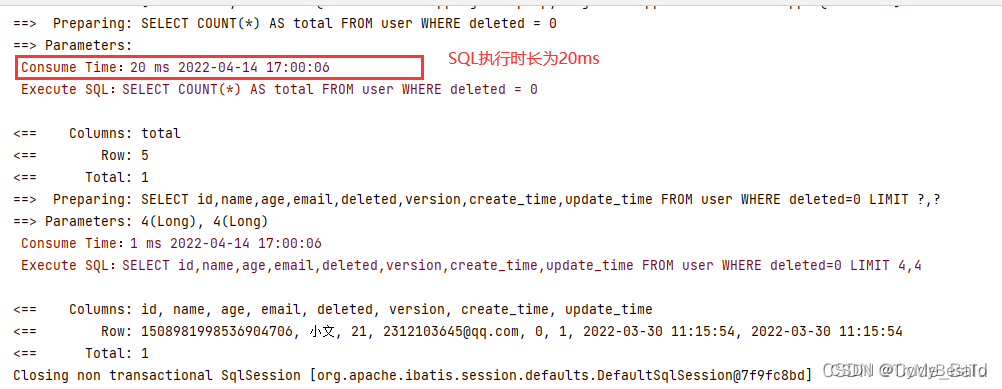
- 因为在配置文件中设置了慢SQL的检查,为2s,所以这里的查询可以通过
- 但是只要超过了时长就会抛出异常。
配置乐观锁
乐观锁:
- 特点:乐观锁是一种并发类型的锁,其本身不对数据进行加锁而是通过业务实现锁的功能,不对数据进行加锁就意味着允许多个请求同时访问数据,同时也省掉了对数据加锁和解锁的过程,这种方式因为节省了悲观锁加锁的操作,所以可以一定程度的的提高操作的性能,不过在并发非常高的情况下,会导致大量的请求冲突,冲突导致大部分操作无功而返而浪费资源,所以在高并发的场景下,乐观锁的性能却反而不如悲观锁。
悲观锁:
- 是基于一种悲观的态度类来防止一切数据冲突,它是以一种预防的姿态在修改数据之前把数据锁住,然后再对数据进行读写,在它释放锁之前任何人都不能对其数据进行操作,直到前面一个人把锁释放后下一个人数据加锁才可对数据进行加锁,然后才可以对数据进行操作。
- 一般数据库本身锁的机制默认都是基于悲观锁的机制实现的;
- 特点:可以完全保证数据的独占性和正确性,因为每次请求都会先对数据进行加锁, 然后进行数据操作,最后再解锁,而加锁释放锁的过程会造成消耗,所以性能不高;
乐观锁实现方式:
- 取出记录时,获取当前 version
- 更新时,带上这个 version
- 执行更新时,set version = newVersion where version = oldVersion
- 如果 version != oldVersion (被其他线程抢先更新了),就会更新失败。
数据库中添加version字段
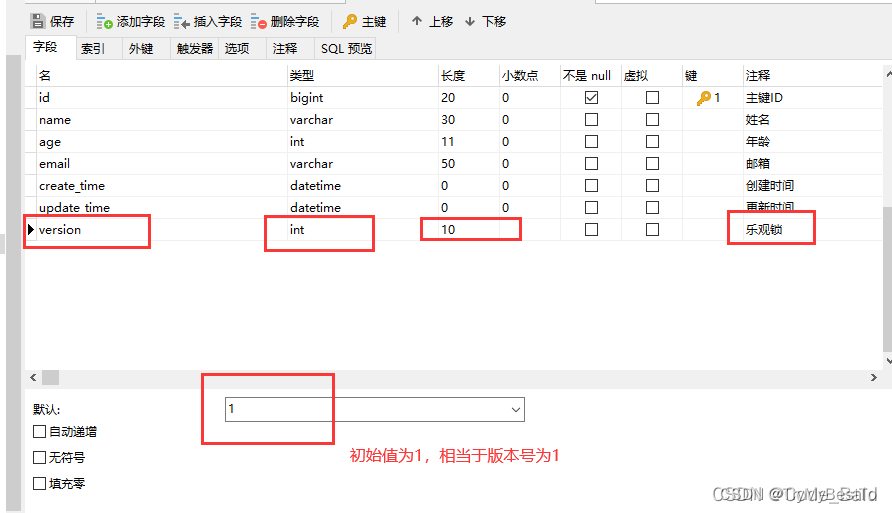
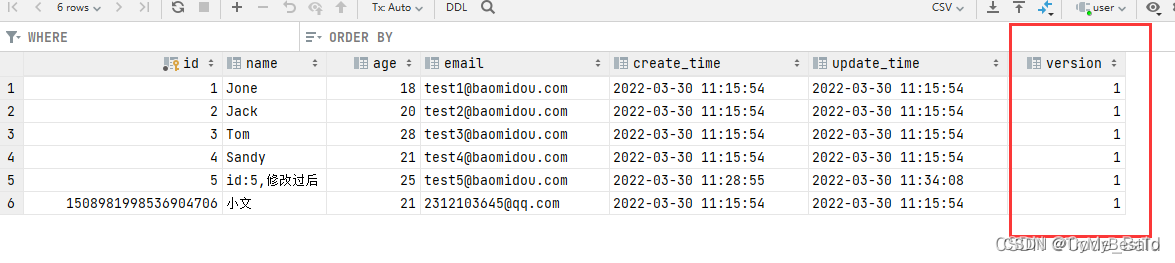
添加完成后查看是否更改完成
@Version 注解同步实体类
@Version    //乐观锁version注解
private Integer version;
配置插件:
spring xml 方式:
<bean class="com.baomidou.mybatisplus.extension.plugins.inner.OptimisticLockerInnerInterceptor" id="optimisticLockerInnerInterceptor"/>
<bean id="mybatisPlusInterceptor" class="com.baomidou.mybatisplus.extension.plugins.MybatisPlusInterceptor">
<property name="interceptors">
<list>
<ref bean="optimisticLockerInnerInterceptor"/>
</list>
</property>
</bean>
spring boot 的注解方式:
- 首先创建配置类文件 config,在该文件下创建配置类 MyBatisPlusConfig,该类需要添加三个注解:
- @Configuration :配置类
- @MapperScan(“com.wen.mybatis_plus.mapper”) :扫描mapper
- 是将原先 MybatisPlusApplication 中的扫描换到这里的,所以 MybatisPlusApplication 中就不需要@MapperScan()了,在该配置类里添加 @MapperScan() 即可。
- @EnableTransactionManagement :自动管理事务,默认是开启的。
@Configuration  //配置类
@MapperScan("com.wen.mybatis_plus.mapper")  //扫描mapper
@EnableTransactionManagement
public class MyBatisPlusConfig {
    //注册乐观锁插件
    @Bean
    public MybatisPlusInterceptor mybatisPlusInterceptor() {
        MybatisPlusInterceptor interceptor = new MybatisPlusInterceptor();
        interceptor.addInnerInterceptor(new OptimisticLockerInnerInterceptor());
        return interceptor;
    }
}
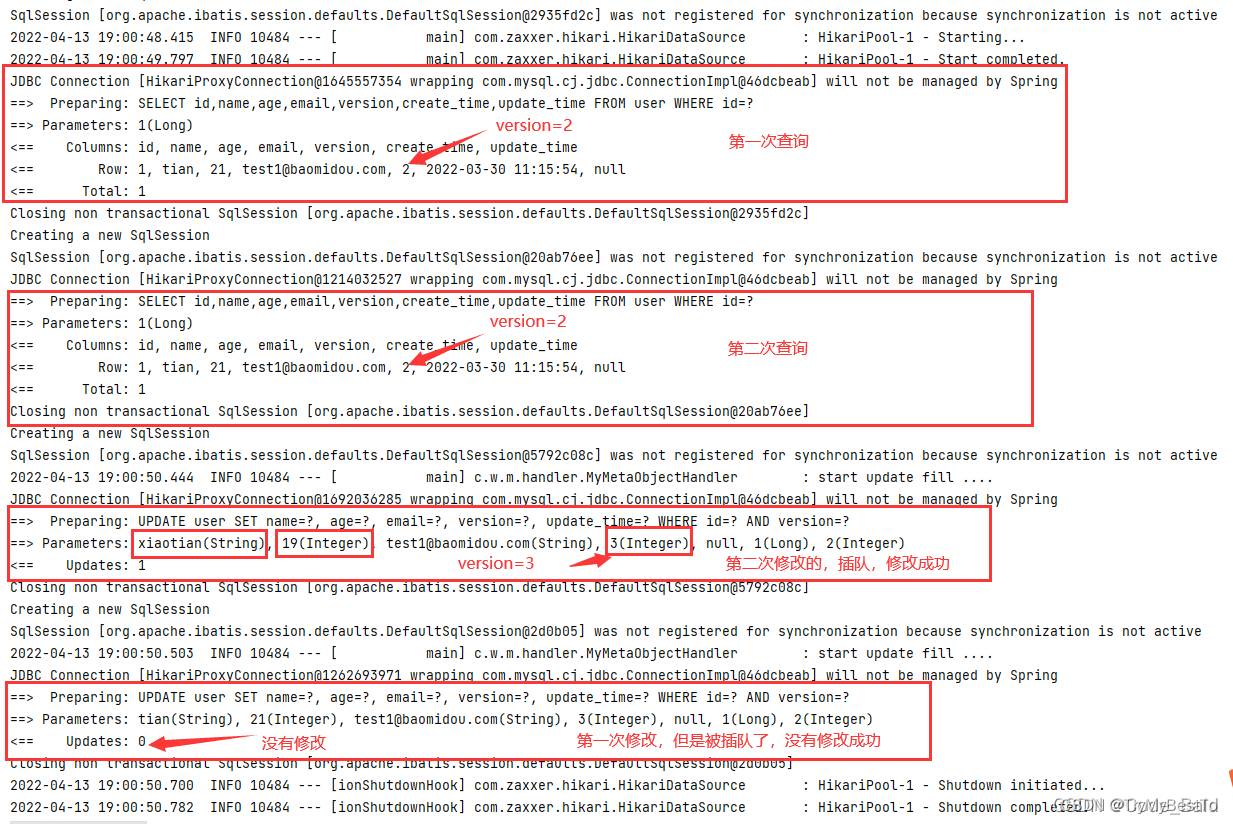
测试更新失败的情况:
void testOptimisticLocker_failure() {
    //模拟多线程实现插队效果
    //线程1
    User user = userMapper.selectById(1l);
    user.setName("tian");
    user.setAge(21);
    //线程2
    User user2 = userMapper.selectById(1l);
    user2.setName("xiaotian");
    user2.setAge(19);
    userMapper.updateById(user2);   //在这里插队
    // 乐观锁时,更新会失败

    userMapper.updateById(user);    //如果没有乐观锁就会覆盖插队线程的值
}
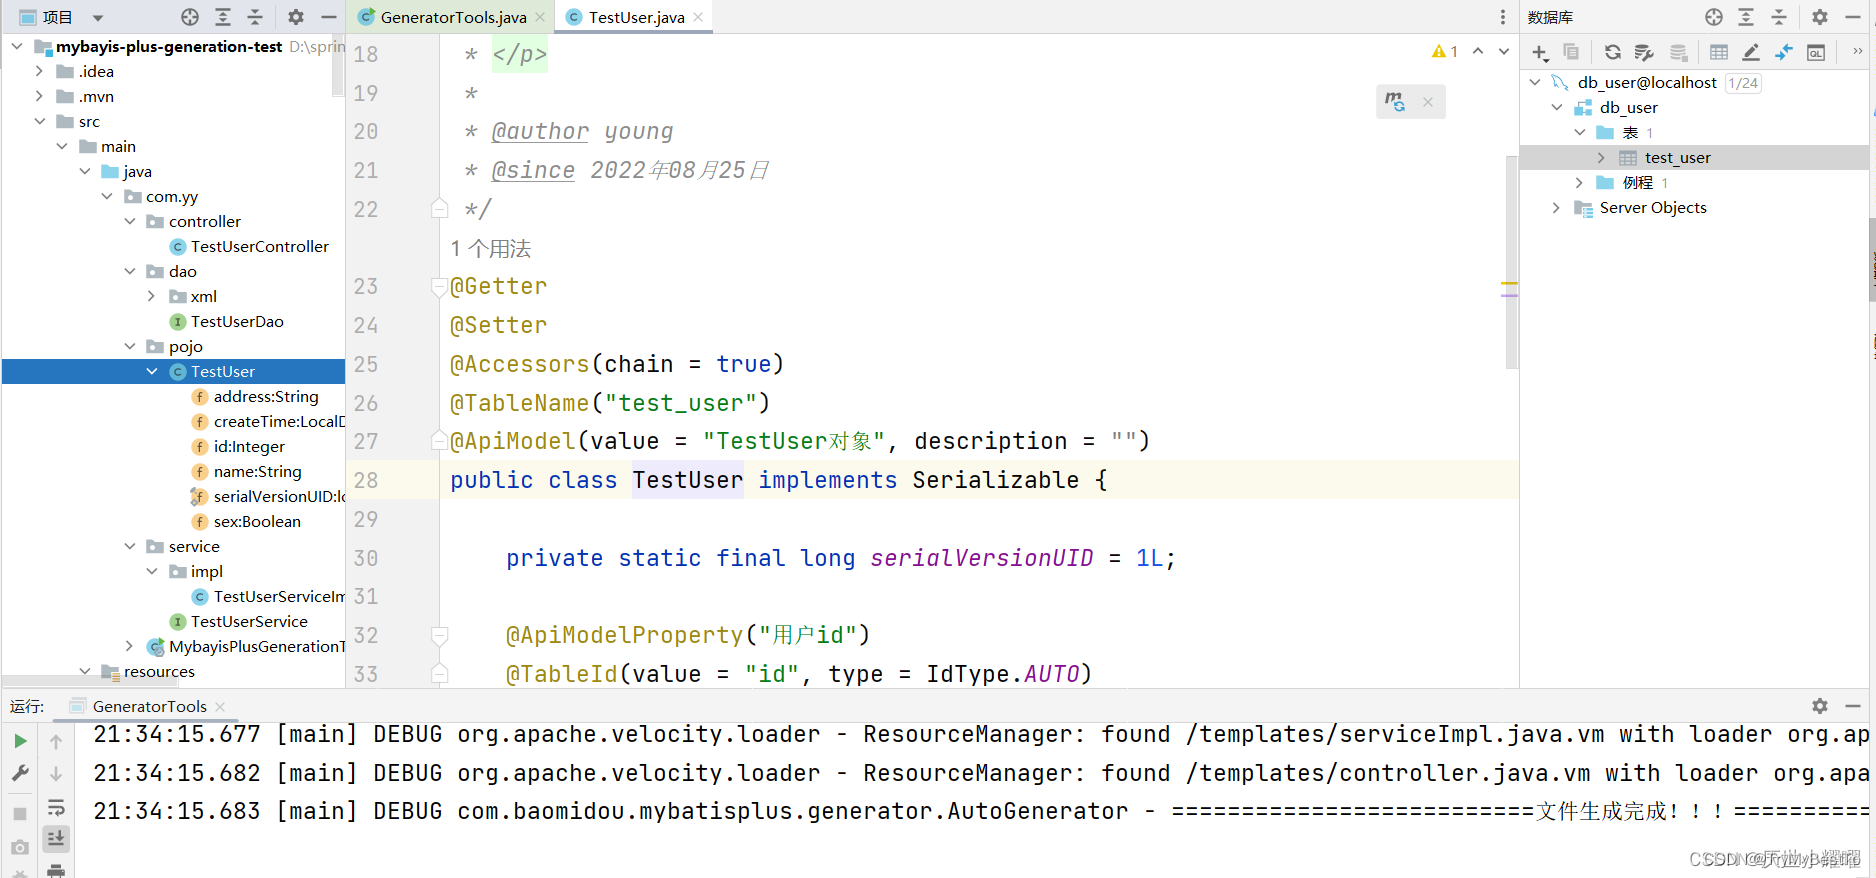
代码自动生成器
方式一、MybatisPlus
- 官方文档:https://baomidou.com/
- MyBatis-Plus比他们更全面,虽然需要我们自己编写一些配置代码,但是在构建Springboot项目中,通过代码自动生成,直接构建出项目全面的基本结构。例如常用的POJO,DAO,Service,Service实现类,Controller层以及mapper.xml文件 ,并且在service中继承了封装好的IService类,一般的sql和实现类基本不用书写就能在controller中调用,并且我们还可以自己编辑自己的业务SQL语句,可谓相当灵活!
-
准备一个初始项目,数据表,连接好数据库
-
导入Mybatis-Plus相关依赖
<!-- mysql驱动,让项目可以连接上MySQL数据库,自己数据库是什么版本的,就导入对应版本的驱动,我这里的数据库是8.0.27 -->
<dependency>
    <groupId>mysql</groupId>
    <artifactId>mysql-connector-java</artifactId>
    <version>8.0.27</version>
</dependency>
<!-- springboot整合MybatisPlus,这个依赖只有在SpringBoot项目中才需要导入,其他项目无需导入这个依赖 -->
<dependency>
    <groupId>com.baomidou</groupId>
    <artifactId>mybatisplus-spring-boot-starter</artifactId>
    <version>1.0.5</version>
</dependency>

<!-- MyBatisPlus依赖,要使用MyBatisPlus就必须导入MyBatisPlus的依赖,因为MyBatisPlus中默认有MyBatis的依赖,所以无需再导入MyBatis的依赖了 -->
<dependency>
    <groupId>com.baomidou</groupId>
    <artifactId>mybatis-plus</artifactId>
    <version>3.4.3.4</version>
</dependency>

<!-- MyBatis代码生成器依赖,要使用代码生成器,就需要导入代码生成器依赖 -->
<dependency>
    <groupId>com.baomidou</groupId>
    <artifactId>mybatis-plus-generator</artifactId>
    <version>3.5.1</version>
</dependency>

<!-- MyBatis代码生成器的模板引擎,这个也许需要导入的,官方的文档是这样写的,velocity引擎是默认的,不需要配置其他东西,比较方便,其他模板引擎也可以使用,还可以自定义模板引擎,具体请看官网 -->
<dependency>
    <groupId>org.apache.velocity</groupId>
    <artifactId>velocity-engine-core</artifactId>
    <version>2.3</version>
</dependency>
- 配置数据库配置文件 application.yml
spring:
  datasource:
    driver-class-name: com.mysql.cj.jdbc.Driver
    password: 123456
    username: root
    url: jdbc:mysql://localhost:3306?test_user&useSSL=true&useUnicode=true&characterEncoding=utf-8&serverTimezone=UTC
server:
  port: 8086
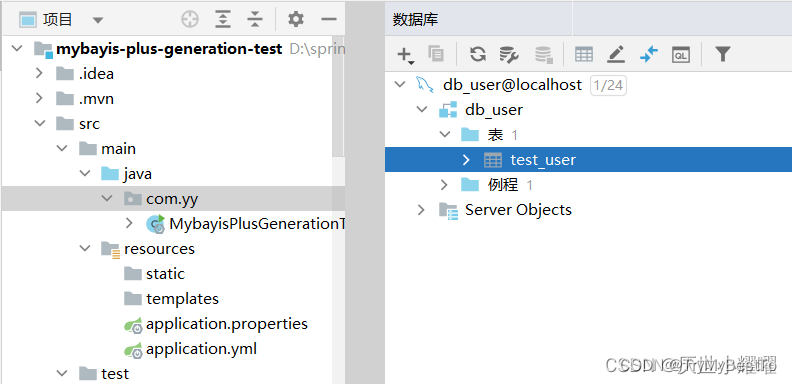
- 构建代码自动生成工具类,其他更多的配置可参考官网=》https://baomidou.com/
import com.baomidou.mybatisplus.annotation.IdType;
import com.baomidou.mybatisplus.generator.AutoGenerator;
import com.baomidou.mybatisplus.generator.config.*;
import com.baomidou.mybatisplus.generator.config.querys.MySqlQuery;
import com.baomidou.mybatisplus.generator.config.rules.DateType;
import com.baomidou.mybatisplus.generator.config.rules.NamingStrategy;

import java.util.Collections;

public class CodeGeneration {
    public static void main(String[] args) {

        MySqlQuery mySqlQuery = new MySqlQuery() {
            @Override
            public String[] fieldCustom() {
                return new String[]{"Default"};
            }
        };


        DataSourceConfig dsc = new DataSourceConfig.Builder("jdbc:mysql://localhost:3306/flowerpotnet?&useSSL=true&useUnicode=true&characterEncoding=utf-8&serverTimezone=Asia/Shanghai","root","123456")
                .dbQuery(mySqlQuery).build();
        //通过datasourceConfig创建AutoGenerator
        AutoGenerator generator = new AutoGenerator(dsc);

        /**
         * 全局配置
         */
        String projectPath = System.getProperty("user.dir"); //获取项目路径
        String filePath = projectPath + "/src/main/java";  //java下的文件路径
        GlobalConfig global = new GlobalConfig.Builder()
                .outputDir(filePath)//生成的输出路径
                .author("young")//生成的作者名字
                //.enableSwagger()开启swagger,需要添加swagger依赖并配置
                .dateType(DateType.TIME_PACK)//时间策略
                .commentDate("yyyy-MM-dd")//格式化时间格式
                .disableOpenDir()//禁止打开输出目录,默认false
                .fileOverride()//覆盖生成文件
                .build();

        /**
         * 包配置
         */
        PackageConfig packages = new PackageConfig.Builder()
                .entity("entity")//实体类包名
                .parent("com.yy")//父包名。如果为空,将下面子包名必须写全部, 否则就只需写子包名
                .controller("controller")//控制层包名
                .mapper("dao")//mapper层包名
                .xml("mapper.xml")//数据访问层xml包名
                .service("service")//service层包名
                .serviceImpl("service.impl")//service实现类包名
                .other("output")//输出自定义文件时的包名
                .pathInfo(Collections.singletonMap(OutputFile.mapperXml, projectPath + "/src/main/resources/mapper")) //路径配置信息,就是配置各个文件模板的路径信息,这里以mapper.xml为例
                .build();
        /**
         * 模板配置
         */

        // 如果模板引擎是 freemarker
//        String templatePath = "/templates/mapper.xml.ftl";
//         如果模板引擎是 velocity
        // String templatePath = "/templates/mapper.xml.vm";


        TemplateConfig template = new TemplateConfig.Builder()
//            .disable()//禁用所有模板
                //.disable(TemplateType.ENTITY)禁用指定模板
//                .service(filePath + "/service.java")//service模板路径
//                .serviceImpl(filePath + "/service/impl/serviceImpl.java")//实现类模板路径
//                .mapper(filePath + "/mapper.java")//mapper模板路径
//                .mapperXml("/templates/mapper.xml")//xml文件模板路路径
//                .controller(filePath + "/controller")//controller层模板路径
                .build();

        /**
         * 注入配置,自定义配置一个Map对象
         */
//    Map<String,Object> map = new HashMap<>();
//        map.put("name","young");
//        map.put("age","22");
//        map.put("sex","男");
//        map.put("description","深情不及黎治跃");
//
//    InjectionConfig injectionConfig = new InjectionConfig.Builder()
//            .customMap(map)
//            .build();

        /**
         * 策略配置开始
         */
        StrategyConfig strategyConfig = new StrategyConfig.Builder()
                .enableCapitalMode()//开启全局大写命名
                //.likeTable()模糊表匹配
                .addInclude()//添加表匹配,指定要生成的数据表名,不写默认选定数据库所有表
                //.disableSqlFilter()禁用sql过滤:默认(不使用该方法)true
                //.enableSchema()启用schema:默认false

                .entityBuilder() //实体策略配置
                //.disableSerialVersionUID()禁用生成SerialVersionUID:默认true
                .enableChainModel()//开启链式模型
                .enableLombok()//开启lombok
                .enableRemoveIsPrefix()//开启 Boolean 类型字段移除 is 前缀
                .enableTableFieldAnnotation()//开启生成实体时生成字段注解
                //.addTableFills()添加表字段填充
                .naming(NamingStrategy.underline_to_camel)//数据表映射实体命名策略:默认下划线转驼峰underline_to_camel
                .columnNaming(NamingStrategy.underline_to_camel)//表字段映射实体属性命名规则:默认null,不指定按照naming执行
                .idType(IdType.AUTO)//添加全局主键类型
                .formatFileName("%s")//格式化实体名称,%s取消首字母I
                .build()

                .mapperBuilder()//mapper文件策略
                .enableMapperAnnotation()//开启mapper注解
                .enableBaseResultMap()//启用xml文件中的BaseResultMap 生成
                .enableBaseColumnList()//启用xml文件中的BaseColumnList
                //.cache(缓存类.class)设置缓存实现类
                .formatMapperFileName("%sMapper")//格式化Dao类名称
                .formatXmlFileName("%sMapper")//格式化xml文件名称
                .build()

                .serviceBuilder()//service文件策略
                .formatServiceFileName("%sService")//格式化 service 接口文件名称
                .formatServiceImplFileName("%sServiceImpl")//格式化 service 接口文件名称
                .build()

                .controllerBuilder()//控制层策略
                //.enableHyphenStyle()开启驼峰转连字符,默认:false
                .enableRestStyle()//开启生成@RestController
                .formatFileName("%sController")//格式化文件名称
                .build();
        /*至此,策略配置才算基本完成!*/

        /**
         * 将所有配置项整合到AutoGenerator中进行执行
         */


        generator.global(global)
                .template(template)
//                .injection(injectionConfig)
                .packageInfo(packages)
                .strategy(strategyConfig)
                .execute();
    }
}
执行完成后即可看到我们相关的文件已经全部生成,并且注解,介绍已经基本到位。这样就能为我们的开发节省很多时间。
报错:
org.springframework.beans.factory.UnsatisfiedDependencyException: Error creating bean with name 'deptServiceImpl': Unsatisfied dependency expressed through field 'baseMapper'; nested exception is org.springframework.beans.factory.NoSuchBeanDefinitionException: No qualifying bean of type 'com.zgnj.mapper.DeptMapper' available: expected at least 1 bean which qualifies as autowire candidate. Dependency annotations: {@org.springframework.beans.factory.annotation.Autowired(required=true)}
    at org.springframework.beans.factory.annotation.AutowiredAnnotationBeanPostProcessor$AutowiredFieldElement.resolveFieldValue(AutowiredAnnotationBeanPostProcessor.java:660) ~[spring-beans-5.3.7.jar:5.3.7]
    at org.springframework.beans.factory.annotation.AutowiredAnnotationBeanPostProcessor$AutowiredFieldElement.inject(AutowiredAnnotationBeanPostProcessor.java:640) ~[spring-beans-5.3.7.jar:5.3.7]
    at org.springframework.beans.factory.annotation.InjectionMetadata.inject(InjectionMetadata.java:119) ~[spring-beans-5.3.7.jar:5.3.7]
    at org.springframework.beans.factory.annotation.AutowiredAnnotationBeanPostProcessor.postProcessProperties(AutowiredAnnotationBeanPostProcessor.java:399) ~[spring-beans-5.3.7.jar:5.3.7]
    at org.springframework.beans.factory.support.AbstractAutowireCapableBeanFactory.populateBean(AbstractAutowireCapableBeanFactory.java:1413) ~[spring-beans-5.3.7.jar:5.3.7]
    at org.springframework.beans.factory.support.AbstractAutowireCapableBeanFactory.doCreateBean(AbstractAutowireCapableBeanFactory.java:601) ~[spring-beans-5.3.7.jar:5.3.7]
    at org.springframework.beans.factory.support.AbstractAutowireCapableBeanFactory.createBean(AbstractAutowireCapableBeanFactory.java:524) ~[spring-beans-5.3.7.jar:5.3.7]
    at org.springframework.beans.factory.support.AbstractBeanFactory.lambda$doGetBean$0(AbstractBeanFactory.java:335) ~[spring-beans-5.3.7.jar:5.3.7]
    at org.springframework.beans.factory.support.DefaultSingletonBeanRegistry.getSingleton(DefaultSingletonBeanRegistry.java:234) ~[spring-beans-5.3.7.jar:5.3.7]
    at org.springframework.beans.factory.support.AbstractBeanFactory.doGetBean(AbstractBeanFactory.java:333) ~[spring-beans-5.3.7.jar:5.3.7]
    at org.springframework.beans.factory.support.AbstractBeanFactory.getBean(AbstractBeanFactory.java:208) ~[spring-beans-5.3.7.jar:5.3.7]
    at org.springframework.beans.factory.support.DefaultListableBeanFactory.preInstantiateSingletons(DefaultListableBeanFactory.java:944) ~[spring-beans-5.3.7.jar:5.3.7]
    at org.springframework.context.support.AbstractApplicationContext.finishBeanFactoryInitialization(AbstractApplicationContext.java:918) ~[spring-context-5.3.7.jar:5.3.7]
    at org.springframework.context.support.AbstractApplicationContext.refresh(AbstractApplicationContext.java:583) ~[spring-context-5.3.7.jar:5.3.7]
    at org.springframework.boot.web.servlet.context.ServletWebServerApplicationContext.refresh(ServletWebServerApplicationContext.java:144) ~[spring-boot-2.4.6.jar:2.4.6]
    at org.springframework.boot.SpringApplication.refresh(SpringApplication.java:771) [spring-boot-2.4.6.jar:2.4.6]
    at org.springframework.boot.SpringApplication.refresh(SpringApplication.java:763) [spring-boot-2.4.6.jar:2.4.6]
    at org.springframework.boot.SpringApplication.refreshContext(SpringApplication.java:438) [spring-boot-2.4.6.jar:2.4.6]
    at org.springframework.boot.SpringApplication.run(SpringApplication.java:339) [spring-boot-2.4.6.jar:2.4.6]
    at org.springframework.boot.SpringApplication.run(SpringApplication.java:1329) [spring-boot-2.4.6.jar:2.4.6]
    at org.springframework.boot.SpringApplication.run(SpringApplication.java:1318) [spring-boot-2.4.6.jar:2.4.6]
    at com.zgnj.PersonnelManagementApplication.main(PersonnelManagementApplication.java:10) [classes/:na]
Caused by: org.springframework.beans.factory.NoSuchBeanDefinitionException: No qualifying bean of type 'com.zgnj.mapper.DeptMapper' available: expected at least 1 bean which qualifies as autowire candidate. Dependency annotations: {@org.springframework.beans.factory.annotation.Autowired(required=true)}
    at org.springframework.beans.factory.support.DefaultListableBeanFactory.raiseNoMatchingBeanFound(DefaultListableBeanFactory.java:1790) ~[spring-beans-5.3.7.jar:5.3.7]
    at org.springframework.beans.factory.support.DefaultListableBeanFactory.doResolveDependency(DefaultListableBeanFactory.java:1346) ~[spring-beans-5.3.7.jar:5.3.7]
    at org.springframework.beans.factory.support.DefaultListableBeanFactory.resolveDependency(DefaultListableBeanFactory.java:1300) ~[spring-beans-5.3.7.jar:5.3.7]
    at org.springframework.beans.factory.annotation.AutowiredAnnotationBeanPostProcessor$AutowiredFieldElement.resolveFieldValue(AutowiredAnnotationBeanPostProcessor.java:657) ~[spring-beans-5.3.7.jar:5.3.7]
    ... 21 common frames omitted


Process finished with exit code 1
- 解决:这个错误的解决方法就是在 SpringBoot 项目的主启动类上的 @SpringBootApplication 注解中添加一个属性,这个属性的作用是,指定 mapper接口所在的包,上方的报错正是因为找不到mapper接口,解决方法如下图所示。

Caused by: org.springframework.beans.factory.NoSuchBeanDefinitionException: No qualifying bean of type 'com.liuyang.mapper.EmployeeMapper' available: expected at least 1 bean which qualifies as autowire candidate. Depend
- 解决:先把MyBatisPlus和代码生成器的依赖都删除,然后将以下依赖添加到pom.xml中,就可以运行起来了。
<dependency>
    <groupId>com.baomidou</groupId>
    <artifactId>mybatis-plus-boot-starter</artifactId>
    <version>3.5.3.1</version>
</dependency>
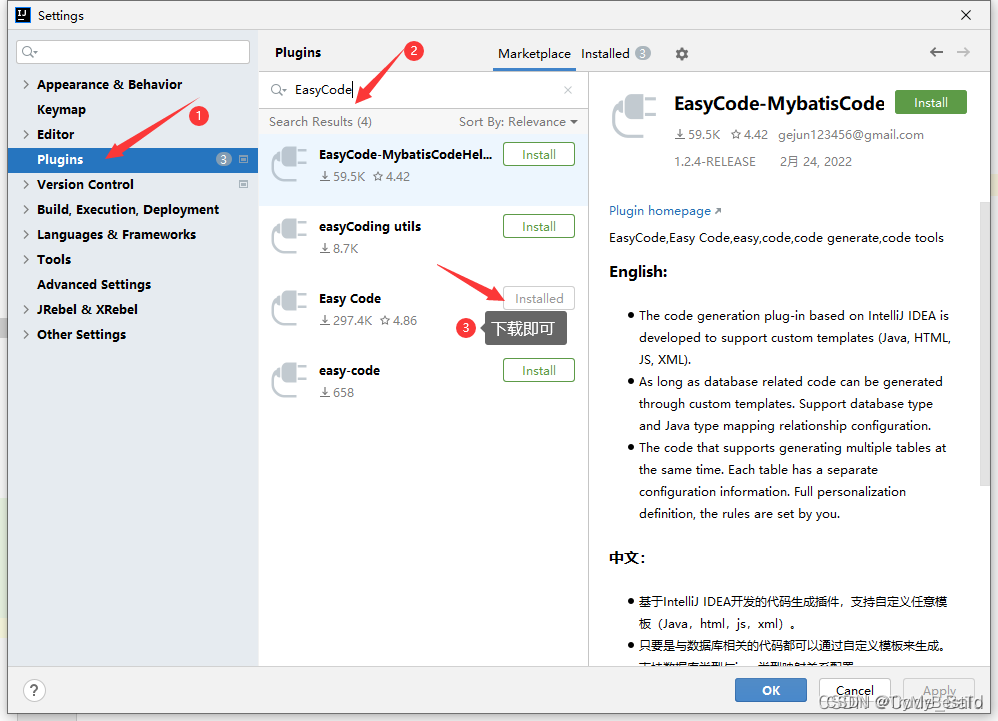
方式二、EasyCode
- EasyCode 是基于 IntelliJ IDEA Ultimate 版开发的一个代码生成插件,主要通过自定义模板(基于velocity)来生成各种你想要的代码。通常用于生成Entity、Dao、Service、Controller。如果你动手能力强还可以用于生成 HTML、JS、PHP 等代码。理论上来说只要是与数据有关的代码都是可以生成的。
- 并不全面,而且缺乏灵活度。
-
安装 EasyCode
-
建立数据库
-
在IDEA配置连接数据库
-
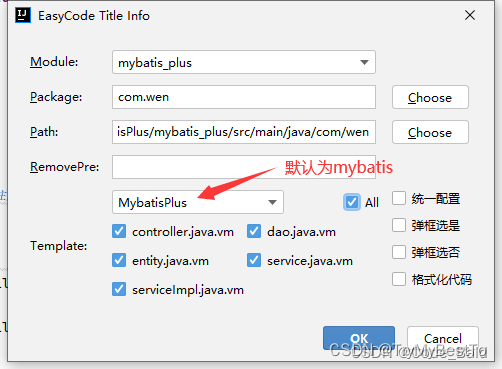
使用 EasyCode
- 在对应的字段上右键,就可以看到多出一个 EasyCode,点击然后选择生成。
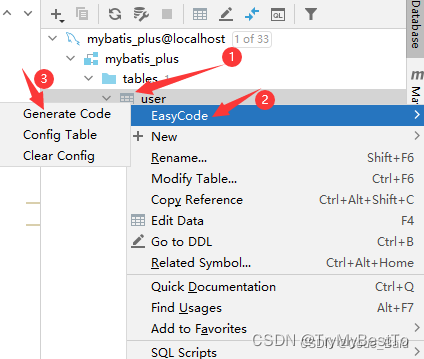
- 在对应的字段上右键,就可以看到多出一个 EasyCode,点击然后选择生成。
-
开始生成代码
-
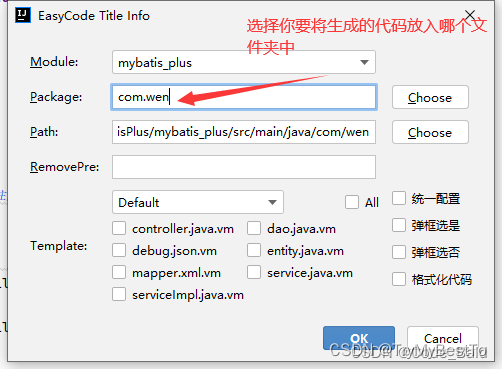
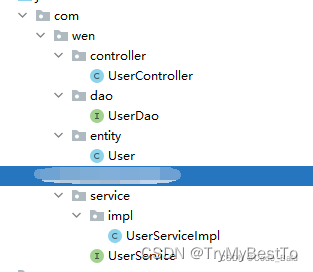
勾选需要生成的代码,点击 OK 即可
效果图:


 824
824


 被折叠的 条评论
为什么被折叠?
被折叠的 条评论
为什么被折叠?
 到【灌水乐园】发言


