


shiro权限框架的使用
1、以前的认证和授权是怎么做的
什么是认证:用户的身份认证
什么是授权:用户所具有的这些权限
1.1、以前的身份认证我们是怎么做的
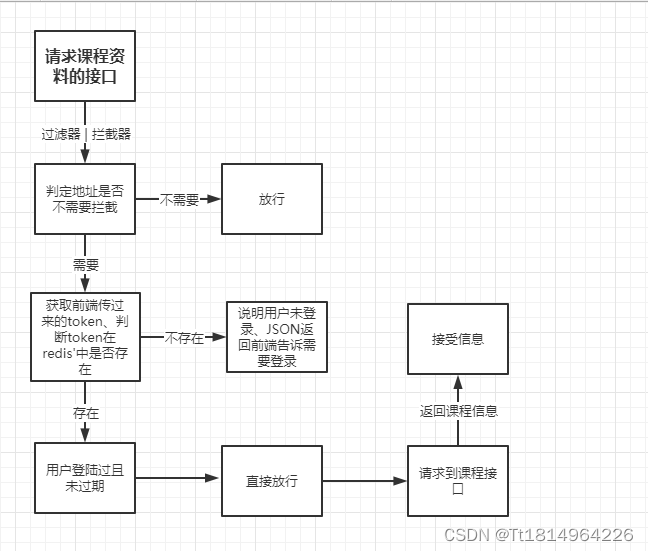
1.1.1、首先就是用户的登陆流程

1.1.2、用户请求资源的时候身份认证
[外链图片转存失败,源站可能有防盗链机制,建议将图片保存下来直接上传(img-iYDh0DMk-1658334492314)(pic\1594776498067.png)]
1.2、用户授权
1.2.1、授权信息的获取
1.2.2、完成授权

2、shiro是什么
以前我们在做 认证和授权的时候 所有的代码 是不是 都是自己写的、有Redis之后呢?简单的说这些代码都不用写 了 因为他已经帮你实现了
shiro是一个认证和授权的框架
2.1、常见的授权框架有哪些呢
Spring Security shiro OAuth2
为啥不学习 Spring Security :是因为这个鬼 本身对Spring是有依赖的 假设我们的程序未使用Spring那么这个Spring Security就不能使用
Oauth2主要是用来做三方认证的(微信、QQ、微博这种第三方的登陆)
shiro:这个鬼是百无禁忌 在哪里都可以用
3、shiro能干什么
1>:用户认证
2>:用户授权
3>:缓存管理
4>:session管理
5>:rememeberMe功能
6>:退出
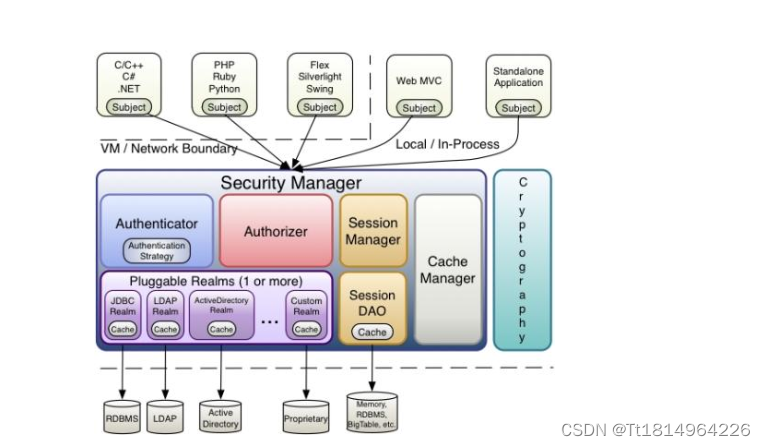
4、shiro的整体的架构
5、shiro的第一个Helloworld程序
5.1、shiro中常见的名词解释
SecurityManager:这个类是咋们shiro的核心 相当于认证授权都需要这个对象
Suject:主体的意思 这个表示的是 谁登陆谁就是主体
Realm :这个Ream对象简单的说就是用来连接 后台数据库 和 shiro之间的核心纽带
认证的一个关键点
Principals:这个表示的是登陆的时候前端封装的这个用户数据 用户数据 (用户名)
Credentials:凭证信息 简单的说 密码
5.2、首先是导包
    <!--导入shiro的相关的包-->
        <dependency>
            <groupId>org.apache.shiro</groupId>
            <artifactId>shiro-all</artifactId>
            <version>1.3.2</version>
        </dependency>
5.3、编写配置文件(resources)下编写shiro.ini
[users]
xiaobobo=123
xiaowangzi=123
5.4、编写测试文件
        //第一步:加载配置文件  初始化 核心管理器的工厂
        IniSecurityManagerFactory iniSecurityManagerFactory = new IniSecurityManagerFactory("classpath:shiro.ini");
        //获取一个核心的管理器
        SecurityManager securityManager = iniSecurityManagerFactory.createInstance();
        //将这个核心管理器放到运行环境中
        SecurityUtils.setSecurityManager(securityManager);
        //获取认证的主体对象
        // 主体:  谁认证 谁就是主体  实际上就是认证的信息的封装
        Subject subject = SecurityUtils.getSubject();
        //准备用户名和密码
        UsernamePasswordToken token = new UsernamePasswordToken("xiaobobo", "123");
        //准备登陆
        subject.login(token);
        //下面就可以打印登陆是否成功了

        System.out.println("第一次打印:"+subject.isAuthenticated());

        subject.logout();

        System.out.println("第二次打印:"+subject.isAuthenticated());
常见的异常的含义
用户名不对的异常
Exception in thread "main" org.apache.shiro.authc.UnknownAccountException:
密码不对的异常
Exception in thread "main" org.apache.shiro.authc.IncorrectCredentialsException
6、shiro的源码的初识(认证为基准)
以视频为准
7、shiro中的自定义Realm的问题
7.1、自定义一个Realm类
public class MyRealm extends AuthorizingRealm {
    @Override
    public String getName() {
        return "MyRealm";
    }


    //    @Autowire
//    private IUserService userService;


    /**
     * 完成用户认证的
     * @param authenticationToken :这里传递是前端页面传递过来的用户名和密码  UserNameAndPasswordToken
     * @return
     * @throws AuthenticationException
     */
    @Override
    protected AuthenticationInfo doGetAuthenticationInfo(AuthenticationToken authenticationToken) throws AuthenticationException {
       //  第一步:通过用户名查询用户对象
        String userName = (String) authenticationToken.getPrincipal();
        System.out.println("前端传递过来的用户名是:"+userName);
        //  第二步:按照上面方法的返回值 直接 返回用户数据给shiro就可以  这样shiro就自动的完成了认证
        //通过用户名 查询数据库  找到这个用户对象
        //userService.findUserByName(userName);
        //查询数据库中...
        //正在查询
        //已经查询出用户对象
        if(!("xiaobobo".equals(userName))){
             //说明用户名不对
            return null;
        }
        //从数据库查询出来的对象
        User user = new User(1, "xiaobobo", "123");

        SimpleAuthenticationInfo simpleAuthenticationInfo = new SimpleAuthenticationInfo(user.getUserName(),user.getPassword(),getName());
        return simpleAuthenticationInfo;
    }


    /**
     * 完成用户的授权的
     * @param principalCollection
     * @return
     */
    @Override
    protected AuthorizationInfo doGetAuthorizationInfo(PrincipalCollection principalCollection) {
        return null;
    }
}
7.2、编写配置文件
[main]
#自定义 realm
customRealm=com.qf.cd.realm.MyRealm
#将realm设置到securityManager
securityManager.realms=$customRealm
7.3、测试
public static void main(String[] args){
        //第一步:加载配置文件  初始化 核心管理器的工厂
        IniSecurityManagerFactory iniSecurityManagerFactory = new IniSecurityManagerFactory("classpath:shiro-realm.ini");
        //获取一个核心的管理器
        SecurityManager securityManager = iniSecurityManagerFactory.createInstance();
        //将这个核心管理器放到运行环境中
        SecurityUtils.setSecurityManager(securityManager);
        //获取认证的主体对象
        // 主体:  谁认证 谁就是主体  实际上就是认证的信息的封装
        Subject subject = SecurityUtils.getSubject();
        //准备用户名和密码
        UsernamePasswordToken token = new UsernamePasswordToken("xiaobobo", "12323");
        //准备登陆
        subject.login(token);
        //下面就可以打印登陆是否成功了
        System.out.println("第一次打印:"+subject.isAuthenticated());
        subject.logout();
        System.out.println("第二次打印:"+subject.isAuthenticated());
    }
8、shiro中盐的问题
解释:当我们在开发一个系统的时候 铭感数据在数据库中是不能存储明文的、那么这个时候在shiro中 就提供了 盐这个概念
那么这个盐 说白了 就是用来机械能给你数据的加密的 或者散列的
 public static void main(String[] args){
        Md5Hash md5Hash = new Md5Hash("123");
        System.out.println(md5Hash);
        Md5Hash md5Hash1 = new Md5Hash(md5Hash);
        System.out.println(md5Hash1);
        Md5Hash md5Hash2 = new Md5Hash("123", "", 2);
        System.out.println(md5Hash2);
        System.out.println("---------------------------------");
        Md5Hash md5Hash3 = new Md5Hash("123", "xiaobobo");
        Md5Hash md5Hash4 = new Md5Hash("xiaobobo123");
        System.out.println(md5Hash3);
        System.out.println(md5Hash4);
    }
8.1、编写realm
public class MyRealm extends AuthorizingRealm {
    @Override
    public String getName() {
        return "MyRealm";
    }


    //    @Autowire
//    private IUserService userService;


    /**
     * 完成用户认证的
     * @param authenticationToken :这里传递是前端页面传递过来的用户名和密码  UserNameAndPasswordToken
     * @return
     * @throws AuthenticationException
     */
    @Override
    protected AuthenticationInfo doGetAuthenticationInfo(AuthenticationToken authenticationToken) throws AuthenticationException {
       //  第一步:通过用户名查询用户对象
        String userName = (String) authenticationToken.getPrincipal();
        System.out.println("前端传递过来的用户名是:"+userName);
        //  第二步:按照上面方法的返回值 直接 返回用户数据给shiro就可以  这样shiro就自动的完成了认证
        //通过用户名 查询数据库  找到这个用户对象
        //userService.findUserByName(userName);
        //查询数据库中...
        //正在查询
        //已经查询出用户对象
        if(!("xiaobobo".equals(userName))){
             //说明用户名不对
            return null;
        }
        //从数据库查询出来的对象
        User user = new User(1, "xiaobobo", "202cb962ac59075b964b07152d234b70");

        SimpleAuthenticationInfo simpleAuthenticationInfo = new SimpleAuthenticationInfo(user.getUserName(),user.getPassword(),getName());
        return simpleAuthenticationInfo;
    }


    /**
     * 完成用户的授权的
     * @param principalCollection
     * @return
     */
    @Override
    protected AuthorizationInfo doGetAuthorizationInfo(PrincipalCollection principalCollection) {
        return null;
    }
}
8.2、编写配置文件
[main]
#定义凭证匹配器
credentialsMatcher=org.apache.shiro.authc.credential.HashedCredentialsMatcher
#散列算法
credentialsMatcher.hashAlgorithmName=md5
#散列次数
credentialsMatcher.hashIterations=1

#将凭证匹配器设置到realm
customRealm=com.qf.cd.salt.MyRealm
customRealm.credentialsMatcher=$credentialsMatcher
securityManager.realms=$customRealm
8.3、编写测试文件
public class Test002 {

    public static void main(String[] args){

        //第一步:加载配置文件  初始化 核心管理器的工厂
        IniSecurityManagerFactory iniSecurityManagerFactory = new IniSecurityManagerFactory("classpath:shiro-salt.ini");
        //获取一个核心的管理器
        SecurityManager securityManager = iniSecurityManagerFactory.createInstance();
        //将这个核心管理器放到运行环境中
        SecurityUtils.setSecurityManager(securityManager);
        //获取认证的主体对象
        // 主体:  谁认证 谁就是主体  实际上就是认证的信息的封装
        Subject subject = SecurityUtils.getSubject();
        //准备用户名和密码
        UsernamePasswordToken token = new UsernamePasswordToken("xiaobobo", "123");
        //准备登陆
        subject.login(token);
       //下面就可以打印登陆是否成功了
        System.out.println("第一次打印:"+subject.isAuthenticated());
        subject.logout();
        System.out.println("第二次打印:"+subject.isAuthenticated());
    }
}
9、shiro中的授权的问题
1>:代码授权
2>:注解授权
3>:过滤器授权
4>:jsp页面授权
9.1、realm中的授权方法的编写
 @Override
    protected AuthorizationInfo doGetAuthorizationInfo(PrincipalCollection principalCollection) {
        /**
         * 授权和认证也一样也有自己的步骤
         * 1>:获取用户名
         * 2>:通过用户名查询用户具有的权限
         * 3>:查询用户具有的角色
         * 4>:将权限和角色 直接设置给AuthorizationInfo对象就OK了
         */

        //获取用户名
        String userName = (String) principalCollection.getPrimaryPrincipal();
        //通过用户名查询角色
        //查询中
        //查询出来了..
        Set<String> roles=new HashSet<>();
        roles.add("administrator");
        roles.add("seller");
        roles.add("buyer");

        //根据用户名查询用户所具有的权限
        Set<String> permissions=new HashSet<>();
        permissions.add("adManager");
        permissions.add("userManager");
        permissions.add("xiaoboboManager");
        permissions.add("roleManager");

        //接下来封装成AuthorizationInfo对象

        SimpleAuthorizationInfo simpleAuthorizationInfo = new SimpleAuthorizationInfo(roles);
        simpleAuthorizationInfo.setStringPermissions(permissions);


        System.out.println("这里是授权的方法  该方法被执行了....");

        return simpleAuthorizationInfo;
    }
9.2、编程式授权方法的编写
 public static void main(String[] args){

        //第一步:加载配置文件  初始化 核心管理器的工厂
        IniSecurityManagerFactory iniSecurityManagerFactory = new IniSecurityManagerFactory("classpath:shiro-salt.ini");
        //获取一个核心的管理器
        SecurityManager securityManager = iniSecurityManagerFactory.createInstance();
        //将这个核心管理器放到运行环境中
        SecurityUtils.setSecurityManager(securityManager);
        //获取认证的主体对象
        // 主体:  谁认证 谁就是主体  实际上就是认证的信息的封装
        Subject subject = SecurityUtils.getSubject();
        //准备用户名和密码
        UsernamePasswordToken token = new UsernamePasswordToken("xiaobobo", "123");
        //准备登陆
        subject.login(token);
        //下面就可以打印登陆是否成功了

        if(subject.isPermitted("xiaobobomanager")){
            System.out.println("具有小波波管理的全年");
        }

        // subject.isPermitted()// 这个表示的是是否具有一系列的权限  一个以判断 返回一个数组
        // subject.hasAllRoles() ;   //判断用户是否具有所有的角色
        // subject.hasRole();     //是否具有某一个角色
        // subject.hasRoles();    //是否具有这些角色  会一个一个的判断


    }
10、Spring整合shiro的写法
10.1、基础框架的一个编写
10.1.1、导包
  <!--导包-->
        <!--导入我们Shiro的相关包 -->
    <!--    <dependency>
            <groupId>org.apache.shiro</groupId>
            <artifactId>shiro-core</artifactId>
            <version>1.3.2</version>
        </dependency>
        <dependency>
            <groupId>org.apache.shiro</groupId>
            <artifactId>shiro-web</artifactId>
            <version>1.3.2</version>
        </dependency>
        <dependency>
            <groupId>org.apache.shiro</groupId>
            <artifactId>shiro-spring</artifactId>
            <version>1.3.2</version>
        </dependency>
        <dependency>
            <groupId>org.apache.shiro</groupId>
            <artifactId>shiro-ehcache</artifactId>
            <version>1.3.2</version>
        </dependency>
        <dependency>
            <groupId>org.apache.shiro</groupId>
            <artifactId>shiro-quartz</artifactId>
            <version>1.3.2</version>
        </dependency>-->

        <dependency>
            <groupId>org.apache.shiro</groupId>
            <artifactId>shiro-all</artifactId>
            <version>1.3.2</version>
        </dependency>
        <!--导入的是shiro的依赖包 -->
        <dependency>
            <groupId>commons-logging</groupId>
            <artifactId>commons-logging</artifactId>
            <version>1.2</version>
        </dependency>
        <!--导入我们Spring的相关包 -->
        <dependency>
            <groupId>org.springframework</groupId>
            <artifactId>spring-context</artifactId>
            <version>4.3.7.RELEASE</version>
        </dependency>
        <dependency>
            <groupId>org.springframework</groupId>
            <artifactId>spring-core</artifactId>
            <version>4.3.7.RELEASE</version>
        </dependency>

        <dependency>
            <groupId>org.springframework</groupId>
            <artifactId>spring-beans</artifactId>
            <version>4.3.7.RELEASE</version>
        </dependency>
        <dependency>
            <groupId>org.springframework</groupId>
            <artifactId>spring-web</artifactId>
            <version>4.3.7.RELEASE</version>
        </dependency>
        <dependency>
            <groupId>org.springframework</groupId>
            <artifactId>spring-webmvc</artifactId>
            <version>4.3.7.RELEASE</version>
        </dependency>
        <dependency>
            <groupId>org.springframework</groupId>
            <artifactId>spring-aop</artifactId>
            <version>4.3.7.RELEASE</version>
        </dependency>
        <dependency>
            <groupId>org.springframework</groupId>
            <artifactId>spring-jdbc</artifactId>
            <version>4.3.7.RELEASE</version>
        </dependency>
        <dependency>
            <groupId>org.springframework</groupId>
            <artifactId>spring-tx</artifactId>
            <version>4.3.7.RELEASE</version>
        </dependency>
        <!--导入我们的Junit的测试包 -->
        <dependency>
            <groupId>junit</groupId>
            <artifactId>junit</artifactId>
            <version>4.12</version>
            <scope>test</scope>
        </dependency>
        <!--Web工程的相关包 -->
        <!--导入我们的Servlet的API -->
        <dependency>
            <groupId>javax.servlet</groupId>
            <artifactId>javax.servlet-api</artifactId>
            <version>3.1.0</version>
            <scope>provided</scope>
        </dependency>
        <!--导入我们jstl的标签库的包 -->
        <dependency>
            <groupId>javax.servlet.jsp.jstl</groupId>
            <artifactId>javax.servlet.jsp.jstl-api</artifactId>
            <version>1.2.1</version>
        </dependency>
        <dependency>
            <groupId>javax.servlet</groupId>
            <artifactId>jsp-api</artifactId>
            <version>2.0</version>
            <scope>provided</scope>
        </dependency>
        <dependency>
            <groupId>org.apache.taglibs</groupId>
            <artifactId>taglibs-standard-impl</artifactId>
            <version>1.2.5</version>
        </dependency>

        <dependency>
            <groupId>org.projectlombok</groupId>
            <artifactId>lombok</artifactId>
            <version>1.18.10</version>
        </dependency>

        <!--介入aspectj的相关包 -->
        <!-- https://mvnrepository.com/artifact/org.aspectj/aspectjweaver -->
        <dependency>
            <groupId>org.aspectj</groupId>
            <artifactId>aspectjweaver</artifactId>
            <version>1.8.11</version>
        </dependency>
10.1.2、编写web.xml文件
<!DOCTYPE web-app PUBLIC
 "-//Sun Microsystems, Inc.//DTD Web Application 2.3//EN"
 "http://java.sun.com/dtd/web-app_2_3.dtd" >

<web-app>
  <display-name>Archetype Created Web Application</display-name>

  <!--配置Spring-->

  <context-param>
    <param-name>contextConfigLocation</param-name>
    <param-value>classpath:bean-*.xml</param-value>
  </context-param>


  <!--配置shiro

     这个过滤器并不是咋们的目标过滤器
     因为这个过滤器只是拦截所有请求  然后转交给目标过滤器
     这里的名字是不能乱写的
     需要和后面的真正的过滤器的名字 保持一致
 -->
  <filter>
    <filter-name>shiroFilter</filter-name>
    <filter-class>org.springframework.web.filter.DelegatingFilterProxy</filter-class>
    <!--要让这个过滤器  去管理 目标过滤器的生命周期-->
    <init-param>
      <param-name>targetFilterLifecycle</param-name>
      <param-value>true</param-value>
    </init-param>
  </filter>

  <filter-mapping>
    <filter-name>shiroFilter</filter-name>
    <url-pattern>/*</url-pattern>
  </filter-mapping>

  <listener>
    <listener-class>org.springframework.web.context.ContextLoaderListener</listener-class>
  </listener>

  <!--配置SpringMVC-->

  <servlet>
    <servlet-name>DispatcherServlet</servlet-name>
    <servlet-class>org.springframework.web.servlet.DispatcherServlet</servlet-class>
    <init-param>
      <param-name>contextConfigLocation</param-name>
      <param-value>classpath:spring-mvc.xml</param-value>
    </init-param>
  </servlet>

  <servlet-mapping>
    <servlet-name>DispatcherServlet</servlet-name>
    <url-pattern>*.action</url-pattern>
  </servlet-mapping>
</web-app>
10.1.3、编写bean-shiro.xml文件
<beans xmlns="http://www.springframework.org/schema/beans"
       xmlns:xsi="http://www.w3.org/2001/XMLSchema-instance" xmlns:p="http://www.springframework.org/schema/p"
       xmlns:context="http://www.springframework.org/schema/context"
       xmlns:tx="http://www.springframework.org/schema/tx"
       xmlns:aop="http://www.springframework.org/schema/aop"
       xsi:schemaLocation="
        http://www.springframework.org/schema/beans
        http://www.springframework.org/schema/beans/spring-beans.xsd
        http://www.springframework.org/schema/context
        http://www.springframework.org/schema/context/spring-context.xsd
        http://www.springframework.org/schema/tx
        http://www.springframework.org/schema/tx/spring-tx.xsd
        http://www.springframework.org/schema/aop
        http://www.springframework.org/schema/aop/spring-aop.xsd">


    <!--配置过滤器-->
    <!--这个过滤器才是咋们真正的过滤器-->
    <bean id="shiroFilter" class="org.apache.shiro.spring.web.ShiroFilterFactoryBean">
        <!--登陆成功之后 跳转的页面-->
      <!--  <property name="successUrl" value="/index.jsp"></property>-->
        <!--配置安全管理器  注入-->
        <property name="securityManager" ref="securityManager"></property>
        <!--用户没有权限的时候 访问了某一个页面的时候 返回的友好的页面-->
        <property name="unauthorizedUrl" value="/unauthication.jsp"></property>
        <!--如果未认证 或者 认证失败之后 跳转的登陆地址-->
        <property name="loginUrl" value="/login.action"></property>
        <!--这里是 shiro这个框架 给我们提供的为了完成某些功能的 过滤器-->
        <property name="filterChainDefinitions">
           <value>

               /logout.action = logout

               /** = authc    <!--表示的意思是 所有的请求都需要认证之后才能访问-->

           </value>
        </property>
    </bean>


    <!--配置核心管理器
        安全管理器
    -->

    <bean id="securityManager" class="org.apache.shiro.web.mgt.DefaultWebSecurityManager">
        <!--在核心管理器中注入realm对象-->
        <property name="realm" ref="realm"></property>
    </bean>


    <bean id="realm" class="com.qf.shiro.realm.MyRealm"></bean>


    <aop:aspectj-autoproxy></aop:aspectj-autoproxy>
    <!--包的扫描-->
    <context:component-scan base-package="com.qf.shiro"></context:component-scan>


</beans>
10.1.4、编写spring-mvc.xml文件
<?xml version="1.0" encoding="UTF-8"?>
<beans xmlns="http://www.springframework.org/schema/beans"
       xmlns:xsi="http://www.w3.org/2001/XMLSchema-instance"
       xmlns:p="http://www.springframework.org/schema/p"
       xmlns:context="http://www.springframework.org/schema/context"
       xmlns:aop="http://www.springframework.org/schema/aop"
       xmlns:tx="http://www.springframework.org/schema/tx"
       xmlns:mvc="http://www.springframework.org/schema/mvc"
       xmlns:task="http://www.springframework.org/schema/task"
       xsi:schemaLocation="http://www.springframework.org/schema/beans
        http://www.springframework.org/schema/beans/spring-beans-4.0.xsd
        http://www.springframework.org/schema/context
        http://www.springframework.org/schema/context/spring-context-4.0.xsd
        http://www.springframework.org/schema/aop
        http://www.springframework.org/schema/aop/spring-aop-4.0.xsd
        http://www.springframework.org/schema/tx
        http://www.springframework.org/schema/tx/spring-tx-4.0.xsd
        http://www.springframework.org/schema/mvc
        http://www.springframework.org/schema/mvc/spring-mvc.xsd
        http://www.springframework.org/schema/task
        http://www.springframework.org/schema/task/spring-task-3.1.xsd"
>


    <mvc:annotation-driven></mvc:annotation-driven>

    <aop:aspectj-autoproxy></aop:aspectj-autoproxy>

    <context:component-scan base-package="com.qf.shiro.controller"></context:component-scan>


</beans>
10.1.5、编写controller
package com.qf.shiro.controller;

import com.qf.shiro.pojo.User;
import org.apache.shiro.SecurityUtils;
import org.apache.shiro.authc.IncorrectCredentialsException;
import org.apache.shiro.authc.UnknownAccountException;
import org.apache.shiro.web.filter.authc.FormAuthenticationFilter;
import org.springframework.stereotype.Controller;
import org.springframework.ui.Model;
import org.springframework.web.bind.annotation.RequestMapping;

import javax.servlet.http.HttpServletRequest;

/**
 * @Auther: xiaobobo
 * @Date: 2020/7/16 14:28
 * @Description:这个是用户的控制器
 */
@Controller
public class UserController {


    /**
     * 登陆的方法
     *
     * 这里不写登陆的逻辑  那么只写 登陆失败之后的处理
     *
     * @return
     */
    @RequestMapping(value = "login")
    public String login(HttpServletRequest request, Model model){

        //所以这里面放的是 异常的名字
        String shiroLoginFailure = (String) request.getAttribute("shiroLoginFailure");
        System.out.println("错误信息是:"+shiroLoginFailure);
        if(UnknownAccountException.class.getName().equals(shiroLoginFailure)){
            System.out.println("用户名不对....");
            model.addAttribute("userNameError","用户名不对");
        }else if(IncorrectCredentialsException.class.getName().equals(shiroLoginFailure)){
            System.out.println("密码不对....");
            model.addAttribute("passwordError","密码不对");

        }else {
            System.out.println("系统故障....");
            model.addAttribute("otherError", "系统问题");
        }
        return "/login.jsp";
    }


    /**
     * 跳转到首页
     * @return
     */
    @RequestMapping("jumpIndexPage")
    public String jumpIndexPage(Model model){

        //怎么获取用户信息呢?
        User user = (User) SecurityUtils.getSubject().getPrincipal();
        model.addAttribute("userName",user.getUserName());
        model.addAttribute("users",user);
        return "/index.jsp";

    }
}
10.1.6、编写登陆页面
<%--
  Created by IntelliJ IDEA.
  User: apple
  Date: 2020/7/16
  Time: 10:42
  To change this template use File | Settings | File Templates.
--%>
<%@ page contentType="text/html;charset=UTF-8" language="java" isELIgnored="false" %>
<html>
<head>
    <title>Title</title>
</head>
<body>


    <%--登陆的表单--%>
    <form action="/login.action" method="post">
        用户名:<input type="text" name="username">${userNameError}<br>
        密码:<input type="text" name="password">${passwordError}<<br>
        <input type="submit" value="登陆">
    </form>

</body>
</html>
10.1.7、编写首页
<%@ page contentType="text/html;charset=UTF-8" language="java" isELIgnored="false" %>
<%@ taglib uri="http://shiro.apache.org/tags" prefix="shiro" %>
<%@ taglib prefix="c" uri="http://java.sun.com/jsp/jstl/core" %>
<html>
<head>
</head>
<body>
<h2>首页</h2>

欢迎>${userName}回来!!!!<<br>

欢迎:<shiro:principal></shiro:principal>回来!!!!<<br>

<a href="/logout.action">退出功能</a>

<hr>

菜单信息<<br>
<c:forEach items="${users.resourcesName}" var="sourceName">
    ${sourceName}<br>
</c:forEach>


</body>
</html>
10.2、退出功能的编写
10.2.1、首先在页面上要有一个按钮
<a href="/logout.action">退出功能</a>
10.2.2、然后配置一个过滤器
/logout.action = logout
10.3、在首页上显示用户信息的编写
10.3.1、编写Contoller获取用户信息
  /**
     * 跳转到首页
     * @return
     */
    @RequestMapping("jumpIndexPage")
    public String jumpIndexPage(Model model){

        //怎么获取用户信息呢?
        User user = (User) SecurityUtils.getSubject().getPrincipal();
        model.addAttribute("userName",user.getUserName());
        model.addAttribute("users",user);
        return "/index.jsp";

    }
10.3.2、更改那个源码
[外链图片转存失败,源站可能有防盗链机制,建议将图片保存下来直接上传(img-WHdZwYUi-1658334492318)(pic\1594887380351.png)]
10.3.3、在首页上使用jstl标签
<%@ taglib prefix="c" uri="http://java.sun.com/jsp/jstl/core" %>

菜单信息<<br>
<c:forEach items="${users.resourcesName}" var="sourceName">
    ${sourceName}<br>
</c:forEach>
10.4、过滤器授权的使用
10.4.1、首先准备一个Controller
  /**
     * 过滤器授权
     *
     * 在这里 哦有这样一个需求
     *下面这个方法  必须具有  用户管理的权限才能访问
     *
     * @return
     */
    @RequestMapping("authzirationGLQ")
    public String authzirationGLQ(){
        System.out.println("我实行了  这里是过滤器授权");
        return "/main.jsp";
    }
10.4.2、在bean-base的过滤器中进行配置
<property name="filterChainDefinitions">
           <value>


               /authzirationGLQ.action = perms[userManager]   <!--这个就表示的是当前请求的路径必须具有某一个权限才能访问-->

               /logout.action = logout

               /** = authc    <!--表示的意思是 所有的请求都需要认证之后才能访问-->

           </value>
        </property>
10.4.3、准备一个按钮
<a href="/authzirationGLQ.action">验证过滤器授权</a>
10.5、注解授权的使用
10.5.1、在spring-mvc.xml中进行配置 支持 shiro的注解授权
    <!--这个就是注解授权的时候  开启支持这个注解授权-->
    <bean id="advisor" class="org.apache.shiro.spring.security.interceptor.AuthorizationAttributeSourceAdvisor">
        <property name="securityManager" ref="securityManager"></property>
    </bean>
10.5.2、准备一个请求的方法使用shiro提供的注解
 /**
     * 测试注解授权
     * @return
     */
    @RequestMapping("authorizationSQ")
    @RequiresPermissions({"userManager"})    //这个表示的是下面的方法  必须具有 xiaoboboManager的权限才能访问
    //@RequiresRoles({})  这个就表示的是下面的方法 必须具有某一个角色才能访问
    public String authorizationSQ(){
        System.out.println("我执行了....");
        return "/main.jsp";
    }
10.5.3、准备一个按钮来进行触发
<a href="/authorizationSQ.action">验证注解授权</a> <br>
10.6、jsp页面授权的使用
10.6.1、在jsp页面上导入shiro的标签库
<%@ taglib uri="http://shiro.apache.org/tags" prefix="shiro" %>
10.6.2、在jsp页面上使用 shiro的标签
shiro标签的使用<<br>

<%--这个是昨天说的 认证中的第一个参数--%>
<shiro:principal></shiro:principal>

<%--没有认证那么就执行中间(打印 没有认证)这个  认证 了 就不会执行--%>
<shiro:notAuthenticated>
    没有认证
</shiro:notAuthenticated>


<shiro:hasPermission name="roleManager">
   <a href="#">角色管理</a>
</shiro:hasPermission>


<shiro:hasRole name="xxManager">
    <a href="#">管理员管理</a>
</shiro:hasRole>

<%--拥有其中的任何一个角色 才能执行中间的代码--%>
<shiro:hasAnyRoles name="xxxx"></shiro:hasAnyRoles>


<%--认证通过之后才会执行--%>
<shiro:authenticated>
    认证通过了
</shiro:authenticated>
10.7、缓存的使用
缓存究竟是缓存什么东西:简单的说 如果没有使用缓存的话 那么 每一次在进行授权的时候 都会访问realm中 的 授权的方法 因为在realm中 授权的方法中存在数据库的访问 所以 如果不使用缓存的话 那么会导致 我们频繁的去请求数据库 这样数据库的压力就比较大 了
这个时候 缓存就应运而生了
10.7.1、首先就是导包
       <dependency>
            <groupId>org.springframework</groupId>
            <artifactId>spring-context-support</artifactId>
            <version>4.3.7.RELEASE</version>
        </dependency>
10.7.2、在resources下 配置 encache.xml的配置文件
<ehcache xmlns:xsi="http://www.w3.org/2001/XMLSchema-instance"
         xsi:noNamespaceSchemaLocation="../config/ehcache.xsd">
    <!--缓存到硬盘的位置-->
    <diskStore path="G:\ehcache" />
    <!--配置的是默认所有的缓存数据的生命周期-->
    <defaultCache
            maxElementsInMemory="1000"
            maxElementsOnDisk="10000000"
            eternal="false"
            overflowToDisk="false"
            timeToIdleSeconds="120"
            timeToLiveSeconds="120"
            diskExpiryThreadIntervalSeconds="120"
            memoryStoreEvictionPolicy="LRU">
    </defaultCache>
</ehcache>
10.7.3、在bean-base.xml中配置缓存的使用
 <!--配置缓存-->
    <bean id="ehCacheManager" class="org.apache.shiro.cache.ehcache.EhCacheManager">
        <!--配置缓存的最终实例-->
        <property name="cacheManager" ref="cacheManager"></property>
    </bean>

    <!--这个配置的是Spring中的这个Ehcahce的缓存实例-->
    <bean id="cacheManager" class="org.springframework.cache.ehcache.EhCacheManagerFactoryBean">
        <!--配置的是ehcach的配置文件的路径-->
        <property name="configLocation" value="classpath:ehcache.xml"></property>
        <!--是否配置缓存共享-->
        <property name="shared" value="true"></property>
    </bean>

在安全管理器中注入
  <bean id="securityManager" class="org.apache.shiro.web.mgt.DefaultWebSecurityManager">
        <!--在核心管理器中注入realm对象-->
        <property name="realm" ref="realm"></property>
        <!--在安全管理器中配置缓存的管理器-->
        <property name="cacheManager" ref="ehCacheManager"></property>
    </bean>
10.8、会话的管理(并没有什么用)
10.8.1、在bean-base.xml中进行配置
  <!--接下来配置 会话管理-->
    <bean id="sessionManager" class="org.apache.shiro.web.session.mgt.DefaultWebSessionManager">
        <!--设置session的超时时间-->
        <property name="globalSessionTimeout" value="10"></property>
        <!--session过期之后 是否需要删除-->
        <property name="deleteInvalidSessions" value="true"></property>
    </bean>
10.8.2、在安全管理中进行注入
 <bean id="securityManager" class="org.apache.shiro.web.mgt.DefaultWebSecurityManager">
        <!--在核心管理器中注入realm对象-->
        <property name="realm" ref="realm"></property>
        <!--在安全管理器中配置缓存的管理器-->
        <property name="cacheManager" ref="ehCacheManager"></property>
        <!--下面配置Session的管理-->
        <property name="sessionManager" ref="sessionManager"></property>
    </bean>
10.9、rememeberMe的使用(记住我这个功能)
10.9.1、在登陆页面上整一个checkbox名字叫做是否记住我
    <%--登陆的表单--%>
    <form action="/login.action" method="post">
        用户名:<input type="text" name="username">${userNameError}<br>
        密码:<input type="text" name="password">${passwordError}<<br>
        是否记住我:<<input type="checkbox" name="rememberMe"><br>
        <input type="submit" value="登陆">
    </form>
10.9.2、在bean-base.xml中进行配置
  <!--配置记住我的这个功能-->
    <bean id="rememberMeManager" class="org.apache.shiro.web.mgt.CookieRememberMeManager">
        <!--注入Cookie-->
        <property name="cookie" ref="simpleCookie"></property>
    </bean>


    <bean id="simpleCookie" class="org.apache.shiro.web.servlet.SimpleCookie">
        <!--设置Cookie的名字-->
        <property name="name" value="rememberMe"></property>
        <!--一个月过期-->
        <property name="maxAge" value="2592000"></property>
        <!--配置路径-->
        <property name="path" value="/"></property>
    </bean>
10.9.3、在安全管理器中进行注入
  <bean id="securityManager" class="org.apache.shiro.web.mgt.DefaultWebSecurityManager">
        <!--在核心管理器中注入realm对象-->
        <property name="realm" ref="realm"></property>
        <!--在安全管理器中配置缓存的管理器-->
        <property name="cacheManager" ref="ehCacheManager"></property>
        <!--下面配置Session的管理-->
        <!--<property name="sessionManager" ref="sessionManager"></property>-->
        <!--注入记住我的这个功能-->
        <property name="rememberMeManager" ref="rememberMeManager"></property>
    </bean>
10.9.4、配置哪些页面在使用了记住我的功能的情况下能使用
/index.jsp = user
/main.jsp =user
10.10、解决一些shiro的开发问题
10.10.1、改名户名的问题
1>:编写表单认证器
public class MyFormAuthenticationFilter extends FormAuthenticationFilter {


    @Override
    protected boolean onLoginSuccess(AuthenticationToken token, Subject subject, ServletRequest request, ServletResponse response) throws Exception {
        HttpServletResponse resp= (HttpServletResponse) response;
        resp.sendRedirect("/index.jsp");
        return false;
    }


    @Override
    protected boolean onLoginFailure(AuthenticationToken token, AuthenticationException e, ServletRequest request, ServletResponse response) {
        return super.onLoginFailure(token, e, request, response);
    }
}
2>:在bean-base中进行申明
 <!--下面申明我们自己的表单认证器-->
        <property name="filters">
          <map>
              <entry key="authc" value-ref="formAuthenticationFilter"></entry>
          </map>
        </property>


  <!--配置自己的表单认证器-->
    <bean id="formAuthenticationFilter" class="com.qf.shiro.filter.MyFormAuthenticationFilter">
        <property name="usernameParam" value="userName"></property>
        <property name="passwordParam" value="pwd"></property>
        <property name="rememberMeParam" value="rememberMe"></property>
    </bean>
3>:更改页面的名字
 <%--登陆的表单--%>
    <form action="/login.action" method="post">
        用户名:<input type="text" name="userName">${userNameError}<br>
        密码:<input type="text" name="pwd">${passwordError}<<br>
        是否记住我:<<input type="checkbox" name="rememberMe"><br>
        <input type="submit" value="登陆">
    </form>


 720
720


 被折叠的 条评论
为什么被折叠?
被折叠的 条评论
为什么被折叠?
 到【灌水乐园】发言


