


安装wsl2
- 运行:appwiz.cpl 打开程序和功能
- 点击启用或关闭 windows 功能
- 勾选这两个选项

- 勾选后重启
- 重启后,打开微软商店,自动更新wsl,然后安装所需的linux即可。
- 如果下载慢,可自行下载,打开链接:
wsl发行版 json格式
可以看到下面的内容:
{
   "Distributions": [
       {
           "Name": "Ubuntu",
           "FriendlyName": "Ubuntu",
           "StoreAppId": "9PDXGNCFSCZV",
           "Amd64": true,
           "Arm64": true,
           "Amd64PackageUrl": "https://wslstorestorage.blob.core.windows.net/wslblob/Ubuntu2204-220117.appx",
           "Arm64PackageUrl": "https://wslstorestorage.blob.core.windows.net/wslblob/Ubuntu2204-220117_ARM64.appx",
           "PackageFamilyName": "CanonicalGroupLimited.Ubuntu_79rhkp1fndgsc"
       },
       {
           "Name": "Ubuntu-22.04",
           "FriendlyName": "Ubuntu 22.04 LTS",
           "StoreAppId": "9PN20MSR04DW",
           "Amd64": true,
           "Arm64": true,
           "Amd64PackageUrl": "https://wslstorestorage.blob.core.windows.net/wslblob/Ubuntu2204LTS-230117.appx",
           "Arm64PackageUrl": "https://wslstorestorage.blob.core.windows.net/wslblob/Ubuntu2204LTS-230117_ARM64.appx",
           "PackageFamilyName": "CanonicalGroupLimited.Ubuntu22.04LTS_79rhkp1fndgsc"
       },
       {
           "Name": "Debian",
           "FriendlyName": "Debian GNU/Linux",
           "StoreAppId": "9MSVKQC78PK6",
           "Amd64": true,
           "Arm64": true,
           "Amd64PackageUrl": "https://wsldownload.azureedge.net/TheDebianProject.DebianGNULinux_1.12.2.0_neutral___76v4gfsz19hv4.AppxBundle",
           "Arm64PackageUrl": "https://wsldownload.azureedge.net/TheDebianProject.DebianGNULinux_1.12.2.0_neutral___76v4gfsz19hv4.AppxBundle",
           "PackageFamilyName": "TheDebianProject.DebianGNULinux_76v4gfsz19hv4"
       },
       {
           "Name": "kali-linux",
           "FriendlyName": "Kali Linux Rolling",
           "StoreAppId": "9PKR34TNCV07",
           "Amd64": true,
           "Arm64": false,
           "Amd64PackageUrl": "https://wsldownload.azureedge.net/KaliLinux_1.13.1.0.AppxBundle",
           "Arm64PackageUrl": null,
           "PackageFamilyName": "KaliLinux.54290C8133FEE_ey8k8hqnwqnmg"
       },
       {
           "Name": "SLES-12",
           "FriendlyName": "SUSE Linux Enterprise Server v12",
           "StoreAppId": "9MZ3D1TRP8T1",
           "Amd64": true,
           "Arm64": false,
           "Amd64PackageUrl": "https://wsldownload.azureedge.net/SLES-12_v1.appx",
           "Arm64PackageUrl": null,
           "PackageFamilyName": "46932SUSE.SUSELinuxEnterpriseServer12SP2_022rs5jcyhyac"
       },
       {
           "Name": "SLES-15",
           "FriendlyName": "SUSE Linux Enterprise Server v15",
           "StoreAppId": "9NJFZK00FGKV",
           "Amd64": true,
           "Arm64": false,
           "Amd64PackageUrl": null,
           "Arm64PackageUrl": null,
           "PackageFamilyName": null
       },
       {
           "Name": "Ubuntu-18.04",
           "FriendlyName": "Ubuntu 18.04 LTS",
           "StoreAppId": "9N9TNGVNDL3Q",
           "Amd64": true,
           "Arm64": true,
           "Amd64PackageUrl": "https://wsldownload.azureedge.net/Ubuntu_1804.2019.522.0_x64.appx",
           "Arm64PackageUrl": "https://wsldownload.azureedge.net/Ubuntu_1804.2019.522.0_ARM64.appx",
           "PackageFamilyName": "CanonicalGroupLimited.Ubuntu18.04onWindows_79rhkp1fndgsc"
       },
       {
           "Name": "Ubuntu-20.04",
           "FriendlyName": "Ubuntu 20.04 LTS",
           "StoreAppId": "9N6SVWS3RX71",
           "Amd64": true,
           "Arm64": true,
           "Amd64PackageUrl": "https://wsldownload.azureedge.net/Ubuntu_2004.2020.424.0_x64.appx",
           "Arm64PackageUrl": "https://wsldownload.azureedge.net/Ubuntu_2004.2020.424.0_ARM64.appx",
           "PackageFamilyName": "CanonicalGroupLimited.Ubuntu20.04onWindows_79rhkp1fndgsc"
       },

       {
           "Name": "OracleLinux_8_5",
           "FriendlyName": "Oracle Linux 8.5",
           "StoreAppId": "9P06H18WXBVP",
           "Amd64": true,
           "Arm64": false,
           "Amd64PackageUrl": "https://wslstorestorage.blob.core.windows.net/wslblob/OracleLinux8.5_8.5.1.0.Appx",
           "Arm64PackageUrl": null,
           "PackageFamilyName": "3810OracleAmericaInc.OracleLinux8.5_dm28ctvqnhe9g"
       },
       {
           "Name": "OracleLinux_7_9",
           "FriendlyName": "Oracle Linux 7.9",
           "StoreAppId": "9P7L0QWBSLTK",
           "Amd64": true,
           "Arm64": false,
           "Amd64PackageUrl": "https://wslstorestorage.blob.core.windows.net/wslblob/OracleLinux7.9_7.9.1.0.Appx",
           "Arm64PackageUrl": null,
           "PackageFamilyName": "3810OracleAmericaInc.OracleLinux7.9_dm28ctvqnhe9g"
       }
   ]
}
下载appx,然后打开文件所在目录,右键 在终端中打开,执行
Add-AppPackage (你的appx文件)
跑完进度条即可。
7. 输入bash,即可进入。
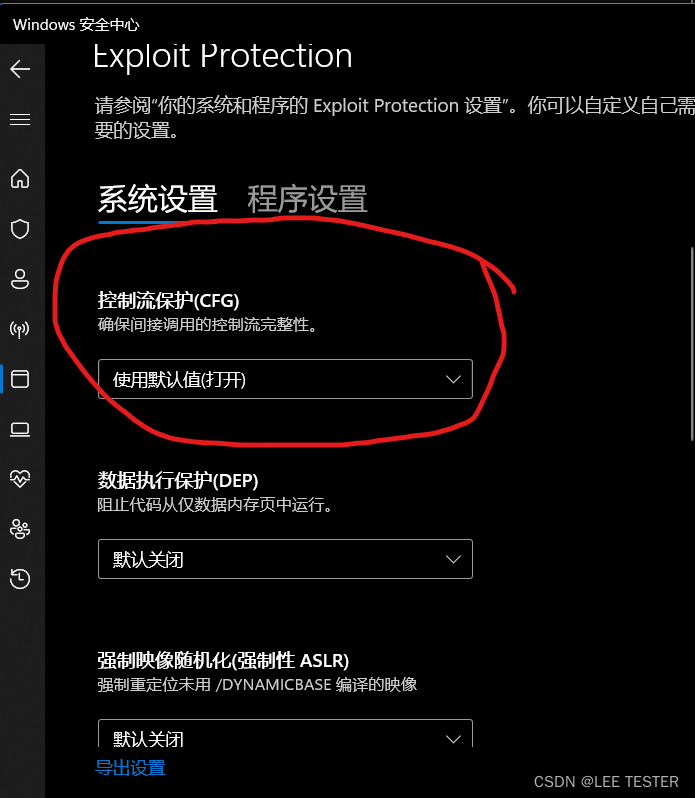
8. 注意事项:defender 不可以禁用, 而且保证 cfg打开。
9. 更多wsl的帮助,见wsl官方文档。
配置Ubuntu
我安装的是Ubuntu-22.04。
- 更改源
cd /etc/apt/
# 备份source.list
sudo mv sources.list sources.list.bak
# 修改source.list
sudo vim sources.list
- 将下面内容粘贴到文件中
长江流域建议用中科大源
# 默认注释了源码仓库,如有需要可自行取消注释
deb https://mirrors.ustc.edu.cn/ubuntu/ jammy main restricted universe multiverse
# deb-src https://mirrors.ustc.edu.cn/ubuntu/ jammy main restricted universe multiverse

deb https://mirrors.ustc.edu.cn/ubuntu/ jammy-security main restricted universe multiverse
# deb-src https://mirrors.ustc.edu.cn/ubuntu/ jammy-security main restricted universe multiverse

deb https://mirrors.ustc.edu.cn/ubuntu/ jammy-updates main restricted universe multiverse
# deb-src https://mirrors.ustc.edu.cn/ubuntu/ jammy-updates main restricted universe multiverse

deb https://mirrors.ustc.edu.cn/ubuntu/ jammy-backports main restricted universe multiverse
# deb-src https://mirrors.ustc.edu.cn/ubuntu/ jammy-backports main restricted universe multiverse

# 预发布软件源,不建议启用
# deb https://mirrors.ustc.edu.cn/ubuntu/ jammy-proposed main restricted universe multiverse
# deb-src https://mirrors.ustc.edu.cn/ubuntu/ jammy-proposed main restricted universe multiverse
北方城市建议用清华源
deb https://mirrors.tuna.tsinghua.edu.cn/debian/ bullseye main contrib non-free
# deb-src https://mirrors.tuna.tsinghua.edu.cn/debian/ bullseye main contrib non-free

deb https://mirrors.tuna.tsinghua.edu.cn/debian/ bullseye-updates main contrib non-free
# deb-src https://mirrors.tuna.tsinghua.edu.cn/debian/ bullseye-updates main contrib non-free

deb https://mirrors.tuna.tsinghua.edu.cn/debian/ bullseye-backports main contrib non-free
# deb-src https://mirrors.tuna.tsinghua.edu.cn/debian/ bullseye-backports main contrib non-free

deb https://mirrors.tuna.tsinghua.edu.cn/debian-security bullseye-security main contrib non-free
# deb-src https://mirrors.tuna.tsinghua.edu.cn/debian-security bullseye-security main contrib non-free
按esc,输入 :wq保存。执行下面的命令进行更新
sudo apt update
sudo apt upgrade
安装一些小工具(可选)
- gedit
我不是用vim的那块材料,老老实实用GUI的编辑器吧。
sudo apt install -y gedit
- plocate
sudo apt install -y plocate
不要等命令跑完,跑完要花很长时间。由于wsl2跨文件系统性能很差,因此可以修改配置文件使之不扫描windows文件。
sudo gedit /etc/updatedb.conf
在PRUNEPATHS后添加 /mnt
PRUNE_BIND_MOUNTS="yes"
# PRUNENAMES=".git .bzr .hg .svn"
PRUNEPATHS="/mnt /tmp /var/spool /media /var/lib/os-prober /var/lib/ceph /home/.ecryptfs /var/lib/schroot"
PRUNEFS="NFS afs autofs binfmt_misc ceph cgroup cgroup2 cifs coda configfs curlftpfs debugfs devfs devpts devtmpfs ecryptfs ftpfs fuse.ceph fuse.cryfs fuse.encfs fuse.glusterfs fuse.gvfsd-fuse fuse.mfs fuse.rclone fuse.rozofs fuse.sshfs fusectl fusesmb hugetlbfs iso9660 lustre lustre_lite mfs mqueue ncpfs nfs nfs4 ocfs ocfs2 proc pstore rpc_pipefs securityfs shfs smbfs sysfs tmpfs tracefs udev udf usbfs"
更新数据库
sudo updatedb
查找某个文件
locate [something]
- 安装mysql
sudo apt install mysql-server
sudo apt install mysql-client
安装好后,输入 mysql ,我这里会显示错误:
ERROR 2002 (HY000): Can't connect to local MySQL server through socket '/var/run/mysqld/mysqld.sock' (13)
执行
cd /var/run
sudo mkdir mysqld
sudo chmod a=rwx mysqld
再次运行,发现还是报错:
ERROR 1045 (28000): Access denied for user 'yourname'@'localhost' (using password: NO)
以root身份运行mysql是正常的。
sudo mysql
Welcome to the MySQL monitor.  Commands end with ; or \g.
Your MySQL connection id is 13
Server version: 8.0.32-0ubuntu0.22.04.2 (Ubuntu)

Copyright (c) 2000, 2023, Oracle and/or its affiliates.

Oracle is a registered trademark of Oracle Corporation and/or its
affiliates. Other names may be trademarks of their respective
owners.

Type 'help;' or '\h' for help. Type '\c' to clear the current input statement.

mysql>
这里引用一下其他人的方法,ERROR 1698 (28000): Access denied for user ‘root‘@‘localhost‘解决方法以及wsl2(Ubuntu-22.04)配置mysql8.0。
启动mysql
如果需要在外网访问wsl的MySQL数据库,需要做以下两个事情。
首先,在windows下将本地3306端口暴漏到3307端口
netsh interface portproxy add v4tov4 listenport=3307 listenaddress=0.0.0.0 connectport=3306 connectaddress=localhost
然后在wsl中允许3306端口通过:
iptables -A INPUT -i eth0 -p tcp -m tcp --dport 3306 -j ACCEPT
这样就可以在别处使用ip:3307访问到wsl的mysql了。
4. 安装anaconda
下载链接:anaconda,选择64-Bit (x86) Installer (737 MB)。下载完成后,执行
bash [anaconda-name].sh
更新环境变量
echo 'export PATH="~/anaconda3/bin:$PATH"' >> ~/.bashrc
source ~/.bashrc
conda #验证是否安装成功
- 修改conda源
这个文章讲的很详细的:Conda 替换镜像源方法尽头,再也不用到处搜镜像源地址
注意,打开.condarc文件,在channels:下方如果有 - defaults,一定要删除!否则它还是会去境外下载! - 使用vscode连接到wsl进行开发
这个文章讲的很详细的:Windows Linux子系统(WSL),vscode+python+jupyter 开发环境搭建
安装node.js、vue.js
- 安装nvm
wget https://raw.githubusercontent.com/nvm-sh/nvm/master/install.sh | bash
国内访问可能不大行,这里直接贴脚本
#!/usr/bin/env bash

{ # this ensures the entire script is downloaded #

nvm_has() {
  type "$1" > /dev/null 2>&1
}

nvm_echo() {
  command printf %s\\n "$*" 2>/dev/null
}

if [ -z "${BASH_VERSION}" ] || [ -n "${ZSH_VERSION}" ]; then
  # shellcheck disable=SC2016
  nvm_echo >&2 'Error: the install instructions explicitly say to pipe the install script to `bash`; please follow them'
  exit 1
fi

nvm_grep() {
  GREP_OPTIONS='' command grep "$@"
}

nvm_default_install_dir() {
  [ -z "${XDG_CONFIG_HOME-}" ] && printf %s "${HOME}/.nvm" || printf %s "${XDG_CONFIG_HOME}/nvm"
}

nvm_install_dir() {
  if [ -n "$NVM_DIR" ]; then
    printf %s "${NVM_DIR}"
  else
    nvm_default_install_dir
  fi
}

nvm_latest_version() {
  nvm_echo "v0.39.3"
}

nvm_profile_is_bash_or_zsh() {
  local TEST_PROFILE
  TEST_PROFILE="${1-}"
  case "${TEST_PROFILE-}" in
    *"/.bashrc" | *"/.bash_profile" | *"/.zshrc" | *"/.zprofile")
      return
    ;;
    *)
      return 1
    ;;
  esac
}

#
# Outputs the location to NVM depending on:
# * The availability of $NVM_SOURCE
# * The method used ("script" or "git" in the script, defaults to "git")
# NVM_SOURCE always takes precedence unless the method is "script-nvm-exec"
#
nvm_source() {
  local NVM_GITHUB_REPO
  NVM_GITHUB_REPO="${NVM_INSTALL_GITHUB_REPO:-nvm-sh/nvm}"
  local NVM_VERSION
  NVM_VERSION="${NVM_INSTALL_VERSION:-$(nvm_latest_version)}"
  local NVM_METHOD
  NVM_METHOD="$1"
  local NVM_SOURCE_URL
  NVM_SOURCE_URL="$NVM_SOURCE"
  if [ "_$NVM_METHOD" = "_script-nvm-exec" ]; then
    NVM_SOURCE_URL="https://raw.githubusercontent.com/${NVM_GITHUB_REPO}/${NVM_VERSION}/nvm-exec"
  elif [ "_$NVM_METHOD" = "_script-nvm-bash-completion" ]; then
    NVM_SOURCE_URL="https://raw.githubusercontent.com/${NVM_GITHUB_REPO}/${NVM_VERSION}/bash_completion"
  elif [ -z "$NVM_SOURCE_URL" ]; then
    if [ "_$NVM_METHOD" = "_script" ]; then
      NVM_SOURCE_URL="https://raw.githubusercontent.com/${NVM_GITHUB_REPO}/${NVM_VERSION}/nvm.sh"
    elif [ "_$NVM_METHOD" = "_git" ] || [ -z "$NVM_METHOD" ]; then
      NVM_SOURCE_URL="https://github.com/${NVM_GITHUB_REPO}.git"
    else
      nvm_echo >&2 "Unexpected value \"$NVM_METHOD\" for \$NVM_METHOD"
      return 1
    fi
  fi
  nvm_echo "$NVM_SOURCE_URL"
}

#
# Node.js version to install
#
nvm_node_version() {
  nvm_echo "$NODE_VERSION"
}

nvm_download() {
  if nvm_has "curl"; then
    curl --fail --compressed -q "$@"
  elif nvm_has "wget"; then
    # Emulate curl with wget
    ARGS=$(nvm_echo "$@" | command sed -e 's/--progress-bar /--progress=bar /' \
                            -e 's/--compressed //' \
                            -e 's/--fail //' \
                            -e 's/-L //' \
                            -e 's/-I /--server-response /' \
                            -e 's/-s /-q /' \
                            -e 's/-sS /-nv /' \
                            -e 's/-o /-O /' \
                            -e 's/-C - /-c /')
    # shellcheck disable=SC2086
    eval wget $ARGS
  fi
}

install_nvm_from_git() {
  local INSTALL_DIR
  INSTALL_DIR="$(nvm_install_dir)"
  local NVM_VERSION
  NVM_VERSION="${NVM_INSTALL_VERSION:-$(nvm_latest_version)}"
  if [ -n "${NVM_INSTALL_VERSION:-}" ]; then
    # Check if version is an existing ref
    if command git ls-remote "$(nvm_source "git")" "$NVM_VERSION" | nvm_grep -q "$NVM_VERSION" ; then
      :
    # Check if version is an existing changeset
    elif ! nvm_download -o /dev/null "$(nvm_source "script-nvm-exec")"; then
      nvm_echo >&2 "Failed to find '$NVM_VERSION' version."
      exit 1
    fi
  fi

  local fetch_error
  if [ -d "$INSTALL_DIR/.git" ]; then
    # Updating repo
    nvm_echo "=> nvm is already installed in $INSTALL_DIR, trying to update using git"
    command printf '\r=> '
    fetch_error="Failed to update nvm with $NVM_VERSION, run 'git fetch' in $INSTALL_DIR yourself."
  else
    fetch_error="Failed to fetch origin with $NVM_VERSION. Please report this!"
    nvm_echo "=> Downloading nvm from git to '$INSTALL_DIR'"
    command printf '\r=> '
    mkdir -p "${INSTALL_DIR}"
    if [ "$(ls -A "${INSTALL_DIR}")" ]; then
      # Initializing repo
      command git init "${INSTALL_DIR}" || {
        nvm_echo >&2 'Failed to initialize nvm repo. Please report this!'
        exit 2
      }
      command git --git-dir="${INSTALL_DIR}/.git" remote add origin "$(nvm_source)" 2> /dev/null \
        || command git --git-dir="${INSTALL_DIR}/.git" remote set-url origin "$(nvm_source)" || {
        nvm_echo >&2 'Failed to add remote "origin" (or set the URL). Please report this!'
        exit 2
      }
    else
      # Cloning repo
      command git clone "$(nvm_source)" --depth=1 "${INSTALL_DIR}" || {
        nvm_echo >&2 'Failed to clone nvm repo. Please report this!'
        exit 2
      }
    fi
  fi
  # Try to fetch tag
  if command git --git-dir="$INSTALL_DIR"/.git --work-tree="$INSTALL_DIR" fetch origin tag "$NVM_VERSION" --depth=1 2>/dev/null; then
    :
  # Fetch given version
  elif ! command git --git-dir="$INSTALL_DIR"/.git --work-tree="$INSTALL_DIR" fetch origin "$NVM_VERSION" --depth=1; then
    nvm_echo >&2 "$fetch_error"
    exit 1
  fi
  command git -c advice.detachedHead=false --git-dir="$INSTALL_DIR"/.git --work-tree="$INSTALL_DIR" checkout -f --quiet FETCH_HEAD || {
    nvm_echo >&2 "Failed to checkout the given version $NVM_VERSION. Please report this!"
    exit 2
  }
  if [ -n "$(command git --git-dir="$INSTALL_DIR"/.git --work-tree="$INSTALL_DIR" show-ref refs/heads/master)" ]; then
    if command git --no-pager --git-dir="$INSTALL_DIR"/.git --work-tree="$INSTALL_DIR" branch --quiet 2>/dev/null; then
      command git --no-pager --git-dir="$INSTALL_DIR"/.git --work-tree="$INSTALL_DIR" branch --quiet -D master >/dev/null 2>&1
    else
      nvm_echo >&2 "Your version of git is out of date. Please update it!"
      command git --no-pager --git-dir="$INSTALL_DIR"/.git --work-tree="$INSTALL_DIR" branch -D master >/dev/null 2>&1
    fi
  fi

  nvm_echo "=> Compressing and cleaning up git repository"
  if ! command git --git-dir="$INSTALL_DIR"/.git --work-tree="$INSTALL_DIR" reflog expire --expire=now --all; then
    nvm_echo >&2 "Your version of git is out of date. Please update it!"
  fi
  if ! command git --git-dir="$INSTALL_DIR"/.git --work-tree="$INSTALL_DIR" gc --auto --aggressive --prune=now ; then
    nvm_echo >&2 "Your version of git is out of date. Please update it!"
  fi
  return
}

#
# Automatically install Node.js
#
nvm_install_node() {
  local NODE_VERSION_LOCAL
  NODE_VERSION_LOCAL="$(nvm_node_version)"

  if [ -z "$NODE_VERSION_LOCAL" ]; then
    return 0
  fi

  nvm_echo "=> Installing Node.js version $NODE_VERSION_LOCAL"
  nvm install "$NODE_VERSION_LOCAL"
  local CURRENT_NVM_NODE

  CURRENT_NVM_NODE="$(nvm_version current)"
  if [ "$(nvm_version "$NODE_VERSION_LOCAL")" == "$CURRENT_NVM_NODE" ]; then
    nvm_echo "=> Node.js version $NODE_VERSION_LOCAL has been successfully installed"
  else
    nvm_echo >&2 "Failed to install Node.js $NODE_VERSION_LOCAL"
  fi
}

install_nvm_as_script() {
  local INSTALL_DIR
  INSTALL_DIR="$(nvm_install_dir)"
  local NVM_SOURCE_LOCAL
  NVM_SOURCE_LOCAL="$(nvm_source script)"
  local NVM_EXEC_SOURCE
  NVM_EXEC_SOURCE="$(nvm_source script-nvm-exec)"
  local NVM_BASH_COMPLETION_SOURCE
  NVM_BASH_COMPLETION_SOURCE="$(nvm_source script-nvm-bash-completion)"

  # Downloading to $INSTALL_DIR
  mkdir -p "$INSTALL_DIR"
  if [ -f "$INSTALL_DIR/nvm.sh" ]; then
    nvm_echo "=> nvm is already installed in $INSTALL_DIR, trying to update the script"
  else
    nvm_echo "=> Downloading nvm as script to '$INSTALL_DIR'"
  fi
  nvm_download -s "$NVM_SOURCE_LOCAL" -o "$INSTALL_DIR/nvm.sh" || {
    nvm_echo >&2 "Failed to download '$NVM_SOURCE_LOCAL'"
    return 1
  } &
  nvm_download -s "$NVM_EXEC_SOURCE" -o "$INSTALL_DIR/nvm-exec" || {
    nvm_echo >&2 "Failed to download '$NVM_EXEC_SOURCE'"
    return 2
  } &
  nvm_download -s "$NVM_BASH_COMPLETION_SOURCE" -o "$INSTALL_DIR/bash_completion" || {
    nvm_echo >&2 "Failed to download '$NVM_BASH_COMPLETION_SOURCE'"
    return 2
  } &
  for job in $(jobs -p | command sort)
  do
    wait "$job" || return $?
  done
  chmod a+x "$INSTALL_DIR/nvm-exec" || {
    nvm_echo >&2 "Failed to mark '$INSTALL_DIR/nvm-exec' as executable"
    return 3
  }
}

nvm_try_profile() {
  if [ -z "${1-}" ] || [ ! -f "${1}" ]; then
    return 1
  fi
  nvm_echo "${1}"
}

#
# Detect profile file if not specified as environment variable
# (eg: PROFILE=~/.myprofile)
# The echo'ed path is guaranteed to be an existing file
# Otherwise, an empty string is returned
#
nvm_detect_profile() {
  if [ "${PROFILE-}" = '/dev/null' ]; then
    # the user has specifically requested NOT to have nvm touch their profile
    return
  fi

  if [ -n "${PROFILE}" ] && [ -f "${PROFILE}" ]; then
    nvm_echo "${PROFILE}"
    return
  fi

  local DETECTED_PROFILE
  DETECTED_PROFILE=''

  if [ "${SHELL#*bash}" != "$SHELL" ]; then
    if [ -f "$HOME/.bashrc" ]; then
      DETECTED_PROFILE="$HOME/.bashrc"
    elif [ -f "$HOME/.bash_profile" ]; then
      DETECTED_PROFILE="$HOME/.bash_profile"
    fi
  elif [ "${SHELL#*zsh}" != "$SHELL" ]; then
    if [ -f "$HOME/.zshrc" ]; then
      DETECTED_PROFILE="$HOME/.zshrc"
    elif [ -f "$HOME/.zprofile" ]; then
      DETECTED_PROFILE="$HOME/.zprofile"
    fi
  fi

  if [ -z "$DETECTED_PROFILE" ]; then
    for EACH_PROFILE in ".profile" ".bashrc" ".bash_profile" ".zprofile" ".zshrc"
    do
      if DETECTED_PROFILE="$(nvm_try_profile "${HOME}/${EACH_PROFILE}")"; then
        break
      fi
    done
  fi

  if [ -n "$DETECTED_PROFILE" ]; then
    nvm_echo "$DETECTED_PROFILE"
  fi
}

#
# Check whether the user has any globally-installed npm modules in their system
# Node, and warn them if so.
#
nvm_check_global_modules() {
  local NPM_COMMAND
  NPM_COMMAND="$(command -v npm 2>/dev/null)" || return 0
  [ -n "${NVM_DIR}" ] && [ -z "${NPM_COMMAND%%"$NVM_DIR"/*}" ] && return 0

  local NPM_VERSION
  NPM_VERSION="$(npm --version)"
  NPM_VERSION="${NPM_VERSION:--1}"
  [ "${NPM_VERSION%%[!-0-9]*}" -gt 0 ] || return 0

  local NPM_GLOBAL_MODULES
  NPM_GLOBAL_MODULES="$(
    npm list -g --depth=0 |
    command sed -e '/ npm@/d' -e '/ (empty)$/d'
  )"

  local MODULE_COUNT
  MODULE_COUNT="$(
    command printf %s\\n "$NPM_GLOBAL_MODULES" |
    command sed -ne '1!p' |                     # Remove the first line
    wc -l | command tr -d ' '                   # Count entries
  )"

  if [ "${MODULE_COUNT}" != '0' ]; then
    # shellcheck disable=SC2016
    nvm_echo '=> You currently have modules installed globally with `npm`. These will no'
    # shellcheck disable=SC2016
    nvm_echo '=> longer be linked to the active version of Node when you install a new node'
    # shellcheck disable=SC2016
    nvm_echo '=> with `nvm`; and they may (depending on how you construct your `$PATH`)'
    # shellcheck disable=SC2016
    nvm_echo '=> override the binaries of modules installed with `nvm`:'
    nvm_echo

    command printf %s\\n "$NPM_GLOBAL_MODULES"
    nvm_echo '=> If you wish to uninstall them at a later point (or re-install them under your'
    # shellcheck disable=SC2016
    nvm_echo '=> `nvm` Nodes), you can remove them from the system Node as follows:'
    nvm_echo
    nvm_echo '     $ nvm use system'
    nvm_echo '     $ npm uninstall -g a_module'
    nvm_echo
  fi
}

nvm_do_install() {
  if [ -n "${NVM_DIR-}" ] && ! [ -d "${NVM_DIR}" ]; then
    if [ -e "${NVM_DIR}" ]; then
      nvm_echo >&2 "File \"${NVM_DIR}\" has the same name as installation directory."
      exit 1
    fi

    if [ "${NVM_DIR}" = "$(nvm_default_install_dir)" ]; then
      mkdir "${NVM_DIR}"
    else
      nvm_echo >&2 "You have \$NVM_DIR set to \"${NVM_DIR}\", but that directory does not exist. Check your profile files and environment."
      exit 1
    fi
  fi
  # Disable the optional which check, https://www.shellcheck.net/wiki/SC2230
  # shellcheck disable=SC2230
  if nvm_has xcode-select && [ "$(xcode-select -p >/dev/null 2>/dev/null ; echo $?)" = '2' ] && [ "$(which git)" = '/usr/bin/git' ] && [ "$(which curl)" = '/usr/bin/curl' ]; then
    nvm_echo >&2 'You may be on a Mac, and need to install the Xcode Command Line Developer Tools.'
    # shellcheck disable=SC2016
    nvm_echo >&2 'If so, run `xcode-select --install` and try again. If not, please report this!'
    exit 1
  fi
  if [ -z "${METHOD}" ]; then
    # Autodetect install method
    if nvm_has git; then
      install_nvm_from_git
    elif nvm_has curl || nvm_has wget; then
      install_nvm_as_script
    else
      nvm_echo >&2 'You need git, curl, or wget to install nvm'
      exit 1
    fi
  elif [ "${METHOD}" = 'git' ]; then
    if ! nvm_has git; then
      nvm_echo >&2 "You need git to install nvm"
      exit 1
    fi
    install_nvm_from_git
  elif [ "${METHOD}" = 'script' ]; then
    if ! nvm_has curl && ! nvm_has wget; then
      nvm_echo >&2 "You need curl or wget to install nvm"
      exit 1
    fi
    install_nvm_as_script
  else
    nvm_echo >&2 "The environment variable \$METHOD is set to \"${METHOD}\", which is not recognized as a valid installation method."
    exit 1
  fi

  nvm_echo

  local NVM_PROFILE
  NVM_PROFILE="$(nvm_detect_profile)"
  local PROFILE_INSTALL_DIR
  PROFILE_INSTALL_DIR="$(nvm_install_dir | command sed "s:^$HOME:\$HOME:")"

  SOURCE_STR="\\nexport NVM_DIR=\"${PROFILE_INSTALL_DIR}\"\\n[ -s \"\$NVM_DIR/nvm.sh\" ] && \\. \"\$NVM_DIR/nvm.sh\"  # This loads nvm\\n"

  # shellcheck disable=SC2016
  COMPLETION_STR='[ -s "$NVM_DIR/bash_completion" ] && \. "$NVM_DIR/bash_completion"  # This loads nvm bash_completion\n'
  BASH_OR_ZSH=false

  if [ -z "${NVM_PROFILE-}" ] ; then
    local TRIED_PROFILE
    if [ -n "${PROFILE}" ]; then
      TRIED_PROFILE="${NVM_PROFILE} (as defined in \$PROFILE), "
    fi
    nvm_echo "=> Profile not found. Tried ${TRIED_PROFILE-}~/.bashrc, ~/.bash_profile, ~/.zprofile, ~/.zshrc, and ~/.profile."
    nvm_echo "=> Create one of them and run this script again"
    nvm_echo "   OR"
    nvm_echo "=> Append the following lines to the correct file yourself:"
    command printf "${SOURCE_STR}"
    nvm_echo
  else
    if nvm_profile_is_bash_or_zsh "${NVM_PROFILE-}"; then
      BASH_OR_ZSH=true
    fi
    if ! command grep -qc '/nvm.sh' "$NVM_PROFILE"; then
      nvm_echo "=> Appending nvm source string to $NVM_PROFILE"
      command printf "${SOURCE_STR}" >> "$NVM_PROFILE"
    else
      nvm_echo "=> nvm source string already in ${NVM_PROFILE}"
    fi
    # shellcheck disable=SC2016
    if ${BASH_OR_ZSH} && ! command grep -qc '$NVM_DIR/bash_completion' "$NVM_PROFILE"; then
      nvm_echo "=> Appending bash_completion source string to $NVM_PROFILE"
      command printf "$COMPLETION_STR" >> "$NVM_PROFILE"
    else
      nvm_echo "=> bash_completion source string already in ${NVM_PROFILE}"
    fi
  fi
  if ${BASH_OR_ZSH} && [ -z "${NVM_PROFILE-}" ] ; then
    nvm_echo "=> Please also append the following lines to the if you are using bash/zsh shell:"
    command printf "${COMPLETION_STR}"
  fi

  # Source nvm
  # shellcheck source=/dev/null
  \. "$(nvm_install_dir)/nvm.sh"

  nvm_check_global_modules

  nvm_install_node

  nvm_reset

  nvm_echo "=> Close and reopen your terminal to start using nvm or run the following to use it now:"
  command printf "${SOURCE_STR}"
  if ${BASH_OR_ZSH} ; then
    command printf "${COMPLETION_STR}"
  fi
}

#
# Unsets the various functions defined
# during the execution of the install script
#
nvm_reset() {
  unset -f nvm_has nvm_install_dir nvm_latest_version nvm_profile_is_bash_or_zsh \
    nvm_source nvm_node_version nvm_download install_nvm_from_git nvm_install_node \
    install_nvm_as_script nvm_try_profile nvm_detect_profile nvm_check_global_modules \
    nvm_do_install nvm_reset nvm_default_install_dir nvm_grep
}

[ "_$NVM_ENV" = "_testing" ] || nvm_do_install

} # this ensures the entire script is downloaded #
- 关闭该终端,重新开启一个新终端。输入nvm,应该可以看到:
Node Version Manager (v0.39.3)

Note: <version> refers to any version-like string nvm understands. This includes:
  - full or partial version numbers, starting with an optional "v" (0.10, v0.1.2, v1)
  - default (built-in) aliases: node, stable, unstable, iojs, system
  - custom aliases you define with `nvm alias foo`
篇幅有限,就不全贴出来了。
3. 安装最新的lts版本
nvm install --lts
- 安装好后,输入node,可以看到:
Welcome to Node.js v18.15.0.
Type ".help" for more information.
>
- 安装nrm
npm install nrm -g
- 显示可用的镜像站
nrm ls
显示
  npm ---------- https://registry.npmjs.org/
  yarn --------- https://registry.yarnpkg.com/
  tencent ------ https://mirrors.cloud.tencent.com/npm/
  cnpm --------- https://r.cnpmjs.org/
  taobao ------- https://registry.npmmirror.com/
  npmMirror ---- https://skimdb.npmjs.com/registry/
切换为淘宝:
nrm use taobao
显示:
Registry has been set to: https://registry.npmmirror.com/
- 创建Vue3项目
在即将放项目的目录下,执行
npm init vue@latest
之后按需求回答一些问题即可。
注意事项
1、在windows 通过IDEA开发,wsl2中一些文件最好不要使用软连接,否则IDEA不认


 980
980


 被折叠的 条评论
为什么被折叠?
被折叠的 条评论
为什么被折叠?
 到【灌水乐园】发言


