


RabbitMQ 实现延迟队列的方式主要有两种: 死信交换机、延迟队列插件
延迟队列的使用场景包括:
① 延迟发送短信
② 用户下单,如果用户在15分钟内未支付,则自动取消
③ 预约工作会议,20分钟后自动通知所有参会人员
死信交换机
基本概念
当一个队列中的消息满足下列情况之一时,可以成为死信(dead letter):
① 消费者使用 basic.reject 或 basic.nack 声明消费失败,并且消息的 requeue 参数设置为 false
② 消息是一个过期消息,超时无人消费
③ 要投递的队列消息堆积满了,最早的消息可能成为死信
如果该队列配置了 dead-letter-exchange 属性,指定了一个交换机,那么队列中的死信就会投递到这个交换机中,而这个交换机称为死信交换机(Dead Letter Exchange,简称DLX)
死信交换机和 RepublishMessageRecoverer 的区别是,死信交换机的消息是通过队列传递给交换机的,而 RepublishMessageRecoverer 是通过消费者传递给交换机的
给队列绑定死信交换机的方式:
1.给队列设置 dead-letter-exchange 属性,指定一个交换机
2.给队列设置 dead-letter-routing-key 属性,设置死信交换机与死信队列的 RoutingKey
TTL:
TTL,也就是 Time-To-Live。如果一个队列中的消息 TTL 结束仍未消费,则会变为死信,TTL 超时分为两种情况:
① 消息所在的队列设置了存活时间
② 消息本身设置了存活时间
若设置了 TTL 和死信交换机,就可以让一个消费者监听死信队列,进而实现消息的延迟投递
如果队列和消息都设置了TTL,那么以较小的值为准
代码实现
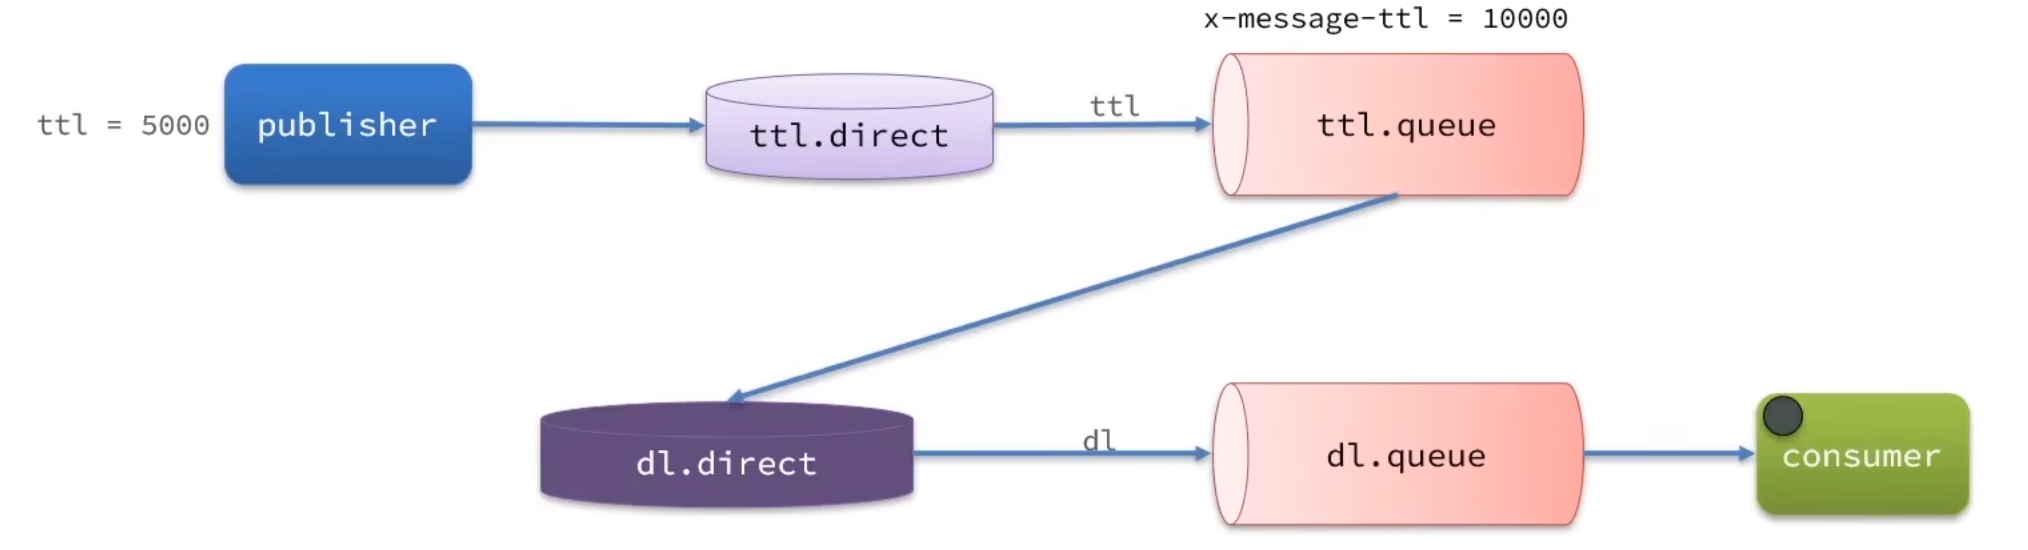
下面实现上图的延迟消息:
1.在 consumer 声明死信交换机和队列,编写监听方法
@Component
public class DelayListener {


    @RabbitListener(bindings = @QueueBinding(
            value = @Queue(name = "dl.queue"),
            exchange = @Exchange(name = "dl.direct"),
            key = "dl"
    ))
    public void listenDlQueue(String msg) {


        System.out.println(LocalDateTime.now() + ":收到 dl.queue 的延迟消息" + msg);
    }

}
2.在 consumer 声明延迟队列和对应的交换机,在声明队列时配置 ttl、dead-letter-exchange、dead-letter-routing-key 属性
@Configuration
public class DelayConfig {


    @Bean
    public DirectExchange ttlExchange() {


        return new DirectExchange("ttl.direct");
    }

    @Bean
    public Queue ttlQueue() {


        return QueueBuilder
                .durable("ttl.queue")
                .ttl(10000) // 10s
                .deadLetterExchange
最低0.47元/天 解锁文章


 197
197

 被折叠的 条评论
为什么被折叠?
被折叠的 条评论
为什么被折叠?
 到【灌水乐园】发言


