


一、静态资源访问
创建Spring Boot项目时默认创建static目录,静态资源存放在此。如果是前后端分离的项目,这里为空。
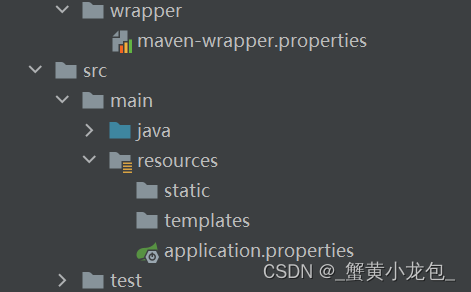
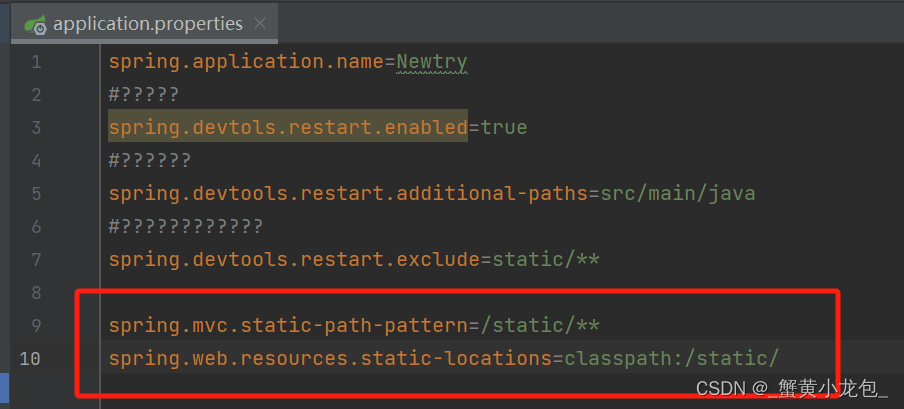
如果默认的静态资源过滤策略不能满足开发需求,也可以自定义静态资源过滤策略。 在application.properties中直接定义过滤规则和静态资源位置:
(classpath表示编译后的类路径,在target包下的class文件夹下的static,static也可以个更换)
二、文件上传
原理:前端用表单对数据进行收集,在发送服务器时对表单数据进行编码。将表单的默认编码格式enctype="application/x-www-form-urlencoded",修改为enctype="multipart/form-data"。
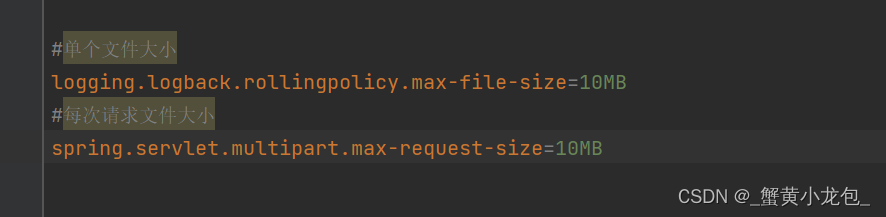
Spring Boot项目上传使用的是内嵌Tomact,每个文件最大配置为1Mb,单个请求文件总数不能大于10Mb,如要更改默认值需要在application.properties中配置。不想限制文件上传大小,就将两个值修改为-1即可。如下图:
在controller包中新建FileUploadController的java文件

FileUploadController下写入下述代码,用于实现文件上传。
注解@PostMapping("") 等价于 @RequestMapping(value = " ",method = RequestMethod.POST)
MultipartFile 和 HttpServletRequest 为java存在的类, HttpServletRequest用于web服务器的获取request请求;
package com.example.newtry.controller;

import org.springframework.web.bind.annotation.PatchMapping;
import org.springframework.web.bind.annotation.PostMapping;
import org.springframework.web.bind.annotation.RestController;
import org.springframework.web.multipart.MultipartFile;

import javax.servlet.http.HttpServletRequest;
import java.io.File;
import java.io.IOException;

@RestController
public class FileUploadController {

    //@PostMapping("") = @RequestMapping(value = " ",method = RequestMethod.POST)
    @PostMapping("/upload")
    //request网络请求
    public String up(String name , MultipartFile photo, HttpServletRequest request) throws Exception{
        //获取参数name的值
        System.out.println(name);
        //获取图片的原始名称
        System.out.println(photo.getOriginalFilename());
        //获取图片的文件类型
        System.out.println(photo.getContentType());
       //获取web服务器的运行目录
        String path = request.getServletContext().getRealPath("/upload/");
        System.out.println(path);
        saveFile(photo,path);
        return "上传成功";
    }

    public void saveFile(MultipartFile photo,String path) throws IOException{
        File dir =new File(path);
       //判断存储的目录是否存在,不存在则创建
        if(!dir.exists()){
            dir.mkdir();
        }

        File file = new File(path + photo.getOriginalFilename());
        photo.transferTo(file);
    }
}
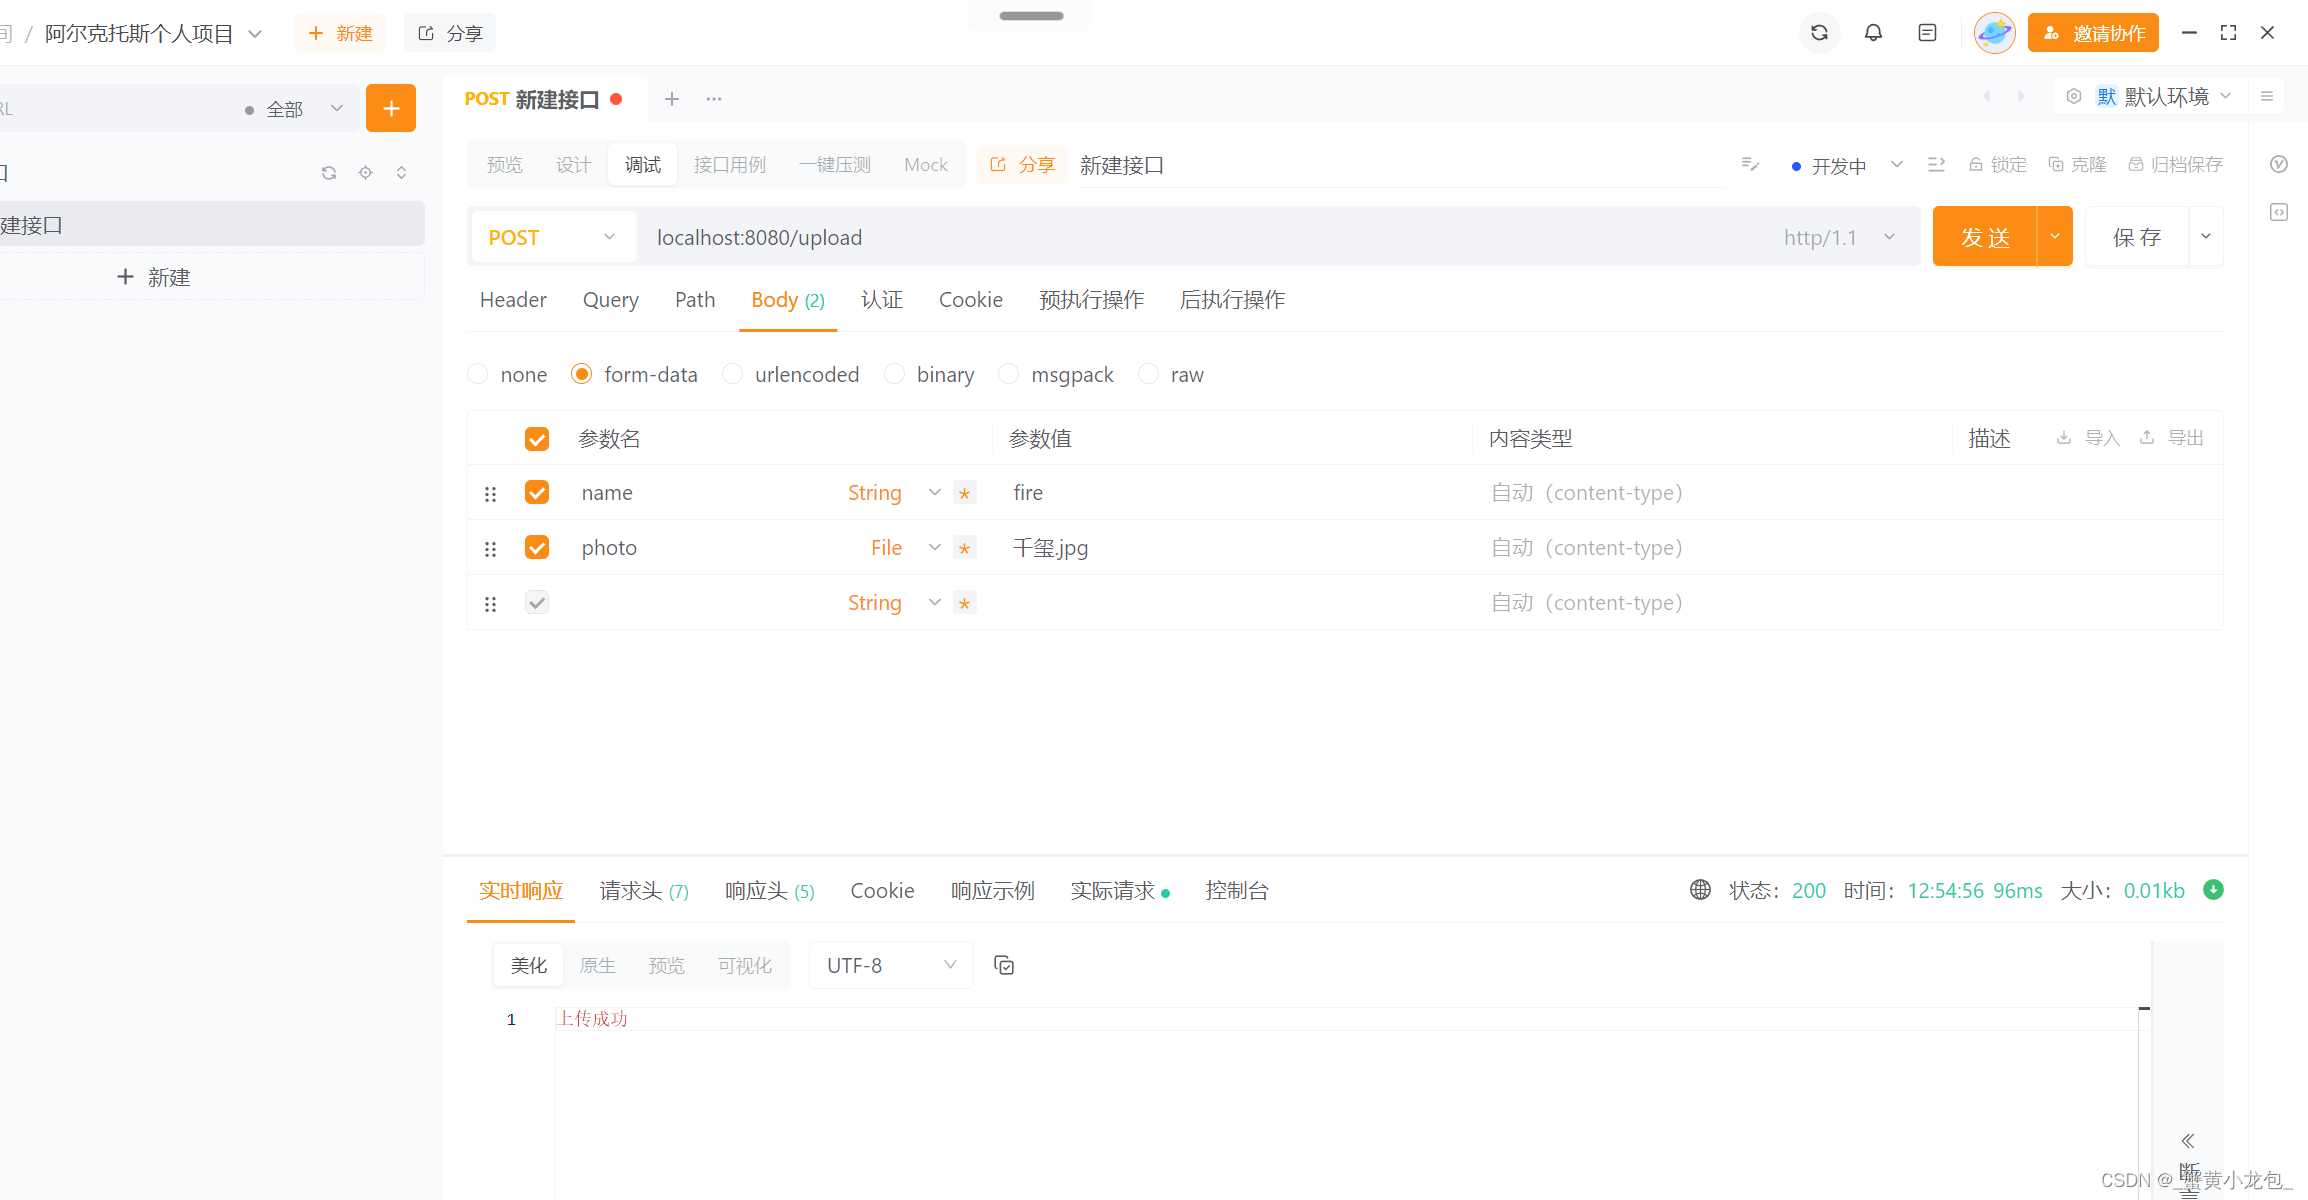
使用APIPOST进行测试,文件上传成功。

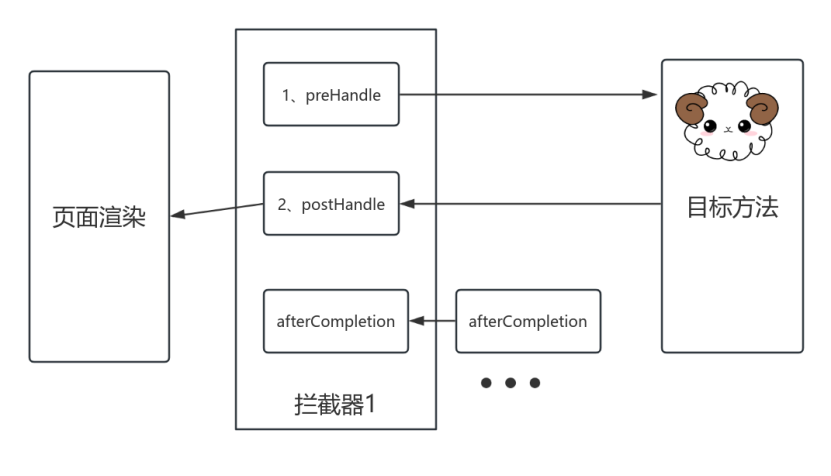
三、拦截器
拦截器常用在复杂的web项目中,大致用在权限检查(用户的登录检测)、性能监控(记录程序的运行数据)和通用行为(读取cookie得到用户信息,将用户对象放入请求)。
Spring Boot实现拦截器为定义HandlerInterceptor接口,其中定义preHandle、postHandle、afterCompletion三种方法。其工作流程如下图:
允许存在多个拦截器
以登录为例进行拦截模拟:
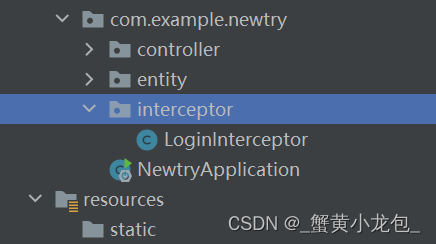
(1)创建interceptor包,拦截器类文件均在此处存储,
(2)重写拦截器preHandle方法部分,查看库写好的Handle类下的方法,使用时需要重写。
request为前端的请求
package com.example.newtry.interceptor;

import org.springframework.web.servlet.HandlerInterceptor;

import javax.servlet.http.HttpServletRequest;
import javax.servlet.http.HttpServletResponse;
import java.io.IOException;

public class LoginInterceptor implements HandlerInterceptor {

    @Override
    public boolean preHandle(HttpServletRequest request, HttpServletResponse response,Object handler) throws IOException{
        System.out.println("LoginInterceptor" );
        return false;
    }
}
(3)为拦截器进行配置,一般在config包下创建一个类,如图
package com.example.newtry.config;

import com.example.newtry.interceptor.LoginInterceptor;
import org.springframework.context.annotation.Configuration;
import org.springframework.web.servlet.config.annotation.InterceptorRegistry;
import org.springframework.web.servlet.config.annotation.WebMvcConfigurer;

//@Configuration注解为了生效
@Configuration
public class WebConfig implements WebMvcConfigurer {

    @Override
    public void addInterceptors(InterceptorRegistry registry){
        //拦截所有资源
        registry.addInterceptor(new LoginInterceptor());
    }
}
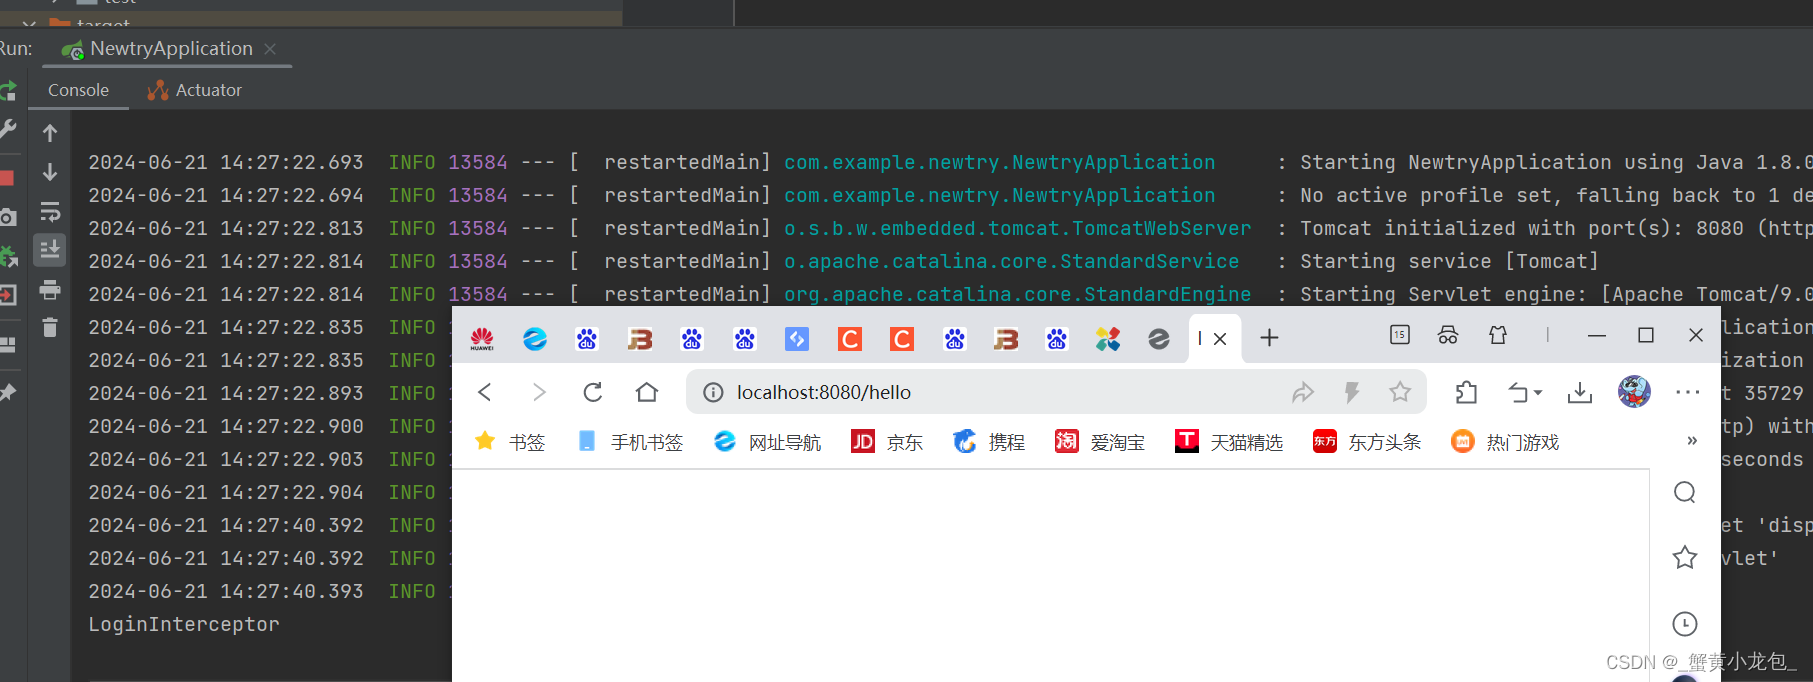
(4)使用浏览器访问编写好的hello页面,当拦截器生效则在控制台进行打印,如下图拦截成功。


 389
389

 被折叠的 条评论
为什么被折叠?
被折叠的 条评论
为什么被折叠?
 到【灌水乐园】发言


