该小项目的最终的界面如图所示:

本项目中的所有植物图像均为自己拍摄,一共12种植物,每种1250张,共15000张。网络采用VGG-16,Resnet50,ALEXNET,可以随便切换网络进行训练。
本文仅供大家学习讨论,本人也是参考了很多位大佬的程序,如有错误还请大家指正。
如需完整代码还请支持一下我这个艰难的求学者,不为赚钱,谨为改善学习和生活的条件,真心感谢:
下面介绍相关实现部分(不含GUI界面的代码,GUI使用Pyqt5编写)
首先导入各种包
import logging
import os
import pickle
import random
import time

import numpy as np
import tensorflow as tf
import tensorflow.contrib.slim as slim
from PIL import Image
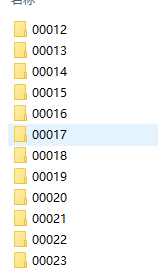
所有图像按照如下方式进行分类,每一个文件夹五位数,最后两位为品种编号,代表一种植物图像,每种文件夹内的图像按照如下方式进行命名,即前两位与文件夹名称保持一致,后三位从000-999为个体编号。图像大小均为224*224*3.


对图像的label进行读取,遍历整个文件夹获取图像的名称,前两位就是图像的label,相关代码实现如下。
    def __init__(self, data_dir):
        truncate_path = data_dir + ('%05d' % FLAGS.charset_size)

        self.image_names = []
        for root, sub_folder, file_list in os.walk(data_dir):
            print(root)
            if root < truncate_path:
                self.image_names += [os.path.join(root, file_path) for file_path in file_list]
        random.shuffle(self.image_names)
        print(self.image_names)
        self.labels = [int(file_name[len(data_dir):].split(os.sep)[0]) for file_name in self.image_names]
        print(self.labels)
为了解决图像数据集过少的问题,引入了图像增强操作扩充数据集,使用随机上下、左右翻转、在一定范围内随机调整亮度、对比度、饱和度、色相等。可以按需要开启关闭或者调参。
    def data_augmentation(images):
        if FLAGS.random_flip_up_down:
            images = tf.image.random_flip_up_down(images)
        if FLAGS.random_flip_left_right:
            images = tf.image.random_flip_left_right(images)
        if FLAGS.random_brightness:
            images = tf.image.random_brightness(images, max_delta=0.1)
        if FLAGS.random_contrast:
            images = tf.image.random_contrast(images, 0.9, 1.1)
        if FLAGS.resize_image_with_crop_or_pad:
            images = tf.image.resize_image_with_crop_or_pad(images, FLAGS.image_size, FLAGS.image_size)
        if FLAGS.random_saturation:
            images = tf.image.random_saturation(images, 0.9, 1.1)
        if FLAGS.random_hue:
            images = tf.image.random_hue(images, max_delta=0.1)
        return images
构造批处理队列,将label放入队列中。
 def input_pipeline(self, batch_size, num_epochs=None):
        images_tensor = tf.convert_to_tensor(self.image_names, dtype=tf.string)
        labels_tensor = tf.convert_to_tensor(self.labels, dtype=tf.int64)
        input_queue = tf.train.slice_input_producer([images_tensor, labels_tensor], num_epochs=num_epochs)
        labels = input_queue[1]
        images_content = tf.read_file(input_queue[0])
        images = tf.image.convert_image_dtype(tf.image.decode_jpeg(images_content, channels=3), tf.float32)
        images = self.data_augmentation(images)
        new_size = tf.constant([FLAGS.image_size, FLAGS.image_size], dtype=tf.int32)
        images = tf.image.resize_images(images, new_size)
        image_batch, label_batch = tf.train.shuffle_batch([images, labels], batch_size=batch_size, capacity=150,
                                                          min_after_dequeue=10)
        return image_batch, label_batch
神经网络部分就跳过了,接着就是返回一些相关参数,比如准确率、topk,loss,step等等一系列的。
def build_graph(top_k):
    with tf.device('/gpu:0'):
        keep_prob = tf.placeholder(dtype=tf.float32, shape=[], name='keep_prob')
        images = tf.placeholder(dtype=tf.float32, shape=[None, FLAGS.image_size, FLAGS.image_size, FLAGS.pic_channel],
                                name='image_batch')
        labels = tf.placeholder(dtype=tf.int64, shape=[None], name='label_batch')
        logits = cnn(images)
    with tf.device('/gpu:0'):
        with tf.name_scope("loss"):
            loss = tf.reduce_mean(tf.nn.sparse_softmax_cross_entropy_with_logits(logits=logits, labels=labels))
    with tf.device('/gpu:0'):
        with tf.name_scope("accuracy"):
            accuracy = tf.reduce_mean(tf.cast(tf.equal(tf.argmax(logits, 1), labels), tf.float32))
        global_step = tf.get_variable("step", [], initializer=tf.constant_initializer(0.0), trainable=False)
        rate = tf.train.exponential_decay(2e-4, global_step, decay_steps=2000, decay_rate=0.97, staircase=True)
        update_ops = tf.get_collection(tf.GraphKeys.UPDATE_OPS)
        with tf.control_dependencies(update_ops):
            train_op = tf.train.AdamOptimizer(learning_rate=rate).minimize(loss, global_step=global_step)
    with tf.name_scope("probabilities"):
        with tf.device('/gpu:0'):
            probabilities = tf.nn.softmax(logits)
        predicted_val_top_k, predicted_index_top_k = tf.nn.top_k(probabilities, k=top_k)
        accuracy_in_top_k = tf.reduce_mean(tf.cast(tf.nn.in_top_k(probabilities, labels, top_k), tf.float32))
    tf.summary.scalar('loss', loss)
    tf.summary.scalar('accuracy', accuracy)
    tf.summary.scalar('top_k', accuracy_in_top_k)
    merged_summary_op = tf.summary.merge_all()
    return {'images': images,
            'labels': labels,
            'keep_prob': keep_prob,
            'top_k': top_k,
            'global_step': global_step,
            'train_op': train_op,
            'loss': loss,
            'accuracy': accuracy,
            'accuracy_top_k': accuracy_in_top_k,
            'merged_summary_op': merged_summary_op,
            'predicted_distribution': probabilities,
            'predicted_index_top_k': predicted_index_top_k,
            'predicted_val_top_k': predicted_val_top_k}
随后开启回话进行训练,保存模型,写入log。
def train():
    print('Begin training')
    train_feeder = DataIterator(data_dir=FLAGS.train_data_dir)
    test_feeder = DataIterator(data_dir=FLAGS.test_data_dir)
    with tf.Session() as sess:
        train_images, train_labels = train_feeder.input_pipeline(batch_size=FLAGS.batch_size, num_epochs=FLAGS.epoch)
        test_images, test_labels = test_feeder.input_pipeline(batch_size=FLAGS.batch_size)
        graph = build_graph(top_k=5)
        sess.run(tf.global_variables_initializer())
        sess.run(tf.local_variables_initializer())
        coord = tf.train.Coordinator()
        threads = tf.train.start_queue_runners(sess=sess, coord=coord)
        saver = tf.train.Saver()
        train_writer = tf.summary.FileWriter(FLAGS.log_dir + '/train', sess.graph)
        test_writer = tf.summary.FileWriter(FLAGS.log_dir + '/test')
        start_step = 0
        if FLAGS.restore:
            ckpt = tf.train.latest_checkpoint(FLAGS.checkpoint_dir)
            if ckpt:
                saver.restore(sess, ckpt)
                print("restore from the checkpoint {0}".format(ckpt))
                start_step += int(ckpt.split('-')[-1])
        logger.info(':::Training Start:::')
       try:
            while not coord.should_stop():
                start_time = time.time()
                train_images_batch, train_labels_batch = sess.run([train_images, train_labels])
                feed_dict = {graph['images']: train_images_batch,
                             graph['labels']: train_labels_batch,
                             graph['keep_prob']: 0.8}
                _, loss_val, accuracy_train, train_summary, step = sess.run([graph['train_op'],
                                                                             graph['loss'],
                                                                             graph['accuracy'],
                                                                             graph['merged_summary_op'],
                                                                             graph['global_step']], feed_dict=feed_dict)
                train_writer.add_summary(train_summary, step)
                # print(train_labels_batch)
                # Ending time
                end_time = time.time()

                logger.info("the step: {0} takes {1}s   loss: {2}   accuracy: {3}%".format(round(step, 0),
                                                                                           round(end_time - start_time,
                                                                                                 2), round(loss_val, 2),
                                                                                           round(accuracy_train * 100,
                                                                                                 2)))
                if step > FLAGS.max_steps:
                    break

                if step % FLAGS.eval_steps == 1:
                    test_images_batch, test_labels_batch = sess.run([test_images, test_labels])
                    feed_dict = {graph['images']: test_images_batch,
                                 graph['labels']: test_labels_batch,
                                 graph['keep_prob']: 1.0}
                    accuracy_test, test_summary = sess.run([graph['accuracy'],
                                                            graph['merged_summary_op']], feed_dict=feed_dict)
                    test_writer.add_summary(test_summary, step)

                    logger.info('======================= Eval a batch =======================')
                    logger.info('the step: {0} test accuracy: {1} %'.format(step, round(accuracy_test * 100, 2)))
                    logger.info('======================= Eval a batch =======================')
                if step % FLAGS.save_steps == 1:
                    logger.info('Save the ckpt of {0}'.format(step))
                    saver.save(sess, os.path.join(FLAGS.checkpoint_dir, 'my-model'), global_step=graph['global_step'])
        except tf.errors.OutOfRangeError:  # Raised when an operation iterates past the valid input range.
            logger.info('==================Train Finished================')
            saver.save(sess, os.path.join(FLAGS.checkpoint_dir, 'my-model'), global_step=graph['global_step'])
        finally:
            coord.request_stop()
        coord.join(threads)


 2万+
2万+


 被折叠的 条评论
为什么被折叠?


