


1. GPIO Settings
1.1 GPIO 请参照电路原理图配置管脚。需要注意的是ETH管脚output全部置为very high

1.2 RCC Configuration & SYS


SYS: Timebase source ( TIM1 is recommended).
2. Cache and MPU
此处为最关键配置步骤,大多数情况下无法Ping通都是MPU导致,在配置此部分时,切勿参考官方tutorial中所给的代码。
2.1 Enable ICache and DCache

2.2 MPU Control Mode: Background Region Privileged accesses only + MPU disable during hard fault
2.3 MPU Setting
根据以下代码配置MPU:
void MPU_Config(void)
{
  MPU_Region_InitTypeDef MPU_InitStruct = {0};

  /* Disables the MPU */
  HAL_MPU_Disable();

   /* Configure the MPU attributes as Device not cacheable
     for ETH DMA descriptors */
  MPU_InitStruct.Enable = MPU_REGION_ENABLE;
  MPU_InitStruct.BaseAddress = 0x30040000;
  MPU_InitStruct.Size = MPU_REGION_SIZE_256B;
  MPU_InitStruct.AccessPermission = MPU_REGION_FULL_ACCESS;
  MPU_InitStruct.IsBufferable = MPU_ACCESS_BUFFERABLE;
  MPU_InitStruct.IsCacheable = MPU_ACCESS_NOT_CACHEABLE;
  MPU_InitStruct.IsShareable = MPU_ACCESS_NOT_SHAREABLE;
  MPU_InitStruct.Number = MPU_REGION_NUMBER0;
  MPU_InitStruct.TypeExtField = MPU_TEX_LEVEL0;
  MPU_InitStruct.SubRegionDisable = 0x00;
  MPU_InitStruct.DisableExec = MPU_INSTRUCTION_ACCESS_ENABLE;
  HAL_MPU_ConfigRegion(&MPU_InitStruct);

  /* Configure the MPU attributes as Normal Non Cacheable
     for LwIP RAM heap which contains the Tx buffers */
  MPU_InitStruct.Enable = MPU_REGION_ENABLE;
  MPU_InitStruct.BaseAddress = 0x30044000;
  MPU_InitStruct.Size = MPU_REGION_SIZE_16KB;
  MPU_InitStruct.AccessPermission = MPU_REGION_FULL_ACCESS;
  MPU_InitStruct.IsBufferable = MPU_ACCESS_NOT_BUFFERABLE;
  MPU_InitStruct.IsCacheable = MPU_ACCESS_CACHEABLE;
  MPU_InitStruct.IsShareable = MPU_ACCESS_NOT_SHAREABLE;
  MPU_InitStruct.Number = MPU_REGION_NUMBER1;
  MPU_InitStruct.TypeExtField = MPU_TEX_LEVEL0;
  MPU_InitStruct.SubRegionDisable = 0x00;
  MPU_InitStruct.DisableExec = MPU_INSTRUCTION_ACCESS_ENABLE;
  HAL_MPU_ConfigRegion(&MPU_InitStruct);
  /* Enables the MPU */
  HAL_MPU_Enable(MPU_PRIVILEGED_DEFAULT);

}
配置如下:


3. Connectivity
Default settings, but enable Ethernet global interrupt.

4. FREERTOS
Default settings.
5. LWIP Settings
5.1 Platform Settings: All LAN8742
5.2 General Settings
If you want to set static IP address, please disable DHCP. Other settings keep unchanged.
 IP_ADDRESSS is the remote address set by yourself.
5.3 Internet Configuration (WLAN)


IP_ADDRESSS is the local address set by yourself.
6. CLOCK Configuration & Debug

25MHZ HSE. Debug using Serial wire.
7. Project Manager
7.1 My Settings


7.2 Generate Code
现在你可以生成自己的代码了
8. Options for KEIL Project
请一定勾选上Use MicroLIB

9. Codes Section
9.1 Revision
In ethernetif.c file, add SCB_CleanInvalidateDCache(); into *static err_t low_level_output(struct netif *netif, struct pbuf p) and *static struct pbuf * low_level_input(struct netif netif) functions.


如果不加此代码,网络能通,但是有时会出现echo不会响应的现象
9.2 Add Threads
Add TCP and UDP echo threads into your code.


代码参考官方tutorials:STM32H743I-EVAL (LwIP_UDPTCP_Echo_Server_Netconn_RTOS) in STM32Cube_FW_H7_V1.10.0 package.
/*net.c*/
#include "lwipopts.h"
#include "lwip/opt.h"

#include "lwip/sys.h"
#include "lwip/api.h"

void tcpecho_thread(void *arg)
{
    struct netconn *conn, *newconn;
    err_t err;
    LWIP_UNUSED_ARG(arg);

    /* Create a new connection identifier. */
    /* Bind connection to well known port number 7. */
    conn = netconn_new(NETCONN_TCP);
    netconn_bind(conn, IP_ADDR_ANY, 7);

    LWIP_ERROR("tcpecho: invalid conn", (conn != NULL), return;);

    /* Tell connection to go into listening mode. */
    netconn_listen(conn);

    while (1)
    {

        /* Grab new connection. */
        err = netconn_accept(conn, &newconn);
        /*printf("accepted new connection %p\n", newconn);*/
        /* Process the new connection. */
        if (err == ERR_OK)
        {
            struct netbuf *buf;
            void *data;
            u16_t len;

            while ((err = netconn_recv(newconn, &buf)) == ERR_OK)
            {
                /*printf("Recved\n");*/
                do
                {
                    netbuf_data(buf, &data, &len);
                    err = netconn_write(newconn, data, len, NETCONN_COPY);
                } while (netbuf_next(buf) >= 0);
                netbuf_delete(buf);
            }
            /*printf("Got EOF, looping\n");*/
            /* Close connection and discard connection identifier. */
            netconn_close(newconn);
            netconn_delete(newconn);
        }
    }
}

void udpecho_thread(void *arg)
{
    struct netconn *conn;
    struct netbuf *buf, *tx_buf;
    err_t err;
    LWIP_UNUSED_ARG(arg);

    conn = netconn_new(NETCONN_UDP);
    netconn_bind(conn, IP_ADDR_ANY, 7);

    LWIP_ERROR("udpecho: invalid conn", (conn != NULL), return;);

    while (1)
    {
        err = netconn_recv(conn, &buf);
        if (err == ERR_OK)
        {

            tx_buf = netbuf_new();
            netbuf_alloc(tx_buf, buf->p->tot_len);

            pbuf_take(tx_buf->p, (const void *)buf->p->payload, buf->p->tot_len);

            err = netconn_sendto(conn, tx_buf, (const ip_addr_t *)&(buf->addr), buf->port);
            if (err != ERR_OK)
            {
                LWIP_DEBUGF(LWIP_DBG_ON, ("netconn_send failed: %d\n", (int)err));
            }
            else
            {
                LWIP_DEBUGF(LWIP_DBG_ON, ("got %s\n", buffer));
            }
            netbuf_delete(tx_buf);
        }
        netbuf_delete(buf);
    }
}
#ifndef NET_H
#define NET_H

void tcpecho_thread(void *arg);
void udpecho_thread(void *arg);

#endif /* NET_H */
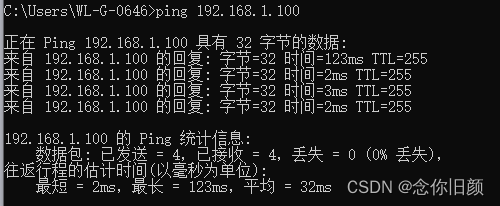
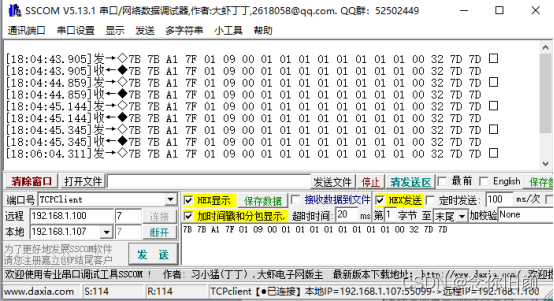
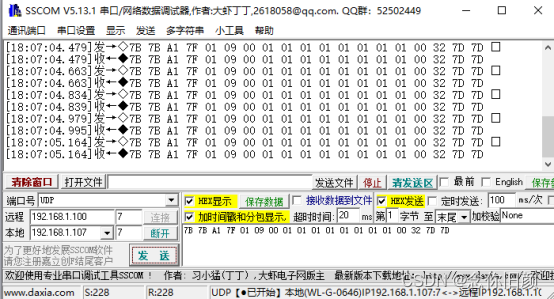
10. Results
CMD Check:Ping 192.168.1.100
Hyper Terminal Check:TCP and UDP echo
11. Appendix
CubeMX Project File Download:
https://download.csdn.net/download/W1062998292/86539854


 2757
2757


 被折叠的 条评论
为什么被折叠?
被折叠的 条评论
为什么被折叠?
 到【灌水乐园】发言


