


Spring AOP
AOP面向切面编程的相关概念
什么是AOP ?
AOP (Aspect Oriented Programing) 称为:面向切面编程,它是一种编程思想。
AOP采取横向抽取机制,取代了传统纵向继承体系的重复性代码编写方式(例如性能监视、事务管理、安全检查、缓存、日志记录等)。
【扩展了解】AOP 是 OOP(面向对象编程(Object Oriented Programming,OOP)是一种计算机编程架构),思想延续 !
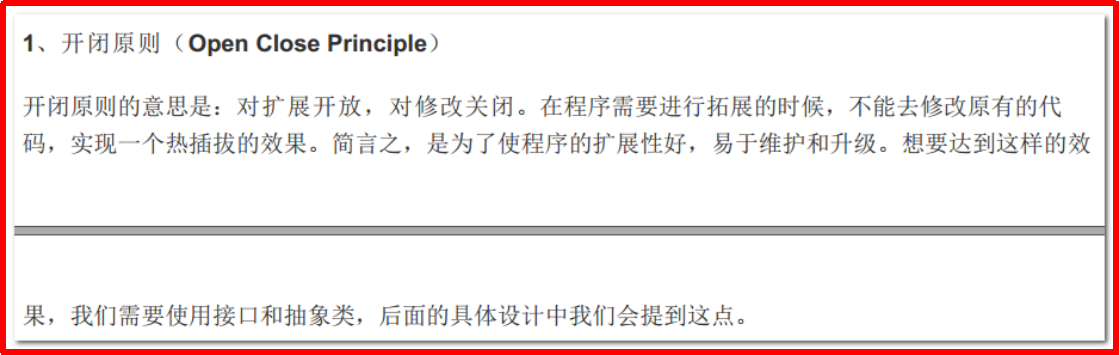
什么是OCP:即开闭原则。
参考网站:http://www.cnblogs.com/muzongyan/archive/2010/08/05/1793454.html
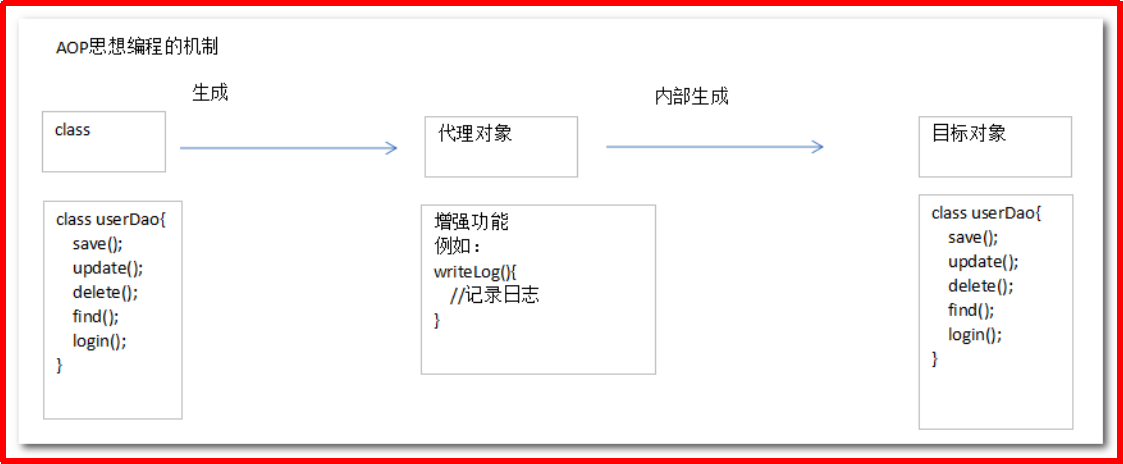
AOP 思想: 基于代理思想,对原来目标对象,创建代理对象,在不修改原对象代码情况下,通过代理对象,调用增强功能的代码,从而对原有业务方法进行增强!
AOP的应用场景
场景一:记录日志
场景二:监控方法运行时间(监控性能)
场景三:权限控制
场景四:缓存优化(第一次调用查询数据库,将查询结果放入内存对象,第二次调用,直接从内存对象返回,不需要查询数据库)
场景五:事务管理(调用方法前开启事务,调用方法后提交或者回滚、关闭事务)
AOP编程相关术语
AOP思想编程的机制
AOP的相关术语
Aspect(切面):是通知和切入点的结合,通知和切入点共同定义了关于切面的全部内容—它的功能、在何时和何地完成其功能
joinpoint(连接点):所谓连接点是指那些被拦截到的点。在spring中,这些点指的是方法,因为spring只支持方法类型的连接点.
Pointcut(切入点):所谓切入点是指我们要对哪些joinpoint进行拦截的定义.
通知定义了切面的”什么”和”何时”,切入点就定义了”何地”.
Advice(通知):所谓通知是指拦截到Pointcut之后所要做的事情就是通知.通知分为前置通知,后置通知,异常通知,最终通知,环绕通知(切面要完成的功能)
Target(目标对象):代理的目标对象
Weaving(织入):是指把切面应用到目标对象来创建新的代理对象的过程.切面在指定的连接点织入到目标对象
Introduction(引入)(不要求掌握):在不修改类代码的前提下, Introduction可以在运行期为类动态地添加一些方法或Field.
通过案例解释AOP相关概念
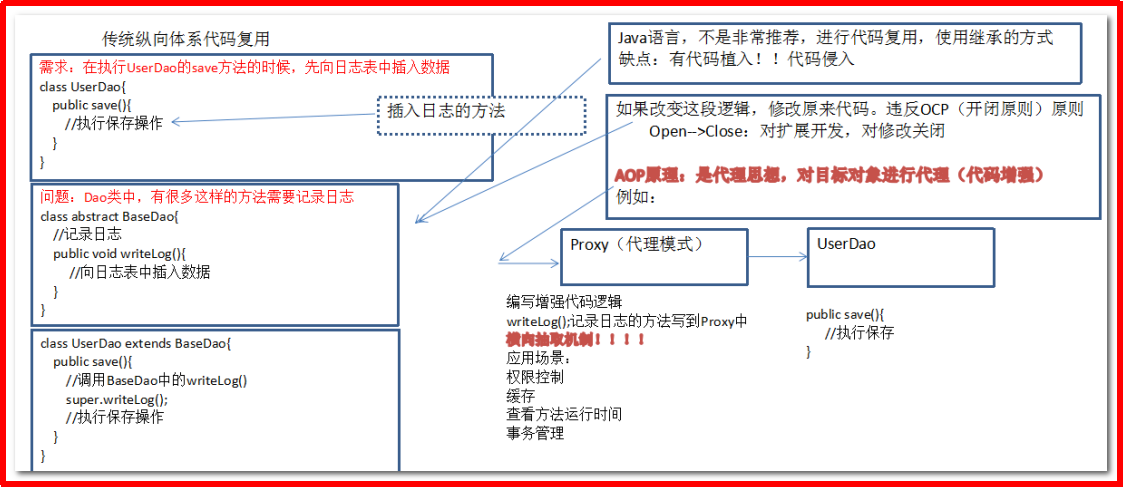
需求:UserDao中有5个方法,分别是save()、update()、delete()、find()、login();在访问UserDao的save()、update()、delete()方法之前,进行记录日志的操作。
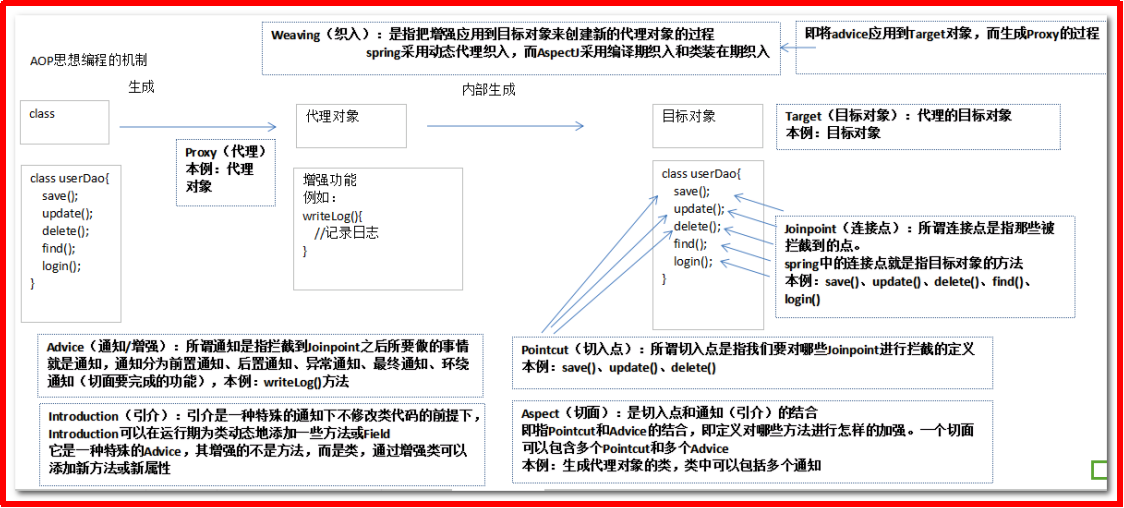
Aspect切面(类):增强代码 Advice(writeLog方法)和 切入点 Pointcut(save,update,delete) 的结合。换句话说:对哪些方法进行怎样的代码增强。
AOP编程底层实现机制(掌握)
AOP 就是要对目标进行代理对象的创建, Spring AOP是基于动态代理的,基于两种动态代理机制: JDK动态代理和CGLIB动态代理
面试题:动态代理和静态代理区别?
动态代理:在虚拟机内部,运行的时候,动态生成代理类(运行时生成,runtime生成) ,并不是真正存在的类, 一般格式:Proxy$$ (Proxy$$Customer)
静态代理:实际存在代理类(例如:struts2 Action的代理类 ActionProxy,struts2的拦截器)
JDK动态代理
JDK动态代理,针对目标对象的接口进行代理,动态生成接口的实现类!(必须有接口)
【过程要点】:
1、 必须对接口生成代理 (只能对目标对象里面的接口方法进行增强)
2、 采用Proxy对象,通过newProxyInstance方法为目标创建代理对象。
该方法接收三个参数:
(1)目标对象类加载器
(2)目标对象实现的接口
(3)代理后的处理程序InvocationHandler
使用 Proxy类提供 newProxyInstance 方法对目标对象接口进行代理

参数说明:
loader:定义代理类的类加载器
interfaces:代理类要实现的接口列表
h:指派方法调用的调用处理程序
3、 实现InvocationHandler 接口中 invoke方法,在目标对象每个方法调用时,都会执行invoke
【示例】:需求:对目标对象中存在保存和查询的方法,在执行保存的方法的时候,记录日志
第一步:新建web工程:spring4_d02_c04。创建包com.wit
第二步:编写业务接口,接口中定义save()和find()的方法。
//接口(表示代理的目标接口)
public interface ICustomerService {
	//保存
	public void save();
	//查询
	public int find();
}
第三步:编写业务类,类要实现接口
//实现类
public class CustomerServiceImpl implements ICustomerService{
//保存
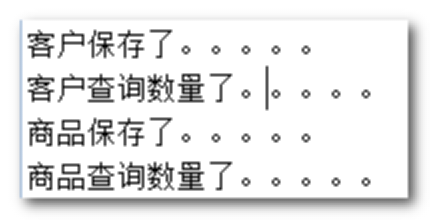
public void save() {
System.out.println("客户保存了。。。。。");
}
//查询
public int find() {
System.out.println("客户查询数量了。。。。。");
return 100;
}
}
第四步:使用JDK代理完成
代理工厂:
有三种方案完成JDK动态代理:
方案一:在内部实现new InvocationHandler(),指定匿名类
//专门用来生成jdk的动态代理对象的-通用
public class JdkProxyFactory{
	//成员变量
	private Object target;
	//注入target目标对象
	public JdkProxyFactory(Object target) {
		this.target = target;
	}

	public Object getProxyObject(){
		//参数1:目标对象的类加载器
		//参数2:目标对象实现的接口
		//参数3:回调方法对象
		/**方案一:在内部实现new InvocationHandler(),指定匿名类*/
		return Proxy.newProxyInstance(target.getClass().getClassLoader(), target.getClass().getInterfaces(), new InvocationHandler(){

			public Object invoke(Object proxy, Method method, Object[] args)
					throws Throwable {
				//如果是保存的方法,执行记录日志操作
				if(method.getName().equals("save")){
					writeLog();
				}
				//目标对象原来的方法执行
				Object object = method.invoke(target, args);//调用目标对象的某个方法,并且返回目标对象
				return object;
			}

		});
	}

	//记录日志
	private static void writeLog(){
		System.out.println("增强代码:写日志了。。。");
	}

}
方案二:传递内部类的对象,指定内部类
//专门用来生成jdk的动态代理对象的-通用
public class JdkProxyFactory{
	//成员变量
	private Object target;
	//注入target
	public JdkProxyFactory(Object target) {
		this.target = target;
	}

	public Object getProxyObject(){
		//参数1:目标对象的类加载器
		//参数2:目标对象实现的接口
		//参数3:回调方法对象
		/**方案二:传递内部类的对象,指定内部类*/
		return Proxy.newProxyInstance(target.getClass().getClassLoader(), target.getClass().getInterfaces(),new MyInvocationHandler());
	}

	//自己制定内部类:类的内部可以多次使用类型
	private class MyInvocationHandler implements InvocationHandler{

		public Object invoke(Object proxy, Method method, Object[] args)
				throws Throwable {
			//如果是保存的方法,执行记录日志操作
			if(method.getName().equals("save")){
				writeLog();
			}
			//目标对象原来的方法执行
			Object object = method.invoke(target, args);//调用目标对象的某个方法,并且返回目标对象
			return object;
		}

	}

	//记录日志
	private static void writeLog(){
		System.out.println("增强代码:写日志了。。。");
	}

}
方案三:直接使用调用类作为接口实现类,实现InvocationHandler接口
//专门用来生成jdk的动态代理对象的-通用
public class JdkProxyFactory implements InvocationHandler{
	//成员变量
	private Object target;
	//注入target
	public JdkProxyFactory(Object target) {
		this.target = target;
	}

	public Object getProxyObject(){
		//参数1:目标对象的类加载器
		//参数2:目标对象实现的接口
		//参数3:回调方法对象
		/**方案三:直接使用调用类作为接口实现类,实现InvocationHandler接口*/
		return Proxy.newProxyInstance(target.getClass().getClassLoader(), target.getClass().getInterfaces(),this);
	}

	//记录日志
	private static void writeLog(){
		System.out.println("增强代码:写日志了。。。");
	}

	//参数1:代理对象
	//参数2:目标的方法对象
	//参数3:目标的方法的参数
	public Object invoke(Object proxy, Method method, Object[] args)
			throws Throwable {
		//如果是保存的方法,执行记录日志操作
		if(method.getName().equals("save")){
			writeLog();
		}
		//目标对象原来的方法执行
		Object object = method.invoke(target, args);//调用目标对象的某个方法,并且返回目标对象
		return object;
	}

}
第五步:使用SpringTest.java进行测试
//目标:使用动态代理,对原来的方法进行功能增强,而无需更改原来的代码。
//JDK动态代理:基于接口的(对象的类型,必须实现接口!)
@Test
public void testJdkProxy(){
    //target(目标对象)
    ICustomerService target = new CustomerServiceImpl();
    //实例化注入目标对象
    JdkProxyFactory jdkProxyFactory = new JdkProxyFactory(target);
    //获取Proxy Object代理对象:基于目标对象类型的接口的类型的子类型的对象
    ICustomerService proxy = (ICustomerService)jdkProxyFactory.getProxyObject();
    //调用目标对象的方法
    proxy.save();
    System.out.println("————————————————————————————————————————");
    proxy.find();
}
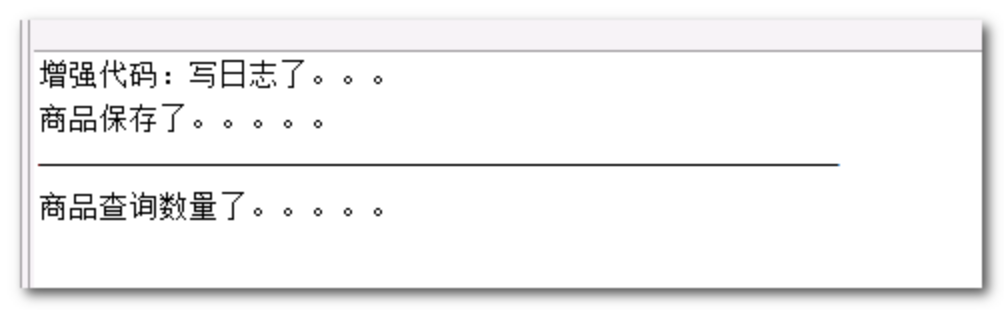
第六步:在控制台查看输出结果
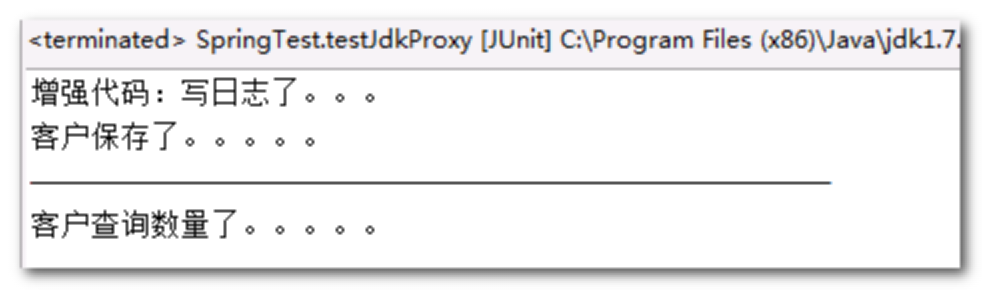
从结果上看出:在保存方法的前面,输入了日志增强。
保存动态代理的class文件的方式,必须在main方法里面执行才有效果:
System.getProperties().put("“sun.misc.ProxyGenerator.saveGeneratedFiles”, “true”); //jdk1.8以及之前版本
System.getProperties().put(“jdk.proxy.ProxyGenerator.saveGeneratedFiles”, “true”); //jdk1.8之后版本
最后,使用断点查看JDK代理,生成的代理对象

说明
Interface ICustomerService{
//目标接口
}
Class CustomerServiceImpl implements ICustomerService{
//目标类实现接口
}
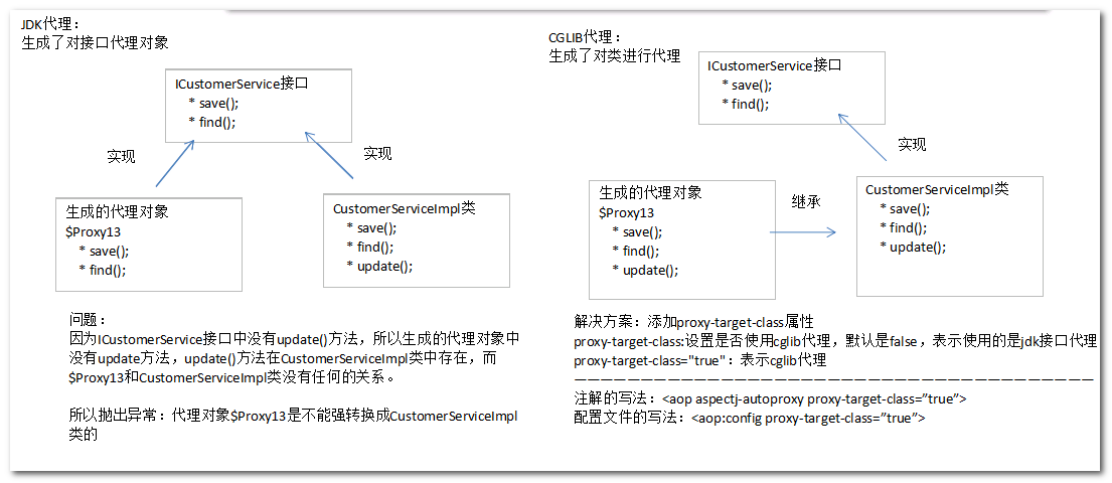
JDK代理对接口代理
Class $Proxy2 implements ICustomerService{
//JDK代理类是目标接口的实现类
ICustomerService customerService = new CustomerServiceImpl();
public void save() {
writeLog()
customerService.save();
}
public int find() {
int returnValue = customerService.find();
return returnValue;
}
//记录日志
private static void writeLog(){
System.out.println("增强代码:写日志了。。。");
}
}
注意:
JDK动态代理的缺点: 只能面向接口代理,不能直接对目标类进行代理 ,如果没有接口,则不能使用JDK代理。
Cglib动态代理
Cglib的引入为了解决类的直接代理问题(生成代理子类),不需要接口也可以代理!
什么是cglib ?
CGLIB(Code Generation Library)是一个开源项目!是一个强大的,高性能,高质量的Code生成类库,它可以在运行期扩展Java类与实现Java接口。
百度百科:参考网站
http://baike.baidu.com/link?url=A19bwp5SinV_KZPV6TMorLe4oGpPVdAHgdRBJZC3HCuVqNm7JaDCnkOpvxdF4bnq-f9Wni4CBm5rZFiygUgHCa
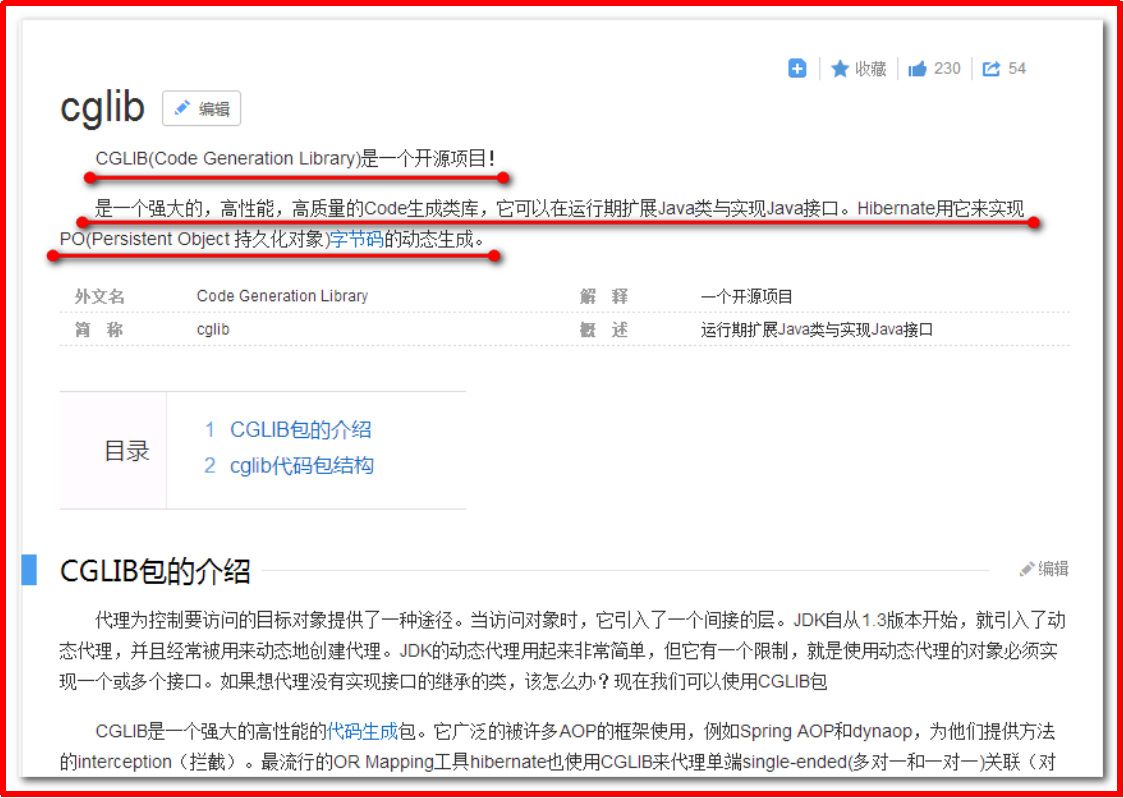
该代理方式需要相应的jar包,但不需要导入。因为Spring core包已经包含cglib ,而且同时包含了cglib 依赖的asm的包(动态字节码的操作类库)
【示例】:需求:对目标对象中存在保存和查询的方法,在执行保存的方法的时候,记录日志
第一步:将spring的核心jar导入进来,因为spring的包,包含了cglib的包

将spring的core包引进来(他包含了cglib)
第二步:创建包com.wit.cglib,编写业务类,创建类ProductService.java,类不需要实现接口
//没有接口的类
public class ProductService {
	public void save() {
		System.out.println("商品保存了。。。。。");

	}

	public int find() {
		System.out.println("商品查询数量了。。。。。");
		return 99;
	}
}
第三步:使用cglib代理,创建类CglibProxyFactory.java
//cglib动态代理工厂:用来生成cglib代理对象
public class CglibProxyFactory implements MethodInterceptor{
	//声明一个代理对象引用
	private Object target;
	//注入代理对象
	public CglibProxyFactory(Object target) {
		this.target = target;
	}

	//获取代理对象
	public Object getProxyObject(){
		//1.代理对象生成器(工厂思想)
		Enhancer enhancer = new Enhancer();
// 类加载器
		enhancer.setClassLoader(target.getClass().getClassLoader());
		//2.在增强器上设置两个属性
		//设置要生成代理对象的目标对象:生成的目标对象类型的子类型
		enhancer.setSuperclass(target.getClass());
		//设置回调方法
		enhancer.setCallback(this);
//		Callback
		//3.创建获取对象
		return enhancer.create();
	}


	//回调方法(代理对象的方法)
	//参数1:代理对象
	//参数2:目标对象的方法对象
	//参数3:目标对象的方法的参数的值
	//参数4:代理对象的方法对象
	public Object intercept(Object proxy, Method method, Object[] args,
			MethodProxy methodProxy) throws Throwable {
		//如果是保存的方法,执行记录日志操作
		if(method.getName().equals("save")){
			writeLog();
		}
		//目标对象原来的方法执行
		Object object = method.invoke(target, args);//调用目标对象的某个方法,并且返回目标对象
		return object;
	}

	//写日志的增强功能
	//Advice通知、增强
	//记录日志
	private static void writeLog(){
		System.out.println("增强代码:写日志了。。。");
	}

}
第四步:测试代码,使用SpringTest.java进行测试
保存代理对象使用 System.setProperty(DebuggingClassWriter.DEBUG_LOCATION_PROPERTY, System.getProperty("user.dir"));
//cglib动态代理:可以基于类(无需实现接口)生成代理对象
@Test
public void testCglibProxy(){
    System.setProperty(DebuggingClassWriter.DEBUG_LOCATION_PROPERTY, System.getProperty("user.dir"));

    //target目标:
    ProductService target = new ProductService();
    //weave织入,生成proxy代理对象
    //代理工厂对象,注入目标
    CglibProxyFactory cglibProxyFactory = new CglibProxyFactory(target);
    //获取proxy:思考:对象的类型
    //代理对象,其实是目标对象类型的子类型
    ProductService proxy=(ProductService) cglibProxyFactory.getProxyObject();
    //调用代理对象的方法
    proxy.save();
    System.out.println("————————————————————————————————————————");
    proxy.find();

}
第五步:控制台输出结果
最后,使用断点查看cglib代理,生成的代理对象

说明
Class ProductService{
    //目标类
}
Cglib对类代理(动态生成)
Class ProductService$$EnhancerByCGLIB$$df9980d0 extends ProductService{
	//CGLIB代理类是目标类的子类
	ProductService productService= new ProductService();
		public void save() {
		writeLog()
		productService.save();
	}
	public int find() {
		int returnValue = productService.find();
		return returnValue;
	}
	//记录日志
	private static void writeLog(){
		System.out.println("增强代码:写日志了。。。");
	}
}
代理知识小结
区别:
- Jdk代理:基于接口的代理,一定是基于接口,会生成目标对象的接口类型的子对象。
- Cglib代理:基于类的代理,不需要基于接口,会生成目标对象类型的子对象。
代理知识总结:
spring在运行期,生成动态代理对象,不需要特殊的编译器.
spring有两种代理方式:
1、若目标对象实现了若干接口,spring使用JDK的java.lang.reflect.Proxy类代理。(默认)
2、若目标对象没有实现任何接口,spring使用CGLIB库生成目标对象的子类。
使用该方式时需要注意:
1、对接口创建代理优于对类创建代理,因为会产生更加松耦合的系统,所以spring默认是使用JDK代理。
对类代理是让遗留系统或无法实现接口的第三方类库同样可以得到通知,这种方式应该是备用方案。
2、标记为final的方法不能够被通知。spring是为目标类产生子类。任何需要被通知的方法都被复写,将通知织入。final方法是不允许重写的。
3、spring只支持方法连接点:不提供属性接入点,spring的观点是属性拦截破坏了封装。
提示:
- Spring AOP 优先对接口进行代理 (使用Jdk动态代理)
- 如果目标对象没有实现任何接口,才会对类进行代理(使用cglib动态代理)
AspectJ 切面编程(xml方式)
百度百科文档:
http://baike.baidu.com/link?url=2h5jS5pGRtcNexdPQBt1CSgPXpqFyyCu0WR-dJKh9mLxjdpLloT9XsY7pQIwGdOLQB1n7Shfoqr65JXiOtmDEK
开发方法还是三步:
(1)确定目标对象(bean)
(2)编写通知,对目标对象增强(advice)
(3)配置切入点(pointcut)、切面(aspect)
AspectJ 提供Advice类型
普通的pojo即可。(不需要实现接口)
AspectJ提供不同的通知类型:
- Before 前置通知,相当于BeforeAdvice
- AfterReturning 后置通知,相当于AfterReturningAdvice
- Around 环绕通知,相当于MethodInterceptor
- AfterThrowing抛出通知,相当于ThrowAdviceAfter
- 最终final通知,不管是否异常,该通知都会执行
- DeclareParents 引介通知,相当于IntroductionInterceptor (不要求掌握)
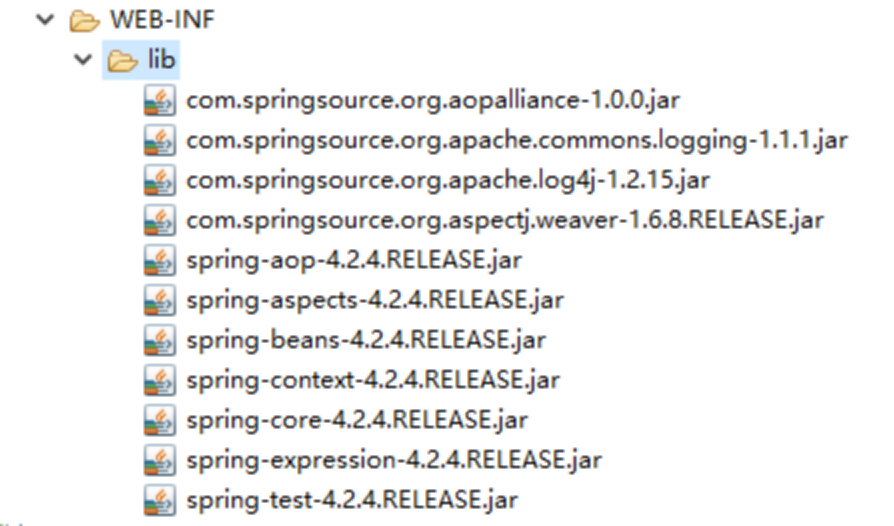
第一步:新建web项目spring4_d02_c05
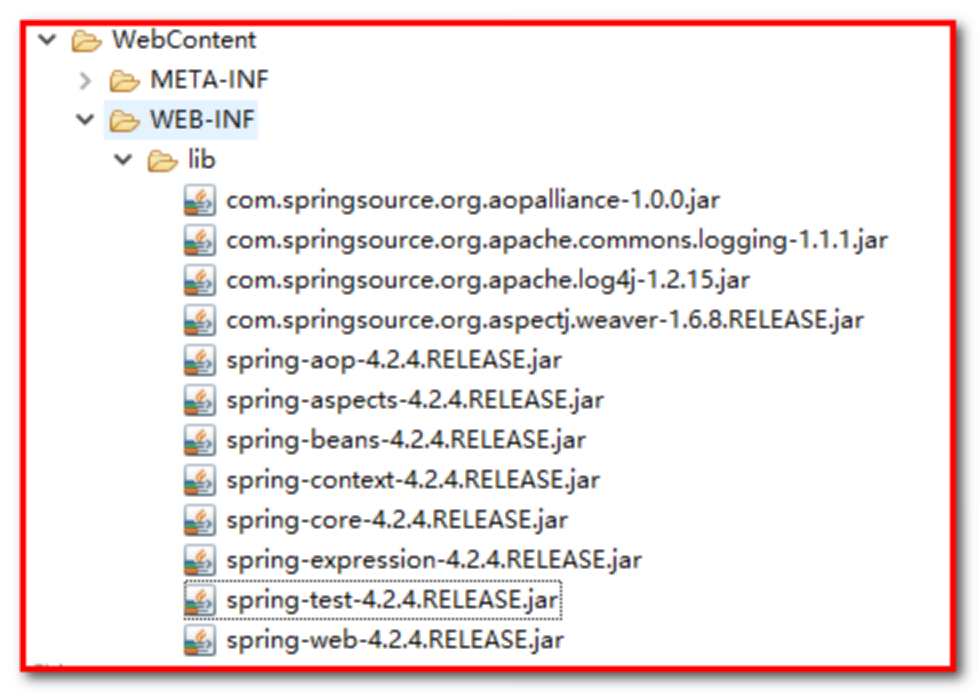
导入jar包 (11个)
基本spring开发 6个 (4+2)(包含配置文件)
Spring测试集成 1个
Spring AOP编程 4个(2对)

共需要导入的jar包
在src下,创建applicationContext.xml。
第一步:引用aop的名称空间
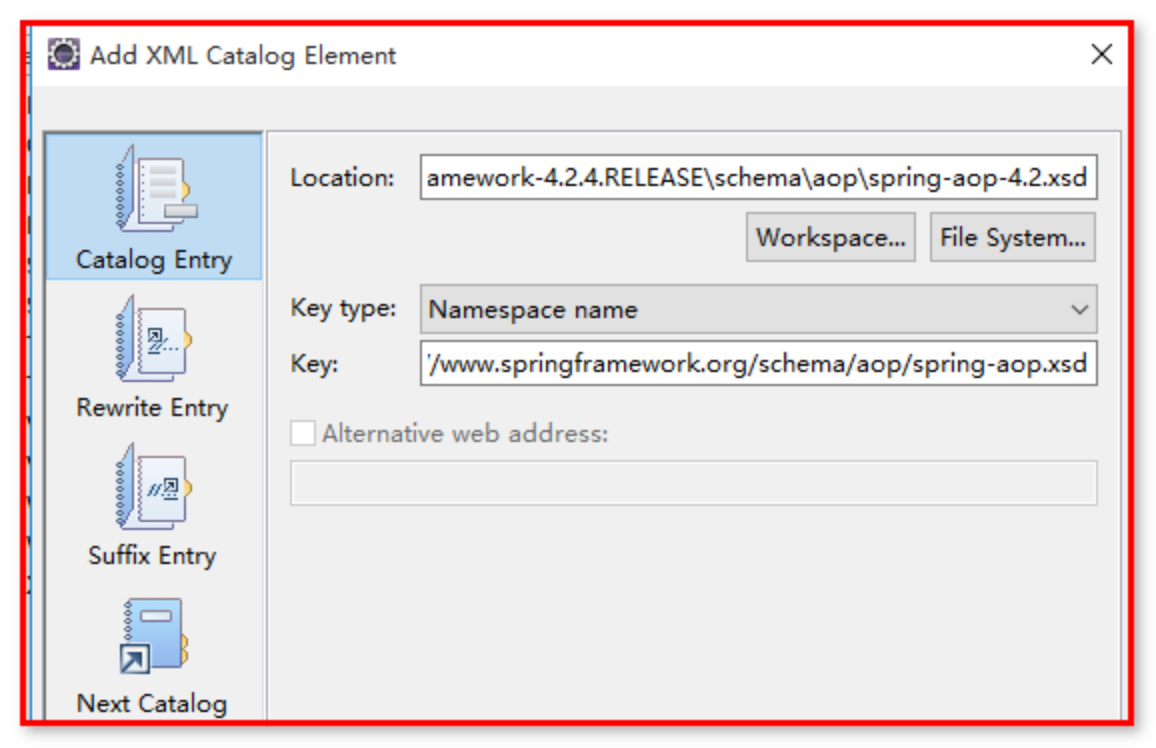
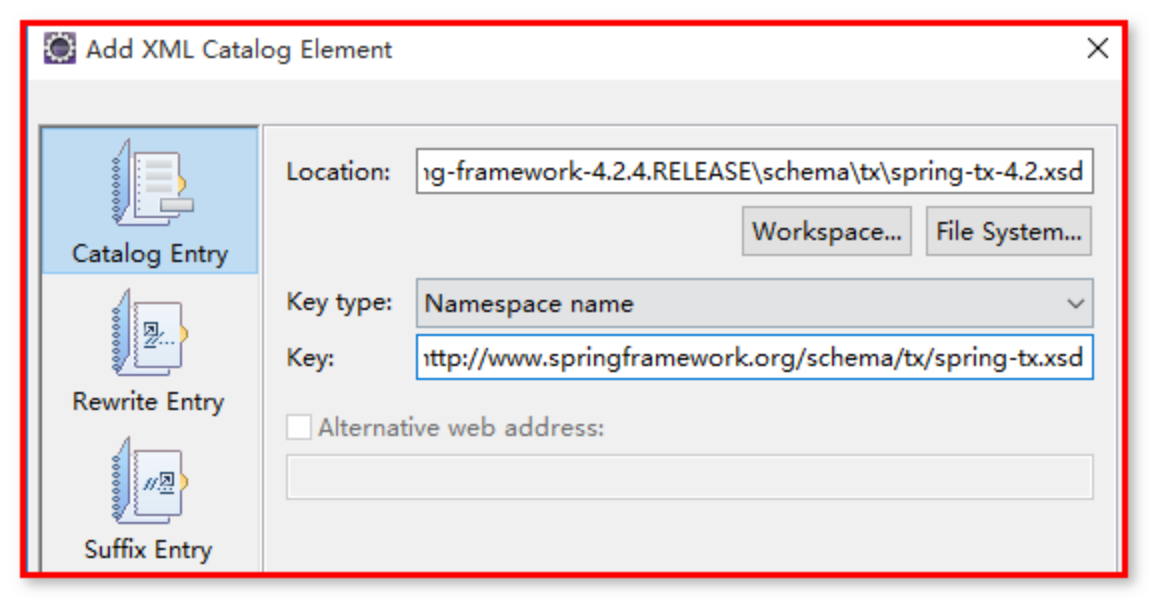
查看:spring-framework-4.2.4.RELEASE\docs\spring-framework-reference\html中的xsd-config.html,搜素aop,发现:
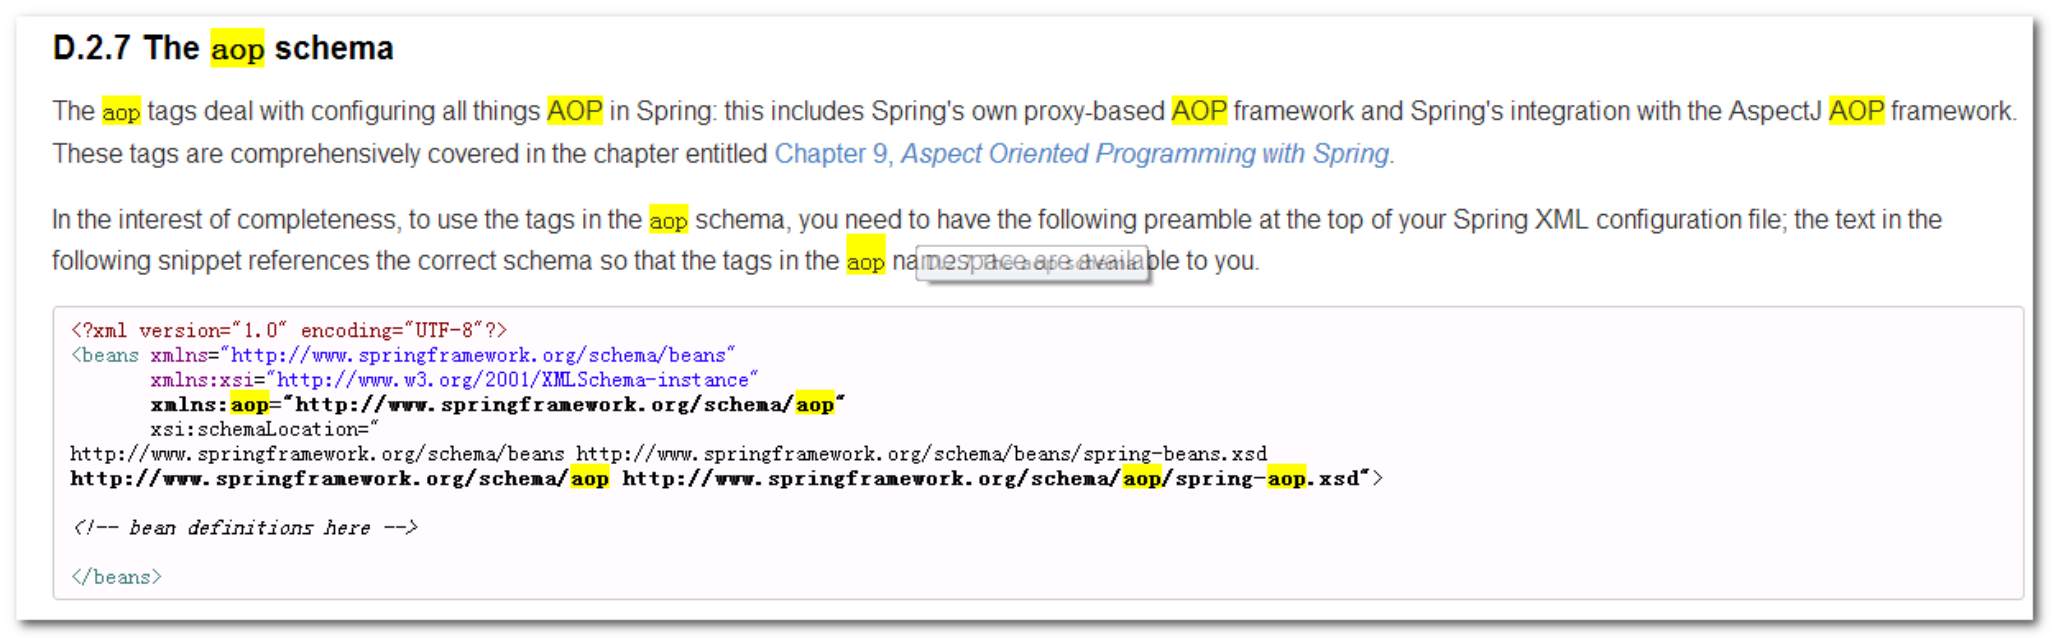
需要我们引入aop的文件约束。如图
<beans xmlns="http://www.springframework.org/schema/beans"
       xmlns:xsi="http://www.w3.org/2001/XMLSchema-instance"
       xmlns:context="http://www.springframework.org/schema/context"
       xmlns:aop="http://www.springframework.org/schema/aop"
       xsi:schemaLocation="http://www.springframework.org/schema/beans
       					   http://www.springframework.org/schema/beans/spring-beans.xsd
						   http://www.springframework.org/schema/context
						   http://www.springframework.org/schema/context/spring-context.xsd
						   http://www.springframework.org/schema/aop
                           http://www.springframework.org/schema/aop/spring-aop.xsd">
配置aop提示
第二步:编写Before 前置通知Advice增强 :
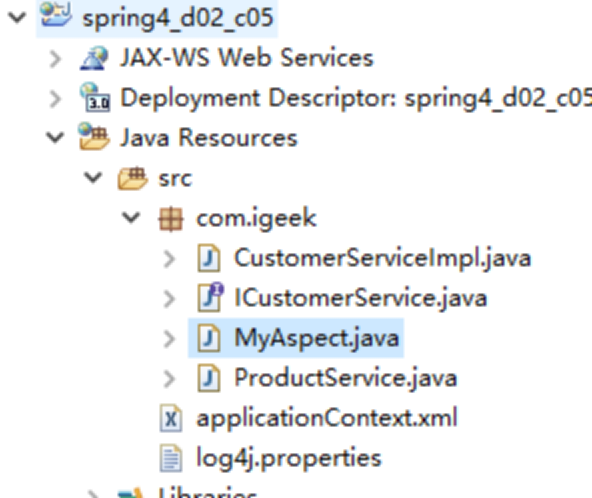
创建包:com.wit,复制上个项目中的
CustomerServiceImpl.java,ICustomerService.java,ProductService.java到包中
配置bean
<!-- 1.确定了要增强的target对象 -->
	<!-- 对于spring来说,目标对象:就是bean对象 -->
	<!-- 基于接口类 -->
	<bean id="customerService" class="com.wit.CustomerServiceImpl"/>
	<!-- 基于一般类 -->
	<bean id="productService" class="com.wit.ProductService"/>
创建类:MyAspect.java
编写MyAspect.java
//aspectj的advice通知增强类,无需实现任何接口
public class MyAspect {
//前置通知
//普通的方法。方法名随便,但也不能太随便,一会要配置
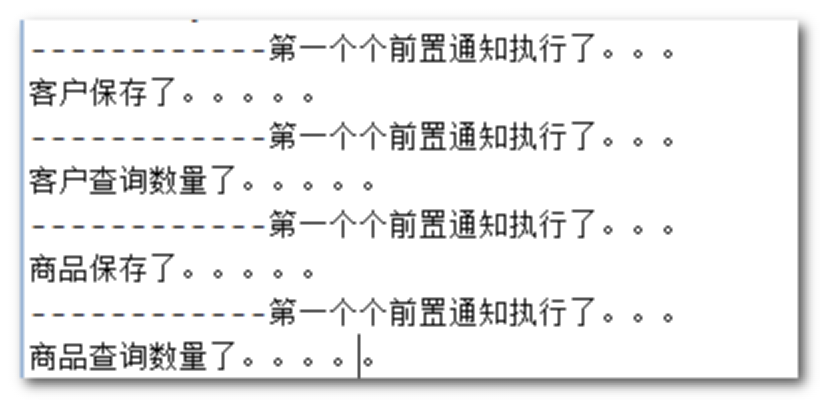
public void firstbefore(){
System.out.println("------------第一个个前置通知执行了。。。");
}
}
将前置通知配置到spring的容器中
<!-- 2.配置advice通知增强 -->
<bean id="myAspectAdvice" class="com.wit.MyAspect"/>
配置切入点和切面(让切入点关联通知)
第三步:配置切面(包括切入点),让切入点关联通知
核心配置文件applicationContext.xml中添加:
<!-- 3:配置aop -->
	<aop:config>
		<!-- 切入点:拦截哪些bean的方法 -->
		<aop:pointcut expression="bean(*Service)" id="myPointcut"/>
		<!--
			切面:要对哪些方法进行怎样的增强
			aop:aspect:aspejctj的方式!
			ref:配置通知
		-->
		<aop:aspect ref="myAspectAdvice">

			<!-- 第一个前置通知 :在访问目标对象方法之前,先执行通知的方法
				method:advice类中的方法名,
                pointcut-ref="myPointcut":注入切入点
                目的是让通知关联切入点
			-->
		    <aop:before method="firstbefore" pointcut-ref="myPointcut"/>
		</aop:aspect>
	</aop:config>
使用SpringTest测试代码:
//springjunit集成测试
@RunWith(SpringJUnit4ClassRunner.class)
@ContextConfiguration(locations="classpath:applicationContext.xml")
public class SpringTest {
	//注入要测试bean
	@Autowired
	private ICustomerService customerService;
	@Autowired
	private ProductService productService;

	//测试
	@Test
	public void test(){
		//基于接口
		customerService.save();
		customerService.find();
		//基于类的
		productService.save();
		productService.find();
	}

}
测试结果:
和传统的aop配置相比,更灵活,advice不需要实现接口,简单的pojo就可以了;一个通知可以增强多个连接点,一个连接点可以被多次增强。
【扩展优化】:
1.将切入点放入aspectj标签里面写,同时配置多个通知方法
<!-- 2.配置advice通知增强 -->
	<bean id="myAspectAdvice" class="cn.wit.spring.c_aspectjaop.MyAspect"/>

	<!-- 3:配置aop -->
	<aop:config>
		<!--
			切面:要对哪些方法进行怎样的增强
			aop:aspect:aspejctj的方式!
			ref:配置通知
		-->
		<aop:aspect ref="myAspectAdvice">
			<aop:pointcut expression="bean(*Service)" id="myPointcut"/>
			<!-- 第一个前置通知 :在访问目标对象方法之前,先执行通知的方法
				method:advice类中的方法名,
                pointcut-ref="myPointcut":注入切入点
                                        目的是让通知关联切入点
			-->
		    <aop:before method="firstbefore" pointcut-ref="myPointcut"/>
			  <aop:before method="firstbefore2" pointcut-ref="myPointcut"/>
		</aop:aspect>
	</aop:config>
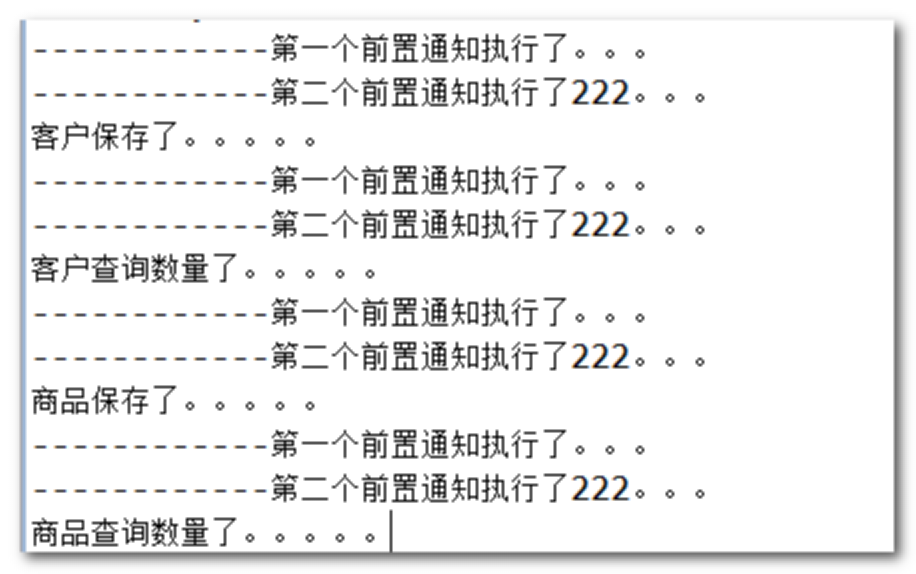
2.配置多个通知方法:
//aspectj的advice通知增强类,无需实现任何接口
public class MyAspect {

	//前置通知
	//普通的方法。方法名随便,但也不能太随便,一会要配置
	public void firstbefore(){
		System.out.println("------------第一个前置通知执行了。。。");
	}

	public void firstbefore2(){
		System.out.println("------------第二个前置通知执行了222。。。");
	}
}
3.执行结果:表示在执行目标对象方法之前执行
AspectJ切面编程,相比于传统的SpringAOP,定义的通知方法更多。
分析各种通知应用
Before前置通知
案例应用:实现权限控制(即:权限不足的时候,抛出异常)、记录方法调用信息日志
第一步:配置MyAspect类(切面),配置before方法(通知)
//aspectj的advice通知增强类,无需实现任何接口
public class MyAspect {
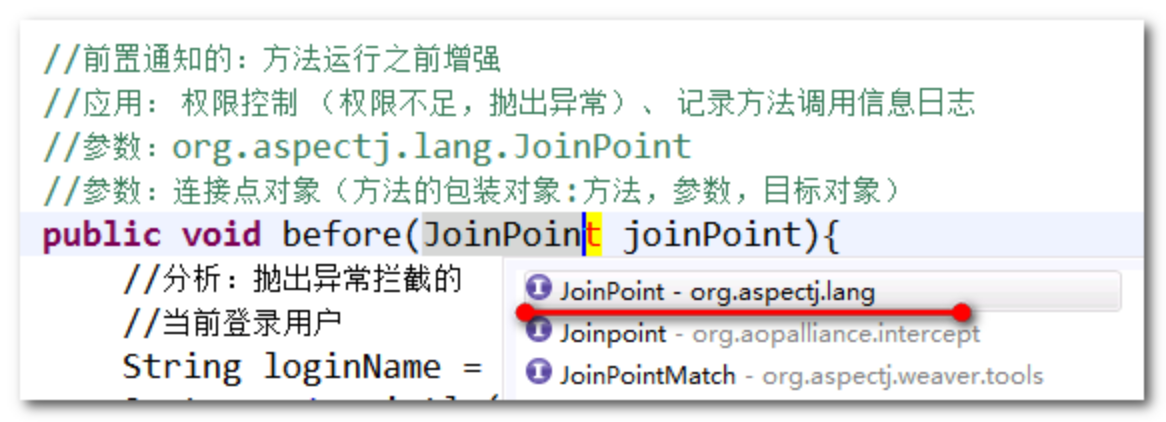
//前置通知的:方法运行之前增强
//应用: 权限控制 (权限不足,抛出异常)、 记录方法调用信息日志
//参数:org.aspectj.lang.JoinPoint
//参数:连接点对象(方法的包装对象:方法,参数,目标对象)
public void before(JoinPoint joinPoint){
//分析:抛出异常拦截的
//当前登录用户
String loginName = "Rose";
System.out.println("方法名称:"+joinPoint.getSignature().getName());
System.out.println("目标对象:"+joinPoint.getTarget().getClass().getName());
System.out.println("代理对象:"+joinPoint.getThis().getClass().getName());
//判断当前用户有没有执行方法权限
if(joinPoint.getSignature().getName().equals("find")){
if(!loginName.equals("admin")){
//只有超级管理员admin有权限,其他人不能执行某个方法,比如查询方法
throw new RuntimeException("您没有权限执行方法:"+joinPoint.getSignature().getName()+",类型为:"+joinPoint.getTarget().getClass().getName());
}
}
}
}
通过JoinPoint 连接点对象,获取目标对象信息 !
这里注意:引包不要引错了,使用aspectj中的连接点(org.aspectj.lang.JoinPoint):
第二步:Spring容器中配置,配置applicationContext.xml
<!-- 3:配置aop -->
	<aop:config>
		<aop:aspect ref="myAspectAdvice">
			<aop:pointcut expression="bean(*Service)" id="myPointcut"/>
			<!-- 前置通知 -->
			<aop:before method="before" pointcut-ref="myPointcut" />
		</aop:aspect>

	</aop:config>
第三步:使用SpringTest.java进行测试:
//springjunit集成测试
@RunWith(SpringJUnit4ClassRunner.class)
@ContextConfiguration(locations="classpath:applicationContext.xml")
public class SpringTest {
	//注入要测试bean
	@Autowired
	private ICustomerService customerService;
	@Autowired
	private ProductService productService;

	//测试
	@Test
	public void test(){
		//基于接口
		customerService.save();
		customerService.find();
		//基于类的
		productService.save();
		productService.find();
	}

}
提示:
Aspectj的文档
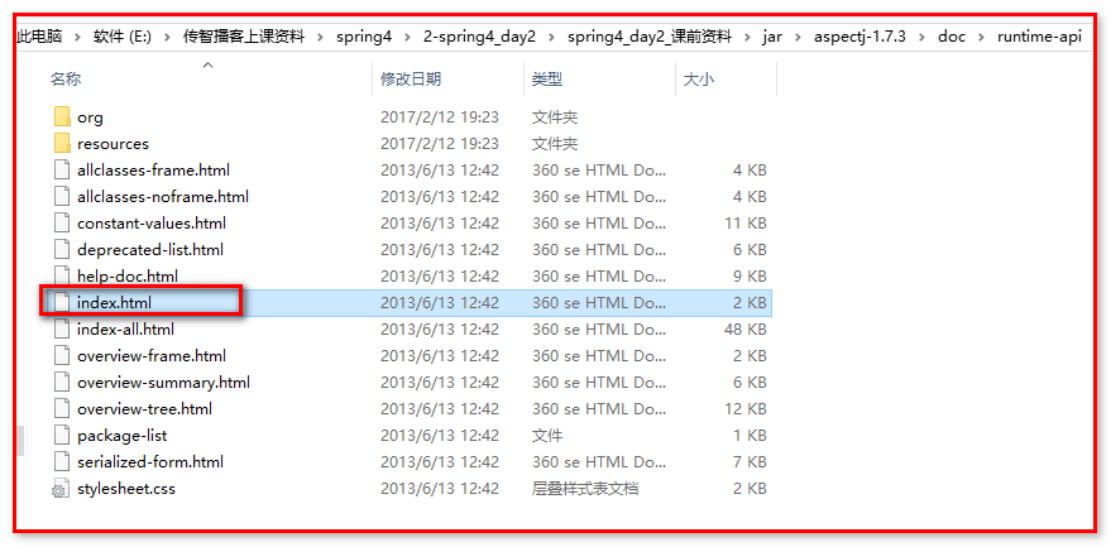
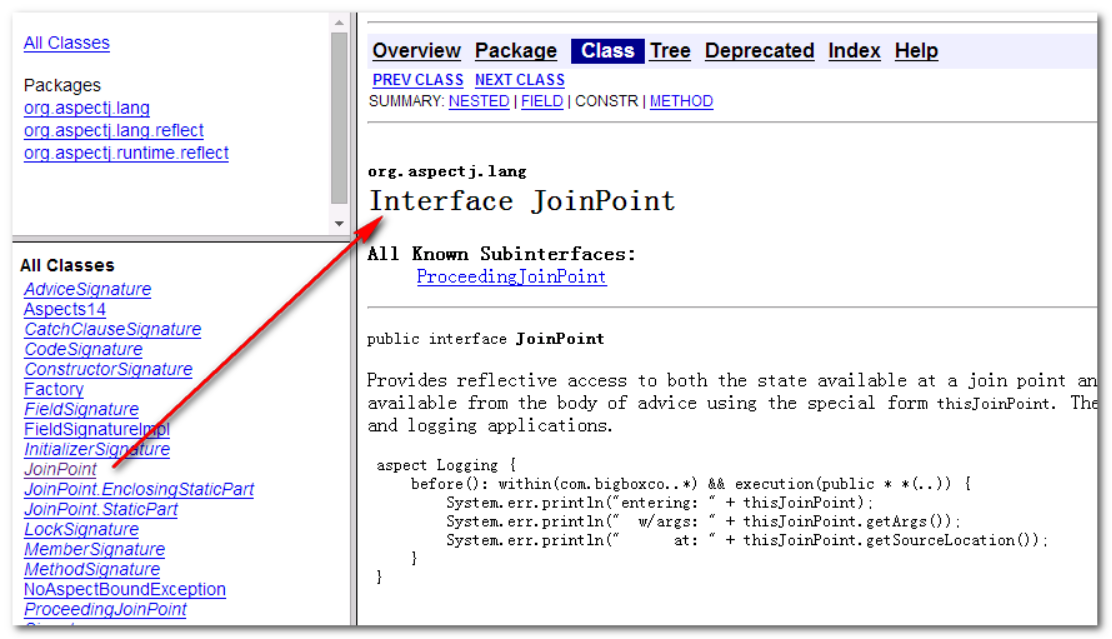
JoinPoint使用参考文档:资料\jar\aspectj-1.7.3\doc\runtime-api\index.html

提示:和传统aop的对比发现,aspectj更灵活,一个类中可以写N个增强方法,但传统的只能是一个类对应一个方法。
AfterReturing 后置通知
特点:在目标方法运行后,返回值后执行通知增强代码逻辑。
应用场景:与业务相关的,如网上营业厅查询余额后,自动下发短信功能。
分析:后置通知可以获取到目标方法返回值,如果想对返回值进行操作,使用后置通知(但不能修改目标方法返回)
第一步:配置MyAspect类(切面),配置afterReturing方法(通知)
//aspectj的advice通知增强类,无需实现任何接口
public class MyAspect {
	//应用场景:与业务相关的,如网上营业厅查询余额后,自动下发短信。
	//后置通知:会在目标方法执行之后调用通知方法增强。
	//参数1:连接点对象(方法的包装对象:方法,参数,目标对象)
	//参数2:目标方法执行后的返回值,类型是object,“参数名”随便,但也不能太随便,一会要配置
	public void afterReturing(JoinPoint joinPoint,Object returnVal){
		//下发短信:调用运行商的接口,短信猫。。。
		System.out.println("-++++++++-后置通知-当前下发短信的方法"+"-尊敬的用户,您调用的方法返回余额为:"+returnVal);
		//同时可以可以在下发后,记录日志:
		System.out.println("----日志记录,操作的类型:"+joinPoint.getTarget().getClass().getSimpleName()
				+",操作的方法:"+joinPoint.getSignature().getName()
				);
	}
}
第二步:Spring容器中配置,配置applicationContext.xml
<!-- 3:配置aop -->
	<aop:config>
		<aop:aspect ref="myAspectAdvice">
			<aop:pointcut expression="bean(*Service)" id="myPointcut"/>
			<!-- 后置通知
				returning:配置方法中的参数名字,与通知方法的第二个参数的名字,名字必须对应。
				在运行的时候,spring会自动将返回值传入该参数中。
			-->
			<aop:after-returning method="afterReturing" returning="returnVal" pointcut-ref="myPointcut"/>
		</aop:aspect>

	</aop:config>
第三步:使用SpringTest.java进行测试:
//springjunit集成测试
@RunWith(SpringJUnit4ClassRunner.class)
@ContextConfiguration(locations="classpath:applicationContext.xml")
public class SpringTest {
	//注入要测试bean
	@Autowired
	private ICustomerService customerService;
	@Autowired
	private ProductService productService;

	//测试
	@Test
	public void test(){
		//基于接口
		customerService.save();
		customerService.find();
		//基于类的
		productService.save();
		productService.find();
	}

}
Around 环绕通知
特点:目标执行前后,都进行增强(控制目标方法执行)
应用场景:日志、缓存、权限、性能监控、事务管理
增强代码的方法要求:
接受的参数:ProceedingJoinPoint(可执行的连接点)
返回值:Object返回值(即目标对象方法的返回值)
抛出Throwable异常。
【示例】
第一步:配置MyAspect类(切面),配置around方法(通知)
//aspectj的advice通知增强类,无需实现任何接口
public class MyAspect {
	//应用场景:日志、缓存、权限、性能监控、事务管理
	//环绕通知:在目标对象方法的执行前+后,可以增强
	//参数:可以执行的连接点对象ProcessdingJoinPoint(方法),特点是调用proceed()方法可以随时随地执行目标对象的方法(相当于目标对象的方法执行了)
	//必须抛出一个Throwable
	public Object around(ProceedingJoinPoint proceedingJoinPoint) throws Throwable{
		//目标:事务的控制:
		//开启事务:
		System.out.println("-----开启了事务。。。。。。。。。");
		//执行了目标对象的方法
		Object resultObject = proceedingJoinPoint.proceed();
		//结束事务
		System.out.println("-----提交了事务。。。。。。。。。");
		return resultObject;//目标对象执行的结果
	}
}
第二步:Spring容器中配置,配置applicationContext.xml
<!-- 3:配置aop -->
	<aop:config>
		<aop:aspect ref="myAspectAdvice">
			<aop:pointcut expression="bean(*Service)" id="myPointcut"/>
			<!-- 环绕通知 -->
			<aop:around method="around" pointcut-ref="myPointcut"/>
		</aop:aspect>

	</aop:config>
第三步:使用SpringTest.java进行测试:
//springjunit集成测试
@RunWith(SpringJUnit4ClassRunner.class)
@ContextConfiguration(locations="classpath:applicationContext.xml")
public class SpringTest {
	//注入要测试bean
	@Autowired
	private ICustomerService customerService;
	@Autowired
	private ProductService productService;

	//测试
	@Test
	public void test(){
		//基于接口
		customerService.save();
		customerService.find();
		//基于类的
		productService.save();
		productService.find();
	}

}
AfterThrowing 抛出通知(异常通知)
作用:目标代码出现异常,通知执行。记录异常日志、通知管理员(短信、邮件)
应用场景:处理异常(一般不可预知),记录日志
【示例】
第一步:配置MyAspect类(切面),配置aterThrowing方法(通知)
//aspectj的advice通知增强类,无需实现任何接口
public class MyAspect {
	//作用:目标代码出现异常,通知执行。记录异常日志、通知管理员(短信、邮件)
	//只有目标对象方法抛出异常,通知才会执行
	//参数1:静态连接点(方法对象)
	//参数2:目标方法抛出的异常,参数名随便,但也不能太随便
	public void afterThrowing(JoinPoint joinPoint,Throwable ex){
		//一旦发生异常,发送邮件或者短信给管理员
		System.out.println("++管理员您好,"+joinPoint.getTarget().getClass().getName()+"的方法:"
		+joinPoint.getSignature().getName()+"发生了异常,异常为:"+ex.getMessage());
	}
}
第二步:Spring容器中配置,配置applicationContext.xml
<!-- 3:配置aop -->
	<aop:config>
		<aop:aspect ref="myAspectAdvice">
			<aop:pointcut expression="bean(*Service)" id="myPointcut"/>
			<!-- 抛出通知
				throwing:通知中的方法的第二个参数,异常类型的参数的名字,在运行的时候,spring会自动将异常传入该参数中。-->
			<aop:after-throwing method="afterThrowing" throwing="ex" pointcut-ref="myPointcut"/>
    </aop:aspect>

	</aop:config>
第三步:使用SpringTest.java进行测试:
//springjunit集成测试
@RunWith(SpringJUnit4ClassRunner.class)
@ContextConfiguration(locations="classpath:applicationContext.xml")
public class SpringTest {
	//注入要测试bean
	@Autowired
	private ICustomerService customerService;
	@Autowired
	private ProductService productService;

	//测试
	@Test
	public void test(){
		//基于接口
		customerService.save();
		customerService.find();
		//基于类的
		productService.save();
		productService.find();
	}

}
此时发现通知的方法并没有执行。
那我们在目标对象的方法中故意抛出异常,大家看看效果
测试:
在ProductService.java中save的方法中,制造异常:
//没有接口的类
public class ProductService {
	public void save() {
		System.out.println("商品保存了。。。。。");
		//故意制造异常
		int d = 1/0;
	}

	public int find() {
		System.out.println("商品查询数量了。。。。。");
		return 99;
	}
}
查看测试结果:

After 最终通知
作用:不管目标方法是否发生异常,最终通知都会执行(类似于finally代码功能)
应用场景:释放资源(关闭文件、关闭数据库连接、网络连接、释放内存对象)
【示例】
第一步:配置MyAspect类(切面),配置after方法(通知)
//aspectj的advice通知增强类,无需实现任何接口
public class MyAspect {
	//应用场景:释放资源 (关闭文件、 关闭数据库连接、 网络连接、 释放内存对象 )
	//最终通知:不管是否有异常都会执行
	public void after(JoinPoint joinPoint){
		//释放数据库连接
		System.out.println("数据库的connection被释放了。。。。。,执行的方法是:"+joinPoint.getSignature().getName());
	}
}
第二步:Spring容器中配置,配置applicationContext-aspectJ.xml
<!-- 3:配置aop -->
	<aop:config>
		<aop:aspect ref="myAspectAdvice">
			<aop:pointcut expression="bean(*Service)" id="myPointcut"/>
			<!-- 最终通知 -->
			<aop:after method="after" pointcut-ref="myPointcut"/>
      <!--  以上代码也可以写成:pointcut切入点表达式:只能给一个通知方法来用,相当于省略了<aop:pointcut expression="bean(*Service)" id="myPointcut"/>
			<aop:after method="after" pointcut="bean(*Service)"/>-->
		</aop:aspect>

	</aop:config>
第三步:使用SpringTest.java进行测试:
//springjunit集成测试
@RunWith(SpringJUnit4ClassRunner.class)
@ContextConfiguration(locations="classpath:applicationContext.xml")
public class SpringTest {
	//注入要测试bean
	@Autowired
	private ICustomerService customerService;
	@Autowired
	private ProductService productService;

	//测试
	@Test
	public void test(){
		//基于接口
		customerService.save();
		customerService.find();
		//基于类的
		productService.save();
		productService.find();
	}

}
查看测试结果:

五种通知小结:
(1)只要掌握Around(环绕通知)通知类型,就可实现其他四种通知效果。
(2)因为你可以在环绕通知的方法中编写如下代码:
try {
//前置通知
Object result = proceedingJoinPoint.proceed();
//后置通知
}catch(Exception){
//抛出通知
}finally{
//最终通知
}
各种Advice方法可接收的参数和返回值小结(参考)
方法格式:
public returnType method (param)
public 返回值类型 方法名 (参数类型 参数名)
返回值类型:void和Object
方法名:任意名称(但是也不能太随意)
参数类型:
* 参数类型为JoinPoint接口类型,返回值类型为void
* 参数类型为ProceedingJoinPoint接口类型,返回值类型为Object
具体为:
| 通知类型 | 输入参数(可选) | 返回值类型 | 其他 |
|---|---|---|---|
| Before前置通知 | JoinPoint(静态连接点信息) | void | |
| AfterReturning后置通知 | JoinPoint,Object | void | |
| Around环绕通知 | ProceedingJoinPoint(可执行的连接点信息) | Object | throws Throwable |
| AfterThrowing抛出通知 | JoinPoint,Throwable | void | |
| After最终通知 | JoinPoint | void |
总结:
1、注解方式装配bean对象
2、混合配置
3、测试集成 (@runwith @ContextConfiguration(核心配置))—熟悉
4、AOP的思想(如何实现),AOP在哪些地方使用?
5、aop的原理(动态代理:jdk,cglib)
6、AspectJ 切面编程(xml方式)
7、各种通知应用
@Aspectj注解配置切面编程
搭建环境
新建web项目 spring4_d03_c02 , 导入jar包(12个)
同时导入
applicationContext.xml,
log4j.properties到工程
第一步:编写目标对象(bean)、spring容器、测试类
创建包:com.wit
(1):创建接口ICustomerService.java
//接口
public interface ICustomerService {
	//保存
	public void save();

	//查询
	public int find();

}
创建接口的实现类,CustomerServiceImpl
//实现类
/**
 * @Service("customerService")
 * 相当于spring容器中定义:
 * <bean id="customerService" class="com.wit.CustomerServiceImpl">
 */
@Service("customerService")
public class CustomerServiceImpl implements ICustomerService{

	public void save() {
		System.out.println("客户保存了。。。。。");

	}

	public int find() {
		System.out.println("客户查询数量了。。。。。");
		return 100;
	}

}
创建类ProductService.java,不需要实现接口
//没有接口的类
/**
 * @Service("productService")
 * 相当于spring容器中定义:
 * <bean id="productService" class="com.wit.ProductService">
 */
@Service("productService")
public class ProductService {
	public void save() {
		System.out.println("商品保存了。。。。。");

	}

	public int find() {
		System.out.println("商品查询数量了。。。。。");
		return 99;
	}
}
(2):配置applicationContext.xml
引入几个命名空间:bean、aop、context
<beans xmlns="http://www.springframework.org/schema/beans"
       xmlns:xsi="http://www.w3.org/2001/XMLSchema-instance"
       xmlns:p="http://www.springframework.org/schema/p"
       xmlns:context="http://www.springframework.org/schema/context"
       xmlns:aop="http://www.springframework.org/schema/aop"
       xsi:schemaLocation="http://www.springframework.org/schema/beans
                           http://www.springframework.org/schema/beans/spring-beans.xsd
                           http://www.springframework.org/schema/context
                           http://www.springframework.org/schema/context/spring-context.xsd
                           http://www.springframework.org/schema/aop
                           http://www.springframework.org/schema/aop/spring-aop.xsd">
使用bean注解的扫描(自动开启注解功能)
<!-- 1。确定目标 -->
	<!-- 扫描bean组件 -->
	<context:component-scan base-package="com.wit"/>
(3):测试代码SpringTest.java
//springjunit集成测试
@RunWith(SpringJUnit4ClassRunner.class)
@ContextConfiguration(locations="classpath:applicationContext.xml")
public class SpringTest {
	//注入要测试bean
	@Autowired
	private ICustomerService customerService;
	@Autowired
	private ProductService productService;

	//测试
	@Test
	public void test(){
		//基于接口
		customerService.save();
		customerService.find();

		//基于类的
		productService.save();
		productService.find();
	}

}
测试结果:
第二步:编写通知,配置切面
1)编写通知类,在通知类添加@Aspect 注解,代表这是一个切面类,并将切面类交给spring管理(能被spring扫描到@Component)。
@Component(“myAspect”):将增强的类交给spring管理,才可以增强
@Aspect:将该类标识为切面类(这里面有方法进行增强),相当于<aop:aspect ref=”myAspect”>
//advice通知类增强类
@Component("myAspect")//相当于<bean id="myAspect" class="com.wit.MyAspect"/>
@Aspect//相当于<aop:aspect ref="myAspect">
public class MyAspect {

}
2) 在切面的类,通知方法上添加
AspectJ提供不同的通知类型
@Before 前置通知,相当于BeforeAdvice
@AfterReturning 后置通知,相当于AfterReturningAdvice
@Around 环绕通知,相当于MethodInterceptor
@AfterThrowing抛出通知,相当于ThrowAdvice
@After 最终final通知,不管是否异常,该通知都会执行
@DeclareParents 引介通知,相当于IntroductionInterceptor (不要求掌握)
复习回顾:如果是applicationContext.xml中配置通知类型:如下:
<bean id="myAspectAdvice" class="com.wit.MyAspect"/>
<aop:config>
	<aop:aspect ref="myAspectAdvice">
		<aop:pointcut expression="bean(*Service)" id="myPointcut"/>
		<!-- 前置通知 -->
		<aop:before method="before" pointcut-ref="myPointcut" />
	</aop:aspect>
</aop:config>
等同于:以下是简化的写法!可以省略aop:pointcut
<bean id="myAspectAdvice" class="com.wit.MyAspect"/>
<aop:config>
		<aop:aspect ref="myAspectAdvice">
			<!-- 前置通知 -->
			<aop:before method="before" pointcut="bean(*Service)" />
		</aop:aspect>
</aop:config>
3) 在spring容器中开启AspectJ 注解自动代理机制
使用aop:aspectj-autoproxy/
作用:能自动扫描带有@Aspect的bean,将其作为增强aop的配置,有点相当于:aop:config
<!-- 1。确定目标 -->
	<!-- 扫描bean组件 -->
	<context:component-scan base-package="com.wit"/>
	<!-- 2:编写通知 -->

	<!-- 3:配置aop的aspectj的自动代理:
			自动扫描bean组件中,含有@Aspect的bean,将其作为aop管理,开启动态代理    -->
<aop:aspectj-autoproxy/>
前置通知
在切面的类MyAspect.java类中添加通知方法@Before(),
方案一:可以直接将切入点的表达式写到@Before()中
//前置通知
//相当于:<aop:before method="before" pointcut="bean(*Service)"/>
//@Before("bean(*Service)"):参数值:自动支持切入点表达式或切入点名字
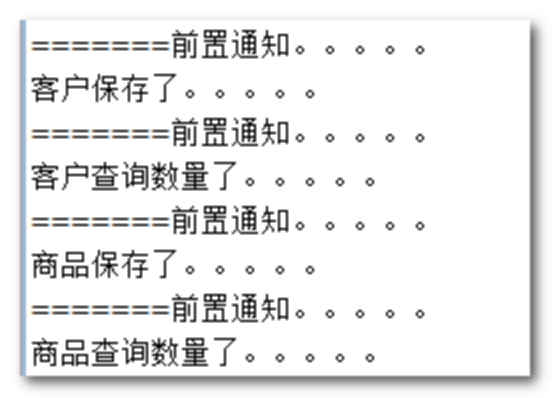
@Before("bean(*Service)")
public void before(JoinPoint joinPoint){
System.out.println("=======前置通知。。。。。");
}
方案二:可以使用自定义方法,使用@Pointcut 定义切入点
切入点方法的语法要求:
切点方法:private void 无参数、无方法体的方法,方法名为切入点的名称
一个通知方法@Before可以使用多个切入点表达式,中间使用“||”符合分隔,用来表示多个切入点
//自定义切入点
//方法名就是切入点的名字
//相当于<aop:pointcut expression="bean(customerService)" id="myPointcut"/>
@Pointcut(value="bean(customerService)")
private void myPointcut(){}
//自定义切入点
//方法名就是切入点的名字
//相当于<aop:pointcut expression="bean(productService)" id="myPointcut2"/>
@Pointcut(value="bean(productService)")
private void myPointcut2(){}


//前置通知
//相当于:<aop:before method="before" pointcut-ref="myPointcut"/>
//相当于:<aop:before method="before" pointcut-ref="myPointcut2"/>
@Before("myPointcut()||myPointcut2()")//等同于@Before("bean(*Service)")
public void before(JoinPoint joinPoint){
    System.out.println("=======前置通知。。。。。");
}


使用SpringTest进行测试:
//springjunit集成测试
@RunWith(SpringJUnit4ClassRunner.class)
@ContextConfiguration(locations="classpath:applicationContext.xml")
public class SpringTest {
	//注入要测试bean
	@Autowired
	private ICustomerService customerService;
	@Autowired
	private ProductService productService;

	//测试
	@Test
	public void test(){
		//基于接口
		customerService.save();
		customerService.find();
		//基于类的
		productService.save();
		productService.find();
	}

}
测试结果:
后置通知
在切面的类MyAspect.java类中添加通知方法
//后置通知
//target:拦截某一个类型的bean(唯一),表示只对CustomerServiceImpl类中的方法做后置通知的查找
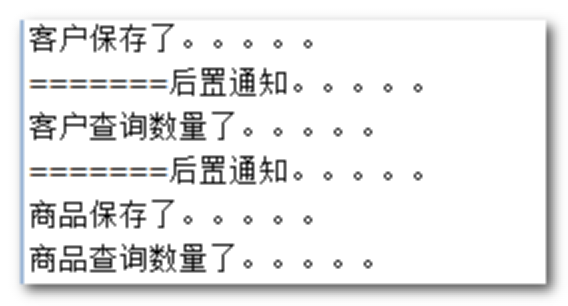
@AfterReturning(value="target(com.wit.CustomerServiceImpl)", returning="returnVal")
public void afterReturning(JoinPoint joinPoint, Object returnVal){
System.out.println("=======后置通知。。。。。");
}
使用SpringTest进行测试:
//springjunit集成测试
@RunWith(SpringJUnit4ClassRunner.class)
@ContextConfiguration(locations="classpath:applicationContext.xml")
public class SpringTest {
	//注入要测试bean
	@Autowired
	private ICustomerService customerService;
	@Autowired
	private ProductService productService;

	//测试
	@Test
	public void test(){
		//基于接口
		customerService.save();
		customerService.find();

		//基于类的
		productService.save();
		productService.find();
	}

}
查看测试结果:
环绕通知
在切面的类MyAspect.java类中添加通知方法
参考:https://blog.csdn.net/ChenShiAi/article/details/108256984
//环绕通知:
// @Around("execution(* com.wit*.*(..))")//要增强返回类型任意,所有的com.wit包中的类,类中所有的方法,参数任意
// @Around("execution(* com.wit..*.*(..))")//要增强返回类型任意,com.wit包,及其子包中所有类,类中所有的方法,参数任意
// @Around("execution(* com.wit..*.save(..))")//要增强com.wit包及其子包中所有的类,类中以save结尾的方法,参数任意
// 要增强com.wit包中的ICustomerService类的子类型的所有方法,参数任意
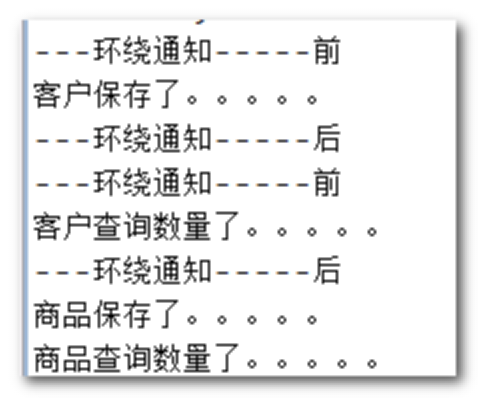
@Around("execution(* com.wit.ICustomerService+.*(..))")
public Object around(ProceedingJoinPoint proceedingJoinPoint) throws Throwable{
System.out.println("---环绕通知-----前");
Object object = proceedingJoinPoint.proceed();
System.out.println("---环绕通知-----后");
return object;
}
使用SpringTest进行测试:
//springjunit集成测试
@RunWith(SpringJUnit4ClassRunner.class)
@ContextConfiguration(locations="classpath:applicationContext.xml")
public class SpringTest {
	//注入要测试bean
	@Autowired
	private CustomerService customerService;
	@Autowired
	private ProductService productService;

	//测试
	@Test
	public void test(){
		//基于接口
		customerService.save();
		customerService.find();

		//基于类的
		productService.save();
		productService.find();
	}

}
测试结果:
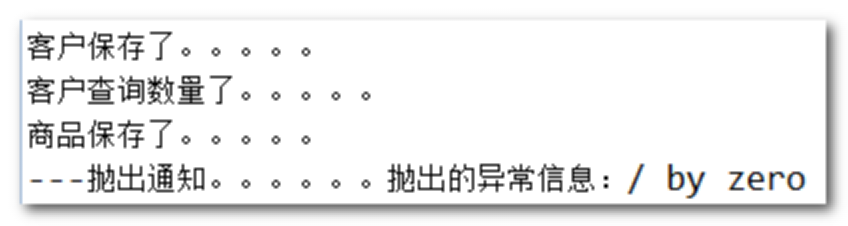
抛出通知
在切面的类MyAspect.java类中添加通知方法
//抛出通知
//切入点表达式:增强所有com包以及子包下面的所有类型的bean的所有方法
@AfterThrowing(value="within(com..*)",throwing="ex")
public void afterThrowing(JoinPoint joinPoint ,Throwable ex){
    System.out.println("---抛出通知。。。。。。"+"抛出的异常信息:"+ex.getMessage());
}
使用SpringTest进行测试:
//springjunit集成测试
@RunWith(SpringJUnit4ClassRunner.class)
@ContextConfiguration(locations="classpath:applicationContext.xml")
public class SpringTest {
	//注入要测试bean
	@Autowired
	private CustomerService customerService;
	@Autowired
	private ProductService productService;

	//测试
	@Test
	public void test(){
		//基于接口
		customerService.save();
		customerService.find();

		//基于类的
		productService.save();
		productService.find();
	}

}
发现没有执行抛出通知,原因是目标对象没有异常,在ProductService添加异常。
@Service("productService")
public class ProductService {
	public void save() {
		System.out.println("商品保存了。。。。。");
		int d = 1/0;
	}

	public int find() {
		System.out.println("商品查询数量了。。。。。");
		return 99;
	}
}
测试结果:
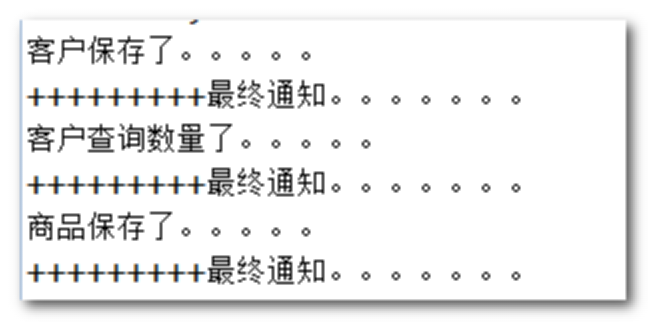
最终通知
在切面的类MyAspect.java类中添加通知方法
//最终通知
//拦截所有以ice结尾的bean
@After("bean(*ice)")
public void after(JoinPoint joinPoint){
    System.out.println("+++++++++最终通知。。。。。。。");
}
使用SpringTest进行测试:
//springjunit集成测试
@RunWith(SpringJUnit4ClassRunner.class)
@ContextConfiguration(locations="classpath:applicationContext.xml")
public class SpringTest {
	//注入要测试bean
	@Autowired
	private CustomerService customerService;
	@Autowired
	private ProductService productService;

	//测试
	@Test
	public void test(){
		//基于接口
		customerService.save();
		customerService.find();

		//基于类的
		productService.save();
		productService.find();
	}

}
测试不管是否抛出异常,都会执行最终通知。
@Service("productService")
public class ProductService {
	public void save() {
		System.out.println("商品保存了。。。。。");
		int d = 1/0;
	}

	public int find() {
		System.out.println("商品查询数量了。。。。。");
		return 99;
	}
}
测试结果:
【扩展补充】:我们的aop代理是使用的Spring的内部代理机制,默认是如果有接口就优先对接口代理(jdk动态代理)。
问题:如果目标对象有接口,能否只对实现类代理,而不对接口进行代理呢?
当然可以了
【测试】
第一步:在CustomerServiceImpl的子类中添加一个新的方法update(),而接口中不要定义update()的方法:
@Service("customerService")
public class CustomerServiceImpl implements CustomerService{

	public void save() {
		System.out.println("客户保存了。。。。。");

	}

	public int find() {
		System.out.println("客户查询数量了。。。。。");
		return 100;
	}

	//子类扩展方法
	public void update(){
		System.out.println("客户更新了。。。新增方法。。。");
	}

}
第二步:在测试类中调用子类的扩展方法:
//springjunit集成测试
@RunWith(SpringJUnit4ClassRunner.class)
@ContextConfiguration(locations="classpath:applicationContext.xml")
public class SpringTest {
	//注入要测试bean
	@Autowired
	private CustomerService customerService;
	@Autowired
	private ProductService productService;

	//测试
	@Test
	public void test(){
		//基于接口
		customerService.save();
		customerService.find();

		//基于类的
		productService.save();
		productService.find();

		//扩展方法执行:customerService是一个动态代理对象,原因,该对象是接口的子类型的对象
		((CustomerServiceImpl)customerService).update();
	}

}
结果发现异常:

为什么会抛出异常呢?原因是代理的目标对象是接口,无法转换为子类。
可以使用类代理(cglib动态代理),只需要设置 proxy-target-class = true
方案一:注解方式:
<!-- 配置aop的aspectj的自动代理:
			自动扫描bean组件中,含有@Aspect的bean,将其作为aop管理,开启动态代理
				proxy-target-class:设置是否使用cglib代理,默认是false,表示使用的是jdk接口代理
				proxy-target-class="true":表示cglib代理
	-->
	<aop:aspectj-autoproxy proxy-target-class="true"/>
方案二:配置文件XML的方式
<!-- 3:配置aop -->
    <aop:config proxy-target-class="true">
    </aop:config>
Spring JdbcTemplate的使用
Spring JdbcTemplate 是一个模板工具类,简化Jdbc编程 (类似 Apache DbUtils )
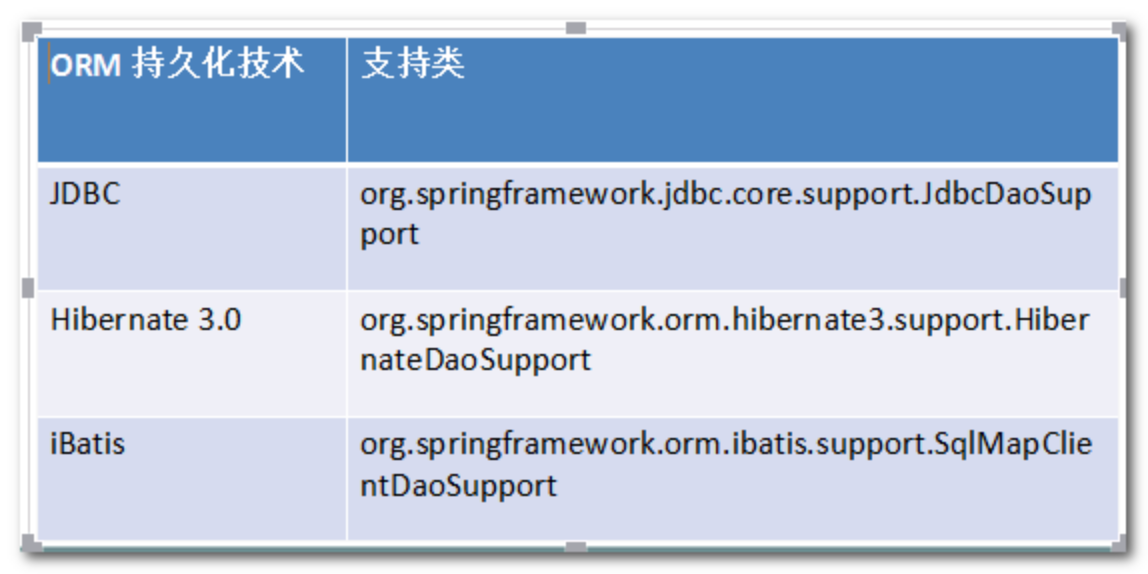
为了方便Dao中注入JdbcTemplate,Spring为每一个持久化技术都提供了支持类。
Spring对不同持久化技术的支持,Spring为各种支持的持久化技术,都提供了简单操作的模板和回调:
| ORM****持久化技术 | 模板类 |
|---|---|
| JDBC | org.springframework.jdbc.core.JdbcTemplate |
| Hibernate3.0 | org.springframework.orm.hibernate3.HibernateTemplate |
| IBatis(MyBatis) | org.springframework.orm.ibatis.SqlMapClientTemplate |
| JPA | org.springframework.orm.jpa.JpaTemplate |
JdbcTemplate 快速入门
第一步:基础工程搭建:
新建web项目 spring4_d03_c04
第二步:导入jar包
-
Spring核心包6个
-
Spring AOP包4个
-
测试包1个
-
JDBC模版开发包2个
(1)spring-jdbc-4.2.4.RELEASE.jar
(2)spring-tx-4.2.4.RELEASE.jar
- 数据库驱动1个(mysql)
总共需要的jar包
导入配置文件:在src中导入log4j.properties和applicationContiext.xml
第三步:建立mysql数据库,创建witspring
附加知识:解决数据库乱码问题:参考文档:http://www.cnblogs.com/ndxsdhy/archive/2011/11/19/2255111.html

第四步:使用JDBCTemplate编写程序(建表) ,基本步骤如下:
1)构建连接池
2)构建JDBCTemplate
3)调用JDBCTemplate的execute方法
使用mysql数据库,创建包com.wit,创建测试类JdbcTemplateTest.java进行测试:
public class JdbcTemplateTest {

	@Test
	public void test(){
		//目标:使用jdbctemplate执行一段sql
		//1.构建数据源
		//spring内置了一个数据源
		DriverManagerDataSource dataSource = new DriverManagerDataSource();
		dataSource.setDriverClassName("com.mysql.jdbc.Driver");
		dataSource.setUrl("jdbc:mysql://localhost:3306/witspring?useUnicode=true&characterEncoding=utf-8&useSSL=FALSE&serverTimezone=UTC");
		dataSource.setUsername("root");
		dataSource.setPassword("root");

		//2.创建jdbctemplate实例
		JdbcTemplate jdbcTemplate = new JdbcTemplate(dataSource);
		//等同于
//		jdbcTemplate.setDataSource(dataSource)

		//3.执行sql,创建表test001
		jdbcTemplate.execute("create table test001(id int,name varchar(20))");

	}

}
通过XML配置创建JdbcTemplate对象(多种数据源)
下面将使用几种数据源的方式进行配置。
目标:将数据源和jdbcTemplate都交给Spring来管理:
在applicationContext.xml中配置dataSource连接池和jdbcTemplate模版对象。编写applicationContext.xml文件
<!--
类似于:DriverManagerDataSource dataSource = new DriverManagerDataSource();
dataSource.setDriverClassName("com.mysql.jdbc.Driver");
dataSource.setUrl("jdbc:mysql:///witspring");
dataSource.setUsername("root");
dataSource.setPassword("root");
-->
<!-- 配置内置的数据源bean -->
<bean id="dataSource" class="org.springframework.jdbc.datasource.DriverManagerDataSource">
<property name="driverClassName" value="com.mysql.jdbc.Driver"/>
<property name="url" value="jdbc:mysql://localhost:3306/witspring?useUnicode=true&characterEncoding=utf-8&useSSL=FALSE&serverTimezone=UTC"/>
<property name="username" value="root"/>
<property name="password" value="root"/>
</bean>
<!-- jdbctemplate对象 -->
<bean id="jdbcTemplate" class="org.springframework.jdbc.core.JdbcTemplate">
<!-- 注入数据源 -->
<property name="dataSource" ref="dataSource"/>
</bean>
数据源:DriverManagerDataSource是spring内置的连接池,不建议生产环境使用,可以在测试环境使用
编写测试,使用SpringTest.java进行测试
@RunWith(SpringJUnit4ClassRunner.class)
@ContextConfiguration(locations="classpath:applicationContext.xml")
public class SpringTest {
	//注入要测试bean
	@Autowired
	private JdbcTemplate jdbcTemplate;

	@Test
	public void testCreatetable(){
		jdbcTemplate.execute("create table test002(id int,name varchar(20))");
	}

}
加入druid数据源依赖
<dependency>
  	<groupId>com.alibaba</groupId>
    <artifactId>druid</artifactId>
    <version>1.1.21</version>
</dependency>
配置applicationContext.xml文件
<bean id="dataSource"
class="com.alibaba.druid.pool.DruidDataSource" init-method="init"
destroy-method="close">
<!-- 基本属性 url、user、password -->
<property name="driverClassName" value="com.mysql.jdbc.Driver" />
<property name="url" value="jdbc:mysql://localhost:3306/witspring?useUnicode=true&characterEncoding=utf-8&useSSL=FALSE&serverTimezone=UTC" />
<property name="username" value="root" />
<property name="password" value="root" />
<!-- 配置监控统计拦截的filters -->
<property name="filters" value="stat" />
<!-- 配置初始化大小、最小、最大 -->
<property name="maxActive" value="20" />
<property name="initialSize" value="1" />
<property name="minIdle" value="1" />
<!-- 配置获取连接等待超时的时间 -->
<property name="maxWait" value="60000" />
<!-- 配置间隔多久才进行一次检测,检测需要关闭的空闲连接,单位是毫秒 -->
<property name="timeBetweenEvictionRunsMillis" value="60000" />
<!-- 配置一个连接在池中最小生存的时间,单位是毫秒 -->
<property name="minEvictableIdleTimeMillis" value="300000" />
<property name="testWhileIdle" value="true" />
<property name="testOnBorrow" value="false" />
<property name="testOnReturn" value="false" />
<!-- 打开PSCache,并且指定每个连接上PSCache的大小 -->
<property name="poolPreparedStatements" value="true" />
<property name="maxOpenPreparedStatements" value="20" />
</bean>
<bean id="jdbcTemplate"
class="org.springframework.jdbc.core.JdbcTemplate">
<!-- 注入数据源 -->
<property name="dataSource" ref="dataSource" />
</bean>
测试类:
@RunWith(SpringJUnit4ClassRunner.class)
@ContextConfiguration(locations="classpath:applicationContext.xml")
public class SpringTest {
	//注入要测试bean
	@Autowired
	private JdbcTemplate jdbcTemplate;

	@Test
	public void testCreatetable(){
		jdbcTemplate.execute("create table test003(id int,name varchar(20))");
	}
}
外部属性文件的配置
模拟需求:
现在数据源的相关参数配置,是测试环境下的。
现在,要将工程搭建在正式的服务器上,因为测试环境和正式环境的数据库肯定不是一个,所以肯定首先要更改数据源相关的配置。
缺点:必须手动修改applicationContext.xml文件,容易造成误操作。
解决方案:不修改。可以将数据源相关配置参数,外置。
目的:可以将xml配置中可能要经常修改内容,抽取到一个properties文件
应用:使用properties文件配置参数,如数据库连接参数等。
第一步: src新建db.properties
将经常需要修改变量抽取出来
jdbc.driverClass=com.mysql.jdbc.Driver
jdbc.url=jdbc:mysql://localhost:3306/witspring?useUnicode=true&characterEncoding=utf-8&useSSL=FALSE&serverTimezone=UTC
jdbc.username=root
jdbc.password=root
第二步:配置applicationContext.xml文件,在applicationContext.xml 通过
<context:property-placeholder> 引入外部属性文件
通过${key} 引用属性的值
<!-- 引入外部属性配置文件-->
	<context:property-placeholder location="classpath:db.properties"/>

	<!-- 配置内置的数据源bean,使用db.properties -->
	<bean id="dataSource" class="org.springframework.jdbc.datasource.DriverManagerDataSource">
		<property name="driverClassName" value="${jdbc.driverClass}"/>
		<property name="url" value="${jdbc.url}"/>
		<property name="username" value="${jdbc.username}"/>
		<property name="password" value="${jdbc.password}"/>
	</bean>
第三步:使用SpringTest.java进行测试
@RunWith(SpringJUnit4ClassRunner.class)
@ContextConfiguration(locations="classpath:applicationContext.xml")
public class SpringTest {
	//注入要测试bean
	@Autowired
	private JdbcTemplate jdbcTemplate;

	@Test
	public void testCreatetable(){
		jdbcTemplate.execute("create table test004(id int,name varchar(20))");
	}
}
基于JdbcTemplate实现DAO(CURD)
第一步:创建一个表book:

第二步:创建com.wit.domain包,创建Book类,类中的属性用来对应book表的字段
//实体类
public class Book {

	private Integer id;
	private String name;
	private Double price;

	public Integer getId() {
		return id;
	}
	public void setId(Integer id) {
		this.id = id;
	}
	public String getName() {
		return name;
	}
	public void setName(String name) {
		this.name = name;
	}
	public Double getPrice() {
		return price;
	}
	public void setPrice(Double price) {
		this.price = price;
	}

	public String toString() {
		return "Book [id=" + id + ", name=" + name + ", price=" + price + "]";
	}

}
第三步:编写Dao类
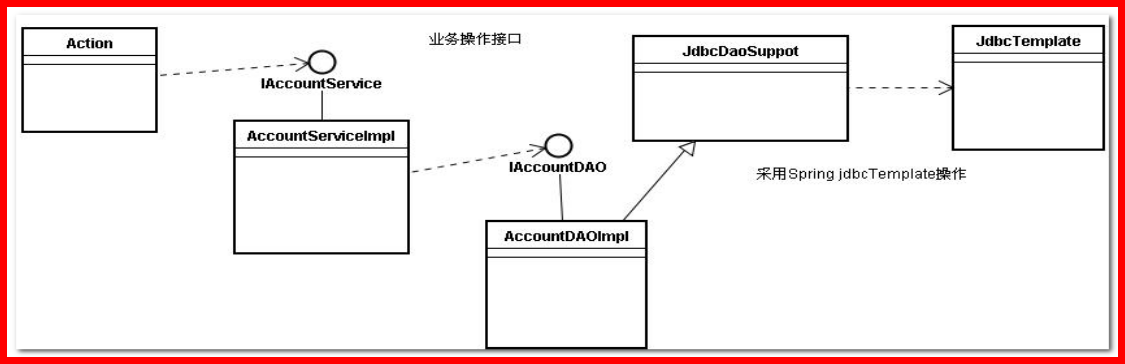
为了方便Dao中注入JdbcTemplate,Spring为每一个持久化技术都提供了支持类,如图
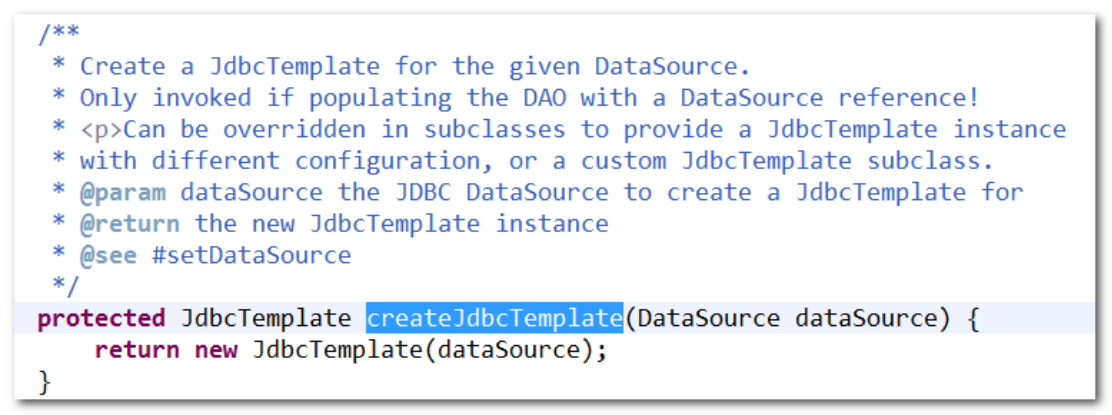
如果想编写DAO实现CURD,只需要继承Spring提供 JdbcDAOSupport支持类 !
源代码分析JdbcDaoSupport:不难发现,需要注入数据源
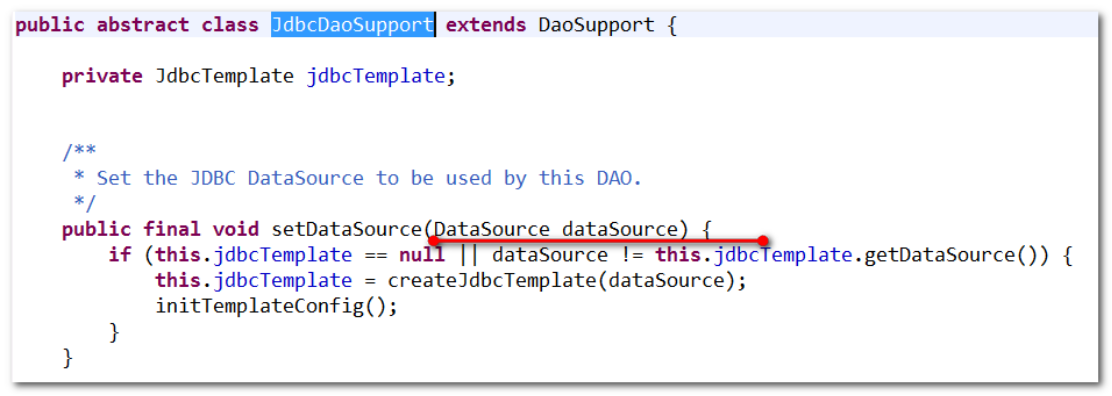
而且只要注入datasource,就有了jdbcTemplate,相当于也注入了jdbcTemplate
编写的Dao类继承JdbcDaoSupport
//图书操作的dao层
//JdbcDaoSupport简化JdbcTemplate的代码开发。
public class BookDao extends JdbcDaoSupport {

	//注入jdbctempate
//	private JdbcTemplate jdbcTemplate;
//	public void setJdbcTemplate(JdbcTemplate jdbcTemplate) {
//		this.jdbcTemplate = jdbcTemplate;
//	}

	//保存图书
	public void save(Book book){
		String sql="insert into book values(null,?,?)";
		//调用jdbctemplate
//		jdbcTemplate.update(sql, book.getName(),book.getPrice());
		super.getJdbcTemplate().update(sql, book.getName(),book.getPrice());
	}
}
配置spring核心配置文件,注入jdbcTemplate到BookDao:
<!-- jdbctemplate对象 -->
	<bean id="jdbcTemplate" class="org.springframework.jdbc.core.JdbcTemplate">
		<!-- 注入数据源 -->
		<property name="dataSource" ref="dataSource"/>
	</bean>

<!-- 配置dao,注入jdbctemplate -->
	<bean id="bookDao" class="com.wit.dao.BookDao">
		<!-- 方案一:在BookDao中提供jdbcTempate属性,通过set方法注入 jdbcTemplate-->
		<!-- <property name="jdbcTemplate" ref="jdbcTemplate"/> -->
		<!-- 方案二:BookDao类继承JdbcDaoSupport,直接注入数据源,就拥有了jdbctempate对象 -->
		<property name="dataSource" ref="dataSource"/>
	</bean>
实现增加、删除、修改功能
通过jdbcTemplate提供 update一个方法就可以
参看api文档:spring-framework-4.2.4.RELEASE/docs/javadoc-api/index.html

创建com.wit.dao包,创建BookDao类
编写BookDao类:
//图书操作的dao层
//JdbcDaoSupport简化JdbcTemplate的代码开发。
public class BookDao extends JdbcDaoSupport {

	//注入jdbctempate
//	private JdbcTemplate jdbcTemplate;
//	public void setJdbcTemplate(JdbcTemplate jdbcTemplate) {
//		this.jdbcTemplate = jdbcTemplate;
//	}

	//保存图书
	public void save(Book book){
		String sql="insert into book values(null,?,?)";
		//调用jdbctemplate
//		jdbcTemplate.update(sql, book.getName(),book.getPrice());
		super.getJdbcTemplate().update(sql, book.getName(),book.getPrice());
	}

	//更新
	public void update(Book book){
		String sql="update book set name =? ,price =? where id =?";
		super.getJdbcTemplate().update(sql, book.getName(),book.getPrice(),book.getId());
	}

	//删除
	public void delete(Book book){
		super.getJdbcTemplate().update("delete from book where id =?", book.getId());
	}
}
简单返回值的查询
查询单个对象

编写BookDao类:
//根据id查询一个
	public Book findById(Integer id){
		return super.getJdbcTemplate().queryForObject("select * from book where id =?", new Object[] {id}, new BookRowMapper());
}
//自定义的手动装配的类
class BookRowMapper implements RowMapper<Book>{
    //参数1:自动将查询出来的结果集传进来
    //返回是:封装好的数据对象
    public Book mapRow(ResultSet rs, int rowNum) throws SQLException {
        Book book = new Book();
        //取当前指针的结果集
        book.setId(rs.getInt(1));
        book.setName(rs.getString(2));
        book.setPrice(rs.getDouble(3));
        return book;
    }
}
【这里注意】:
使用自定义RowMapper的方式装配bean:
使用new BookRowMapper() 手动装配
复杂对象返回的查询
查询集合

手动装配对象和自动装配对象
//查询所有
public List<Book> findAll(){
    return super.getJdbcTemplate().query("select * from book", new BookRowMapper());
}

//复杂条件查询列表
public List<Book> findByCondition(Book book){
    return super.getJdbcTemplate().query("select * from book where name like ? and price =?", new BookRowMapper(), "%"+book.getName()+"%",book.getPrice());

}
创建包com.wit.test
创建SpringTest.java进行测试:
@RunWith(SpringJUnit4ClassRunner.class)
@ContextConfiguration(locations="classpath:applicationContext.xml")
public class SpringTest {
	//测试dao
	@Autowired
	private BookDao bookDao;

	/**保存测试*/
	@Test
	public void testSave(){
		Book book = new Book();
		book.setName("如来神掌");
		book.setPrice(1998d);
		bookDao.save(book);
	}

	/**更新测试*/
	@Test
	public void testUpdate(){
		Book book = new Book();
		book.setId(1);
		book.setName("降龙十八掌");
		book.setPrice(298d);
		bookDao.update(book);
	}

	/**保存更新*/
	@Test
	public void testDelete(){
		Book book = new Book();
		book.setId(2);
		bookDao.delete(book);
	}

	/**使用主键ID查询测试*/
	@Test
	public void testFindById(){
		Integer id = 3;
		Book book = bookDao.findById(id);
		System.out.println(book);
	}

	/**查询测试*/
	@Test
	public void testFindAll(){
		List<Book> list = bookDao.findAll();
		System.out.println(list);
	}

	/**查询条件查询测试*/
	@Test
	public void testFindCondition(){
		Book book = new Book();
		book.setName("如来神掌");
		book.setPrice(1998d);
		List<Book> list = bookDao.findByCondition(book);
		System.out.println(list);
	}
}
Spring的事务管理机制
Spring事务管理高层抽象主要包括3个接口,Spring的事务主要是由他们共同完成的:PlatformTransactionManager:事务管理器—主要用于平台相关事务的管理TransactionDefinition:事务定义信息(隔离、传播、超时、只读)—通过配置如何进行事务管理。TransactionStatus:事务具体运行状态—事务管理过程中,每个时间点事务的状态信息。
PlatformTransactionManager事务管理器
参考:spring-framework-4.2.4.RELEASE\docs\javadoc-api\index.html
搜索:PlatformTransactionManager
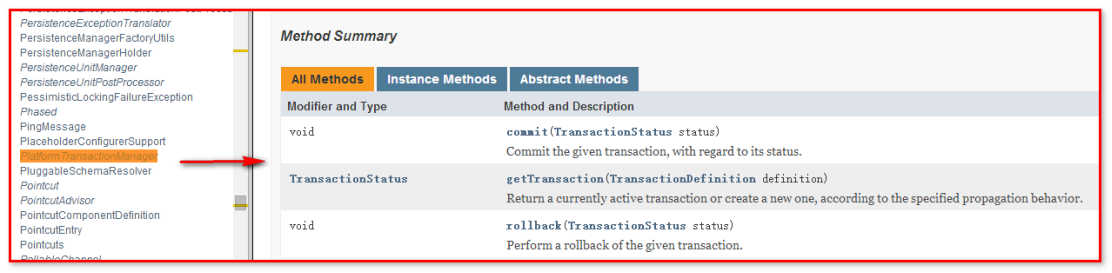
该接口提供三个方法:
-
commit:提交事务
-
rollback:回滚事务
-
getTransaction:获取事务状态
Spring为不同的持久化框架提供了不同PlatformTransactionManager接口实现:
| 事务 | 说明 |
|---|---|
| org.springframework.jdbc.datasource.DataSourceTransactionManager | 使用Spring JDBC或iBatis 进行持久化数据时使用 |
| org.springframework.orm.hibernate5.HibernateTransactionManager | 使用Hibernate5.0版本进行持久化数据时使用 |
| org.springframework.orm.jpa.JpaTransactionManager | 使用JPA进行持久化时使用 |
| org.springframework.jdo.JdoTransactionManager | 当持久化机制是Jdo时使用 |
| org.springframework.transaction.jta.JtaTransactionManager | 使用一个JTA实现来管理事务,在一个事务跨越多个资源时必须使用 |
DataSourceTransactionManager针对JdbcTemplate、MyBatis 事务控制,使用Connection(连接)进行事务控制:
开启事务 connection.setAutoCommit(false);
提交事务 connection.commit();
回滚事务 connection.rollback();
事务管理器的选择?
用户根据选择和使用的持久层技术,来选择对应的事务管理器。
TransactionDefinition事务定义信息
用来定义事务相关的属性的,给事务管理器用。
参考:spring-framework-4.2.4.RELEASE/docs/javadoc-api/index.html
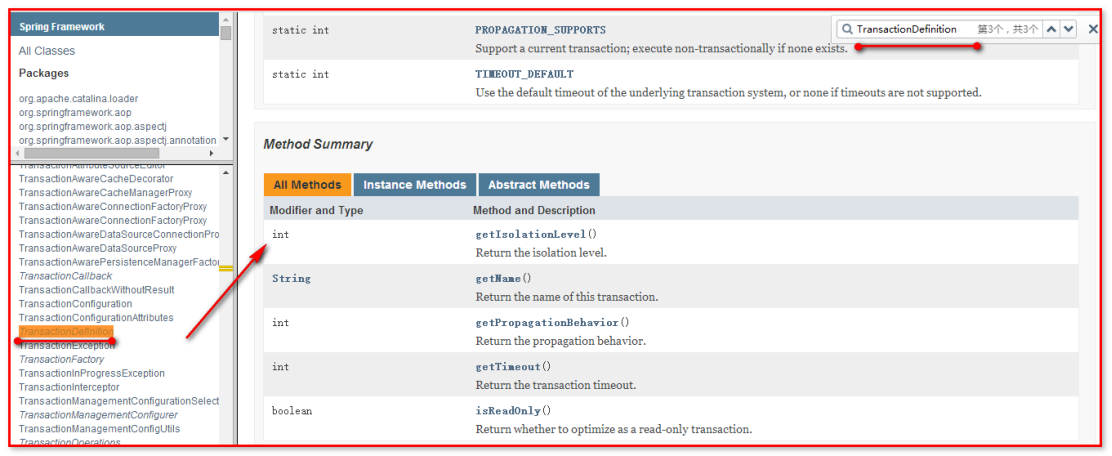
该接口主要提供的方法:
-
getIsolationLevel:隔离级别获取
-
getPropagationBehavior:传播行为获取
-
getTimeout:获取超时时间(事务的有效期)
-
isReadOnly 是否只读(保存、更新、删除—对数据进行操作-变成可读写的,查询-设置这个属性为true,只能读不能写),事务管理器能够根据这个返回值进行优化。
这些事务的定义信息,都可以在配置文件中配置和定制。
事务的隔离级别IsolationLevel
| 隔离级别 | 含义 |
|---|---|
| DEFAULT | 使用后端数据库默认的隔离级别(spring中的的选择项) |
| READ_UNCOMMITED | 允许你读取还未提交的改变了的数据。可能导致脏、幻、不可重复读 |
| READ_COMMITTED | 允许在并发事务已经提交后读取。可防止脏读,但幻读和不可重复读仍可发生 |
| REPEATABLE_READ | 对相同字段的多次读取是一致的,除非数据被事务本身改变。可防止脏、不可重复读,但幻读仍可能发生。 |
| SERIALIZABLE | 完全服从ACID的隔离级别,确保不发生脏、幻、不可重复读。这在所有的隔离级别中是最慢的,它是典型的通过完全锁定在事务中涉及的数据表来完成的。 |
脏读:一个事务读取了另一个事务改写但还未提交的数据,如果这些数据被回滚,则读到的数据是无效的。
不可重复读:在同一事务中,多次读取同一数据返回的结果有所不同。换句话说就是,后续读取可以读到另一事务已提交的更新数据。相反,“可重复读”在同一事务中多次读取数据时,能够保证所读数据一样,也就是,后续读取不能读到另一事务已提交的更新数据。
幻读:一个事务读取了几行记录后,另一个事务插入一些记录,幻读就发生了。再后来的查询中,第一个事务就会发现有些原来没有的记录。
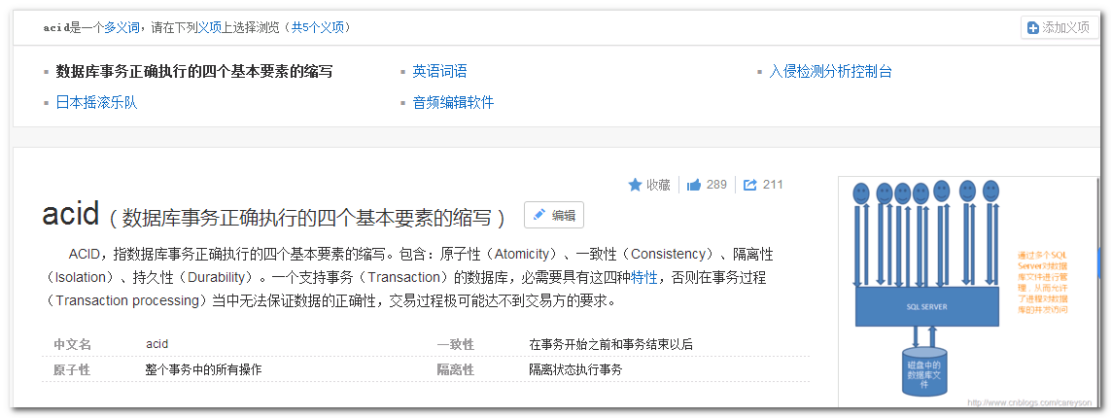
事务四大特性 ACID —隔离性引发问题 ---- 解决事务的隔离问题 隔离级别
Mysql 默认隔离级别 REPEATABLE_READ
Oracle 默认隔离级别 READ_COMMITTED
多学一招:什么是ACID原则:
参考:
百度百科
http://baike.baidu.com/link?url=EPDxwsYxObXZAmy1WEEhuj1_Hr3b3UMQi4SGYOPVcWcvPMzFteL2MRU39khXZgHB9NLzpqpRQoiI6OFCS5WkeJ2nyK-ozmNcXb-aRocRMYa
事务的传播行为PropagationBehavior
什么是事务的传播行为?有什么作用?
事务传播行为用于解决两个被事务管理的方法互相调用问题
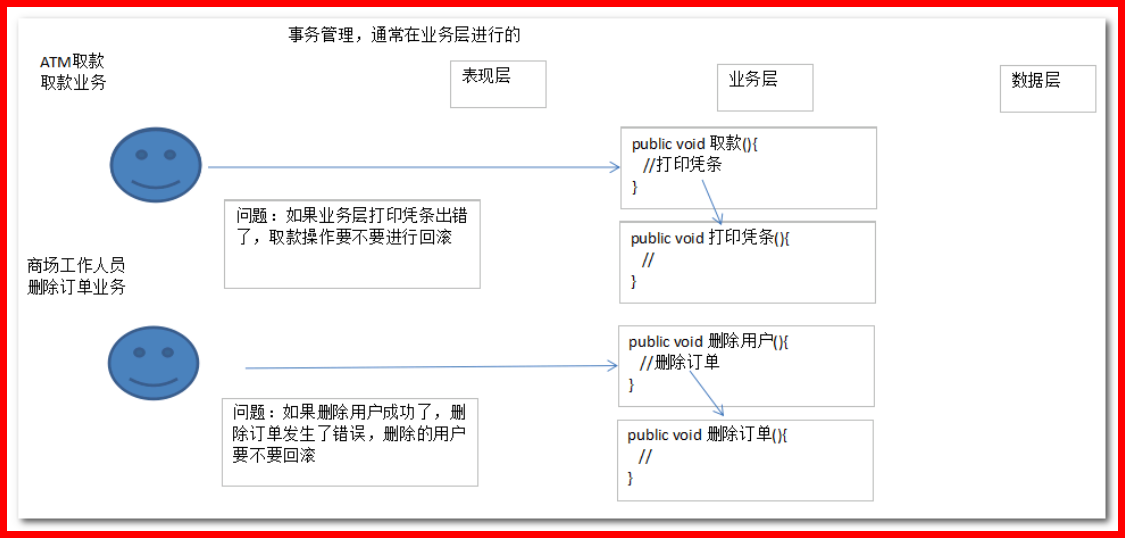
业务层两个方法面临的事务问题:
* 有些时候需要处于同一个事务(删除用户删除完成之后,需要同时删除用户对应的订单,需要事务回滚,例如商场工作人员删除订单业务),
* 有些时候不能在同一个事务(取款是一个事务操作,打印凭条是一个事务操作,例如ATM取款业务) !
事务的传播行为的7种类型:
| 事务传播行为类型 | 说明 |
|---|---|
| PROPAGATION_REQUIRED | 支持当前事务,如果不存在就新建一个 |
| PROPAGATION_SUPPORTS | 支持当前事务,如果不存在,就不使用事务 |
| PROPAGATION_MANDATORY | 支持当前事务,如果不存在,抛出异常 |
| PROPAGATION_REQUIRES_NEW | 如果有事务存在,挂起当前事务,创建一个新的事务 |
| PROPAGATION_NOT_SUPPORTED | 以非事务方式运行,如果有事务存在,挂起当前事务 |
| PROPAGATION_NEVER | 以非事务方式运行,如果有事务存在,抛出异常 |
| PROPAGATION_NESTED | 如果当前事务存在,则嵌套事务执行只对DataSourceTransactionManager 起效 |
主要分为三大类:
PROPAGATION_REQUIRED(默认值)、PROPAGATION_SUPPORTS、PROPAGATION_MANDATORY
支持当前事务, A调用B,如果A事务存在,B和A处于同一个事务 。
事务默认传播行为 REQUIRED。最常用的。
PROPAGATION_REQUIRES_NEW、PROPAGATION_NOT_SUPPORTED、PROPAGATION_NEVER
不会支持原来的事务,A调用B, 如果A事务存在, B肯定不会和A处于同一个事务。
常用的事务传播行为:PROPAGATION_REQUIRES_NEW
PROPAGATION_NESTED
嵌套事务,只对DataSourceTransactionManager有效 ,底层使用JDBC的SavePoint机制,允许在同一个事务设置保存点,回滚保存点
附录:嵌套事务的示例:
Connection conn = null;
try {
    conn.setAutoCommit(false);
    Statement stmt = conn.createStatement();
    stmt.executeUpdate("update person set name='888' where id=1");
    Savepoint savepoint = conn.setSavepoint();
    try {
        conn.createStatement().executeUpdate("update person set name='222' where sid=2");
    } catch (Exception ex) {
        conn.rollback(savepoint);
    }
    stmt.executeUpdate("delete from person where id=9");
    conn.commit();
    stmt.close();
} catch (Exception e) {
    conn.rollback();
} finally {
    try {
        if (null != conn && !conn.isClosed())
            conn.close();
    } catch (SQLException e) {
        e.printStackTrace();
    }
}
TransactionStatus 事务状态
事务运行过程中,每个时间点事务状态信息!
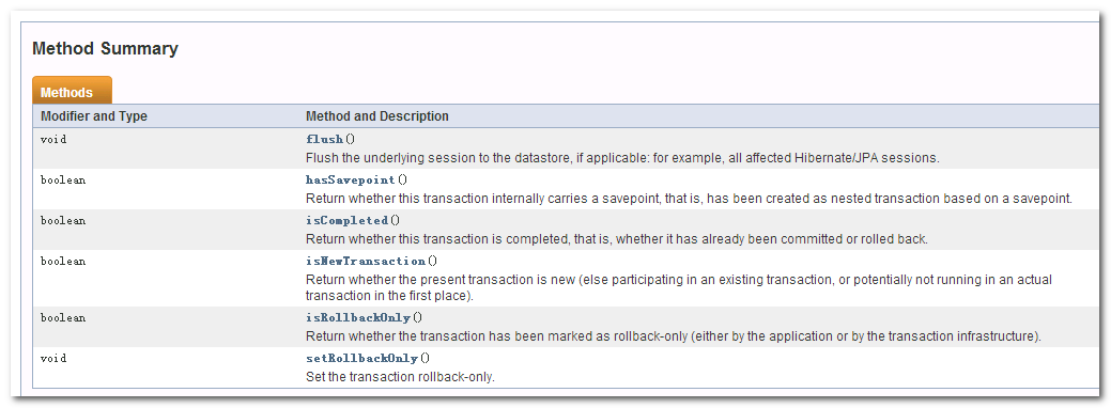
hasSavepoint():判断是否有保留点
isCompleted():判断事务是否结束
isNewTransaction():判断当前事务是否是新开的一个事务。
isRollbackOnly():判断事务是否只能回滚
setRollbackOnly():设置事务是否回滚
【三个事务超级接口对象之间的关系】
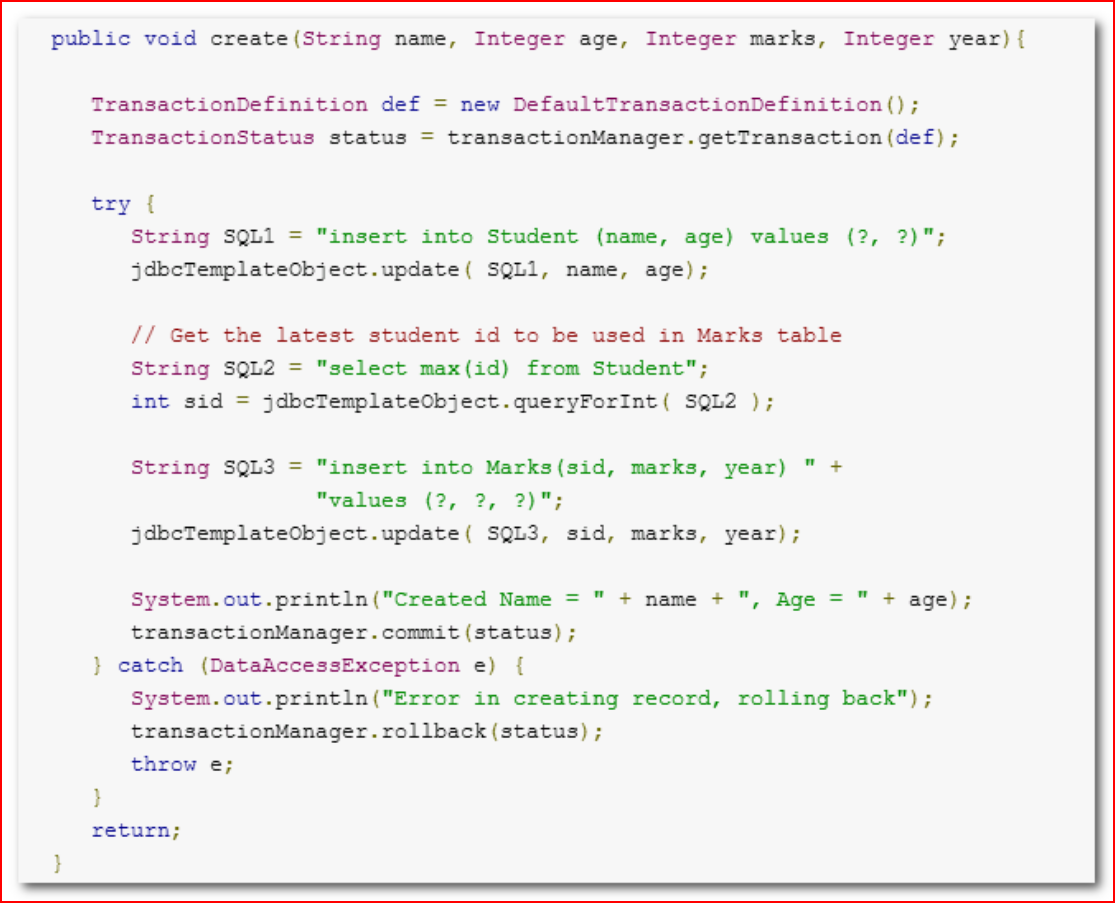
1)首先用户管理事务,需要先配置TransactionDefinition(事务定义信息、事务的管理方案);
2)然后根据TransactionDefinition,通过TransactionManager(事务管理器)进行事务管理;
3)最后事务运行过程中,每个时刻都可以通过获取TransactionStatus(事务状态)来了解事务的运行状态。
Spring事务管理两种方式
Spring 支持两种方式事务管理
一:编程式的事务管理
通过TransactionTemplate手动管理事务
在实际应用中很少使用,原因是要修改原来的代码,加入事务管理代码(侵入性)
参考文档:http://www.yiibai.com/spring/programmatic_management.html
二:使用XML或注解配置声明式事务
* Spring的声明式事务是通过AOP实现的(环绕通知)
* 开发中经常使用(代码侵入性最小)–推荐使用!
不需要修改业务层的代码,也不需要手动添加transactionManager.commit(),也不需要手动添加transactionManager.rollback(),更不需要使用try…catch…
声明式事务管理案例-转账(xml、注解)
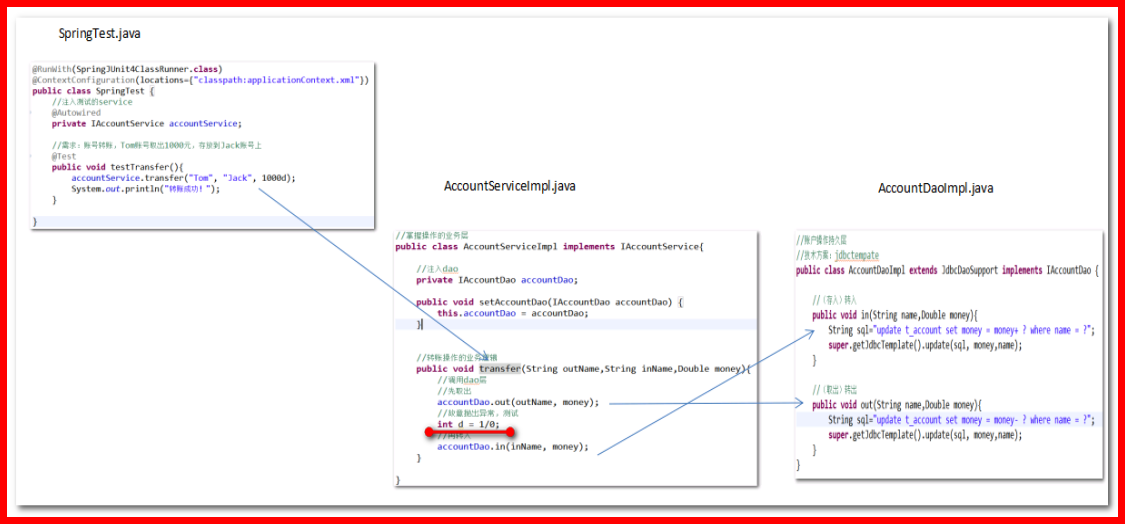
编写转账案例,引出事务管理问题
需求:账号转账,Tom账号取出1000元,存放到Jack账号上
数据表和测试数据准备:
建表脚本(MySQL):
第一步:创建表t_account
CREATE TABLE `t_account` (
`id` int NOT NULL AUTO_INCREMENT,
`name` varchar(20) NOT NULL,
`money` double DEFAULT NULL,
PRIMARY KEY (`id`)
) ENGINE=InnoDB DEFAULT CHARSET=utf8;
第二步:插入测试数据:
INSERT INTO `t_account` VALUES (1, 'Tom', 1000);
INSERT INTO `t_account` VALUES (2, 'Jack', 1100);
第三步:查看测试数据:
SELECT * FROM t_account;
业务接口开发逻辑关系:
第一步:新建web工程
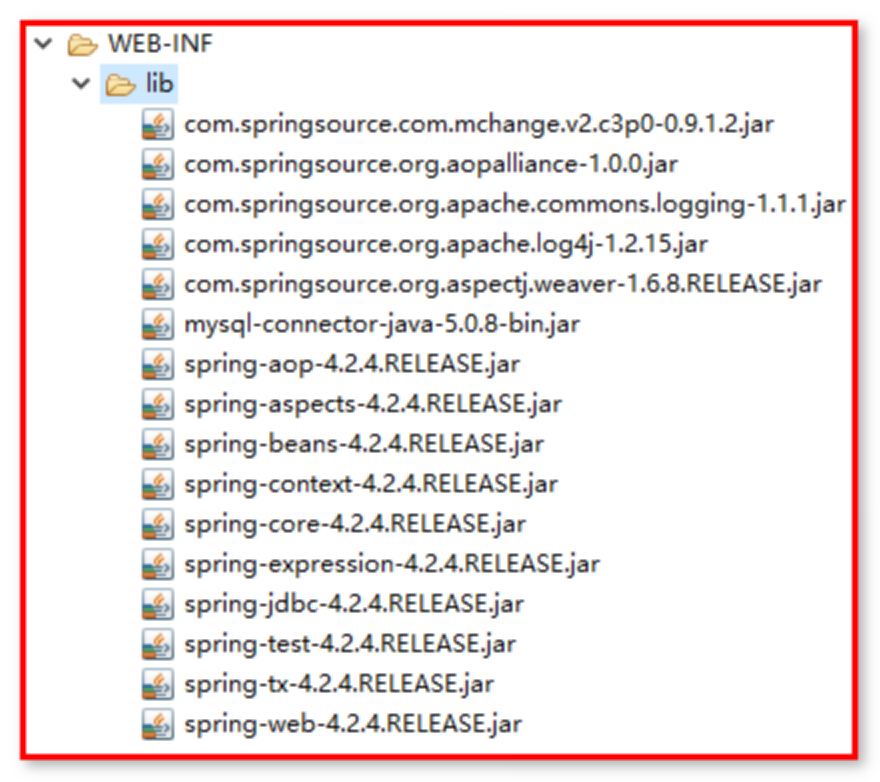
第二步:导入jar(核心4+2,AOP 4, 数据库驱动,c3p0连接池、测试包,jdbc和事务的两个)和applicationContext.xml配置文件和log4j.properties文件和db.properties文件:
第三步:创建IAccountDao接口
public interface IAccountDao {

	//(存入)转入
	public void in(String name,Double money);

	//(取出)转出
	public void out(String name,Double money);
}
创建AccountDaoImpl实现类,实现了IAccountDao接口
//账户操作持久层
//技术方案:jdbctempate
public class AccountDaoImpl extends JdbcDaoSupport implements IAccountDao {

	//(存入)转入
	public void in(String name,Double money){
		String sql="update t_account set money = money+ ? where name = ?";
		super.getJdbcTemplate().update(sql, money,name);
	}

	//(取出)转出
	public void out(String name,Double money){
		String sql="update t_account set money = money- ? where name = ?";
		super.getJdbcTemplate().update(sql, money,name);
	}
}
第四步:建立service层,创建IAccountService接口,编写转账的业务代码:
public interface IAccountService {
	void transfer(String outName,String inName,Double money);

}
创建AccountServiceImpl实现类,实现了IAccountService接口,编写转账的业务操作
//掌握操作的业务层
public class AccountServiceImpl implements IAccountService{

	//注入dao
	private IAccountDao accountDao;

	public void setAccountDao(IAccountDao accountDao) {
		this.accountDao = accountDao;
	}


	//转账操作的业务逻辑
	public void transfer(String outName,String inName,Double money){
		//调用dao层
		//先取出
		accountDao.out(outName, money);
		//再转入
		accountDao.in(inName, money);
	}

}
第五步:使用SpringTest进行测试
@RunWith(SpringJUnit4ClassRunner.class)
@ContextConfiguration(locations={"classpath:applicationContext.xml"})
public class SpringTest {
	//注入测试的service
	@Autowired
	private IAccountService accountService;

	//需求:账号转账,Tom账号取出1000元,存放到Jack账号上
	@Test
	public void testTransfer(){
		accountService.transfer("Tom", "Jack", 1000d);
		System.out.println("转账成功!");
	}

}
第六步:applicationContext.xml文件
<?xml version="1.0" encoding="UTF-8"?>
<beans xmlns="http://www.springframework.org/schema/beans"
xmlns:context="http://www.springframework.org/schema/context"
xmlns:aop="http://www.springframework.org/schema/aop"
xmlns:xsi="http://www.w3.org/2001/XMLSchema-instance"
xsi:schemaLocation="http://www.springframework.org/schema/beans
http://www.springframework.org/schema/beans/spring-beans.xsd
http://www.springframework.org/schema/context
http://www.springframework.org/schema/context/spring-context.xsd
http://www.springframework.org/schema/aop
http://www.springframework.org/schema/aop/spring-aop.xsd">
<!-- 6.3. 外部属性文件的配置 -->
<context:property-placeholder location="classpath:db.properties"/>
<bean id="dataSource"
class="com.alibaba.druid.pool.DruidDataSource" init-method="init"
destroy-method="close">
<!-- 基本属性 url、user、password -->
<property name="driverClassName" value="com.mysql.jdbc.Driver" />
<property name="url" value="jdbc:mysql://localhost:3306/witspring?useUnicode=true&characterEncoding=utf-8&useSSL=FALSE&serverTimezone=UTC" />
<property name="username" value="root" />
<property name="password" value="root" />
<!-- 配置监控统计拦截的filters -->
<property name="filters" value="stat" />
<!-- 配置初始化大小、最小、最大 -->
<property name="maxActive" value="20" />
<property name="initialSize" value="1" />
<property name="minIdle" value="1" />
<!-- 配置获取连接等待超时的时间 -->
<property name="maxWait" value="60000" />
<!-- 配置间隔多久才进行一次检测,检测需要关闭的空闲连接,单位是毫秒 -->
<property name="timeBetweenEvictionRunsMillis" value="60000" />
<!-- 配置一个连接在池中最小生存的时间,单位是毫秒 -->
<property name="minEvictableIdleTimeMillis" value="300000" />
<property name="testWhileIdle" value="true" />
<property name="testOnBorrow" value="false" />
<property name="testOnReturn" value="false" />
<!-- 打开PSCache,并且指定每个连接上PSCache的大小 -->
<property name="poolPreparedStatements" value="true" />
<property name="maxOpenPreparedStatements" value="20" />
</bean>
<!-- 第一步,创建Dao -->
<bean id="accountDao" class="com.wit.dao.AccountDaoImpl">
<property name="dataSource" ref="dataSource"></property>
</bean>
<!-- 第二步,创建Service -->
<bean id="accountService" class="com.wit.service.AccountServiceImpl">
<property name="accountDao" ref="accountDao"></property>
</bean>
</beans>
但是发现问题:
事务管理问题:在Service层没有事务的情况下,如果出现异常,则会转账不成功,数据异常。
扩展:如果不配置事务,那么每一个数据库的操作都是单独的一个事务。
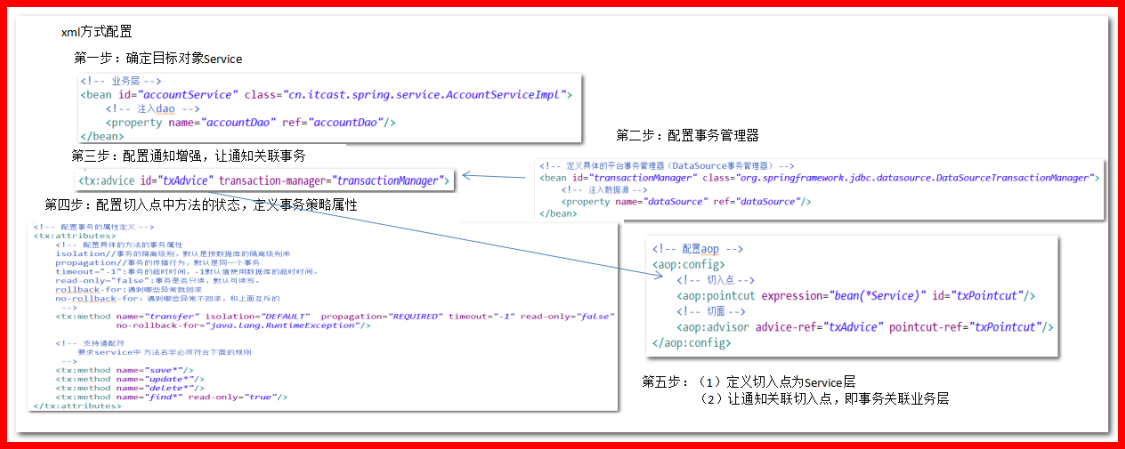
XML配置方式添加事务管理(tx、aop元素)
【操作思路】:
1、确定目标:需要对AccountService 的 transfer方法,配置切入点
2、需要Advice (环绕通知),方法前开启事务,方法后提交关闭事务
3、配置切面和切入点
第一步:导入aop相关的包(4个),引入约束名称空间(aop和tx 的名称空间)
为什么会引入aop的空间呢?让我们往下看!
<beans xmlns="http://www.springframework.org/schema/beans"       xmlns:xsi="http://www.w3.org/2001/XMLSchema-instance"
       xmlns:p="http://www.springframework.org/schema/p"
       xmlns:context="http://www.springframework.org/schema/context"
       xmlns:aop="http://www.springframework.org/schema/aop"
       xmlns:tx="http://www.springframework.org/schema/tx"
       xsi:schemaLocation="http://www.springframework.org/schema/beans
                           http://www.springframework.org/schema/beans/spring-beans.xsd
                           http://www.springframework.org/schema/context
                           http://www.springframework.org/schema/context/spring-context.xsd
                           http://www.springframework.org/schema/aop
                           http://www.springframework.org/schema/aop/spring-aop.xsd
                           http://www.springframework.org/schema/tx
                           http://www.springframework.org/schema/tx/spring-tx.xsd">
必须配置本地提示:
配置Advice通知:
方案一(了解):Spring提供了Around通知类TransactionInterceptor。用来增强bean,spring帮我们写好了一个增强类
可以配置为:
<bean id="transactionInterceptor" class="org.springframework.transaction.interceptor.TransactionInterceptor" />
使用事务拦截器可以参考:
http://www.cnblogs.com/panjun-Donet/archive/2010/08/02/1790311.html
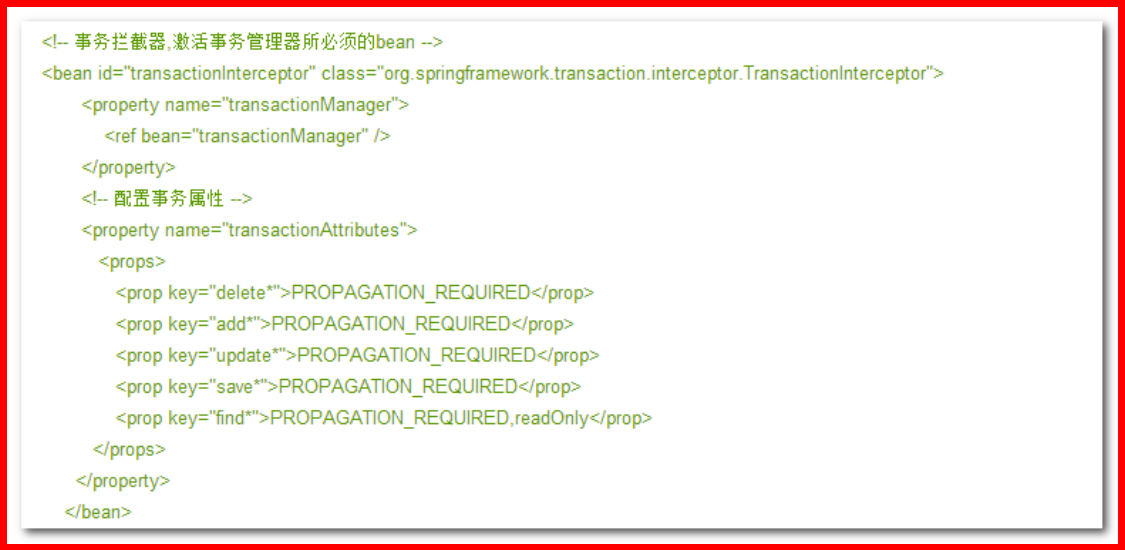
方案二(掌握):但Spring为简化事务的配置,提供了tx:advice来代替上面的配置,也可以理解为该标签是spring为你实现好了的事务的通知增强方案。
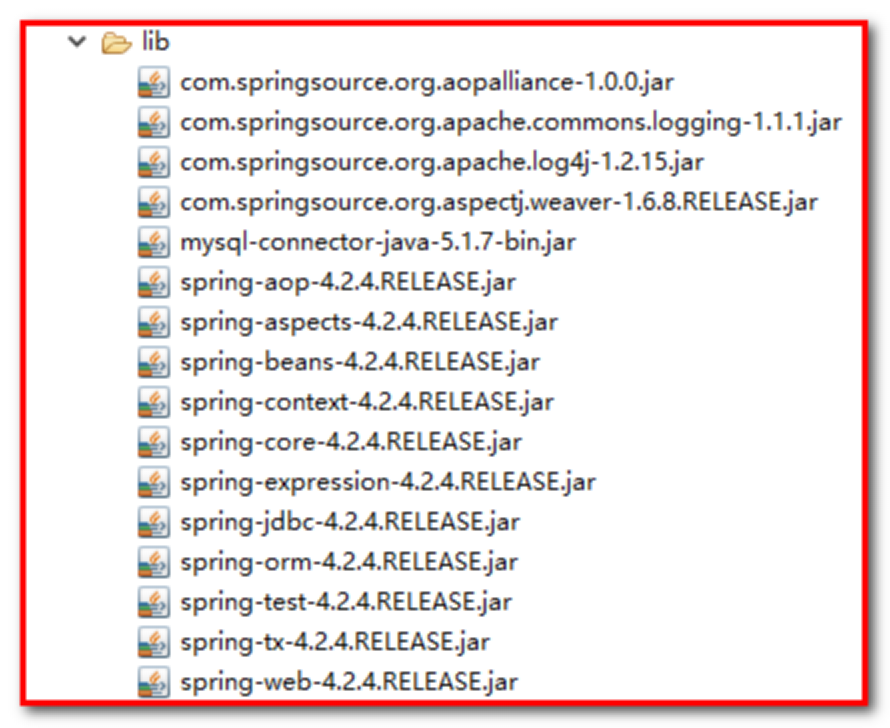
第一步:导入jar包:
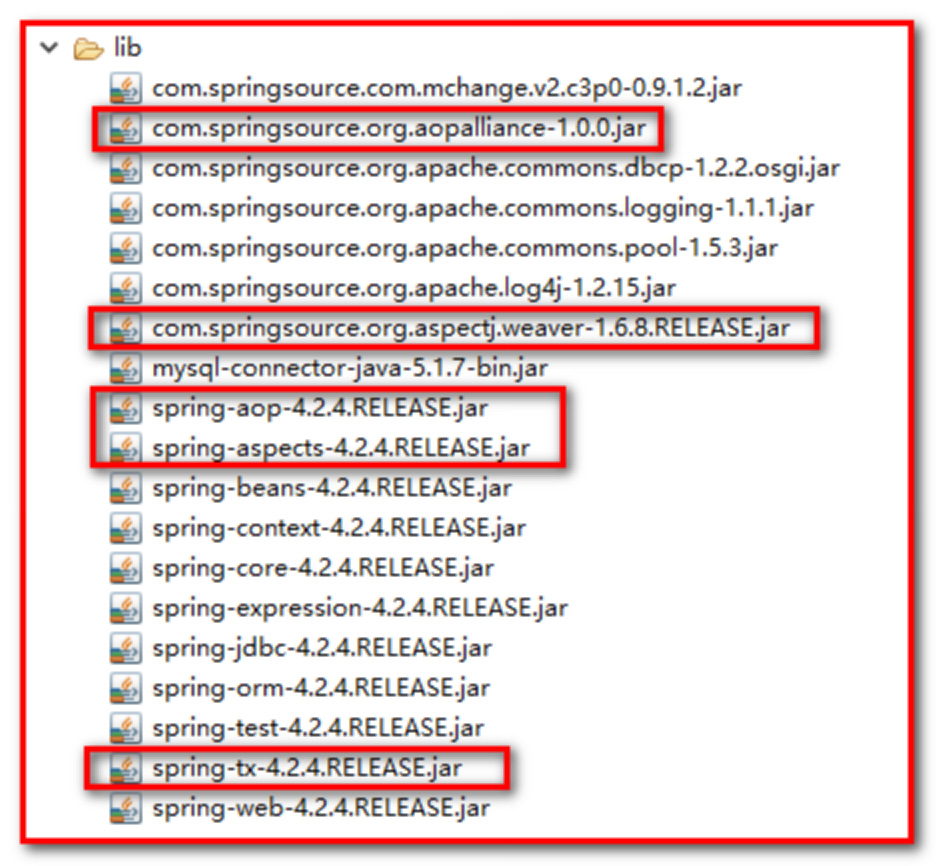
其中:
com.springsource.org.aopalliance-1.0.0.jar:aop切面编程
com.springsource.org.aspectj.weaver-1.6.8.RELEASE.jar:注解开发切面
spring-aop-4.2.4.RELEASE.jar:aop切面编程
spring-aspects-4.2.4.RELEASE.jar:注解开发切面
spring-tx-4.2.4.RELEASE.jar:事务处理
第二步:配置spring容器,applicationContext.xml文件
<beans xmlns="http://www.springframework.org/schema/beans"
xmlns:xsi="http://www.w3.org/2001/XMLSchema-instance"
xmlns:p="http://www.springframework.org/schema/p"
xmlns:context="http://www.springframework.org/schema/context"
xmlns:aop="http://www.springframework.org/schema/aop"
xmlns:tx="http://www.springframework.org/schema/tx"
xsi:schemaLocation="http://www.springframework.org/schema/beans
http://www.springframework.org/schema/beans/spring-beans.xsd
http://www.springframework.org/schema/context
http://www.springframework.org/schema/context/spring-context.xsd
http://www.springframework.org/schema/aop
http://www.springframework.org/schema/aop/spring-aop.xsd
http://www.springframework.org/schema/tx
http://www.springframework.org/schema/tx/spring-tx.xsd">
<!-- 引入外部属性配置文件-->
<context:property-placeholder location="classpath:db.properties"/>
<!-- 配置内置的数据源bean,使用db.properties -->
<bean id="dataSource" class="org.springframework.jdbc.datasource.DriverManagerDataSource">
<property name="driverClassName" value="${jdbc.driverClass}"/>
<property name="url" value="${jdbc.url}"/>
<property name="username" value="${jdbc.username}"/>
<property name="password" value="${jdbc.password}"/>
</bean>
<!-- 第一步:定义具体的平台事务管理器(DataSource事务管理器) -->
<bean id="transactionManager" class="org.springframework.jdbc.datasource.DataSourceTransactionManager">
<!-- 注入数据源 -->
<property name="dataSource" ref="dataSource"/>
</bean>
<!-- 第二步:定义通知,通知中要处理的就是事务 -->
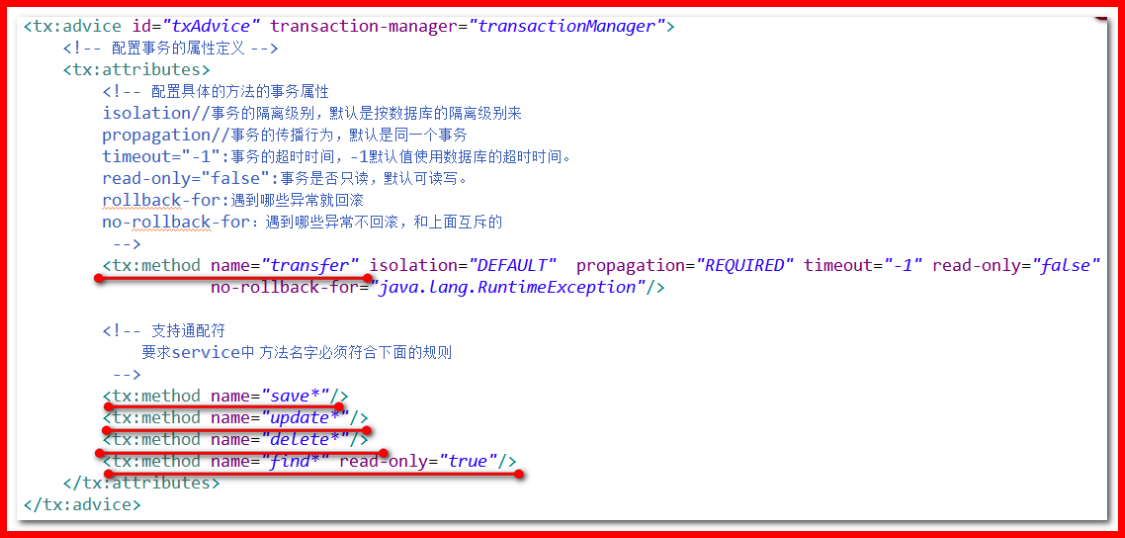
<tx:advice id="txAdvice" transaction-manager="transactionManager">
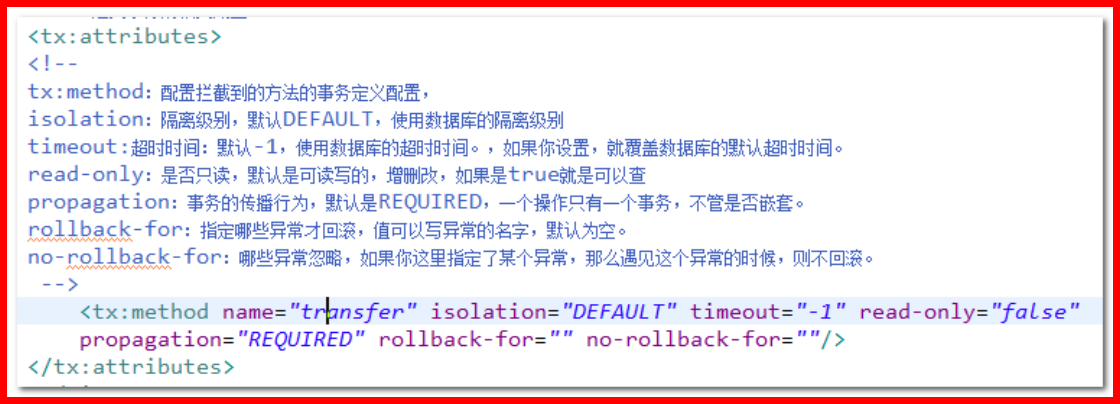
<!-- 配置事务的属性定义 -->
<tx:attributes>
<!-- 配置具体的方法的事务属性
isolation//事务的隔离级别,默认是按数据库的隔离级别来
propagation//事务的传播行为,默认是同一个事务
timeout="-1":事务的超时时间,默认值使用数据库的超时时间。
read-only="false":事务是否只读,默认可读写。
rollback-for:遇到哪些异常就回滚,其他的都不回滚
no-rollback-for:遇到哪些异常不回滚,其他的都回滚。和上面互斥的
-->
<tx:method name="transfer" isolation="DEFAULT" propagation="REQUIRED" timeout="-1" read-only="false"/>
<!-- 支持通配符
要求service中 方法名字必须符合下面的规则
-->
<tx:method name="save*"/>
<tx:method name="update*"/>
<tx:method name="delete*"/>
<tx:method name="find*" read-only="true"/>
</tx:attributes>
</tx:advice>
<!-- 第三步:配置切入点,让通知关联切入点,即事务控制业务层的方法 -->
<aop:config>
<!-- 切入点 -->
<aop:pointcut expression="bean(*Service)" id="txPointcut"/>
<!-- 切面 -->
<aop:advisor advice-ref="txAdvice" pointcut-ref="txPointcut"/>
</aop:config>
<!-- dao -->
<bean id="accountDao" class="com.wit.dao.AccountDaoImpl">
<!-- 注入数据源,才拥有jdbctemplate -->
<property name="dataSource" ref="dataSource"/>
</bean>
<!-- 业务层 -->
<bean id="accountService" class="com.wit.service.AccountServiceImpl">
<!-- 注入dao -->
<property name="accountDao" ref="accountDao"/>
</bean>
</beans>
使用SpringTest.java测试:
@RunWith(SpringJUnit4ClassRunner.class)
@ContextConfiguration(locations={"classpath:applicationContext.xml"})
public class SpringTest {
	//注入测试的service
	@Autowired
	private IAccountService accountService;

	//需求:账号转账,Tom账号取出1000元,存放到Jack账号上
	@Test
	public void testTransfer(){
		accountService.transfer("Tom", "Jack", 1000d);
		System.out.println("转账成功!");
	}
}
【扩展理解】
切入点的配置和事务通知的配置里面都有对方法的配置,有什么区别?
切入点:(业务层类)

你要对哪些方法(连接点)进行增强。(目的是拦截方法进行增强)
切面:(代理类)

对切入点的方法,进行怎样的增强。
通知:(事务)

进行事务相关的增强。
事务增强的属性配置(跟AOP没关系了,只跟增强这个业务有关系):
配置事务增强这个业务的相关内容的配置。相当于给这些拦截到的方法分配具体工作。
重点:【声明式事务处理的原理图】
没有添加事务:
添加事务:
【补充了解】:
rollback-for属性:
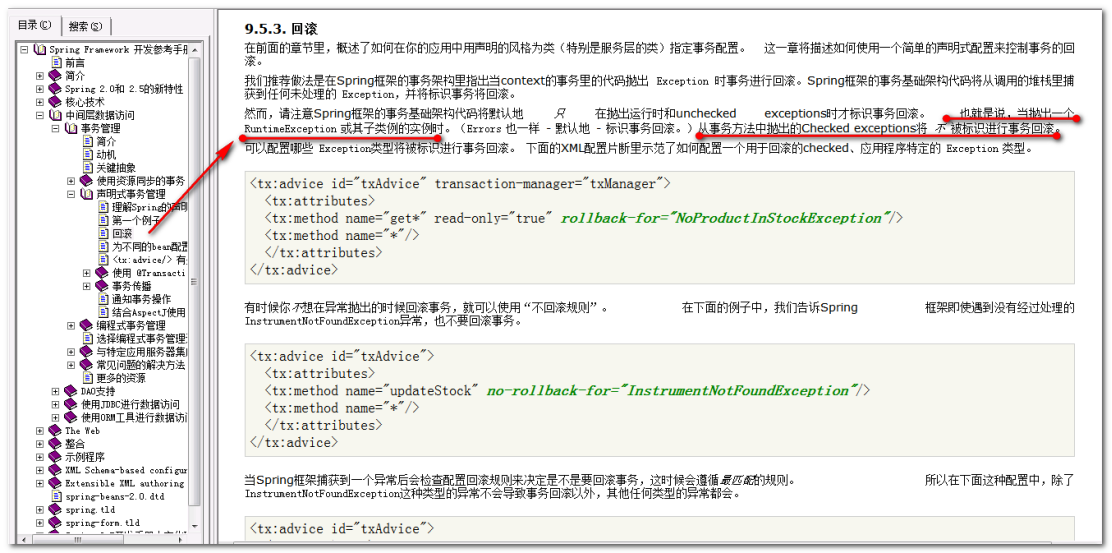
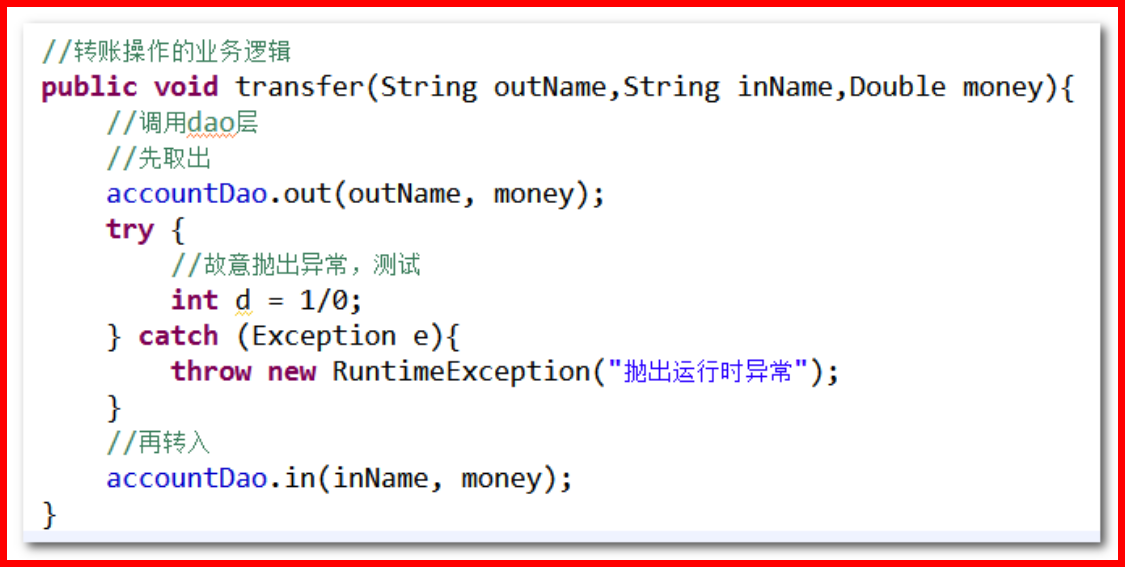
注意事项一:声明式事务处理对运行时异常有效,任何 RuntimeException 将触发事务回滚,但是任何 checked Exception 将不触发事务回滚
事务默认对 运行时异常 进行回滚,对编译时异常 不会滚;所以需要在各个方法的配置里面加上 rollback-for=“Exception”
测试:修改AccountServiceImpl类,使用try…catch…事务没有起作用
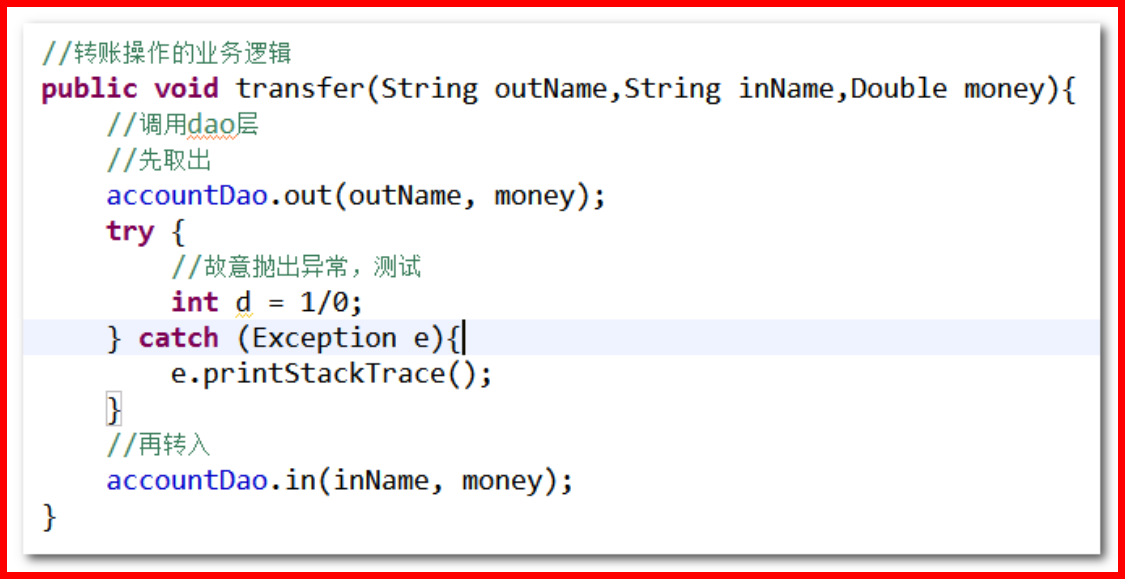
如果修改AccountServiceImpl类,添加RuntimeException,则声明式事务处理起作用
注意事项二:使用rollback-for属性和no-rollback-for属性的用法
rollback-for:遇到哪些异常就回滚,其他的都不回滚
no-rollback-for:遇到哪些异常不回滚,其他的都回滚。和上面互斥的
如果在AccountServiceImpl类中定义:
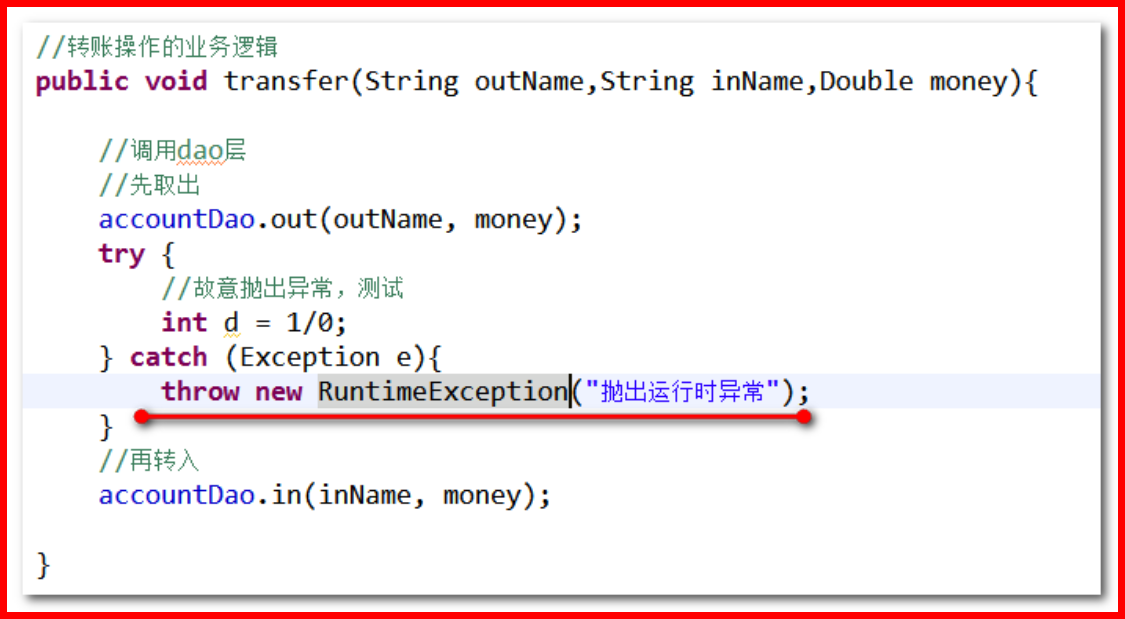
如果抛出运行时异常,声明式事务处理可以使用,表示异常发生时,事务可以回滚
但是如果在applicationContext.xml文件中定义no-rollback-for=“java.lang.RuntimeException”:此时表示遇到运行时异常不回滚
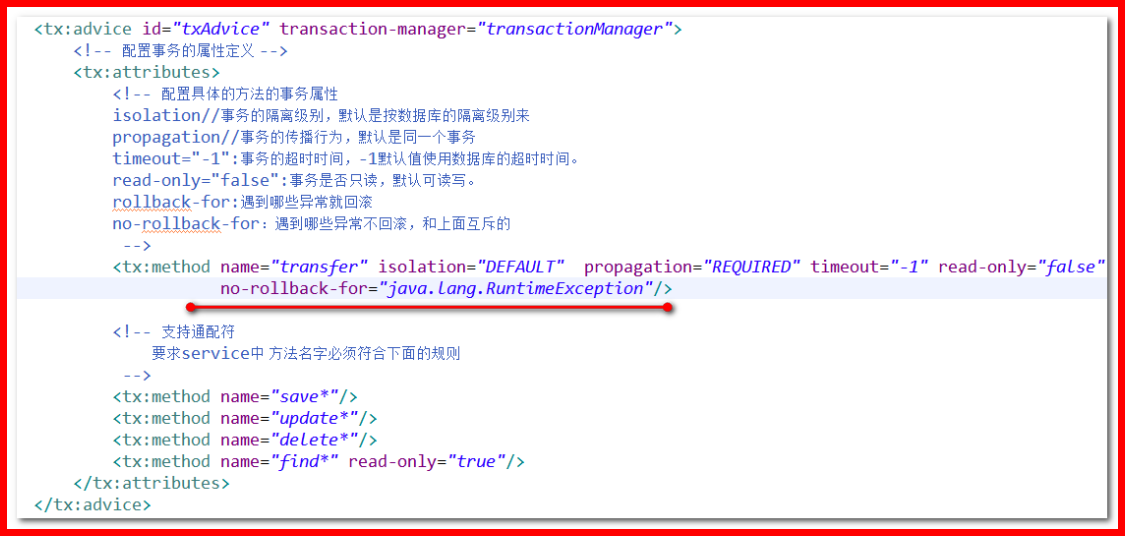
则发现,声明式事务处理不再好使了,异常发生时,事务不被回滚
注解配合方式添加事务管理 @Transactional
步骤:
1.在需要管理事务的方法或者类上面添加@Transactional 注解
2.配置注解驱动事务管理(事务管理注解生效的作用)(需要配置对特定持久层框架使用的事务管理器)
第一步:确定目标(bean的方法):
创建工程:
在com.wit.dao中创建IAccountDao和AccountDaoImpl类
(1)IAccountDao.java接口
public interface IAccountDao {

	//(存入)转入
	public void in(String name,Double money);

	//(取出)转出
	public void out(String name,Double money);
}
(2)AccountDaoImpl.java类
//账户操作持久层
//技术方案:jdbctempate
/**
 * @Repository("accountDao")
 * 相当于容易中定义<bean id="accountDao" class="com.wit.anntx.dao.AccountDaoImpl"/>
 */
@Repository("accountDao")
public class AccountDaoImpl extends JdbcDaoSupport implements IAccountDao {

	//注入数据源
	@Autowired
	//private DataSource dataSource;//没有注入数据源成功~
	原理:放到属性上的的注解相当于,自动生成setter方法上加注解
	//@Autowired	//自动到spring的容器中寻找类型是参数类型(DataSource)的bean
	//public void setDataSource(DataSource dataSource){
	//	this.dataSource=dataSource;
	//}

	@Autowired//当初始化dao的时候,会调用该方法啊,通过set方法的形参注入数据源
	//方法名无所谓
	public void setDi(DataSource dataSource){
		//调用父类的方法
		super.setDataSource(dataSource);
	}

	//(存入)转入
	public void in(String name,Double money){
		String sql="update t_account set money = money+ ? where name = ?";
		super.getJdbcTemplate().update(sql, money,name);
	}

	//(取出)转出
	public void out(String name,Double money){
		String sql="update t_account set money = money- ? where name = ?";
		super.getJdbcTemplate().update(sql, money,name);
	}
}
在com.wit.service中创建IAccountService和AccountServiceImpl类
(1)IAccountService接口
public interface IAccountService {

	void transfer(String outName,String inName,Double money);

}
(2)AccountServiceImpl类
//掌握操作的业务层
/**
* @Service("accountService")
* 相当于spring容器中定义:<bean id="accountService" class="com.wit.anntx.service.AccountServiceImpl">
*/
@Service("accountService")
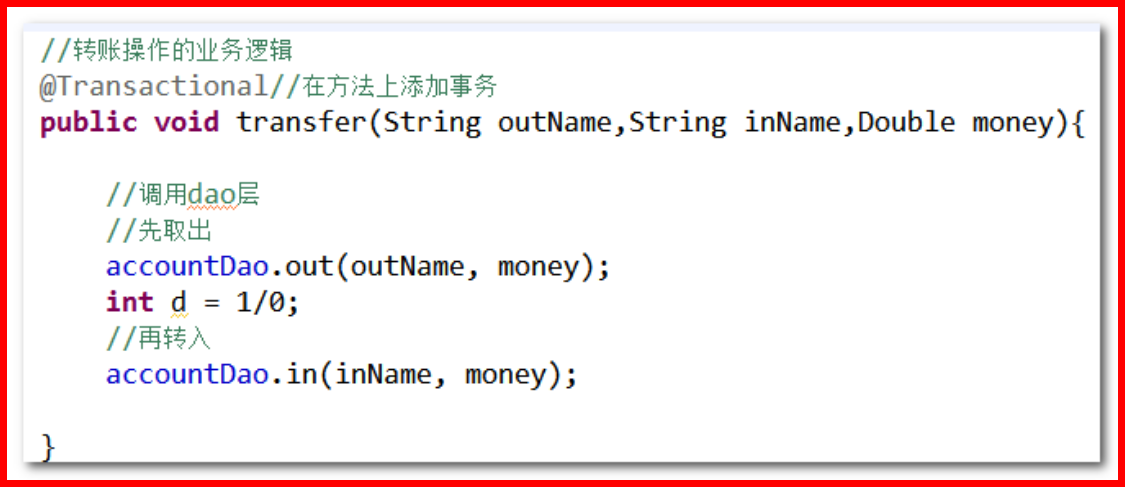
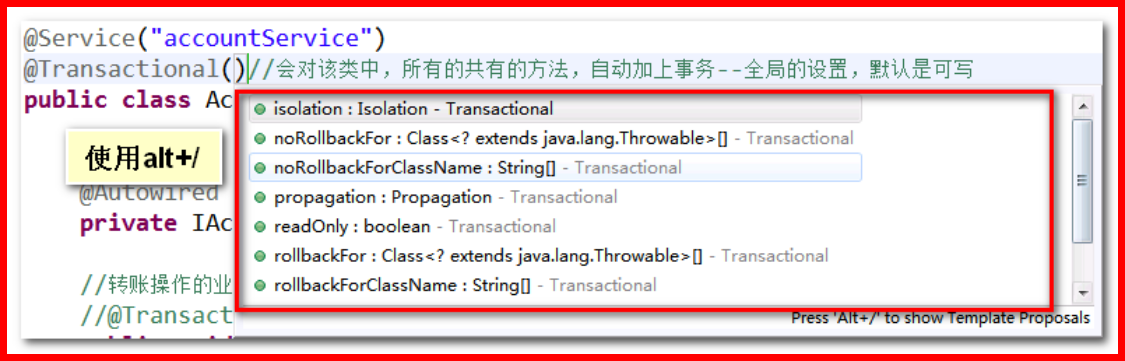
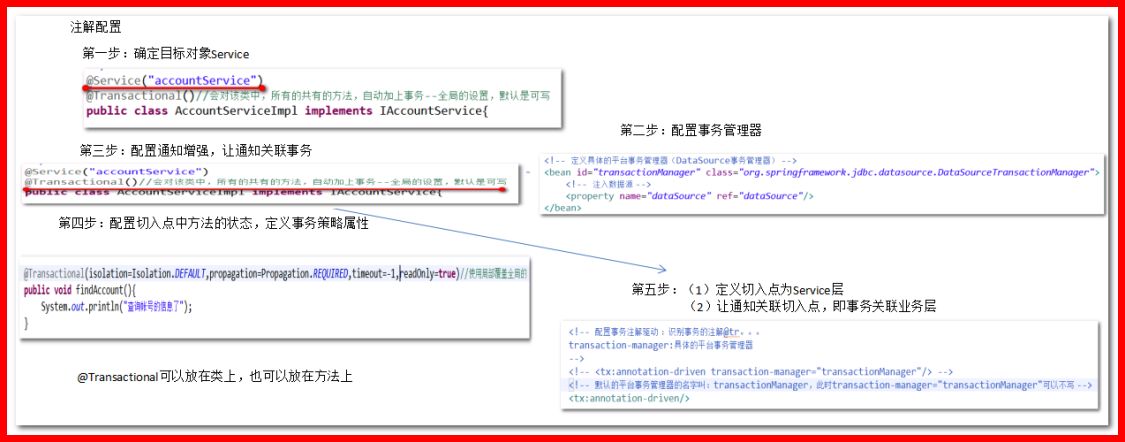
@Transactional//会对该类中,所有的共有的方法,自动加上事务--全局的设置,默认是可写
public class AccountServiceImpl implements IAccountService{
//注入dao
@Autowired
private IAccountDao accountDao;
//转账操作的业务逻辑
// @Transactional//在方法上添加事务
public void transfer(String outName,String inName,Double money){
//调用dao层
//先取出
accountDao.out(outName, money);
int d = 1/0;
//再转入
accountDao.in(inName, money);
}
@Transactional(readOnly=true)//使用局部覆盖全局的
public void findAccount(){
System.out.println("查询帐号的信息了");
}
}
第二步:创建applicationContext.xml在applicationContext.xml中配置:
<?xml version="1.0" encoding="UTF-8"?>
<beans xmlns="http://www.springframework.org/schema/beans"
xmlns:xsi="http://www.w3.org/2001/XMLSchema-instance"
xmlns:p="http://www.springframework.org/schema/p"
xmlns:context="http://www.springframework.org/schema/context"
xmlns:aop="http://www.springframework.org/schema/aop"
xmlns:tx="http://www.springframework.org/schema/tx"
xsi:schemaLocation="http://www.springframework.org/schema/beans
http://www.springframework.org/schema/beans/spring-beans.xsd
http://www.springframework.org/schema/context
http://www.springframework.org/schema/context/spring-context.xsd
http://www.springframework.org/schema/aop
http://www.springframework.org/schema/aop/spring-aop.xsd
http://www.springframework.org/schema/tx
http://www.springframework.org/schema/tx/spring-tx.xsd">
<!-- 引入外部属性配置文件-->
<context:property-placeholder location="classpath:db.properties"/>
<!-- 配置内置的数据源bean,使用db.properties -->
<bean id="dataSource" class="org.springframework.jdbc.datasource.DriverManagerDataSource">
<property name="driverClassName" value="${jdbc.driverClass}"/>
<property name="url" value="${jdbc.url}"/>
<property name="username" value="${jdbc.username}"/>
<property name="password" value="${jdbc.password}"/>
</bean>
<!-- 配置bean组件扫描 -->
<context:component-scan base-package="com.wit"/>
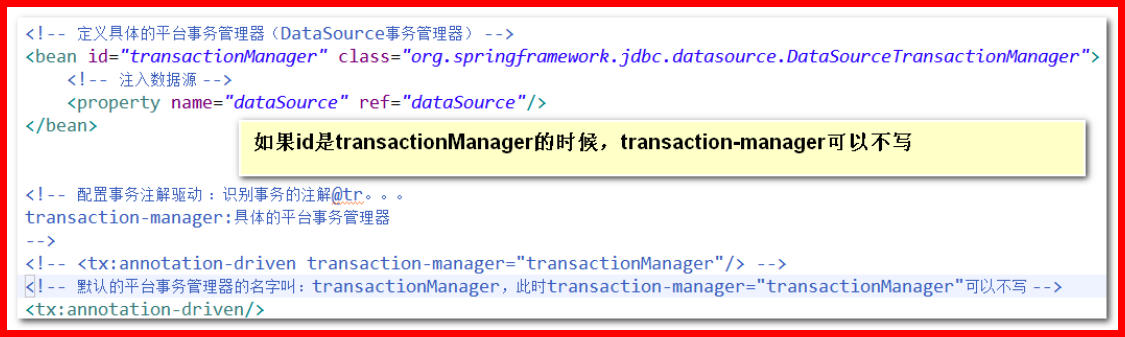
<!-- 定义具体的平台事务管理器(DataSource事务管理器) -->
<bean id="transactionManager" class="org.springframework.jdbc.datasource.DataSourceTransactionManager">
<!-- 注入数据源 -->
<property name="dataSource" ref="dataSource"/>
</bean>
<!-- 配置事务注解驱动 :识别事务的注解@tr。。。
transaction-manager:具体的平台事务管理器
-->
<!-- <tx:annotation-driven transaction-manager="transactionManager"/> -->
<!-- 默认的平台事务管理器的名字叫:transactionManager,此时transaction-manager="transactionManager"可以不写 -->
<tx:annotation-driven transaction-manager="transactionManager"/>
</beans>
【注意】:数据源的注解注入
(1)在需要管理事务的方法或者类上面添加**@Transactional** 注解
(2)配置事务的定义属性信息,在注解中直接配置:
【扩展1】
如果 @Transactional 标注在 Class 上面, 那么将会对这个 Class 里面所有的 public 方法都包装事务方法。等同于该类的每个公有方法都放上了@Transactional。
如果某方法需要单独的事务定义,则需要在方法上加@Transactional来覆盖类上的标注声明。记住:方法级别的事务覆盖类级别的事务,一般我们在企业开发的时候,类上面定义的事务为只读属性(@Transactional(readOnly=true)),增删改的方法上定义的事务为可写属性(@Transactional(readOnly=false))!
//掌握操作的业务层
/**
 * @Service("accountService")
 * 相当于spring容器中定义:<bean id="accountService" class="com.wit.anntx.service.AccountServiceImpl">
 */
@Service("accountService")
@Transactional(readOnly=true)//会对该类中,所有的共有的方法,自动加上事务--全局的设置,默认是可写
public class AccountServiceImpl implements IAccountService{

	//注入dao
	@Autowired
	private IAccountDao accountDao;

	//转账操作的业务逻辑
	@Transactional(readOnly=false)//在方法上添加事务
	public void transfer(String outName,String inName,Double money){

		//调用dao层
		//先取出
		accountDao.out(outName, money);
		int d = 1/0;
		//再转入
		accountDao.in(inName, money);

	}

	@Transactional()//使用局部覆盖全局的
	public void findAccount(){
		System.out.println("查询帐号的信息了");
	}

}
【扩展2】
配置注解驱动事务管理的时候,<tx:annotation-driven/>默认会自动查找并加载名字为transactionManager的事务管理器Bean,因此,当事务管理器的bean的名字为transactionManager 时,可以省略transaction-manager的属性
小结-xml和注解的选择
【面试】:XML配置方式和注解配置方式 进行事务管理 哪种用的多?
XML方式,集中式维护,统一放置到applicationContext.xml文件中,缺点在于配置文件中的内容太多,而且在切入点的方法的命名上也有要求。
<tx:method name="save*"/>
<tx:method name="update*"/>
<tx:method name="delete*"/>
<tx:method name="find*" read-only="true"/>
使用@Transactional注解进行事务管理,配置太分散,使用XML进行事务管理,属性集中配置,便于管理和维护
注意:以后的service的方法名字的命名,必须是上面规则,否则,不能被spring事务管理。!!!!
即以save开头的方法,update开头的方法,delete开头的方法,表示增删改的操作,故事务为可写。
以find开头的方法,表示查询,故事务为只读。
(1)xml方式小结
(2)注解方式小结


 610
610


 被折叠的 条评论
为什么被折叠?
被折叠的 条评论
为什么被折叠?
 到【灌水乐园】发言


