


简单介绍
- 挂载卸载过程
- 更新过程
- 2.1 componentWillReceiveProps (nextProps)(即将废弃)
- 2.2 shouldComponentUpdate(nextProps,nextState)
- 2.3 componentWillUpdate (nextProps,nextState)(即将废弃)
- 2.4 componentDidUpdate(prevProps,prevState)
- 2.5 render()
- 新增两个生命周期
详细说明
React的生命周期从广义上分为三个阶段:挂载、渲染、卸载
因此可以把React的生命周期分为两类:挂载卸载过程和更新过程。
下图是旧生命周期图

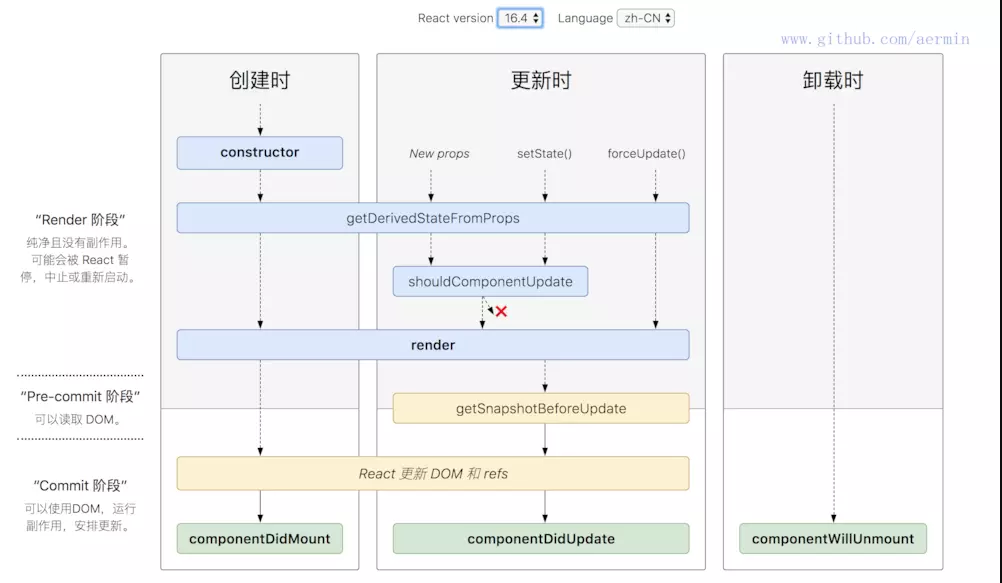
下图是新生命周期图
1.挂载卸载过程
1.1 constructor()
constructor()中完成了React数据的初始化,它接受两个参数:props和context,当想在函数内部使用这两个参数时,需使用super()传入这两个参数。
注意:只要使用了constructor()就必须写super(),否则会导致this指向错误。
1.2 componentWillMount()
componentWillMount()一般用的比较少,它更多的是在服务端渲染时使用。它代表的过程是组件已经经历了constructor()初始化数据后,但是还未渲染DOM时。
1.3 componentDidMount()
组件第一次渲染完成,此时dom节点已经生成,可以在这里调用ajax请求,返回数据setState后组件会重新渲染
1.4 componentWillUnmount()
在此处完成组件的卸载和数据的销毁。
-
clear你在组建中所有的setTimeout,setInterval
-
移除所有组建中的监听 removeEventListener
-
有时候我们会碰到这个warning:
Can only update a mounted or mounting component. This usually means you called setState() on an unmounted component. This is a no-op. Please check the code for the undefined component.
原因:因为你在组件中的ajax请求返回setState,而你组件销毁的时候,请求还未完成,因此会报warning
解决方法:
componentDidMount() {
    this.isMount === true
    axios.post().then((res) => {
    this.isMount && this.setState({   // 增加条件ismount为true时
      aaa:res
    })
})
}
componentWillUnmount() {
    this.isMount === false
}
2.更新过程
2.1 componentWillReceiveProps (nextProps)
- 在接受父组件改变后的props需要重新渲染组件时用到的比较多
- 接受一个参数nextProps
- 通过对比nextProps和this.props,将nextProps的state为当前组件的state,从而重新渲染组件
componentWillReceiveProps (nextProps) {
    nextProps.openNotice !== this.props.openNotice&&this.setState({
        openNotice:nextProps.openNotice
    },() => {
      console.log(this.state.openNotice:nextProps)
      //将state更新为nextProps,在setState的第二个参数(回调)可以打         印出新的state
  })
}
2.2 shouldComponentUpdate(nextProps,nextState)
- 主要用于性能优化(部分更新)
- 唯一用于控制组件重新渲染的生命周期,由于在react中,setState以后,state发生变化,组件会进入重新渲染的流程,在这里return false可以阻止组件的更新
- 因为react父组件的重新渲染会导致其所有子组件的重新渲染,这个时候其实我们是不需要所有子组件都跟着重新渲染的,因此需要在子组件的该生命周期中做判断
2.3 componentWillUpdate (nextProps,nextState)
shouldComponentUpdate返回true以后,组件进入重新渲染的流程,进入componentWillUpdate,这里同样可以拿到nextProps和nextState。
2.4 componentDidUpdate(prevProps,prevState)
组件更新完毕后,react只会在第一次初始化成功会进入componentDidmount,之后每次重新渲染后都会进入这个生命周期,这里可以拿到prevProps和prevState,即更新前的props和state。
2.5 render()
render函数会插入jsx生成的dom结构,react会生成一份虚拟dom树,在每一次组件更新时,在此react会通过其diff算法比较更新前后的新旧DOM树,比较以后,找到最小的有差异的DOM节点,并重新渲染。
3.新增两个生命周期
3.1 getDerivedStateFromProps(nextProps, prevState)
代替componentWillReceiveProps()。
老版本中的componentWillReceiveProps()方法判断前后两个 props 是否相同,如果不同再将新的 props 更新到相应的 state 上去。这样做一来会破坏 state 数据的单一数据源,导致组件状态变得不可预测,另一方面也会增加组件的重绘次数。
举个例子:
// before
componentWillReceiveProps(nextProps) {
  if (nextProps.isLogin !== this.props.isLogin) {
    this.setState({
      isLogin: nextProps.isLogin,
    });
  }
  if (nextProps.isLogin) {
    this.handleClose();
  }
}

// after
static getDerivedStateFromProps(nextProps, prevState) {
  if (nextProps.isLogin !== prevState.isLogin) {
    return {
      isLogin: nextProps.isLogin,
    };
  }
  return null;
}

componentDidUpdate(prevProps, prevState) {
  if (!prevState.isLogin && this.props.isLogin) {
    this.handleClose();
  }
}
这两者最大的不同就是:
在 componentWillReceiveProps 中,我们一般会做以下两件事,一是根据 props 来更新 state,二是触发一些回调,如动画或页面跳转等。
I. 在老版本的 React 中,这两件事我们都需要在 componentWillReceiveProps 中去做。
II. 而在新版本中,官方将更新state与触发回调重新分配到了getDerivedStateFromProps 与componentDidUpdate中,使得组件整体的更新逻辑更为清晰。而且在getDerivedStateFromProps中还禁止了组件去访问this.props,强制让开发者去比较nextProps与prevState中的值,以确保当开发者用到getDerivedStateFromProps这个生命周期函数时,就是在根据当前的props来更新组件的state,而不是去做其他一些让组件自身状态变得更加不可预测的事情。
3.2 getSnapshotBeforeUpdate(prevProps, prevState)
代替componentWillUpdate。
常见的 componentWillUpdate 的用例是在组件更新前,读取当前某个 DOM 元素的状态,并在 componentDidUpdate 中进行相应的处理。
这两者的区别在于:
I. 在React开启异步渲染模式后,在render阶段读取到的DOM元素状态并不总是和commit阶段相同,这就导致在componentDidUpdate中使用componentWillUpdate中读取到的DOM元素状态是不安全的,因为这时的值很有可能已经失效了。
II. getSnapshotBeforeUpdate会在最终的render之前被调用,也就是说在getSnapshotBeforeUpdate中读取到的DOM元素状态是可以保证与componentDidUpdate中一致的。
此生命周期返回的任何值都将作为参数传递给componentDidUpdate()。


 6771
6771


 被折叠的 条评论
为什么被折叠?
被折叠的 条评论
为什么被折叠?
 到【灌水乐园】发言


