


Android已经提供了一个用于测试service的框架,该测试类即为ServiceTestCase。在对service进行设计的时候就需要考虑到自己的测试用例要测试到service生命周期中的各种状态,当然对service的测试离不开ServiceTestCase中的各种方法。

在网上搜了半天,发现关于ServiceTestCase的文章少得可怜,而在SDK中也只有少量的说明,还是自己总结研究一下吧,以下内容大部分出自SDK,外加自己的理解,可能会有理解错误的地方。
根据SDK中的说明画了一个类的继承图如下:

从图中可以看出ServiceTestCase继承了JUnit的TestCase类,因此可以可以在测试中控制程序和服务进行测试工作。另外还可以提供mock application和Context将服务独立系统,这点非常重要,应该可以消除服务对外部的依赖,但还需要进行进一步的研究才能确定。
对于ServiceTestCase有一下几点需要注意:
1.ServiceTestCase.startService()和ServiceTestCase.bindService()这两个方法负责完成测试环境的初始化工作,其中包括mock objects,然后启动服务。
2.ServiceTestCase.bindService()和Service.bindService()方法的不同之处在于其返回值的类型:
ServiceTestCase.bindService()——>Intent
Service.bindService()——>IBinder object
3.同其余的测试一样,ServiceTestCase也在每次测试的时候调用setUp()方法,该方法会通过复制当前的系统Context来建立测试平台,通过调用getSystemContext()方法可以获得此Context。如果要重写这个方法,则第一句必须为super.setUp()。
4.setApplication()和setContext(Context)可以在启动服务前设定mock Context和mock Application。
5.在运行前,ServiceTestCase会默认地运行testAndroidTestCaseSetupProperly()方法来确定测试类正确地搭建好了Context
那么对于Service进行测试到底要测什么呢?在SDK中所提到的主要有以下几个方面:
1.调用Context.startService()或者Context.bindService()后要确定onCreate()方法被正确地调用;同样,当调用Context.stopService(), Context.unbindService(), stopSelf()或者 stopSelfResult()等方法时要确定onDestroy()方法被正确地调用。
2.服务能够正确地处理Context.startService()的多次调用,只有第一次调用才会触发Service.onCreate()方法,但是每次都会调用Service.onStartCommand()方法。还要注意的是startService()不会嵌套调用,因此对Context.stopService()或者 Service.stopSelf() ( stopSelf(int)不再此列)的一次调用就应该能够终止服务。
3.测试服务在实现上的逻辑正确性。
以上都是些理论上的东西,下篇文章结合例子从头完成对一个服务的测试。下面附上ServiceTestCase类的源代码,以供参考。
首先了解一下Service的继承关系,如下图所示,当然还有许多类继承了Service类,如AbstractInputMethodService, AccessibilityService, IntentService, RecognitionService, WallpaperService等。
但是Service到底是用来做什么的?简单来讲Service 用于两种情况:第一种就是在后台完成一系列可能非常耗时的操作,但并不和用户进行交互。比如说我们用手机播放音乐或者传输数据,但同时我们还想干点别的事情,比如看看电子书等,这时就可以将播放音乐或者传输数据等以Service的方式在后台完成,但是并不影响我们看电子书。第二种就是为其他的程序提供一些功能,这种情况下可能会和这些程序保持一种长时间的交互。
在Android中使用Service必须要注意以下几点:
1.每个Service都必须在AndroidManifest.xml中进行声明,一般格式为<service android:enabled="true" android:name=".ServiceName"/>
2.Service并不是运行在一个独立的进程中,而是运行在程序的主进程中,因此如果Service要处理消耗CPU的工作就应该自己创建一个线程来完成,否则可能会导致程序没有响应。
下面来看一下Service的生命周期。要启动Service有两种方法,分别是Contex.startService(),这种情况下可以调用Context.stopService()来结束服务;另外一种方法是Context.bindService(),这种情况下要调用Context.unbindService()来结束服务,并且多个客户程序都可以bind同一个服务。这两种方法并不是独立的,例如我们可以使用startService()来启动一个在后台播放音乐的服务,这可以通过一个Intent对象来实现,但是当我们想控制音乐的播放或者获取当前歌曲的信息时就需要使用一个Activity通过bindService()方法来同Service建立联系,当一个Service有程序bind的时候即使调用stopService()方法也不会停止服务。具体的生命周期如下图所示:

对于service可以通过在生命周期的方法来监视服务的状态,通过startService()方面启动的服务主要有3个pulbic方法可以实现,其中onStart()方法是其所独有的:
void onCreate()
void onStart(Intent intent)
void onDestroy()
通过bindService()方法启动的服务则可以通过3个额外的方法来监视其状态,分别是:
IBinder onBind(Intent intent)
boolean onUnbind(Intent intent)
void onRebind(Intent intent)
要终止服务可以通过stopService()或者stopSelf()方法,需要注意的是不管服务启动了多少次,一旦调用了这两个方法都会终止服务的运行。
在Android中使用Service必须要注意以下几点:
1.每个Service都必须在AndroidManifest.xml中进行声明,一般格式为<service android:enabled="true" android:name=".ServiceName"/>
2.Service并不是运行在一个独立的进程中,而是运行在程序的主进程中,因此如果Service要处理消耗CPU的工作就应该自己创建一个线程来完成,否则可能会导致程序没有响应。
下面来看一下Service的生命周期。要启动Service有两种方法,分别是Contex.startService(),这种情况下可以调用Context.stopService()来结束服务;另外一种方法是Context.bindService(),这种情况下要调用Context.unbindService()来结束服务,并且多个客户程序都可以bind同一个服务。这两种方法并不是独立的,例如我们可以使用startService()来启动一个在后台播放音乐的服务,这可以通过一个Intent对象来实现,但是当我们想控制音乐的播放或者获取当前歌曲的信息时就需要使用一个Activity通过bindService()方法来同Service建立联系,当一个Service有程序bind的时候即使调用stopService()方法也不会停止服务。具体的生命周期如下图所示:
对于service可以通过在生命周期的方法来监视服务的状态,通过startService()方面启动的服务主要有3个pulbic方法可以实现,其中onStart()方法是其所独有的:
void onCreate()
void onStart(Intent intent)
void onDestroy()
通过bindService()方法启动的服务则可以通过3个额外的方法来监视其状态,分别是:
IBinder onBind(Intent intent)
boolean onUnbind(Intent intent)
void onRebind(Intent intent)
要终止服务可以通过stopService()或者stopSelf()方法,需要注意的是不管服务启动了多少次,一旦调用了这两个方法都会终止服务的运行。
根据SDK中的说明画了一个类的继承图如下:
从图中可以看出ServiceTestCase继承了JUnit的TestCase类,因此可以可以在测试中控制程序和服务进行测试工作。另外还可以提供mock application和Context将服务独立系统,这点非常重要,应该可以消除服务对外部的依赖,但还需要进行进一步的研究才能确定。
对于ServiceTestCase有一下几点需要注意:
1.ServiceTestCase.startService()和ServiceTestCase.bindService()这两个方法负责完成测试环境的初始化工作,其中包括mock objects,然后启动服务。
2.ServiceTestCase.bindService()和Service.bindService()方法的不同之处在于其返回值的类型:
ServiceTestCase.bindService()——>Intent
Service.bindService()——>IBinder object
3.同其余的测试一样,ServiceTestCase也在每次测试的时候调用setUp()方法,该方法会通过复制当前的系统Context来建立测试平台,通过调用getSystemContext()方法可以获得此Context。如果要重写这个方法,则第一句必须为super.setUp()。
4.setApplication()和setContext(Context)可以在启动服务前设定mock Context和mock Application。
5.在运行前,ServiceTestCase会默认地运行testAndroidTestCaseSetupProperly()方法来确定测试类正确地搭建好了Context
那么对于Service进行测试到底要测什么呢?在SDK中所提到的主要有以下几个方面:
1.调用Context.startService()或者Context.bindService()后要确定onCreate()方法被正确地调用;同样,当调用Context.stopService(), Context.unbindService(), stopSelf()或者 stopSelfResult()等方法时要确定onDestroy()方法被正确地调用。
2.服务能够正确地处理Context.startService()的多次调用,只有第一次调用才会触发Service.onCreate()方法,但是每次都会调用Service.onStartCommand()方法。还要注意的是startService()不会嵌套调用,因此对Context.stopService()或者 Service.stopSelf() ( stopSelf(int)不再此列)的一次调用就应该能够终止服务。
3.测试服务在实现上的逻辑正确性。
以上都是些理论上的东西,下篇文章结合例子从头完成对一个服务的测试。下面附上ServiceTestCase类的源代码,以供参考。
- /**
- * Copyright (C) 2008 The Android Open Source Project
- *
- * Licensed under the Apache License, Version 2.0 (the "License");
- * you may not use this file except in compliance with the License.
- * You may obtain a copy of the License at
- *
- * http://www.apache.org/licenses/LICENSE-2.0
- *
- * Unless required by applicable law or agreed to in writing, software
- * distributed under the License is distributed on an "AS IS" BASIS,
- * WITHOUT WARRANTIES OR CONDITIONS OF ANY KIND, either express or implied.
- * See the License for the specific language governing permissions and
- * limitations under the License.
- */
-
- package android.test;
-
- import android.app.Application;
- import android.app.Service;
- import android.content.ComponentName;
- import android.content.Context;
- import android.content.Intent;
- import android.os.IBinder;
- import android.os.RemoteException;
- import android.test.mock.MockApplication;
-
- import java.lang.reflect.Field;
- import java.util.Random;
-
- /***
- * This test case provides a framework in which you can test Service classes in
- * a controlled environment. It provides basic support for the lifecycle of a
- * Service, and hooks by which you can inject various dependencies and control
- * the environment in which your Service is tested.
- *
- * <p><b>Lifecycle Support.</b>
- * Every Service is designed to be accessed within a specific sequence of
- * calls. <insert link to Service lifecycle doc here>.
- * In order to support the lifecycle of a Service, this test case will make the
- * following calls at the following times.
- *
- * <ul>
- The test case will not call onCreate() until your test calls
- * {@link #startService} or {@link #bindService}. This gives you a chance
- * to set up or adjust any additional framework or test logic before
- * onCreate().
- *
- When your test calls {@link #startService} or {@link #bindService}
- * the test case will call onCreate(), and then call the corresponding entry point in your service.
- * It will record any parameters or other support values necessary to support the lifecycle.
- *
- After your test completes, the test case {@link #tearDown} function is
- * automatically called, and it will stop and destroy your service with the appropriate
- * calls (depending on how your test invoked the service.)
- * </ul>
- *
- * <p><b>Dependency Injection.</b>
- * Every service has two inherent dependencies, the {@link android.content.Context Context} in
- * which it runs, and the {@link android.app.Application Application} with which it is associated.
- * This framework allows you to inject modified, mock, or isolated replacements for these
- * dependencies, and thus perform a true unit test.
- *
- * <p>If simply run your tests as-is, your Service will be injected with a fully-functional
- * Context, and a generic {@link android.test.mock.MockApplication MockApplication} object.
- * You can create and inject alternatives to either of these by calling
- * {@link AndroidTestCase#setContext(Context) setContext()} or
- * {@link #setApplication setApplication()}. You must do this <i>before</i> calling
- * startService() or bindService(). The test framework provides a
- * number of alternatives for Context, including {link android.test.mock.MockContext MockContext},
- * {@link android.test.RenamingDelegatingContext RenamingDelegatingContext}, and
- * {@link android.content.ContextWrapper ContextWrapper}.
- */
- public abstract class ServiceTestCase<T extends Service> extends AndroidTestCase {
-
- Class<T> mServiceClass;
-
- private Context mSystemContext;
- private Application mApplication;
-
- public ServiceTestCase(Class<T> serviceClass) {
- mServiceClass = serviceClass;
- }
-
- private T mService;
- private boolean mServiceAttached = false;
- private boolean mServiceCreated = false;
- private boolean mServiceStarted = false;
- private boolean mServiceBound = false;
- private Intent mServiceIntent = null;
- private int mServiceId;
-
- /***
- * @return Returns the actual service under test.
- */
- public T getService() {
- return mService;
- }
-
- /***
- * This will do the work to instantiate the Service under test. After this, your test
- * code must also start and stop the service.
- */
- @Override
- protected void setUp() throws Exception {
- super.setUp();
-
- // get the real context, before the individual tests have a chance to muck with it
- mSystemContext = getContext();
-
- }
-
- /***
- * Create the service under test and attach all injected dependencies (Context, Application) to
- * it. This will be called automatically by {@link #startService} or by {@link #bindService}.
- * If you wish to call {@link AndroidTestCase#setContext(Context) setContext()} or
- * {@link #setApplication setApplication()}, you must do so before calling this function.
- */
- protected void setupService() {
- mService = null;
- try {
- mService = mServiceClass.newInstance();
- } catch (Exception e) {
- assertNotNull(mService);
- }
- if (getApplication() == null) {
- setApplication(new MockApplication());
- }
- mService.attach(
- getContext(),
- null, // ActivityThread not actually used in Service
- mServiceClass.getName(),
- null, // token not needed when not talking with the activity manager
- getApplication(),
- null // mocked services don't talk with the activity manager
- );
-
- assertNotNull(mService);
-
- mServiceId = new Random().nextInt();
- mServiceAttached = true;
- }
-
- /***
- * Start the service under test, in the same way as if it was started by
- * {@link android.content.Context#startService Context.startService()}, providing the
- * arguments it supplied. If you use this method to start the service, it will automatically
- * be stopped by {@link #tearDown}.
- *
- * @param intent The Intent as if supplied to {@link android.content.Context#startService}.
- */
- protected void startService(Intent intent) {
- assertFalse(mServiceStarted);
- assertFalse(mServiceBound);
-
- if (!mServiceAttached) {
- setupService();
- }
- assertNotNull(mService);
-
- if (!mServiceCreated) {
- mService.onCreate();
- mServiceCreated = true;
- }
- mService.onStart(intent, mServiceId);
-
- mServiceStarted = true;
- }
-
- /***
- * Start the service under test, in the same way as if it was started by
- * {@link android.content.Context#bindService Context.bindService()}, providing the
- * arguments it supplied.
- *
- * Return the communication channel to the service. May return null if
- * clients can not bind to the service. The returned
- * {@link android.os.IBinder} is usually for a complex interface
- * that has been <a href="{@docRoot}guide/developing/tools/aidl.html">described using
- * aidl.
- *
- * Note: In order to test with this interface, your service must implement a getService()
- * method, as shown in samples.ApiDemos.app.LocalService.
-
- * @param intent The Intent as if supplied to {@link android.content.Context#bindService}.
- *
- * @return Return an IBinder for making further calls into the Service.
- */
- protected IBinder bindService(Intent intent) {
- assertFalse(mServiceStarted);
- assertFalse(mServiceBound);
-
- if (!mServiceAttached) {
- setupService();
- }
- assertNotNull(mService);
-
- if (!mServiceCreated) {
- mService.onCreate();
- mServiceCreated = true;
- }
- // no extras are expected by unbind
- mServiceIntent = intent.cloneFilter();
- IBinder result = mService.onBind(intent);
-
- mServiceBound = true;
- return result;
- }
-
- /***
- * This will make the necessary calls to stop (or unbind) the Service under test, and
- * call onDestroy(). Ordinarily this will be called automatically (by {@link #tearDown}, but
- * you can call it directly from your test in order to check for proper shutdown behaviors.
- */
- protected void shutdownService() {
- if (mServiceStarted) {
- mService.stopSelf();
- mServiceStarted = false;
- } else if (mServiceBound) {
- mService.onUnbind(mServiceIntent);
- mServiceBound = false;
- }
- if (mServiceCreated) {
- mService.onDestroy();
- }
- }
-
- /***
- * Shuts down the Service under test. Also makes sure all resources are cleaned up and
- * garbage collected before moving on to the next
- * test. Subclasses that override this method should make sure they call super.tearDown()
- * at the end of the overriding method.
- *
- * @throws Exception
- */
- @Override
- protected void tearDown() throws Exception {
- shutdownService();
- mService = null;
-
- // Scrub out members - protects against memory leaks in the case where someone
- // creates a non-static inner class (thus referencing the test case) and gives it to
- // someone else to hold onto
- scrubClass(ServiceTestCase.class);
-
- super.tearDown();
- }
-
- /***
- * Set the application for use during the test. If your test does not call this function,
- * a new {@link android.test.mock.MockApplication MockApplication} object will be generated.
- *
- * @param application The Application object that will be injected into the Service under test.
- */
- public void setApplication(Application application) {
- mApplication = application;
- }
-
- /***
- * Return the Application object being used by the Service under test.
- *
- * @return Returns the application object.
- *
- * @see #setApplication
- */
- public Application getApplication() {
- return mApplication;
- }
-
- /***
- * Return a real (not mocked or instrumented) system Context that can be used when generating
- * Mock or other Context objects for your Service under test.
- *
- * @return Returns a reference to a normal Context.
- */
- public Context getSystemContext() {
- return mSystemContext;
- }
-
- public void testServiceTestCaseSetUpProperly() throws Exception {
- setupService();
- assertNotNull("service should be launched successfully", mService);
- }
- }
Android Service Test——简单测试例子
2011-02-21 09:23:46
分类: 嵌入式
前两篇文章对
Android Service和
ServiceTestCase做了简单的分析,在本文中将一步步实现对一个Service的测试,由于参考的资料非常有限,大部分都是自己研究摸索的,不保证正确性。在以后的工作中,我会进行进一步的研究。
首先做一下对服务的启动和停止的测试。测试的对象是一个很简单的播放音乐的服务,代码是我在网上搜的,对其做了一些修改来方便测试,具体代码如下:
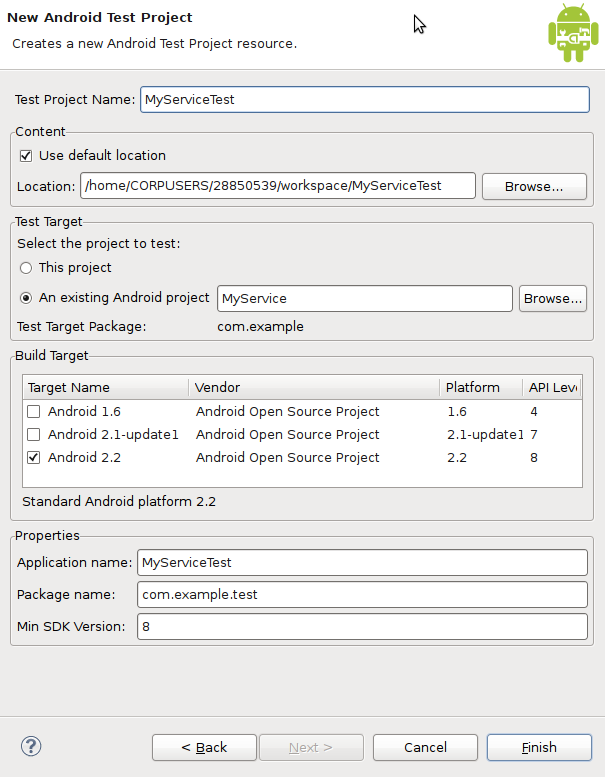
1.在ECLIPSE中运行File>New > Project > Android > Android Test Project.如下图所示,输入Test Project Name并且在“Test Tartget”中选择所要测试的工程。其余的会自动填好。最后点击“Finish”按钮。
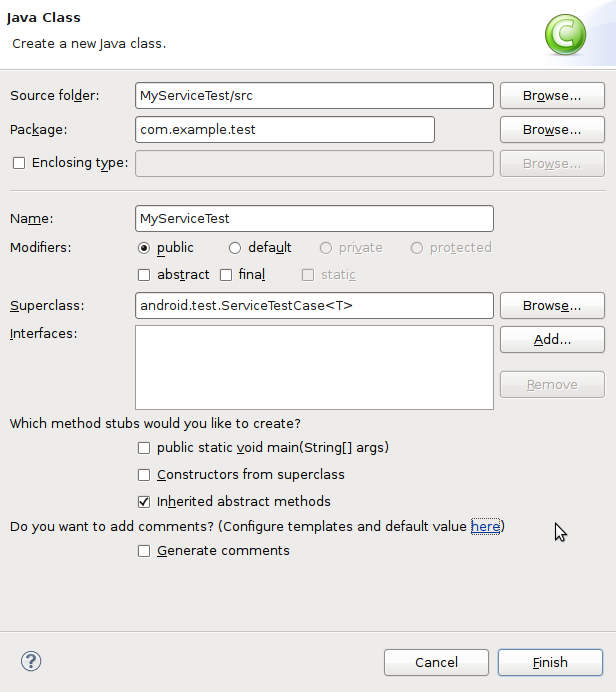
2.在新建的项目上右击鼠标,选择NEW>CLASS。如下图所示,输入类名。在Superclass一览点击Browse,选择“android.test.ServiceTestCase<T>”,将其中的T改为所要测试的服务类名“MyService”。点击finish按钮。这样第一个测试类就创建了。
3.在新建的类中输入代码:
4.在工程上右击鼠标选择Run As> Android JUnit Test运行测试用例,测试结果如下图所示,可以看到测试都通过了,如果测试没通过,在下面的“Failure Trace”中会给出错误信息。最后的两个测试用例是系统自动运行的。
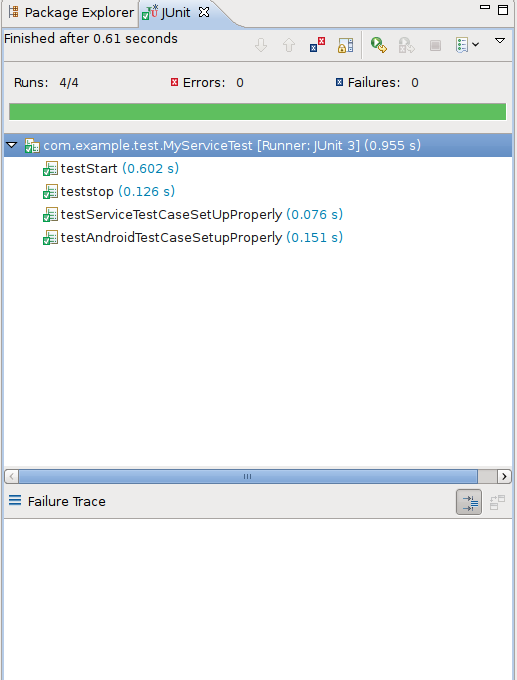
至此,第一个测试例子就结束了,可以看到这个例子非常地简单,在实际开发中所要用的肯定比这复杂得多,还需要对其进行更深入的研究,比如说加入mock object 等。
首先做一下对服务的启动和停止的测试。测试的对象是一个很简单的播放音乐的服务,代码是我在网上搜的,对其做了一些修改来方便测试,具体代码如下:
package com.example;
import android.app.Service;
import android.content.Intent;
import android.media.MediaPlayer;
import android.os.IBinder;
import android.util.Log;
import android.widget.Toast;
public class MyService extends Service {
MediaPlayer player;
public IBinder onBind(Intent intent){
return null;
}
public void onCreate() {
Toast.makeText(this, "My Service Created", Toast.LENGTH_LONG).show();
player=MediaPlayer.create(this, R.raw.start);
player.setLooping(false);
}
public void onDestroy(){
Log.d("stop","stoped");
Toast.makeText(this, "My Servece Stopped", Toast.LENGTH_LONG).show();
player.stop();
}
public void onStart(Intent intent,int startid){
Toast.makeText(this, "Started", Toast.LENGTH_LONG).show();
player.start();
}
}
可以看到该服务非常的简单,我们对其的测试相对应地也很简单。下面就一步步进行测试。import android.app.Service;
import android.content.Intent;
import android.media.MediaPlayer;
import android.os.IBinder;
import android.util.Log;
import android.widget.Toast;
public class MyService extends Service {
MediaPlayer player;
public IBinder onBind(Intent intent){
return null;
}
public void onCreate() {
Toast.makeText(this, "My Service Created", Toast.LENGTH_LONG).show();
player=MediaPlayer.create(this, R.raw.start);
player.setLooping(false);
}
public void onDestroy(){
Log.d("stop","stoped");
Toast.makeText(this, "My Servece Stopped", Toast.LENGTH_LONG).show();
player.stop();
}
public void onStart(Intent intent,int startid){
Toast.makeText(this, "Started", Toast.LENGTH_LONG).show();
player.start();
}
}
1.在ECLIPSE中运行File>New > Project > Android > Android Test Project.如下图所示,输入Test Project Name并且在“Test Tartget”中选择所要测试的工程。其余的会自动填好。最后点击“Finish”按钮。
2.在新建的项目上右击鼠标,选择NEW>CLASS。如下图所示,输入类名。在Superclass一览点击Browse,选择“android.test.ServiceTestCase<T>”,将其中的T改为所要测试的服务类名“MyService”。点击finish按钮。这样第一个测试类就创建了。
3.在新建的类中输入代码:
- package com.example.test;
-
- import com.example.MyService;
- import android.content.Intent;
- import android.test.ServiceTestCase;
- import android.util.Log;
-
- public class MyServiceTest extends ServiceTestCase<MyService> {
-
- private String TAG="myservicetest";
- private Context mContext;
- /**
- * 构造方法
- */
- public MyServiceTest() {
- super(MyService.class);
-
- }
-
- /**
- * 重写setUp方法,第一句调用super.setUp
- */
- protected void setUp() throws Exception {
- super.setUp();
- mContext = getContext();
-
- }
-
- // public void testAndroidTestCaseSetupProperly() {
- // super.testAndroidTestCaseSetupProperly();
- // }
-
- protected void tearDown() throws Exception {
- mContext = null;
- super.tearDown();
- }
-
- /**
- * 测试Service正确地启动
- */
- public void testStart() {
- Log.i(TAG, "start testStart");
- Intent intent = new Intent();
- startService(intent);
- MyService Serv=getService();
- assertNotNull(Serv);
- Log.i(TAG, "end testStart");
- }
- }
-
-
- /**
- * 测试Service正确的终止
- */
- public void teststop() {
- Log.i(TAG, "start teststopService");
- Intent intent = new Intent();
- startService(intent);
- MyService service = getService();
- service.stopService(intent);
- }
- }
至此,第一个测试例子就结束了,可以看到这个例子非常地简单,在实际开发中所要用的肯定比这复杂得多,还需要对其进行更深入的研究,比如说加入mock object 等。


 994
994

 被折叠的 条评论
为什么被折叠?
被折叠的 条评论
为什么被折叠?
 到【灌水乐园】发言


