


JDK中的事件驱动机制
在了解其它之前,有必要先了解下JDK为我们提供的事件驱动(EventListener、EventObject)、观察者模式(Observer)。
JDK不仅提供了Observable类、Observer接口支持观察者模式,而且也提供了EventObject、EventListener接口来支持事件监听模式。
这些类都属于java.util下的
观察者模式(Observable和Observer) JDK1.0提供
被观察对象:观察者 = 1:n (观察者可以有N个)
观察者(Observer)相当于事件监听者(监听器),被观察者(Observable)相当于事件源和事件,执行逻辑时通知observer即可触发observer的update,同时可传被观察者和参数。简化了事件-监听模式的实现。
// 观察者,实现此接口即可
public interface Observer {
	// 当被观察的对象发生变化时候,这个方法会被调用
	//Observable o:被观察的对象
	// Object arg:传入的参数
    void update(Observable o, Object arg);
}

// 它是一个Class
public class Observable {

	// 是否变化,决定了后面是否调用update方法
    private boolean changed = false;
    // 用来存放所有`观察自己的对象`的引用,以便逐个调用update方法
    // 需要注意的是:1.8的jdk源码为Vector(线程安全的),有版本的源码是ArrayList的集合实现;
    private Vector<Observer> obs;

    public Observable() {
        obs = new Vector<>();
    }

	public synchronized void addObserver(Observer o); //添加一个观察者 注意调用的是addElement方法,添加到末尾   所以执行时是倒序执行的
	public synchronized void deleteObserver(Observer o);
	public synchronized void deleteObservers(); //删除所有的观察者

	// 循环调用所有的观察者的update方法
	public void notifyObservers();
	public void notifyObservers(Object arg);
    public synchronized int countObservers() {
        return obs.size();
    }

	// 修改changed的值
    protected synchronized void setChanged() {
        changed = true;
    }
    protected synchronized void clearChanged() {
        changed = false;
    }
    public synchronized boolean hasChanged() {
        return changed;
    }
}
它的使用非常的便捷,看个例子就能明白
class Person extends Observable {
    public String name;

    public Person(String name) {
        this.name = name;
    }

    // 给鱼:这样所有观察的猫都会过来了
    // fishType: 鱼的名字
    public void giveFish(String fishName) {
        setChanged(); // 这个一定不能忘
        notifyObservers(fishName);
    }
}

class Cat implements Observer {
    public String name;

    public Cat(String name) {
        this.name = name;
    }

    @Override
    public void update(Observable o, Object arg) {
        String preffix = o.toString();
        if (o instanceof Person) {
            preffix = ((Person) o).name;
        }
        System.out.println(preffix + "主人放 " + arg + "~了," + name + "去吃鱼吧");
    }
}

// 测试方法如下:
public static void main(String[] args) {
    Person person = new Person("fsx");

    // 来10只猫 观察这个人
    for (int i = 0; i < 10; i++) {
    	person.addObserver(new Cat("cat" + i));
    }

    //开始放fish,这时候观察的猫就应该都过来了
    person.giveFish("草鱼");
}
JDK的观察者模式使用起来确实非常的方便,我们只需要面对两个对象即可。内部观察者队列的都交给Observable去处理了。 并且,它是线程安全的。
发布订阅模式(EventListener和EventObject) JDK1.1提供
事件机制一般包括三个部分:EventObject,EventListener和Source。
- EventObject:事件状态对象的基类,它封装了事件源对象以及和事件相关的信息。所有java的事件类都需要继承该类
- EventListener:是一个标记接口,就是说该接口内是没有任何方法的。所有事件监听器都需要实现该接口。事件监听器注册在事件源上,当事件源的属性或状态改变的时候,调用相应监听器内的回调方法(自己写)。
- Source:一个普通的POJO。事件最初发生的地方,他里面必须含有监听它的监听器们。
class MyEvent extends EventObject {
    public MyEvent(Object source) {
        super(source);
    }
}

// 状态改变事件
class StatusChangedListener implements EventListener {
    public void handleEvent(MyEvent event) {
        System.out.println(event.getSource() + " 的状态改变啦~");
    }

}

// 状态没变化事件
class StateSameListener implements EventListener {
    public void handleEvent(MyEvent event) {
        System.out.println(event.getSource() + " 的状态没有任何变化~");
    }
}

class MySource {
    private int status;
    List<EventListener> eventListeners = new ArrayList<>();

    public int getStatus() {
        return status;
    }

    public void setStatus(int status) {
        this.status = status;
    }

    public void addListener(EventListener listener) {
        eventListeners.add(listener);
    }

    // 调用所有的合适的监听器
    public void notifyListeners(int oldStatus, int newStatus) {
        eventListeners.forEach(l -> {
            if (oldStatus == newStatus) {
                // doSamething
            } else {
                // doSamething
            }
        });
    }

}

// 测试方法
public static void main(String[] args) {
    MySource mySource = new MySource();
    mySource.addListener(new StatusChangedListener());
    mySource.addListener(new StateSameListener());

    int oldStatus = mySource.getStatus();
    mySource.setStatus(1);
    int newStatus = mySource.getStatus();

    // 触发所有的监听者们
    mySource.notifyListeners(oldStatus, newStatus);
}
对比上面的观察者模式,监听模式使用起来确实非常的繁琐,且还有线程安全问题,得自己考解决。我个人觉得JDK的原生的事件、监听模式非常难用(不太建议使用,它最大的败笔在于EventListener接口没有定义一个抽象方法,不知道是作何考虑的,应该是为了更加抽象吧)。因此接下来,大行其道的Spring事件机制就很好的解决使用上的问题~~~。
Spring中事件驱动机制
Spring提供了ApplicationEventPublisher接口作为事件发布者(ApplicationContext接口继承了该接口,担当着事件发布者的角色)。
Spring提供了ApplicationEventMulticaster接口,负责管理ApplicationListener和真正发布ApplicationEvent(ApplicationContext是委托给它完成的)。
ApplicationListener实现了JDK的EventListener,但它抽象出一个onApplicationEvent方法,使用更方便。ApplicationEvent继承自EventObject。 Spring这么做我觉得完全是为了兼容Java规范~
ApplicationEventPublisher最终都是委托给ApplicationEventMulticaster去完成的。当然你也可以自己去实现一个ApplicationEventMulticaster
在AbstractApplicationContext#refresh()方法中:
- initApplicationEventMulticaster()
- registerListeners()
- finishRefresh()方法里的publishEvent(new ContextRefreshedEvent(this))
都是和事件机制相关的方法。
- initApplicationEventMulticaster():我们向容器注册了一个SimpleApplicationEventMulticaster(若我们自己没指定的话),因此若我们希望手动控制事件的发布,是可以@Autowired进来的
- registerListeners():会把所有的ApplicationListener添加进ApplicationEventMulticaster进行管理(注意此处并不包括@EventListener标注的注解方法)
- publishEvent:发布事件。因为ApplicationContext继承了ApplicationEventMulticaster,因此我们一般发布事件建议用它
public abstract class ApplicationEvent extends EventObject {
    private static final long serialVersionUID = 7099057708183571937L;
    private final long timestamp;

    public ApplicationEvent(Object source) {
    	super(source);
    	this.timestamp = System.currentTimeMillis();
    }
    public final long getTimestamp() {
    	return this.timestamp;
    }
}

@FunctionalInterface
public interface ApplicationListener<E extends ApplicationEvent> extends EventListener {
    // 此子接口提供了泛型,和提供了统一的处理方法
    void onApplicationEvent(E event);
}

@FunctionalInterface
public interface ApplicationEventPublisher {
    default void publishEvent(ApplicationEvent event) {
    	publishEvent((Object) event);
    }

    // 这个接口是Spring4.2后提供的,可以发布任意的事件对象(即使不是ApplicationEvent的子类了)
    // 当这个对象不是一个ApplicationEvent,我们会使用PayloadApplicationEvent来包装一下再发送
    // 比如后面会建讲到的@EventListener注解标注的放 就是使用的它
    void publishEvent(Object event);
}
我们知道Spring4.2后提供了@EventListener注解,让我们更便捷的使用监听了,非常的方便。
ApplicationListener类模式的演示和原理解析
它的继承树如下:
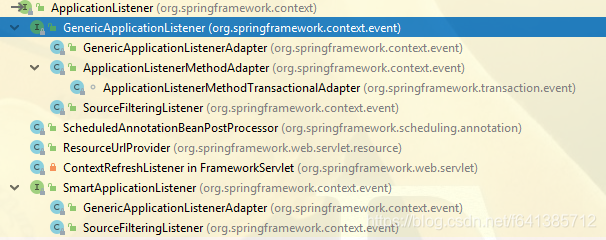
GenericApplicationListener和SmartApplicationListener
// @since 3.0
public interface SmartApplicationListener extends ApplicationListener<ApplicationEvent>, Ordered {
    boolean supportsEventType(Class<? extends ApplicationEvent> eventType);
    boolean supportsSourceType(Class<?> sourceType);
}

// @since 4.2
public interface GenericApplicationListener extends ApplicationListener<ApplicationEvent>, Ordered {
    boolean supportsEventType(ResolvableType eventType);
    boolean supportsSourceType(Class<?> sourceType);
}
GenericApplicationListener是4.2才支持的。若你出现了java.lang.ClassNotFoundException: org.springframework.context.event.GenericApplicationListener这种异常,请检查是不是你Maven的版本冲突引起~
这是Spring最早期就提供了的一种事件监听方式。实现起来也非常的简单。
通过Spring源码我们了解到,Spring容器刷新的时候会发布ContextRefreshedEvent事件,因此若我们需要监听此事件,直接写个监听类即可:
@Slf4j
@Component
public class ApplicationRefreshedEventListener implements ApplicationListener<ContextRefreshedEvent> {

    @Override
    public void onApplicationEvent(ContextRefreshedEvent event) {
        Object source = event.getSource();
        // 此处的source就是ApplicationContext这个对象
        System.out.println(source); //WebApplicationContext for namespace 'dispatcher-servlet': startup date [Tue Mar 26 14:26:27 CST 2019]; parent: Root WebApplicationContext

        //容器此时已经准备好了,可以做你该做的事了~......(请注意:若存在父子容器或者多个容器情况,此方法会被执行多次,请务必注意是否幂等)

    }
}
若是web环境,FrameworkServlet在处理完每一次i请求,也会发出一个事件:ServletRequestHandledEvent
自己发布一个事件,然后自己监听~~~~
public class MyAppEvent extends ApplicationEvent {

    public MyAppEvent(Object source) {
        super(source);
    }
}

// 写个监听器,然后交给容器管理即可
@Slf4j
@Component
public class MyEventListener implements ApplicationListener<MyAppEvent> {

    @Override
    public void onApplicationEvent(MyAppEvent event) {
        Object source = event.getSource();
        long timestamp = event.getTimestamp();

        System.out.println(source);
        System.out.println(timestamp);
        //doSomething

    }
}

public static void main(String[] args) {
	ApplicationContext applicationContext = new AnnotationConfigApplicationContext(RootConfig.class);
	// 发布自己的事件
	applicationContext.publishEvent(new MyAppEvent("this is my event"));
}
// 输出:
this is my event
1553581974928
Spring内置的事件讲解
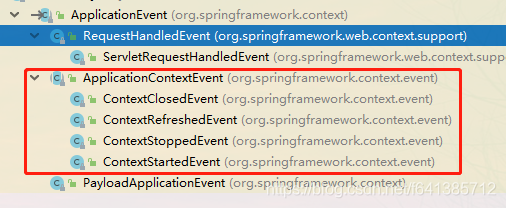
Web相关事件:
- RequestHandledEvent:Web相关事件,只能应用于使用DispatcherServlet的Web应用。在使用Spring作为前端的MVC控制器时,当Spring处理用户请求结束后,系统会自动触发该事件(即ServletRequestHandledEvent)
ApplicationContextEvent:应用本身的事件
- ContextRefreshedEvent:容器初始化完成刷新时触发。此时所有的Bean已经初始化完成,后置处理器等也都已经完成
- ContextStartedEvent:AbstractApplicationContext#start()被手动调用时。
- ContextStoppedEvent:容器的stop方法被手动调用时。
- ContextClosedEvent:close() 关闭容器时候发布。一个已关闭的上下文到达生命周期末端;它不能被刷新或重启
@EventListener注解方法模式演示
在任意方法上标注@EventListener注解,指定 classes,即需要处理的事件类型,一般就是 ApplicationEvent 及其子类(当然任意事件也是Ok的,比如下面的MyAppEvent就是个普通的POJO),可以设置多项。
public class MyAppEvent {

    private String name;

    public MyAppEvent(String name) {
        this.name = name;
    }
}

// 显然此处,它会收到两个时间,分别进行处理
@Component
public class MyAllEventListener {

    //value必须给值,但可以不用是ApplicationEvent的子类  任意事件都ok
    // 也可以给一个入参,代表事件的Event
    @EventListener(value = {ContextRefreshedEvent.class, MyAppEvent.class}
            // confition的使用,若同一个事件进行区分同步异步 等等条件的可以使用此confition 支持spel表达式  非常强大
            /*,condition = "#event.isAsync == false"*/)
    public void handle(Object o) {
        System.out.println(o);
        System.out.println("事件来了~");
    }
}

public static void main(String[] args) {
    ApplicationContext applicationContext = new AnnotationConfigApplicationContext(RootConfig.class);
    // 发布自己的事件
    applicationContext.publishEvent(new MyAppEvent("this is my event"));
}
显然这种方式更被推崇,因为它是方法级别的,更轻便了。(Spring4.2之后提出)
@EventListener的使用注意事项
有小伙伴在启动的时候看到过这样的异常:
Caused by: java.lang.IllegalStateException: Need to invoke method 'applicationContextEvent' declared on target class 'HelloServiceImpl', but not found in any interface(s) of the exposed proxy type. Either pull the method up to an interface or switch to CGLIB proxies by enforcing proxy-target-class mode in your configuration.
	at org.springframework.core.MethodIntrospector.selectInvocableMethod(MethodIntrospector.java:132)
	at org.springframework.aop.support.AopUtils.selectInvocableMethod(AopUtils.java:134)
	at org.springframework.context.event.EventListenerMethodProcessor.processBean(EventListenerMethodProcessor.java:177)
	at org.springframework.context.event.EventListenerMethodProcessor.afterSingletonsInstantiated(EventListenerMethodProcessor.java:133)
那是因为:你把@EventListener写在XXXImpl实现类里面了,形如这样:
@Slf4j
@Service
public class HelloServiceImpl implements HelloService {
	...
    private ApplicationContext applicationContext;
    @EventListener(classes = ContextRefreshedEvent.class)
    public void applicationContextEvent(ContextRefreshedEvent event) {
        applicationContext = event.getApplicationContext();
    }
    ...
}
根本原因:Spring在解析标注有此注解的方法的时候是这么解析的:
public class EventListenerMethodProcessor implements SmartInitializingSingleton, ApplicationContextAware, BeanFactoryPostProcessor {
    ...
    private void processBean(final String beanName, final Class<?> targetType) {
    	...
    		Method methodToUse = AopUtils.selectInvocableMethod(method, context.getType(beanName));
    	...
    }
    ...
}
这里的context.getType(beanName)就是问题的关键。因为Spring默认给我们使用的是JDK Proxy代理(此处只考虑被代理的情况),所以此处getType拿到的默认就是个Proxy,显然它是找不到我们对应方法的(因为方法在impl的实现类里,接口里可以没有)。
另外有一个小细节:标注有@EventListener注解(包括@TransactionalEventListener)的方法的访问权限最低是protected的。
另外可以在监听方法上标注@Order来控制执行顺序。
知道了原因,从来都不缺解决方案:
- 强制使用CGLIB动态代理机制
- 监听器(@EventListener)单独写在一个@Compnent里。当然你也可以使用内部类,如下也是ok的:
@Slf4j
@Service
public class HelloServiceImpl implements HelloService {
	...
	// 这里用private是木有关系的  需要注意的是若你使用内部类,建议务必是static的  否则可能报错如下:
	// Caused by: org.springframework.beans.factory.BeanNotOfRequiredTypeException: Bean named 'helloServiceImpl' is expected to be of type 'com.buqiong.service.HelloServiceImpl' but was actually of type 'com.sun.proxy.$Proxy35'
	// 因为static的类初始化不依赖于外部类,而非static得依赖外部类(所以若不是CGLIB代理  一样出问题)
    @Component
    private static class MyListener {
	    private ApplicationContext applicationContext;
        @EventListener(classes = ContextRefreshedEvent.class)
        public void applicationContextEvent(ContextRefreshedEvent event) {
            applicationContext = event.getApplicationContext();
        }
    }
	...
}
Spring事件机制原理分析
事件收集(EventListenerMethodProcessor)
Spring容器启动过程中:AnnotationConfigUtils.registerAnnotationConfigProcessors(context)注册的7大基础组件时,其中有一个是EventListenerMethodProcessor,它就是处理EventListener注解然后把它注册为一个特别的ApplicationListener的处理器。 当然还有一个EventListenerFactory(DefaultEventListenerFactory)。
// 它是一个SmartInitializingSingleton,所以他会在preInstantiateSingletons()的最后一步执行~~~
// 并且它还是实现了BeanFactoryPostProcessor,所以它需要实现方法`postProcessBeanFactory`
// @since 4.2
public class EventListenerMethodProcessor implements SmartInitializingSingleton, ApplicationContextAware {

    @Nullable
    private ConfigurableApplicationContext applicationContext;
    // 解析注解中的Conditon的
    private final EventExpressionEvaluator evaluator = new EventExpressionEvaluator();
    // 视图 这样set也变成线程安全的了
    private final Set<Class<?>> nonAnnotatedClasses = Collections.newSetFromMap(new ConcurrentHashMap<>(64));

    // 这个方法是BeanFactoryPostProcessor的方法,它在容器的BeanFactory准备完成后,会执行此后置处理器
    // 它的作用:BeanFactory工厂准备好后,就去找所有的EventListenerFactory  然后保存起来
    // 此处:默认情况下Spring在准备Bean工厂的时候,会给我们注册一个`DefaultEventListenerFactory`,
    //如果你使用了注解驱动的Spring事务如@EnableTransactionManagement,它就会额外再添加一个`TransactionalEventListenerFactory`
    // 他俩的实现都非常的简单,下面会简单的说一下~~~
    @Override
    public void postProcessBeanFactory(ConfigurableListableBeanFactory beanFactory) {
    	this.beanFactory = beanFactory;

    	Map<String, EventListenerFactory> beans = beanFactory.getBeansOfType(EventListenerFactory.class, false, false);
    	List<EventListenerFactory> factories = new ArrayList<>(beans.values());
    	// 会根据@Order进行排序~~~~
    	AnnotationAwareOrderComparator.sort(factories);
    	this.eventListenerFactories = factories;
    }
    @Override
    public void afterSingletonsInstantiated() {
    	// 从容器里获得所有的EventListenerFactory,它是用来后面处理标注了@EventListener方法的工厂(Spring默认放置的是DefaultEventListenerFactory,我们也可以继续放  支持@Order等注解)
    	List<EventListenerFactory> factories = getEventListenerFactories();
    	ConfigurableApplicationContext context = getApplicationContext();

    	// 这里厉害了,用Object.class 是拿出容器里面所有的Bean定义~~~  一个一个的检查
    	String[] beanNames = context.getBeanNamesForType(Object.class);
    	for (String beanName : beanNames) {
    		// 不处理Scope作用域代理的类。 和@Scope类似相关
    		if (!ScopedProxyUtils.isScopedTarget(beanName)) {
    			Class<?> type = null;
    			try {
    				// 防止是代理,吧真实的类型拿出来
    				type = AutoProxyUtils.determineTargetClass(context.getBeanFactory(), beanName);
    			}
    			if (type != null) {
    				// 对专门的作用域对象进行兼容~~~~(绝大部分都用不着)
    				if (ScopedObject.class.isAssignableFrom(type)) {
    					...
    				}

    				// 真正处理这个Bean里面的方法们。。。
    				processBean(factories, beanName, type);
    			}
    		}
    	}
    }
    protected void processBean(final List<EventListenerFactory> factories, final String beanName, final Class<?> targetType) {
    	// 缓存下没有被注解过的Class,这样再次解析此Class就不用再处理了
    	//这是为了加速父子容器的情况  做的特别优化
    	if (!this.nonAnnotatedClasses.contains(targetType)) {
    		Map<Method, EventListener> annotatedMethods = null;
    		try {
    			// 这可以说是核心方法,就是找到这个Class里面被标注此注解的Methods们
    			// 在讲述到反射专题的时候,这个方法已经分析过~
    			annotatedMethods = MethodIntrospector.selectMethods(targetType,
    					(MethodIntrospector.MetadataLookup<EventListener>) method ->
    							AnnotatedElementUtils.findMergedAnnotation(method, EventListener.class));
    		}
    		catch (Throwable ex) {
    			// An unresolvable type in a method signature, probably from a lazy bean - let's ignore it.
    			if (logger.isDebugEnabled()) {
    				logger.debug("Could not resolve methods for bean with name '" + beanName + "'", ex);
    			}
    		}
    		// 若一个都没找到,那就标注此类没有标注注解,那就标记一下此类  然后拉到算了  输出一句trace日志足矣
    		if (CollectionUtils.isEmpty(annotatedMethods)) {
    			this.nonAnnotatedClasses.add(targetType);
    			if (logger.isTraceEnabled()) {
    				logger.trace("No @EventListener annotations found on bean class: " + targetType.getName());
    			}
    		}
    		//若存在对应的@EventListener标注的方法,那就走这里
    		// 最终此Method是交给`EventListenerFactory`这个工厂,适配成一个ApplicationListener的
    		// 适配类为ApplicationListenerMethodAdapter,它也是个ApplicationListener
    		else {
    			// Non-empty set of methods
    			ConfigurableApplicationContext context = getApplicationContext();

    			// 处理这些带有@EventListener注解的方法们
    			for (Method method : annotatedMethods.keySet()) {

    				// 这里面注意:拿到每个EventListenerFactory (一般情况下只有DefaultEventListenerFactory,但是若是注解驱动的事务还会有它:TransactionalEventListenerFactory)
    				for (EventListenerFactory factory : factories) {

    					// 加工的工厂类也可能有多个,但默认只有Spring注册给我们的一个
    					// supportsMethod表示是否支持去处理此方法(因为我们可以定义处理器,只处理指定的Method都是欧克的)  Spring默认实现永远返回true(事务相关的除外,请注意工厂的顺序)
    					if (factory.supportsMethod(method)) {

    						// 简单的说,就是把这个方法弄成一个可以执行的方法(主要和访问权限有关)
    						// 这里注意:若你是JDK的代理类,请不要在实现类里书写@EventListener注解的监听器,否则会报错的。(CGLIB代理的木关系) 原因上面已经说明了
    						Method methodToUse = AopUtils.selectInvocableMethod(method, context.getType(beanName));
    						// 把这个方法包装成一个监听器ApplicationListener(ApplicationListenerMethodAdapter类型)
    						// 通过工厂创建出来的监听器  也给添加进context里面去~~~~~
    						ApplicationListener<?> applicationListener = factory.createApplicationListener(beanName, targetType, methodToUse);
    						if (applicationListener instanceof ApplicationListenerMethodAdapter) {
    							// 这个init方法是把ApplicationContext注入进去
    							((ApplicationListenerMethodAdapter) applicationListener).init(context, this.evaluator);
    						}

    						// 添加进去  管理起来
    						context.addApplicationListener(applicationListener);
    						// 这个break意思是:只要有一个工厂处理了这个方法,接下来的工厂就不需要再处理此方法了~~~~(所以工厂之间的排序也比较重要)
    						break;
    					}
    				}
    			}
    		}
    	}
    }
}
就是这样,最终我们所有的Listener都被管理了起来。
EventListenerFactory:为Method生产ApplicationListener
它是一个策略结果,准备为Method生产ApplicationListener,类似一个转换器的作用。
// @since 4.2
// Strategy interface for creating {@link ApplicationListener} for methods annotated with {@link EventListener}.
public interface EventListenerFactory {

    // 是否支持此方法 支持才create
    boolean supportsMethod(Method method);
    // 根据Method等相关信息,生成一个ApplicationListener
    ApplicationListener<?> createApplicationListener(String beanName, Class<?> type, Method method);

}
它的实现类常见的有两个:DefaultEventListenerFactory和TransactionalEventListenerFactory
它是在Bean工厂准备好后,默认都会注册的6大Bean之一~~~~~
public class DefaultEventListenerFactory implements EventListenerFactory, Ordered {

	// 它希望自己是被最后执行的~~~
	private int order = LOWEST_PRECEDENCE;
	public void setOrder(int order) {
		this.order = order;
	}
	@Override
	public int getOrder() {
		return this.order;
	}
	// 匹配所有的标注了@EventListener 的方法
	public boolean supportsMethod(Method method) {
		return true;
	}
	// ApplicationListenerMethodAdapter是一个通用的方法监听适配器~~~~
	@Override
	public ApplicationListener<?> createApplicationListener(String beanName, Class<?> type, Method method) {
		return new ApplicationListenerMethodAdapter(beanName, type, method);
	}

}
TransactionalEventListenerFactory
它是一个和注解驱动的声明式事务相关的监听器工厂。用于处理@TransactionalEventListener这个注解标注的方法
public class TransactionalEventListenerFactory implements EventListenerFactory, Ordered {

    private int order = 50;
    public void setOrder(int order) {
    	this.order = order;
    }
    @Override
    public int getOrder() {
    	return this.order;
    }

    // 很显然,它要求此方法必须标注@TransactionalEventListener这个注解
    // 备注:@TransactionalEventListener继承自@EventListener
    @Override
    public boolean supportsMethod(Method method) {
    	return AnnotatedElementUtils.hasAnnotation(method, TransactionalEventListener.class);
    }

	// ApplicationListenerMethodTransactionalAdapter这个是适配事务监听方法的适配器
	// 它继承自:ApplicationListenerMethodAdapter
	@Override
	public ApplicationListener<?> createApplicationListener(String beanName, Class<?> type, Method method) {
		return new ApplicationListenerMethodTransactionalAdapter(beanName, type, method);
	}

}
关于@EventListener中condition使用
我们先看@EventListener注解本身的定义:
// @since 4.2 只能标注在方法上  和当作元注解使用
@Target({ElementType.METHOD, ElementType.ANNOTATION_TYPE})
@Retention(RetentionPolicy.RUNTIME)
@Documented
public @interface EventListener {

    @AliasFor("classes")
    Class<?>[] value() default {};
    // 标注此方法需要处理的事件类型~~~
    @AliasFor("value")
    Class<?>[] classes() default {};

    ///这个条件大多数使用者都是默认的,毕竟绝大多数情况下都是不需要使用的~~~
    // 总体上,它是根据条件,判断此handler是否需要处理这事件  更加细粒度的控制  支持SpEL表达值
    // 内置的#root.event表示当前事件,#root.args当前方法的入参(数组形式)
    String condition() default "";
}
下面看看condition条件的生效时机。
首先当然是ApplicationListenerMethodAdapter:
/ @since 4.2  @EventListener最终都会适配成它
// GenericApplicationListener接口提供方法:boolean supportsEventType(ResolvableType eventType);
public class ApplicationListenerMethodAdapter implements GenericApplicationListener {

    // 事件表达式处理器  默认使用的SpEL去解析  只是对它进行了增强
    @Nullable
    private EventExpressionEvaluator evaluator;

    public ApplicationListenerMethodAdapter(String beanName, Class<?> targetClass, Method method) {
    	this.beanName = beanName;
    	this.method = BridgeMethodResolver.findBridgedMethod(method);
    	this.targetMethod = (!Proxy.isProxyClass(targetClass) ? AopUtils.getMostSpecificMethod(method, targetClass) : this.method);
    	this.methodKey = new AnnotatedElementKey(this.targetMethod, targetClass);

    	// 处理@EventListener注解信息  备注:至少指定一个监听类型
    	EventListener ann = AnnotatedElementUtils.findMergedAnnotation(this.targetMethod, EventListener.class);
    	// 按照上例 此处为org.springframework.context.event.ContextRefreshedEvent
    	this.declaredEventTypes = resolveDeclaredEventTypes(method, ann);
    	// 拿到条件信息  SpEL中有用
    	this.condition = (ann != null ? ann.condition() : null);
    	// 从此处也能看出,它是支持在方法上标注@Order来控制执行顺序的
    	this.order = resolveOrder(this.targetMethod);
    }


    // 判断该处理器  是否支持当前类型的事件
    // 判断思路很简单:类型匹配上了 就表示可以处理这个事件(支持事件的泛型依赖匹配~~~)
    // 关于condition 是在process处理的时候会生效的
    @Override
    public boolean supportsEventType(ResolvableType eventType) {
    	for (ResolvableType declaredEventType : this.declaredEventTypes) {
    		if (declaredEventType.isAssignableFrom(eventType)) {
    			return true;
    		}
    		if (PayloadApplicationEvent.class.isAssignableFrom(eventType.toClass())) {
    			ResolvableType payloadType = eventType.as(PayloadApplicationEvent.class).getGeneric();
    			if (declaredEventType.isAssignableFrom(payloadType)) {
    				return true;
    			}
    		}
    	}
    	return eventType.hasUnresolvableGenerics();
    }

    // 开始处理事件~~~  此处会checking if the condition match and handling non-null result
    @Override
    public void onApplicationEvent(ApplicationEvent event) {
    	processEvent(event);
    }
    public void processEvent(ApplicationEvent event) {
    	// 解析参数,很简单  主要是兼容PayloadApplicationEvent 把事件拿出来
    	// 返回的数组要么为[],总之最多只有一个参数  就是事件本身
    	Object[] args = resolveArguments(event);

    	//  此处是我们本文的重点,就是解析condition 条件的地方,下面专门讨论,现在继续往下走
    	// 总之就是根据事件源、绝大多数情况下args里面装的就是这个event~~~~~
    	if (shouldHandle(event, args)) {
    		Object result = doInvoke(args); // 这一句非常的简单  就是调用此方法Method~


    		// 这一步就是@EventListener最大的优势。如果它的返回值不为null,那么它可以行使事件链,可以继续发布事件
    		// 把返回值当作事件继续publish(返回值可以是个Object,最终被包装成payload事件~~~~)
    		if (result != null) {
    			handleResult(result);
    		} else {
    			logger.trace("No result object given - no result to handle");
    		}
    	}
    }
}
从源码处可知,真正执行的时候,还要经过condition这一关:下面作为本处的重点,重点分析一下此方法:
private boolean shouldHandle(ApplicationEvent event, @Nullable Object[] args) {
    if (args == null) {
    	return false;
    }
    String condition = getCondition();
    // condition默认是空串  只有配置了才会去执行~~~  是用的解析器是EventExpressionEvaluator
    if (StringUtils.hasText(condition)) {
    	Assert.notNull(this.evaluator, "EventExpressionEvaluator must not be null");
    	// 最终委托给EventExpressionEvaluator去解析
    	// 备注EventExpressionEvaluator是个内部使用的类,只有此处解析用到了~~~
    	return this.evaluator.condition(condition, event, this.targetMethod, this.methodKey, args, this.applicationContext);
    }
    return true;
}
EventExpressionEvaluator:表达式执行器
它是处理SpEL表达式解析的实用程序类。用于可重用、线程安全的组件。
// @since 4.2   CachedExpressionEvaluator也是4.2出来的,提供了缓存的能力,并且内部使用SpEL来解析表达式~~~
class EventExpressionEvaluator extends CachedExpressionEvaluator {

    // ExpressionKey为CachedExpressionEvaluator的一个吧内部类
    // Expression为:org.springframework.expression.Expression 表达式
    private final Map<ExpressionKey, Expression> conditionCache = new ConcurrentHashMap<>(64);
    // 它只有这个一个方法~~~
    public boolean condition(String conditionExpression, ApplicationEvent event, Method targetMethod,
    		AnnotatedElementKey methodKey, Object[] args, @Nullable BeanFactory beanFactory) {
    	// EventExpressionRootObject就是简单的持有传入的两个变量的引用而已~~~
    	// 这个RootObject是我们#root值的来源~~~~
    	EventExpressionRootObject root = new EventExpressionRootObject(event, args);
    	// 准备一个执行上下文。关于SpEL的执行上文,请参照下面的链接
    	// 这个执行上下文是处理此问题的重中之重~~~~下面会有解释
    	// getParameterNameDiscoverer 它能够根据方法参数列表的名称取值~~~强大
    	// 同时也支持a0、a1... 和 p0、p1...等等都直接取值~~这个下面会为何会支持得这么强大的原因~~~
    	MethodBasedEvaluationContext evaluationContext = new MethodBasedEvaluationContext(root, targetMethod, args, getParameterNameDiscoverer());
    	if (beanFactory != null) {
    		evaluationContext.setBeanResolver(new BeanFactoryResolver(beanFactory));
    	}
    	// 可以看到  请让表达式的值返回bool值~~~~~~~
    	// getExpression是父类的~  最终有用的就一句话:expr = getParser().parseExpression(expression);
    	// 默认采用的是SpelExpressionParser这个解析器解析这个表达式
    	return (Boolean.TRUE.equals(getExpression(this.conditionCache, methodKey, conditionExpression).getValue(
    			evaluationContext, Boolean.class)));
    }

}
MethodBasedEvaluationContext :执行器的执行上下文
它是个SpEL中的EvaluationContext。这里最重要的是MethodBasedEvaluationContext这个执行上下文,其实也比较简单。比较有意思的一点是它支持取值除了#root.xxx方式,还支持有a0、a1... 和 p0、p1...等方式
// @since 4.2
public class MethodBasedEvaluationContext extends StandardEvaluationContext {
    ...
    private final Object[] arguments;
    private final ParameterNameDiscoverer parameterNameDiscoverer;

    // .... 这里是按照变量名或者a0这种方式取值的核心处理~~~~
    protected void lazyLoadArguments() {
    	// 支持根据参数名取值
    	String[] paramNames = this.parameterNameDiscoverer.getParameterNames(this.method);
    	...
    	// variables是个Map<String, Object> variables
    	for (int i = 0; i < paramCount; i++) {
    		// 支持a0、a1..方式取值
    		setVariable("a" + i, value);
    		// 支持p0、p1..方式取值
    		setVariable("p" + i, value);
    		// 根据参数列表的形参名字进行取值   如id、name或者obj对象都是ok的(如果是对象,也是支持Bean导航的,因为SpEL是支持的)
    		if (paramNames != null && paramNames[i] != null) {
    			setVariable(paramNames[i], value);
    		}
    	}
    }
}
处理Event的执行上下文是MethodBasedEvaluationContext,支持cache相关注解使用的上下文是CacheEvaluationContext。
由于CacheEvaluationContext是MethodBasedEvaluationContext的子类,所以我们cache相关注解比如@Cacheable等等,它们使用SpEL时也都是支持使用上面方式取值的~~~~
关于cache注解的表达式执行器请参考:org.springframework.cache.interceptor.CacheOperationExpressionEvaluator
事件发布(SimpleApplicationEventMulticaster)
我们一般都会使用AbstractApplicationContext#publish()来发布一个事件:
protected void publishEvent(Object event, @Nullable ResolvableType eventType) {
    // Decorate event as an ApplicationEvent if necessary
    // 如果这个事件不是ApplicationEvent类型,那就包装成这个类型
    ApplicationEvent applicationEvent;
    if (event instanceof ApplicationEvent) {
    	applicationEvent = (ApplicationEvent) event;
    } else {
    	// 注意此处:第一个参数为source,这里传的source,第二个是payload,才传的是事件本身
    	applicationEvent = new PayloadApplicationEvent<>(this, event);

    	// 若没有指定类型。就交给PayloadApplicationEvent<T>,它会根据泛型类型生成出来的~~~
    	if (eventType == null) {
    		eventType = ((PayloadApplicationEvent) applicationEvent).getResolvableType();
    	}
    }

    // Multicast right now if possible - or lazily once the multicaster is initialized
    // 如果是早期事件,就添加进去  会立马发布了(一般都不属于这种)
    if (this.earlyApplicationEvents != null) {
    	this.earlyApplicationEvents.add(applicationEvent);
    } else {
    	// 最终把这些时间都委派给了`ApplicationEventMulticaster` 让它去发送事件
    	getApplicationEventMulticaster().multicastEvent(applicationEvent, eventType);
    }
    // Publish event via parent context as well...
    // 此处注意:特别重要,如果是父容器,也会向父容器里广播一份~~~~~
    if (this.parent != null) {
    	// 这个判断的用意是,既然eventType已经解析出来了,所以就调用protected内部方法即可,而不用再次解析一遍了
    	if (this.parent instanceof AbstractApplicationContext) {
    		((AbstractApplicationContext) this.parent).publishEvent(event, eventType);
    	}
    	// 如果是普通的发布,就没有eventType了
    	else {
    		this.parent.publishEvent(event);
    	}
    }
}
最后事件都会向父类里广播一份。
因此重点看看ApplicationEventMulticaster#multicastEvent:它的唯一实现为:
public class SimpleApplicationEventMulticaster extends AbstractApplicationEventMulticaster {

    // 若set了一个执行器,那所有的监听器都将会异步执行
    @Nullable
    private Executor taskExecutor;
    // 监听者执行失败的回调~~~~~~(比如做回滚等等)
    @Nullable
    private ErrorHandler errorHandler;
    @Override
    public void multicastEvent(final ApplicationEvent event, @Nullable ResolvableType eventType) {
    	ResolvableType type = (eventType != null ? eventType : resolveDefaultEventType(event));
    	// 这里面有个细节:如果有执行器executor ,那就会扔给线程池异步去执行
    	// 默认情况下是没有的(Spring默认情况下同步执行这些监听器的)  我们可以调用set方法配置一个执行器(建议)
    	for (final ApplicationListener<?> listener : getApplicationListeners(event, type)) {
    		Executor executor = getTaskExecutor();
    		// 放在线程池里执行,相当于异步执行。绝大多数情况下,这里都是null
    		if (executor != null) {
    			executor.execute(() -> invokeListener(listener, event));
    		} else {
    			invokeListener(listener, event);
    		}
    	}
    }

    private void doInvokeListener(ApplicationListener listener, ApplicationEvent event) {
        try {
            // 如果是实现了ApplicationListener接口,则直接调用其中的onApplicationEvent()方法;
            //如果是用@EventListener注释,则调用ApplicationListenerMethodAdapter中的onApplicationEvent()方法
            listener.onApplicationEvent(event);
        }
    }
}
ApplicationListenerMethodAdapter#onApplicationEvent
@Override
public void onApplicationEvent(ApplicationEvent event) {
    processEvent(event);
}
public void processEvent(ApplicationEvent event) {
    // 获取参数,最终会交给回调的方法的。事件类型是PayloadApplicationEvent,那就把.getPayload(),否则就是event本身喽
    Object[] args = resolveArguments(event);
    // 解析condition表达式(注意,此处把args传进去了) 因此我们表达式里是可以用这个参数的哦
    if (shouldHandle(event, args)) {

    	// 就是执行目标方法,我们一般返回值都是void,所以就是null
    	// 但是,但是,但是注意了,此处若返回的不是null,还有处理~~~~非常给力:
    	Object result = doInvoke(args);
    	if (result != null) {

    		// 如果返回值是数组或者Collection,会把里面内容当作事件循环publishEvent
    		// 如果就是个POJO,那就直接publish
    		// 事件的传递性 就这么的来了,强大啊
    		handleResult(result);
    	}
    	else {
    		logger.trace("No result object given - no result to handle");
    	}
    }
}
Spring的使用@EventListener监听事件。若监听方法有返回值,那将会把这个返回值当作事件源,一直发送下去,直到返回void或者null停止。
@EventListener(value = {ContextRefreshedEvent.class})
public List<Child> handle(Object o) {
    List<Child> childList = new ArrayList<>();
    childList.add(new Child("1"));
    childList.add(new Child("2"));
    return childList;
}

// 因为上个方法有返回  所以事件会传递到此处
@EventListener(Child.class)
public void handChild(Child c) {
    System.out.println(c.getName() + " 发来了事件");
}

//输出:
//1 发来了事件
//2 发来了事件
这里,抽象父类AbstractApplicationEventMulticaster内部的一些方法是不容忽视的:比如getApplicationListeners:获取对应的监听者
AbstractApplicationEventMulticaster 时间发布器的抽象实现
它是对事件发布器的抽象实现,如果你自己想自定义一个时间发布器,可以继承它
// @since 1.2.3
// 提供基本的侦听器注册功能   比如处理代理对象类型~~~
public abstract class AbstractApplicationEventMulticaster
		implements ApplicationEventMulticaster, BeanClassLoaderAware, BeanFactoryAware {

    // Retriever:猎犬
    // 它是一个内部类,内部持有applicationListeners和applicationListenerBeans的引用
    // 是一个类似包装的类,详细可参加下面具体分析
    private final ListenerRetriever defaultRetriever = new ListenerRetriever(false);

    // 显然它是一个缓存:key由eventType, sourceType唯一确定~
    final Map<ListenerCacheKey, ListenerRetriever> retrieverCache = new ConcurrentHashMap<>(64);
    // retrieval的互斥锁
    private Object retrievalMutex = this.defaultRetriever;

    @Override
    public void setBeanFactory(BeanFactory beanFactory) {
    	this.beanFactory = beanFactory;
    	if (beanFactory instanceof ConfigurableBeanFactory) {
    		ConfigurableBeanFactory cbf = (ConfigurableBeanFactory) beanFactory;
    		if (this.beanClassLoader == null) {
    			this.beanClassLoader = cbf.getBeanClassLoader();
    		}
    		// 互斥锁 用容器里面的互斥锁
    		this.retrievalMutex = cbf.getSingletonMutex();
    	}
    }

    // 向容器内注册一个监听器~~~~
    // 需要注意的是,添加进来的监听器都是保存到defaultRetriever里面的
    // 最后getApplicationListeners就是从这里拿的(注册进来多少  最终返回多少~~~)
    @Override
    public void addApplicationListener(ApplicationListener<?> listener) {
    	synchronized (this.retrievalMutex) {
    		// 这一步:若类型是SingletonTargetSource也给拿出来~~~
    		// 如果不是被代理的对象Advised,那就返回null
    		Object singletonTarget = AopProxyUtils.getSingletonTarget(listener);
    		if (singletonTarget instanceof ApplicationListener) {
    			// 从默认的持有的applicationListeners里把它移除~~
    			// 下面一句肯定又是会添加进来的,所以可议保证它在顶部~~~
    			this.defaultRetriever.applicationListeners.remove(singletonTarget);
    		}

    		this.defaultRetriever.applicationListeners.add(listener);
    		// 没加一个进来  都清空了缓存~~~~~~~~~~~~~~~~
    		this.retrieverCache.clear();
    	}
    }

    // 同样的 根据名称添加一个监听器也是可以的
    @Override
    public void addApplicationListenerBean(String listenerBeanName) {
    	synchronized (this.retrievalMutex) {
    		this.defaultRetriever.applicationListenerBeans.add(listenerBeanName);
    		this.retrieverCache.clear();
    	}
    }
    ...// remove方法类似

    // 如果不传参数,那就是返回defaultRetriever这个里面的值即可~
    protected Collection<ApplicationListener<?>> getApplicationListeners() {
    	synchronized (this.retrievalMutex) {
    		return this.defaultRetriever.getApplicationListeners();
    	}
    }

    // 如果指定了event事件和eventType,那就这个方法   绝大多数情况下都是这里~~~
    // 获取该事件对应的监听者:相当于只会获取supportsEvent() = true支持的这种事件~
    protected Collection<ApplicationListener<?>> getApplicationListeners(ApplicationEvent event, ResolvableType eventType) {

    	Object source = event.getSource();
    	Class<?> sourceType = (source != null ? source.getClass() : null);
    	// 这个key是它俩共同决定的~~~~
    	ListenerCacheKey cacheKey = new ListenerCacheKey(eventType, sourceType);

    	// Quick check for existing entry on ConcurrentHashMap...
    	// 缓存里若存在  直接返回即可~~~~
    	ListenerRetriever retriever = this.retrieverCache.get(cacheKey);
    	if (retriever != null) {
    		return retriever.getApplicationListeners();
    	}


    	// 这里面~~~ 有个缓存安全的特殊处理,其最为核心的方法,其实还是retrieveApplicationListeners
    	// 若是缓存安全的,才会缓存它  否则直接return即可~~~~
    	// 什么叫缓存安全isCacheSafe:原理很简单,就是判断该类型是否在指定classloader或者其parent classloader中
    	if (this.beanClassLoader == null || (ClassUtils.isCacheSafe(event.getClass(), this.beanClassLoader) &&
    					(sourceType == null || ClassUtils.isCacheSafe(sourceType, this.beanClassLoader)))) {
    		// Fully synchronized building and caching of a ListenerRetriever
    		synchronized (this.retrievalMutex) {
    			retriever = this.retrieverCache.get(cacheKey);
    			if (retriever != null) {
    				return retriever.getApplicationListeners();
    			}
    			retriever = new ListenerRetriever(true);
    			// 需要缓存起来,所以才需要把retriever传过去,否则传null即可~(下面传的null)
    			Collection<ApplicationListener<?>> listeners = retrieveApplicationListeners(eventType, sourceType, retriever);

    			// 每个事件对应的Listener,都缓存在此处了~(注意:首次get的才给与缓存)
    			// 因为有的是个体的beanName,有的是给的Bean,所以首次去拿时候缓存吧~~~
    			this.retrieverCache.put(cacheKey, retriever);
    			return listeners;
    		}
    	} else {
    		// No ListenerRetriever caching -> no synchronization necessary
    		return retrieveApplicationListeners(eventType, sourceType, null);
    	}
    }

    // 关于`retrieveApplicationListeners`方法,它就是从defaultRetriever把applicationListeners和beanNames都拿出来合并了
    // 摒弃萃取出supportsEvent() 只支持这种类型的事件~
    // 最终它还`AnnotationAwareOrderComparator.sort(allListeners);`,证明监听器是支持排序接口的~

}
这就是我们getApplicationListeners的具体内容,我们发现:它只会拿注册到本容器的监听器(注册在谁身上就是谁的~~~),并不会去父类的拿的,所以这点一定要注意,你自己写监听器的时候也是需要注意这一点的,避免一些重复执行吧~~~
@EventListener使用中的小细节
- @EventListener注解用在接口或者父类上都是没有任何问题的(这样子类就不用再写了,在接口层进行控制)
- @EventListener标注的方法,无视访问权限
- AbstractApplicationEventMulticaster的相关方法比如addApplicationListenerBean、removeApplicationListener......都是线程安全的。
- 若想要异步执行事件,请自己配置@Bean这个Bean。然后setTaskExecutor()一个进去
需要注意的是,若你注册在接口上,请保证你使用的是JDK的动态代理机制,否则可能导致问题,一般并不建议这么干(虽然可以这么干)
@Component
public class MyAllEventListener implements MyAllEventListenerInterface {
    @Override
    public void handChild(Child c) {
        System.out.println(c.getName() + " 发来了事件");
    }
}

// 注解写在接口上,也是能正常work的~~~
interface MyAllEventListenerInterface {
    @EventListener(Child.class)
    void handChild(Child c);
}
ApplicationListener和@EventListener的区别
@EventListener存在漏事件的现象,但是ApplicationListener能监听到所有的相关事件
上面这句话怎么理解呢?这个和ApplicationListener什么时候注册有关。上面已经讲述了AbstractApplicationEventMulticaster是怎么获取到当前的所有的监听器的,那么它们的区别就在于:它俩注册的时机不一样(此处统一不考虑手动注册时间的情况)
ApplicationListener的注册时机
它是靠一个后置处理器:ApplicationListenerDetector它来处理的。它有两个方法处理:
// @since 4.3.4 出现得还是比较晚的~~~
class ApplicationListenerDetector implements DestructionAwareBeanPostProcessor, MergedBeanDefinitionPostProcessor {
    ...
    // 这个方法会在merge Bean的定义信息时候执行,缓存下该Bean是否是单例Bean
    // 因为后面注册的时候:只有单例Bean才给注册为监听器~~~
    @Override
    public void postProcessMergedBeanDefinition(RootBeanDefinition beanDefinition, Class<?> beanType, String beanName) {
    	if (this.applicationContext != null) {
    		this.singletonNames.put(beanName, beanDefinition.isSingleton());
    	}
    }
    ...
    @Override
    public Object postProcessAfterInitialization(Object bean, String beanName) {
    	if (this.applicationContext != null && bean instanceof ApplicationListener) {
    		// 显然  只有单例Bean才会add进去  注册进去
    		if (Boolean.TRUE.equals(flag)) {
    			this.applicationContext.addApplicationListener((ApplicationListener<?>) bean);
    		} else if (Boolean.FALSE.equals(flag)) {
    			// 输出一个warn日志:
    			if (logger.isWarnEnabled() && !this.applicationContext.containsBean(beanName)) {
    				// 提示用户这个Bean实现了ApplicationListener  但是并不是单例的
    				logger.warn("...");
    			}
    			// 不是单例的就从缓存移除吧~~~~
    			this.singletonNames.remove(beanName);
    		}
    	}
    	return bean;
    }
    ...
}
因为它是以Bean定义的形式注册进工厂的,并且refresh()中有一步registerListeners()它负责注册所有的监听器(Bean形式的),然后才是finishBeanFactoryInitialization(beanFactory),所以它是不会落掉事件的。
@EventListener的注册时机
注册它的是EventListenerMethodProcessor,它是一个SmartInitializingSingleton,它一直到preInstantiateSingletons()所有的单例Bean全部实例化完成了之后,它才被统一注册进去。所以它注册的时机是挺晚的。
由此知道,如果你在普通的单例Bean初始化期间(比如给属性赋值时、构造函数内......)发出了一个事件,@EventListener这种方式的监听器很有可能是监听不到的。
比如我遇到的一个例子:
@RestController
public class xxxController {
	...
	// 此处它是一个@FeignClient,所以在初始化xxxController 的时候肯定会顺带初始化`StaffClient`
    @Autowired
    private StaffClient staffClient;
}
如上,StaffClient这个@FeignClient会创建出一个Feign的子容器(它的父容器为boot容器),而此时我们的监听器为:
@Component
public class MyListener {

    @EventListener(classes = ContextRefreshedEvent.class)
    public void list1(ContextRefreshedEvent event) {
        ApplicationContext applicationContext = event.getApplicationContext();
        int beanDefinitionCount = applicationContext.getBeanDefinitionCount();
        System.out.println("当前容器的Bean总数:" + beanDefinitionCount);

    }
}
因为它是@EventListener,且MyListener这个Bean是交给SpringBoot容器管理的,而feign子容器创建的时候,其实还处于Boot容器流程的内部,所以此时@EventListener肯定是没有注册上的,因此此方法代表的监听器就不会生效了。
其实绝大多数情况下我们都可议采用@EventListener去监听事件,一般使用ApplicationListener的时候,大都只需要监听本容器发出的事件,比如我们监听ContextRefreshedEvent很多时候都会加上这么一句:
@Component
public class MyListener implements ApplicationListener<ContextRefreshedEvent> {
    @Autowired
    private ApplicationContext applicationContext;

    @Override
    public void onApplicationEvent(ContextRefreshedEvent event) {
    	// 相当于只监听本容器发出来的事件,别的容器的我不管~~~~~~~
        if (applicationContext == event.getApplicationContext()) {
			...
        }
    }
}
@EventListener注册不上去的小坑
上面说了,它的注册依赖于EventListenerMethodProcessor,它的执行是发生在容器对所有的单例Bean已经全部完成初始化了~比如我们这样介入一下:
@Component
public class MyBeanFactoryPostProcessor implements BeanFactoryPostProcessor {

    @Override
    public void postProcessBeanFactory(ConfigurableListableBeanFactory beanFactory) throws BeansException {
        for (String beanDefinitionName : beanFactory.getBeanDefinitionNames()) {
            // 让EventListenerMethodProcessor惰性加载~~~~
            if (beanDefinitionName.equals(AnnotationConfigUtils.EVENT_LISTENER_PROCESSOR_BEAN_NAME)) {
                beanFactory.getBeanDefinition(beanDefinitionName).setLazyInit(true);
            }
        }
    }
}
这样容器完成所有的单例实例化步骤后,其实EventListenerMethodProcessor这个Bean并没有完成真正的实例化的。而beanFactory.preInstantiateSingletons()方法最后一步为:
public void preInstantiateSingletons() throws BeansException {
    //...
    // Trigger post-initialization callback for all applicable beans...
    // 执行所有的SmartInitializingSingleton  这里面最为核心的就在于~~~~
    // getSingleton(beanName)这个方法,是直接去Map里找,只有被实例化的的单例Bean才会返回true,否则是false
    // 不知为何Spring此处不用getBean()   我个人认为  这是Spring为了提高速度的一个疏忽吧~~~~~
    for (String beanName : beanNames) {
        Object singletonInstance = getSingleton(beanName);
        if (singletonInstance instanceof SmartInitializingSingleton) {
            final SmartInitializingSingleton smartSingleton = (SmartInitializingSingleton) singletonInstance;
            if (System.getSecurityManager() != null) {
                AccessController.doPrivileged(new PrivilegedAction<Object>() {
                    @Override
                    public Object run() {
                        smartSingleton.afterSingletonsInstantiated();
                        return null;
                    }
                }, getAccessControlContext());
            }
            else {
                smartSingleton.afterSingletonsInstantiated();
            }
        }
    }
}
如上:getSingleton方法是直接去DefaultSingletonBeanRegistry的Map<String, Object> singletonObjects里找的(含singletonFactories)。显然EventListenerMethodProcessor因为是Lazy加载,所以目前还仅仅是Bean的定义信息,所以就不会检测@EventListener的方法,因此它就不生效了。
这是一个坑,当然一般情况下我们不会这么做,但是若真的出现了此情况(比如我们希望提高启动速度,全局惰性加载就会有问题了),希望可以快速定位到原因
各大模式大比拼
- 观察者模式:它是设计模式里的一个术语。是一个非常经典的行为型设计模式。。猫叫了,主人醒了,老鼠跑了,这一经典的例子,是事件驱动模型在设计层面的体现。
- 发布订阅模式:很多人认为等同于观察者模式。但我的理解是两者唯一区别,是发布订阅模式需要有一个调度中心,而观察者模式不需要(观察者的列表可以直接由被观察者维护)。 但它俩混用没问题,一般都不会在表达上有歧义
- 消息队列MQ:中间件级别的消息队列(ActiveMQ,RabbitMQ),可以认为是发布订阅模式的一个具体体现
事件驱动->发布订阅->MQ,从抽象到具体。 因此MQ算是一个落地的产品了
- EventSourcing:这个要关联到领域驱动设计。DDD对事件驱动也是非常地青睐,领域对象的状态完全是由事件驱动来控制。比如有著名的CQRS架构~~~
CQRS架构和微服务的关系:微服务的目的是为了从业务角度拆分(职责分离)当前业务领域的不同业务模块到不同的服务,每个微服务之间的数据完全独立,它们之间的交互可以通过SOA RPC调用(耦合比较高),也可以通过EDA 消息驱动(耦合比较低,比如我们常用的分布式产品:MQ)。
| 参考: |


 88
88

 被折叠的 条评论
为什么被折叠?
被折叠的 条评论
为什么被折叠?
 到【灌水乐园】发言


