


在高并发场景下,锁是必不可少的存在,可以避免脏读的发生,现在定义一个场景来模拟高并发场景下有什么问题。
场景:用户下单,每下一次单就把库存数减一。
步骤一,创建springboot项目distributed_lock_redis
步骤二,引入依赖
<groupId>curise.distributed.actualize</groupId>
    <artifactId>lock_redis</artifactId>
    <version>1.0-SNAPSHOT</version>
    <description>基于redis实现分布式锁</description>
    <packaging>jar</packaging>
    <parent>
        <groupId>org.springframework.boot</groupId>
        <artifactId>spring-boot-starter-parent</artifactId>
        <version>2.0.2.RELEASE</version>
        <relativePath/>
    </parent>
    <properties>
        <project.build.sourceEncoding>UTF-8</project.build.sourceEncoding>
        <project.reporting.outputEncoding>UTF-8</project.reporting.outputEncoding>
        <java.version>1.8</java.version>
    </properties>

    <dependencies>
        <dependency>
            <groupId>org.springframework.boot</groupId>
            <artifactId>spring-boot-starter</artifactId>
        </dependency>
        <dependency>
            <groupId>org.springframework.boot</groupId>
            <artifactId>spring-boot-starter-test</artifactId>
            <scope>test</scope>
        </dependency>

        <dependency>
            <groupId>org.springframework.boot</groupId>
            <artifactId>spring-boot-starter-redis</artifactId>
            <version>1.4.7.RELEASE</version>
        </dependency>

        <dependency>
            <groupId>org.springframework.boot</groupId>
            <artifactId>spring-boot-starter-web</artifactId>
        </dependency>

    </dependencies>

    <build>
        <plugins>
            <plugin>
                <groupId>org.springframework.boot</groupId>
                <artifactId>spring-boot-maven-plugin</artifactId>
            </plugin>
        </plugins>
    </build>
步骤三,创建配置文件application.yml、application-dev.yml、application-prob.yml,分别作如下配置
spring:
  profiles:
    active: dev
server:
port: 8084
spring:
redis:
host: 192.168.0.117
password: 123456
port: 6379
database: 0
jedis:
pool:
max-idle: 8
min-idle: 0
max-active: 8server:
port: 8085
spring:
redis:
host: 192.168.0.117
password: 123456
port: 6379
database: 0
jedis:
pool:
max-idle: 8
min-idle: 0
max-active: 8其中application-dev.yml、application-prob.yml只是端口不一致。
第四步,创建应用主类Application
@SpringBootApplication
public class Application {

    public static void main(String[] args) {
        SpringApplication.run(Application.class, args);
    }


}
第五步, 创建RedisConfiguration配置类
import com.fasterxml.jackson.annotation.JsonAutoDetect;
import com.fasterxml.jackson.annotation.PropertyAccessor;
import com.fasterxml.jackson.databind.ObjectMapper;
import org.springframework.beans.factory.annotation.Qualifier;
import org.springframework.beans.factory.annotation.Value;
import org.springframework.context.annotation.Bean;
import org.springframework.context.annotation.Configuration;
import org.springframework.context.annotation.Primary;
import org.springframework.data.redis.connection.RedisConnectionFactory;
import org.springframework.data.redis.connection.RedisPassword;
import org.springframework.data.redis.connection.RedisStandaloneConfiguration;
import org.springframework.data.redis.connection.jedis.JedisConnectionFactory;
import org.springframework.data.redis.core.RedisTemplate;
import org.springframework.data.redis.core.StringRedisTemplate;
import org.springframework.data.redis.serializer.Jackson2JsonRedisSerializer;
import org.springframework.data.redis.serializer.RedisSerializer;
import org.springframework.data.redis.serializer.StringRedisSerializer;

@Configuration
public class RedisConfiguration {
    @Value("${spring.redis.host}")
    private String redisHost;

    @Value("${spring.redis.port}")
    private int redisPort;

    @Value("${spring.redis.password}")
    private String redisPassword;

    @Value("${spring.redis.database}")
    private int redisDatabase;


    @Primary
    @Bean(name = "redisConnectionFactory")
    public RedisConnectionFactory redisConnectionFactory() {
        RedisStandaloneConfiguration redisStandaloneConfiguration = new RedisStandaloneConfiguration(redisHost, redisPort);
        redisStandaloneConfiguration.setDatabase(redisDatabase);
        redisStandaloneConfiguration.setPassword(RedisPassword.of(redisPassword));
        return new JedisConnectionFactory(redisStandaloneConfiguration);
    }

    @SuppressWarnings("rawtypes")
    @Bean(name = "redisTemplate")
    public RedisTemplate redisTemplate(@Qualifier("redisConnectionFactory") RedisConnectionFactory cf) {
        RedisTemplate redisTemplate = new RedisTemplate();
        redisTemplate.setConnectionFactory(cf);
        setSerializer(redisTemplate);
        return redisTemplate;
    }

    @Bean(name = "stringRedisTemplate")
    public StringRedisTemplate stringRedisTemplate(@Qualifier("redisConnectionFactory") RedisConnectionFactory cf) {
        StringRedisTemplate stringRedisTemplate = new StringRedisTemplate();
        stringRedisTemplate.setConnectionFactory(cf);
        setStringSerializer(stringRedisTemplate);
        return stringRedisTemplate;
    }

    @SuppressWarnings("rawtypes")
    private void setSerializer(RedisTemplate template) {
        // 使用Jackson2JsonRedisSerialize 替换默认序列化
        Jackson2JsonRedisSerializer jackson2JsonRedisSerializer = new Jackson2JsonRedisSerializer(Object.class);
        ObjectMapper objectMapper = new ObjectMapper();
        objectMapper.setVisibility(PropertyAccessor.ALL, JsonAutoDetect.Visibility.ANY);
        objectMapper.enableDefaultTyping(ObjectMapper.DefaultTyping.NON_FINAL);
        jackson2JsonRedisSerializer.setObjectMapper(objectMapper);
        // 设置value的序列化规则和 key的序列化规则
        template.setValueSerializer(jackson2JsonRedisSerializer);
        template.setKeySerializer(new StringRedisSerializer());
        template.setHashKeySerializer(jackson2JsonRedisSerializer);
        template.setHashValueSerializer(jackson2JsonRedisSerializer);
        template.setDefaultSerializer(jackson2JsonRedisSerializer);
        template.setEnableDefaultSerializer(true);
        template.afterPropertiesSet();
    }

    @SuppressWarnings("rawtypes")
    private void setStringSerializer(RedisTemplate<String, String> template) {
        RedisSerializer stringRedisSerializer = new StringRedisSerializer();
        template.setDefaultSerializer(stringRedisSerializer);
        template.setKeySerializer(stringRedisSerializer);
        template.setValueSerializer(stringRedisSerializer);
        template.setHashKeySerializer(stringRedisSerializer);
        template.setHashValueSerializer(stringRedisSerializer);
    }
}
第六步,创建StockController,并提供order方法实现减库存的逻辑
@RestController
public class StockController {

    @Autowired
    private RedisTemplate redisTemplate;

    /**
     * 模拟下单减库存操作
     * 1.存在高并发问题
     *
     * @return
     */
    @GetMapping("order")
    public String order() {

        ValueOperations<String, Integer> redis = redisTemplate.opsForValue();

        String key = "stock";

        Integer stock = redis.get(key);

        if (stock > 0) {
            System.out.println("当前库存:" + stock);
            stock = stock - 1;
            redis.set(key, stock);
        } else {
            System.out.println("库存不足");
        }
        return "end";
    }
}
第七步,在redis-cli 执行命令 set stock 100
127.0.0.1:6379> set stock 100
OK
127.0.0.1:6379> get stock
"100"
127.0.0.1:6379>
第八步,启动应用
第九步,使用JMeter压测工具测试
JMeter下载地址:http://jmeter.apache.org/download_jmeter.cgi
直接双击解压后bin目录下的jar文件启动JMeter

第十步,配置请求
测试计划——》添加——》线程(用户)——》setUp线程组


线程数:20
Ramp-Up时间:0
循环次数:2
表示在同一时间发送启动20个线程发起请求,一共循环两次发送,即一共40个请求

set-Up线程组——》添加取样器——》HTTP请求


set-Up线程组——》添加——》监听器——》聚合报告
点击启动按钮发送请求

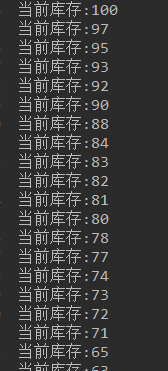
查看控制台打印

如上图,出现了脏读问题,因为不是同步执行,导致多个线程可能获取同样的库存数
如何解决这个问题?
在单机部署环境下,使用synchronized是最简单的方式,改一下order方法
@GetMapping("order")
public String order() {

    ValueOperations<String, Integer> redis = redisTemplate.opsForValue();

    String key = "stock";
    synchronized (this) {
        Integer stock = redis.get(key);
        if (stock > 0) {
             System.out.println("当前库存:" + stock);
             stock = stock - 1;
             redis.set(key, stock);
        } else {
             System.out.println("库存不足");
        }
    }
    return "end";
}
使用JMeter重新测试

没有出现高并发问题。
但是如果在分布式环境下这样还会有用吗,比如有个nginx作负载均衡服务器,将order请求以轮询的方式发送到8084端口和8085端口,这个时候还是会有高并发问题。因为synchronized只能在当前JVM内加锁,一个应用部署两个端口后就是在两个JVM内,还是会产生脏读问题,这里我就不演示了,有兴趣的话你可以自己尝试。
分布式锁实现
分布式锁有多种实现
1.数据库方式
2.基于zookeeper
3.基于redis
不管使用什么方式,有几点是实现分布式锁必须要考虑到的。
- 互斥:互斥好像是必须的,否则怎么叫锁。
- 死锁: 如果一个线程获得锁,然后挂了,并没有释放锁,致使其他节点(线程)永远无法获取锁,这就是死锁。分布式锁必须做到避免死锁。
- 性能: 高并发分布式系统中,线程互斥等待会成为性能瓶颈,需要好的中间件和实现来保证性能。
- 锁特性:考虑到复杂的场景,分布式锁不能只是加锁,然后一直等待。最好实现如Java Lock的一些功能如:锁判断,超时设置,可重入性等。
这里我们通过redis方式实现分布式锁。
在redis中有如下命令: setnx,当key不存在时,执行set操作返回1,当key存在什么也不做返回0

再次修改order方法
@GetMapping("order")
public String order() {
        String lockName = "lock";
        // 获取锁
        Boolean lock = redisTemplate.opsForValue().setIfAbsent(lockName,"lock");
        redisTemplate.expire(lockName,2,TimeUnit.MINUTES);
        if (!lock) {
System.out.println("没有获得锁");
            return "";
        }
        try {
            ValueOperations<String, Integer> redis = redisTemplate.opsForValue();
            String key = "stock";
            Integer stock = redis.get(key);
            if (stock > 0) {
                System.out.println("当前库存:" + stock);
                stock = stock - 1;
                redis.set(key, stock);
            } else {
                System.out.println("库存不足");
            }
        } catch (Exception e) {
            e.printStackTrace();
        } finally {
            // 释放锁
            redisTemplate.delete(lockName);
        }
        return "end";
}
将application.yml的spring.profiles.active修改为dev,然后使用maven将应用打成jar包
使用命令启动jar包java -jar lock_redis-1.0-SNAPSHOT.jar
将application.yml的spring.profiles.active修改为prob,在idea中启动应用
现在成功把应用部署了两个实例,分别是8084端口和8085端口
配置nginx,实现负载均衡
http {
    include       mime.types;
    default_type  application/octet-stream;

    #log_format  main  '$remote_addr - $remote_user [$time_local] "$request" '
    #                  '$status $body_bytes_sent "$http_referer" '
    #                  '"$http_user_agent" "$http_x_forwarded_for"';

    #access_log  logs/access.log  main;

    sendfile        on;
    #tcp_nopush     on;

    #keepalive_timeout  0;
    keepalive_timeout  65;

    #gzip  on;

    upstream test_lock{
        server 192.168.0.35:8084 weight=1;
        server 192.168.0.35:8085 weight=1;
    }

    server {
        listen       80;
        server_name  localhost;

        #charset koi8-r;

        #access_log  logs/host.access.log  main;

        location / {
            proxy_pass http://test_lock;
            proxy_set_header Host $http_host;
            root   html;
            index  index.html index.htm;
        }

        #error_page  404              /404.html;

        # redirect server error pages to the static page /50x.html
        #
        error_page   500 502 503 504  /50x.html;
        location = /50x.html {
            root   html;
        }

        # proxy the PHP scripts to Apache listening on 127.0.0.1:80
        #
        #location ~ \.php$ {
        #    proxy_pass   http://127.0.0.1;
        #}

        # pass the PHP scripts to FastCGI server listening on 127.0.0.1:9000
        #
        #location ~ \.php$ {
        #    root           html;
        #    fastcgi_pass   127.0.0.1:9000;
        #    fastcgi_index  index.php;
        #    fastcgi_param  SCRIPT_FILENAME  /scripts$fastcgi_script_name;
        #    include        fastcgi_params;
        #}

        # deny access to .htaccess files, if Apache's document root
        # concurs with nginx's one
        #
        #location ~ /\.ht {
        #    deny  all;
        #}
    }


    # another virtual host using mix of IP-, name-, and port-based configuration
    #
    #server {
    #    listen       8000;
    #    listen       somename:8080;
    #    server_name  somename  alias  another.alias;

    #    location / {
    #        root   html;
    #        index  index.html index.htm;
    #    }
    #}


    # HTTPS server
    #
    #server {
    #    listen       443 ssl;
    #    server_name  localhost;

    #    ssl_certificate      cert.pem;
    #    ssl_certificate_key  cert.key;

    #    ssl_session_cache    shared:SSL:1m;
    #    ssl_session_timeout  5m;

    #    ssl_ciphers  HIGH:!aNULL:!MD5;
    #    ssl_prefer_server_ciphers  on;

    #    location / {
    #        root   html;
    #        index  index.html index.htm;
    #    }
    #}

}
说明:192.168.0.35是部署应用的ip地址,也就是本机,nginx部署在192.168.0.117上,是一个虚拟机,所以记得关闭本机的防火墙,开放192.168.0.117的80端口
proxy_set_header Host $http_host; 这个配置要记得加上否则nginx在轮询时会被访问拒绝。
修改JMeter请求配置

点击启动测试
两个控制台分别打印


如图,没有发生高并发问题。
但是这样依然不完美,有如下几个问题
1.我们希望没有获得锁的不直接返回而是等待,拿到锁之后继续执行
2.获取锁和设置锁的失效时间不是原子操作,极可能刚获取锁还未设置锁的失效时间时redis或者应用服务挂掉,导致这个锁无法释放造成死锁。
3.设置锁的失效时间固定为2分钟,如果执行时间超过了这个时间则锁自动失效,还是有刚并发问题产生
解决办法:使用Redisson框架提供的Lock实现。
Redisson实现分布式锁
引入依赖
<dependency>
      <groupId>org.redisson</groupId>
      <artifactId>redisson</artifactId>
      <version>3.10.4</version>
</dependency>
创建Redisson配置类(Redisson也支持Redis集群配置)
@Configuration
public class RedissonConfiguration {


    @Bean
    public RedissonClient redisson(){
        Config config = new Config();
        config.useSingleServer().setAddress("redis://192.168.0.117:6379").setPassword("123456").setDatabase(0);
        RedissonClient redisson = Redisson.create(config);
        return redisson;
    }

}
修改order代码
@Autowired
private RedissonClient redisson;

@GetMapping("order")
    public String order() {

        String key = "stock";
        String lockName = "lock";
        // 获取锁
        RLock lock = redisson.getLock(lockName);
        //lock.lock(20000, TimeUnit.MILLISECONDS);
        lock.lock();
        try {
            ValueOperations<String, Integer> redis = redisTemplate.opsForValue();
            Integer stock = redis.get(key);
//            long time = new Random().nextInt(20);
//            System.out.println("睡眠s,检验是否自动续key的有效时间:"+ time );
//            Thread.sleep(time * 1000);
            if (stock > 0) {
                System.out.println("当前库存:" + stock);
                stock = stock - 1;
                redis.set(key, stock);
            } else {
                System.out.println("库存不足");
            }
        } catch (Exception e) {
            e.printStackTrace();
        } finally {
            // 释放锁
            lock.unlock();
        }

        return "end";
    }
通过Redisson拿到锁后,会默认设置超时时间:30s,如果在30-10=20s时未执行完就会再续30s
JMeter测试

现在就基于Redisson框架+redis实现了分布式锁。
Redisson原理

详细原理可以查看https://www.jianshu.com/p/ae43ed4cf4ae。
代码地址:https://github.com/WYA1993/distributed_lock_redis


 1118
1118


 被折叠的 条评论
为什么被折叠?
被折叠的 条评论
为什么被折叠?
 到【灌水乐园】发言


