


前言
前面的一篇文章讲到了 Fragment 的基础知识,本章就让我们使用 Fragment+FrameLayout 布局实现底部导航栏。
实现代码步骤如下:
- 定义布局文件
- 写三个 Fragment 的布局文件
- 写三个自定义的 Fragment 类
- 编写 mainActivity
看完步骤有了一定的了解后我们就开始动手编码啦!!
思考第一步:怎么定义布局文件呢?
答:将我们定义的布局文件看成一个容器,可以使用各种布局,看各自的喜欢,这里我们使用 FrameLayout (帧布局,记住不要跟 Fragment 混淆了)作为放置 Fragment 的容器,底部栏可以看下图的构造
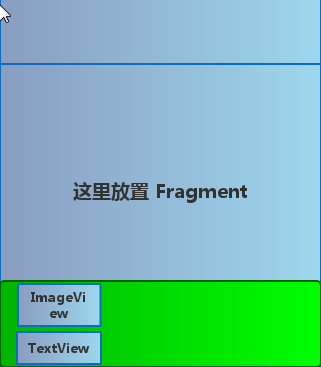
可以看到一个底部栏的选项卡需要一个图片和文字构成,所以图片和文字可以用一个 RelativeLayout 包裹,然后放置在一个盛放三个选项卡的大布局中,可以选用线性布局,具体代码实现下面给出
activity_main.xml
<LinearLayout xmlns:android="http://schemas.android.com/apk/res/android"
    android:layout_width="match_parent"
    android:layout_height="match_parent"
    android:orientation="vertical" >

    <FrameLayout
        android:id="@+id/content"
        android:layout_width="match_parent"
        android:layout_height="0dp"
        android:layout_weight="1" >
    </FrameLayout>

    <LinearLayout
        android:layout_width="match_parent"
        android:layout_height="70dp"
        android:background="#FFFFFF" >

        <RelativeLayout
            android:id="@+id/course_layout"
            android:layout_width="0dp"
            android:layout_height="match_parent"
            android:layout_weight="1" >

            <LinearLayout
                android:layout_width="match_parent"
                android:layout_height="wrap_content"
                android:layout_centerVertical="true"
                android:orientation="vertical" >

                <ImageView
                    android:id="@+id/course_image"
                    android:layout_width="wrap_content"
                    android:layout_height="wrap_content"
                    android:layout_gravity="center_horizontal"
                    android:src="@drawable/ic_tabbar_course_normal" />

                <TextView
                    android:id="@+id/course_text"
                    android:layout_width="wrap_content"
                    android:layout_height="wrap_content"
                    android:layout_gravity="center_horizontal"
                    android:text="课程"
                    android:textColor="#7597B3" />
            </LinearLayout>
        </RelativeLayout>

        <RelativeLayout
            android:id="@+id/found_layout"
            android:layout_width="0dp"
            android:layout_height="match_parent"
            android:layout_weight="1" >

            <LinearLayout
                android:layout_width="match_parent"
                android:layout_height="wrap_content"
                android:layout_centerVertical="true"
                android:orientation="vertical" >

                <ImageView
                    android:id="@+id/found_image"
                    android:layout_width="wrap_content"
                    android:layout_height="wrap_content"
                    android:layout_gravity="center_horizontal"
                    android:src="@drawable/ic_tabbar_found_normal" />

                <TextView
                    android:id="@+id/found_text"
                    android:layout_width="wrap_content"
                    android:layout_height="wrap_content"
                    android:layout_gravity="center_horizontal"
                    android:text="发现"
                    android:textColor="#7597B3" />
            </LinearLayout>
        </RelativeLayout>


        <RelativeLayout
            android:id="@+id/setting_layout"
            android:layout_width="0dp"
            android:layout_height="match_parent"
            android:layout_weight="1" >

            <LinearLayout
                android:layout_width="match_parent"
                android:layout_height="wrap_content"
                android:layout_centerVertical="true"
                android:orientation="vertical" >

                <ImageView
                    android:id="@+id/setting_image"
                    android:layout_width="wrap_content"
                    android:layout_height="wrap_content"
                    android:layout_gravity="center_horizontal"
                    android:src="@drawable/ic_tabbar_settings_normal" />

                <TextView
                    android:id="@+id/setting_text"
                    android:layout_width="wrap_content"
                    android:layout_height="wrap_content"
                    android:layout_gravity="center_horizontal"
                    android:text="设置"
                    android:textColor="#7597B3" />
            </LinearLayout>
        </RelativeLayout>
    </LinearLayout>
</LinearLayout>
思考第二步:怎么写三个 Fragment 布局文件?
答:只需要在 layout 文件夹 bulid 三个 xml 文件,这里为了方便测试 Fragment 的布局内容我就只用了一个 TextView,然后复制三份改下颜色就可以了、
frag1.xml
<?xml version="1.0" encoding="utf-8"?>
<LinearLayout xmlns:android="http://schemas.android.com/apk/res/android"
    xmlns:tools="http://schemas.android.com/tools"
    android:orientation="vertical"
    android:layout_width="match_parent"
    android:layout_height="match_parent"
    android:gravity="center"
    android:background="#FAECD8">
    <TextView
        android:text="日程Fragment"
        android:layout_width="wrap_content"
        android:layout_height="wrap_content" />
</LinearLayout>
思考第三步:如何编写三个 Fragment 类?
答:只需要让自定义的类继承 Fragment 并且实现其中的 onCreateView()方法,使用inflater.inflate()将 Fragment 连接进 View ,也是复制三份,修改下参数即可
Fragment1.java
package com.example.administrator.tab;

import android.support.annotation.Nullable;
import android.support.v4.app.Fragment;
import android.support.v7.app.AppCompatActivity;
import android.os.Bundle;
import android.view.LayoutInflater;
import android.view.View;
import android.view.ViewGroup;

public class Fragment2 extends Fragment {
    @Nullable
    @Override
    public View onCreateView(LayoutInflater inflater, ViewGroup container, Bundle savedInstanceState) {
        View view = inflater.inflate(R.layout.frag2,container,false);
        return  view;
    }
}
思考最后一步:如何编写 MainActivity?
答:这点也是最难的一点,MainActivity 要实现的功能就是把整个界面呈现出来,由于我们这个测试界面比较简单,对象也比较少,实现的功能主要就是点击底部栏的同时切换 Fragment 内容,有这么一些步骤和逻辑
1.定义对象,以便通过事件操作对象,这里要定义的对象有 Fragment对象(展示内容),底部栏对象包括 ImageView(动态更换图片) 和 TestView(动态更换文字) ,layout(点击选项卡图片和文字都可切换)
2.重写点击事件,点击选项卡实现内容切换
3.书写重置选项的方法,当点击下一个选项时其他选项重置为可选状态
说了这么多,还是仔细看看具体代码吧!
package com.example.administrator.tab;

import android.graphics.Color;
import android.support.v4.app.Fragment;
import android.support.v4.app.FragmentActivity;
import android.support.v4.app.FragmentManager;
import android.os.Bundle;
import android.support.v4.app.FragmentTransaction;
import android.view.View;
import android.widget.FrameLayout;
import android.widget.ImageView;
import android.widget.RelativeLayout;
import android.widget.TextView;

public class MainActivity extends FragmentActivity {

    //定义三个 Fragment 对象
    private Fragment1 frag1;
    private Fragment2 frag2;
    private Fragment3 frag3;
    //帧布局对象,就是用来存放 Fragment 的容器
    private FrameLayout fragLayout;

    //定义底部导航栏的三个布局
    private RelativeLayout course_layout;
    private RelativeLayout found_layout;
    private RelativeLayout setting_layout;

    //定义底部导航栏的 ImageView 和 TextView
    //  1
    private ImageView course_image;
    private TextView course_text;

    //  2
    private ImageView found_image;
    private TextView found_text;

    //  3
    private ImageView setting_image;
    private TextView setting_text;

    //定义颜色值
    //定义要用的颜色值
    private int white = Color.parseColor("#FFFFFF");
    private int gray = Color.parseColor("#FFA0A1A7");
    private int blue = Color.parseColor("#FF1F39C9");
    //定义 FragmentManager 对象,需要继承 FragmentActivity否则报错
    FragmentManager fManager;

    @Override
    protected void onCreate(Bundle savedInstanceState) {
        super.onCreate(savedInstanceState);
        setContentView(R.layout.activity_main);
        fManager = getSupportFragmentManager();
        initView();
    }
    //组件初始化
    private void initView() {
        //课程
        course_layout = (RelativeLayout) findViewById(R.id.course_layout);
        course_image = (ImageView) findViewById(R.id.course_image);
        course_text = (TextView) findViewById(R.id.course_text);

        //发现
        found_layout = (RelativeLayout) findViewById(R.id.found_layout);
        found_image = (ImageView) findViewById(R.id.found_image);
        found_text = (TextView) findViewById(R.id.found_text);

        //设置
        setting_layout = (RelativeLayout) findViewById(R.id.setting_layout);
        setting_image = (ImageView) findViewById(R.id.setting_image);
        setting_text = (TextView) findViewById(R.id.setting_text);

        //点击事件
        course_layout.setOnClickListener(new LayoutOnClickListener());
        found_layout.setOnClickListener(new LayoutOnClickListener());
        setting_layout.setOnClickListener(new LayoutOnClickListener());
    }
    //重写点击事件
    class  LayoutOnClickListener implements View.OnClickListener{
        @Override
        public void onClick(View v) {
                switch (v.getId()){
                    case R.id.course_layout:
                        ChoiceTab(0);
                        break;
                    case R.id.found_layout:
                        ChoiceTab(1);
                        break;
                    case R.id.setting_layout:
                        ChoiceTab(2);
                        break;
                    default:break;
                }
        }
    }
    //定义一个选择 tab 后的处理
    public void ChoiceTab(int index){
        //构建 FragmentTransction 执行 Tab事务
        FragmentTransaction transaction = fManager.beginTransaction();
        //重置选项:没有此步骤会使 tab 之间跳转混乱
        clearchoice();
        //隐藏 Fragment 内容,没有此步骤会使得容器内容混乱
       // hideFragment(transaction);
        //对传入参数选项进行处理并显示容器内容
        switch (index){
            case 0:
                course_image.setImageResource(R.drawable.ic_tabbar_course_pressed);
                course_text.setTextColor(blue);
                course_layout.setBackgroundResource(R.drawable.ic_tabbar_bg_click);
                if(frag1 == null){//如果frag1为空(第一次加载)则添加到界面上
                    frag1 = new Fragment1();
                    transaction.add(R.id.content,frag1);
                }else {//如果不为空则直接显示出来
                    transaction.replace(R.id.content, frag1);
                }
                break;
            case 1:
                found_image.setImageResource(R.drawable.ic_tabbar_found_pressed);
                found_text.setTextColor(blue);
                found_layout.setBackgroundResource(R.drawable.ic_tabbar_bg_click);
                if(frag2 == null){
                    frag2 = new Fragment2();
                    transaction.add(R.id.content,frag2);
                }else {
                    transaction.replace(R.id.content, frag2);
                }
                break;
            case 2:
                setting_image.setImageResource(R.drawable.ic_tabbar_settings_pressed);
                setting_text.setTextColor(blue);
                setting_layout.setBackgroundResource(R.drawable.ic_tabbar_bg_click);
                if(frag3 == null){
                    frag3 = new Fragment3();
                    transaction.add(R.id.content,frag3);
                }else {
                   // transaction.show(frag3);
                    transaction.replace(R.id.content, frag3);

                }
                break;
            default:break;
        }
        transaction.commit();
    }

    //定义重置选项的方法
    private void clearchoice() {
        //课程选项重置
        course_image.setImageResource(R.drawable.ic_tabbar_course_normal);
        course_layout.setBackgroundColor(white);
        course_text.setTextColor(gray);

        //发现选项重置
        found_image.setImageResource(R.drawable.ic_tabbar_found_normal);
        found_layout.setBackgroundColor(white);
        found_text.setTextColor(gray);

        //设置选项重置
        setting_image.setImageResource(R.drawable.ic_tabbar_settings_normal);
        setting_layout.setBackgroundColor(white);
        setting_text.setTextColor(gray);
    }
    //定义一个隐藏 Fragment 的方法,将已经显示的内容隐藏
    private void hideFragment(FragmentTransaction transaction) {
        if(frag1 != null){
            transaction.hide(frag1);
        }
        if (frag2 != null){
            transaction.hide(frag2);
        }
        if(frag3 != null){
            transaction.hide(frag3);
        }
    }
}
有人可能会疑问为什么写的隐藏 Fragment 的方法没有用,那是因为我用 transaction.replace()方法界面被取代了,如果是用 transaction.show的同学,则要使用此隐藏方法否则界面会混乱。
关于 Fragment 实现底部导航栏就简单介绍到这里,如果有对 Fragment 基础不了解的可以看看这篇文章☞http://blog.csdn.net/w_ilu/article/details/50982222


 2188
2188

 被折叠的 条评论
为什么被折叠?
被折叠的 条评论
为什么被折叠?
 到【灌水乐园】发言


