Notification的使用大体步骤:
1、 获取状态通知栏管理
2、 实例化通知栏构造器
3、 设置NotificationCompat.Builder
4、 设置PendingIntent
5、 显示
因为Android的快速发展,而Android的版本也快速的升级导致了一些兼容性的问题。对于Notification而言,Android3.0是一个分水岭,在其之前构建Notification推荐使用NotificationCompate.Builder,是一个Android向下版本的兼容包,而在Android3.0之后,一般推荐使用Notification.Builder构建。本博客主要介绍的是Android4.x的开发,所以在这里使用Notification.Builder进行讲解演示。
虽然通知中提供了各种属性的设置,但是一个通知对象,有几个属性是必须要设置的,其他的属性均是可选的,必须设置的属性如下:
1)、小图标,使用setSamllIcon()方法设置。
2)、标题,使用setContentTitle()方法设置。
3)、文本内容,使用setContentText()方法设置。
Notification简介
Notification有两种视觉风格,一种是标准视图(Normal View)、一种是大视图(Big view)。标准视图在Android中各版本是通用的,但是对于大视图而言,仅支持Android4.1+的版本。
Notification.flags属性参数:(是否可以设置多个):
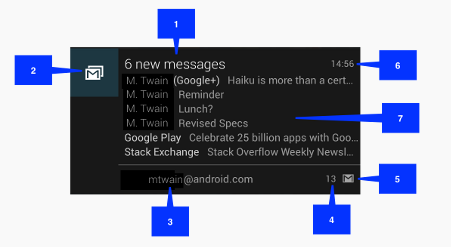
从官方文档了解到,一个标准视图显示的大小保持在64dp高。如下图所示:

1、 通知标题
2、 大图标
3、 通知内容
4、 通知消息
5、 小图标
6、 通知时间,一般为系统时间,也可以使用setWhen()设置。
而对于大视图(Big View)而言,它的细节区域只能显示256dp高度的内容,并且只对Android4.1+之后的设备才支持,它比标准视图不一样的地方,均需要使用setStyle()方法设定,它大致的效果如下:
Android为我们提供了三个实现类,用于显示不同的场景。分别是:
Notification.BigPictureStyle, 在细节部分显示一个256dp高度的位图。
Notification.BigTextStyle,在细节部分显示一个大的文本块。
Notification.InboxStyle,在细节部分显示一段行文本
Notification.FLAG_SHOW_LIGHTS //三色灯提醒,在使用三色灯提醒时候必须加该标志符
Notification.FLAG_ONGOING_EVENT //发起正在运行事件(活动中)
Notification.FLAG_INSISTENT //让声音、振动无限循环,直到用户响应 (取消或者打开)
Notification.FLAG_ONLY_ALERT_ONCE //发起Notification后,铃声和震动均只执行一次
Notification.FLAG_AUTO_CANCEL //用户单击通知后自动消失
Notification.FLAG_NO_CLEAR //只有全部清除时,Notification才会清除 ,不清楚该通知(QQ的通知无法清除,就是用的这个。还有百度通知栏里面的搜索框也是这个)。
使用方法:在设置完属性后,设置
Notification notification = builder.build();
notification.flags = Notification.FLAG_ONLY_ALERT_ONCE;
PendingIntent简介
对于一个通知而言,它显示的消息是有限的,一般仅用于提示一些概要信息。但是一般简短的消息,并不能表达需要告诉用户的全部内容,所以需要绑定一个意图,当用户点击通知的时候,调用一个意图展示出一个Activity用来显示详细的内容。而Notification中,并不使用常规的Intent去传递一个意图,而是使用PendingIntent。
先来说说Intent和PendingIntent的区别,PendingIntent可以看做是对Intent的包装,通过名称可以看出PendingIntent用于处理即将发生的意图,而Intent用来用来处理马上发生的意图。而对于通知来说,它是一系统级的全局通知,并不确定这个意图被执行的时间。当在应用外部执行PendingIntent时,因为它保存了触发应用的Context,使得外部应用可以如在当前应用中一样,执行PendingIntent里的Intent,就算执行的时候响应通知的应用已经被销毁了,也可以通过存在PendingIntent里的Context照常执行它,并且还可以处理Intent说带来的额外信息。
PendingInteng.getBroadcast(contex, requestCode, intent, flags)
PendingInteng.getService(contex, requestCode, intent, flags)
PendingInteng.getActivity(contex, requestCode, intent, flags)
PendingInteng.getActivities(contex, requestCode, intent, flags)
其中flags属性参数:
FLAG_ONE_SHOT 表示返回的PendingIntent仅能执行一次,执行完后自动消失
FLAG_NO_CREATE 表示如果描述的PendingIntent不存在,并不创建相应的PendingIntent,而是返回NULL
FLAG_CANCEL_CURRENT 表示相应的PendingIntent已经存在,则取消前者,然后创建新的PendingIntent
FLAG_UPDATE_CURRENT 表示更新的PendingIntent,如果构建的PendingIntent已经存在,则替换它,常用。
使用RemoteViews自定义Notification
需要使用RemoteViews.RemoteViews描述了一个视图层次的结构,可以显示在另一个进程。RemoteViews提供了多个构造函数,一般使用RemoteViews(String packageName,int layoutId)。第一个参数为包的名称,第二个为layout资源的Id。当获取到RemoteViews对象之后,可以使用它的一系列setXxx()方法通过控件的Id设置控件的属性。最后使用NotificationCompat.Builder.setContent(RemoteViews)方法设置它到一个Notification中。
remoteViews.setOnClickPendingIntent(viewId, pendingIntent);可以进入不同的Activity。如:
remoteViews.setOnClickPendingIntent(R.id.titleTV, PendingIntent.getActivity(context, 0,
new Intent(context, ScrollingActivity.class), PendingIntent.FLAG_UPDATE_CURRENT));
更新与移除通知
在使用NotificationManager.notify()发送通知的时候,需要传递一个标识符,用于唯一标识这个通知。对于有些场景,并不是无限的添加新的通知,有时候需要更新原有通知的信息,这个时候可以重写构建Notification,而使用与之前通知相同标识符来发送通知,这个时候旧的通知就被被新的通知所取代,起到更新通知的效果。
对于一个通知,当展示在状态栏之后,但是使用过后,如何取消呢?Android为我们提供两种方式移除通知,一种是Notification自己维护,使用setAutoCancel()方法设置是否维护,传递一个boolean类型的数据。另外一种方式使用NotificationManager通知管理器对象来维护,它通过notify()发送通知的时候,指定的通知标识Id来操作通知,可以使用cancel(int)来移除一个指定的通知,也可以使用cancelAll()移除所有的通知。
使用NotificationManager移除指定通知示例:
NotificationManager mNotificationManager = (NotificationManager) getSystemService(Context.NOTIFICATION_SERVICE)
mNotificationManager.cancel(0)
设定提示响应
对于有些通知,需要调用一些设备的资源,使用户能更快的发现有新通知,一般可设定的响应有:铃声、闪光灯、震动。对于这三个属性,NotificationCompat.Builder提供了三个方法设定:
setSound(Uri sound):设定一个铃声,用于在通知的时候响应。传递一个Uri的参数,格式为“file:///mnt/sdcard/Xxx.mp3”。
setLights(int argb, int onMs, int offMs):设定前置LED灯的闪烁速率,持续毫秒数,停顿毫秒数。
setVibrate(long[] pattern):设定震动的模式,以一个long数组保存毫秒级间隔的震动。
大多数时候,我们并不需要设定一个特定的响应效果,只需要遵照用户设备上系统通知的效果即可,那么可以使用setDefaults(int)方法设定默认响应参数,在Notification中,对它的参数使用常量定义了,我们只需使用即可:
DEFAULT_ALL:铃声、闪光、震动均系统默认。
DEFAULT_SOUND:系统默认铃声。
DEFAULT_VIBRATE:系统默认震动。
DEFAULT_LIGHTS:系统默认闪光。
设置震动,需要权限:android.permission.VIBRATE
设置闪光灯,需要权限:android.permission.FLASHLIGHT
附录
下面是我封装的一个通知工具类:
package com.test.testandroid;
import android.app.Notification;
import android.app.NotificationManager;
import android.app.PendingIntent;
import android.content.Context;
import android.content.Intent;
import android.graphics.BitmapFactory;
import android.widget.RemoteViews;
/**
* Created by Administrator on 2016-6-19.
* notification builder android
*/
public class NotificationUtil {
private Context context;
private NotificationManager notificationManager;
public NotificationUtil(Context context) {
this.context = context;
notificationManager = (NotificationManager) context.getSystemService(Context.NOTIFICATION_SERVICE);
}
/**
* 普通的Notification
*/
public void postNotification() {
Notification.Builder builder = new Notification.Builder(context);
Intent intent = new Intent(context, MainActivity.class);
PendingIntent pendingIntent = PendingIntent.getActivity(context, 0, intent, PendingIntent.FLAG_UPDATE_CURRENT);
builder.setContentIntent(pendingIntent);
builder.setSmallIcon(R.mipmap.ic_launcher);
builder.setContentTitle("标题");
builder.setContentText("内容");
builder.setWhen(System.currentTimeMillis());
builder.setAutoCancel(true);
builder.setTicker("new message");
builder.setOngoing(true);
builder.setNumber(20);
Notification notification = builder.build();
notification.flags = Notification.FLAG_NO_CLEAR;
notificationManager.notify(0,notification);
}
/**
* 使用下载的Notification,在4.0以后才能使用<p></p>
* Notification.Builder类中提供一个setProgress(int max,int progress,boolean indeterminate)方法用于设置进度条,
* max用于设定进度的最大数,progress用于设定当前的进度,indeterminate用于设定是否是一个确定进度的进度条。
* 通过indeterminate的设置,可以实现两种不同样式的进度条,一种是有进度刻度的(true),一种是循环流动的(false)。
*/
public void postDownloadNotification() {
final Notification.Builder builder = new Notification.Builder(context);
builder.setSmallIcon(R.mipmap.ic_launcher)
.setTicker("showProgressBar").setContentInfo("contentInfo")
.setOngoing(true).setContentTitle("ContentTitle")
.setContentText("ContentText");
new Thread(new Runnable() {
@Override
public void run() {
int progress ;
for (progress = 0; progress < 100; progress += 5) {
builder.setProgress(100, progress, false);
notificationManager.notify(0, builder.build());
try {
Thread.sleep(1 * 1000);
} catch (InterruptedException e) {
System.out.println("sleep failure");
}
}
builder.setContentTitle("Download complete")
.setProgress(0, 0, false).setOngoing(false);
notificationManager.notify(0, builder.build());
}
}).start();
}
/**
* 大视图通知在4.1以后才能使用,BigTextStyle<p></p>
* ****************************************************<p></p>
* Helper class for generating large-format notifications that include a lot of text.
*
* Here's how you'd set the <code>BigTextStyle</code> on a notification:
* <pre class="prettyprint">
* Notification notif = new Notification.Builder(mContext)
* .setContentTitle("New mail from " + sender.toString())
* .setContentText(subject)
* .setSmallIcon(R.drawable.new_mail)
* .setLargeIcon(aBitmap)
* .setStyle(new Notification.BigTextStyle()
* .bigText(aVeryLongString))
* .build();
* </pre>
*
* @see Notification#bigContentView
*/
public void postBigTextNotification() {
Notification.BigTextStyle textStyle = new Notification.BigTextStyle();
textStyle.setBigContentTitle("大标题")
.setSummaryText("SummaryText")
.bigText("Helper class for generating large-format notifications" +
" that include a lot of text; !!!!!!!!!!!" +
"!!!!!!!!!!!!!!!!!!!!!!!!!!!!!!!!!!!!");
Notification.Builder builder2 = new Notification.Builder(
context);
builder2.setSmallIcon(R.mipmap.ic_launcher);
builder2.setLargeIcon(BitmapFactory.decodeResource(
context.getResources(), R.mipmap.ic_launcher));
builder2.setTicker("showBigView_Text")
.setContentInfo("contentInfo");
builder2.setStyle(textStyle);
builder2.setAutoCancel(true);
notificationManager.notify(0, builder2.build());
}
/**
* 大布局通知在4.1以后才能使用,大布局图片
*/
public void postBigPictureNotification() {
Notification.BigPictureStyle bigPictureStyle = new Notification.BigPictureStyle();
bigPictureStyle.bigPicture(BitmapFactory.decodeResource(context.getResources(),
R.mipmap.ic_launcher));
Notification.Builder builder = new Notification.Builder(
context);
builder.setSmallIcon(R.mipmap.ic_launcher);
builder.setLargeIcon(BitmapFactory.decodeResource(
context.getResources(), R.drawable.ic_stop));
builder.setTicker("showBigView_Picture")
.setContentInfo("contentInfo");
builder.setStyle(bigPictureStyle);
builder.setAutoCancel(true);
notificationManager.notify(0, builder.build());
}
/**
* 大布局通知在4.1以后才能使用,InboxStyle
*/
public void postInboxNotification() {
Notification.InboxStyle inboxStyle = new Notification.InboxStyle();
inboxStyle.setBigContentTitle("InboxStyle");
inboxStyle.setSummaryText("Test");
for(int i = 0 ; i < 10; i++){
inboxStyle.addLine("new:" + i);
}
Notification.Builder builder5 = new Notification.Builder(
context);
builder5.setSmallIcon(R.mipmap.ic_launcher);
builder5.setLargeIcon(BitmapFactory.decodeResource(
context.getResources(), R.drawable.ic_stop));
builder5.setTicker("showBigView_InboxStyle")
.setContentInfo("contentInfo");
builder5.setStyle(inboxStyle);
builder5.setAutoCancel(true);
notificationManager.notify(0, builder5.build());
}
/**
* 自定义通知<p></p>
*
* 不设置notification.contentIntent = pendingIntent;则报如下异常:
* android.app.RemoteServiceException:
* Bad notification posted from package com.test.testandroid: Couldn't expand RemoteViews for: StatusBarNotification(
* pkg=com.test.testandroid user=UserHandle{0} id=0 tag=null score=0 key=0|com.test.testandroid|0|null|10168|0: Notification
* (pri=0 contentView=com.test.testandroid/0x7f040038 vibrate=null sound=null defaults=0x0 flags=0x10 color=0xff00aeff vis=PRIVATE))
*/
public void postCustomNotification() {
RemoteViews contentViews = new RemoteViews(context.getPackageName(),
R.layout.mynotification);
contentViews.setImageViewResource(R.id.imageNotifi,R.mipmap.ic_launcher);
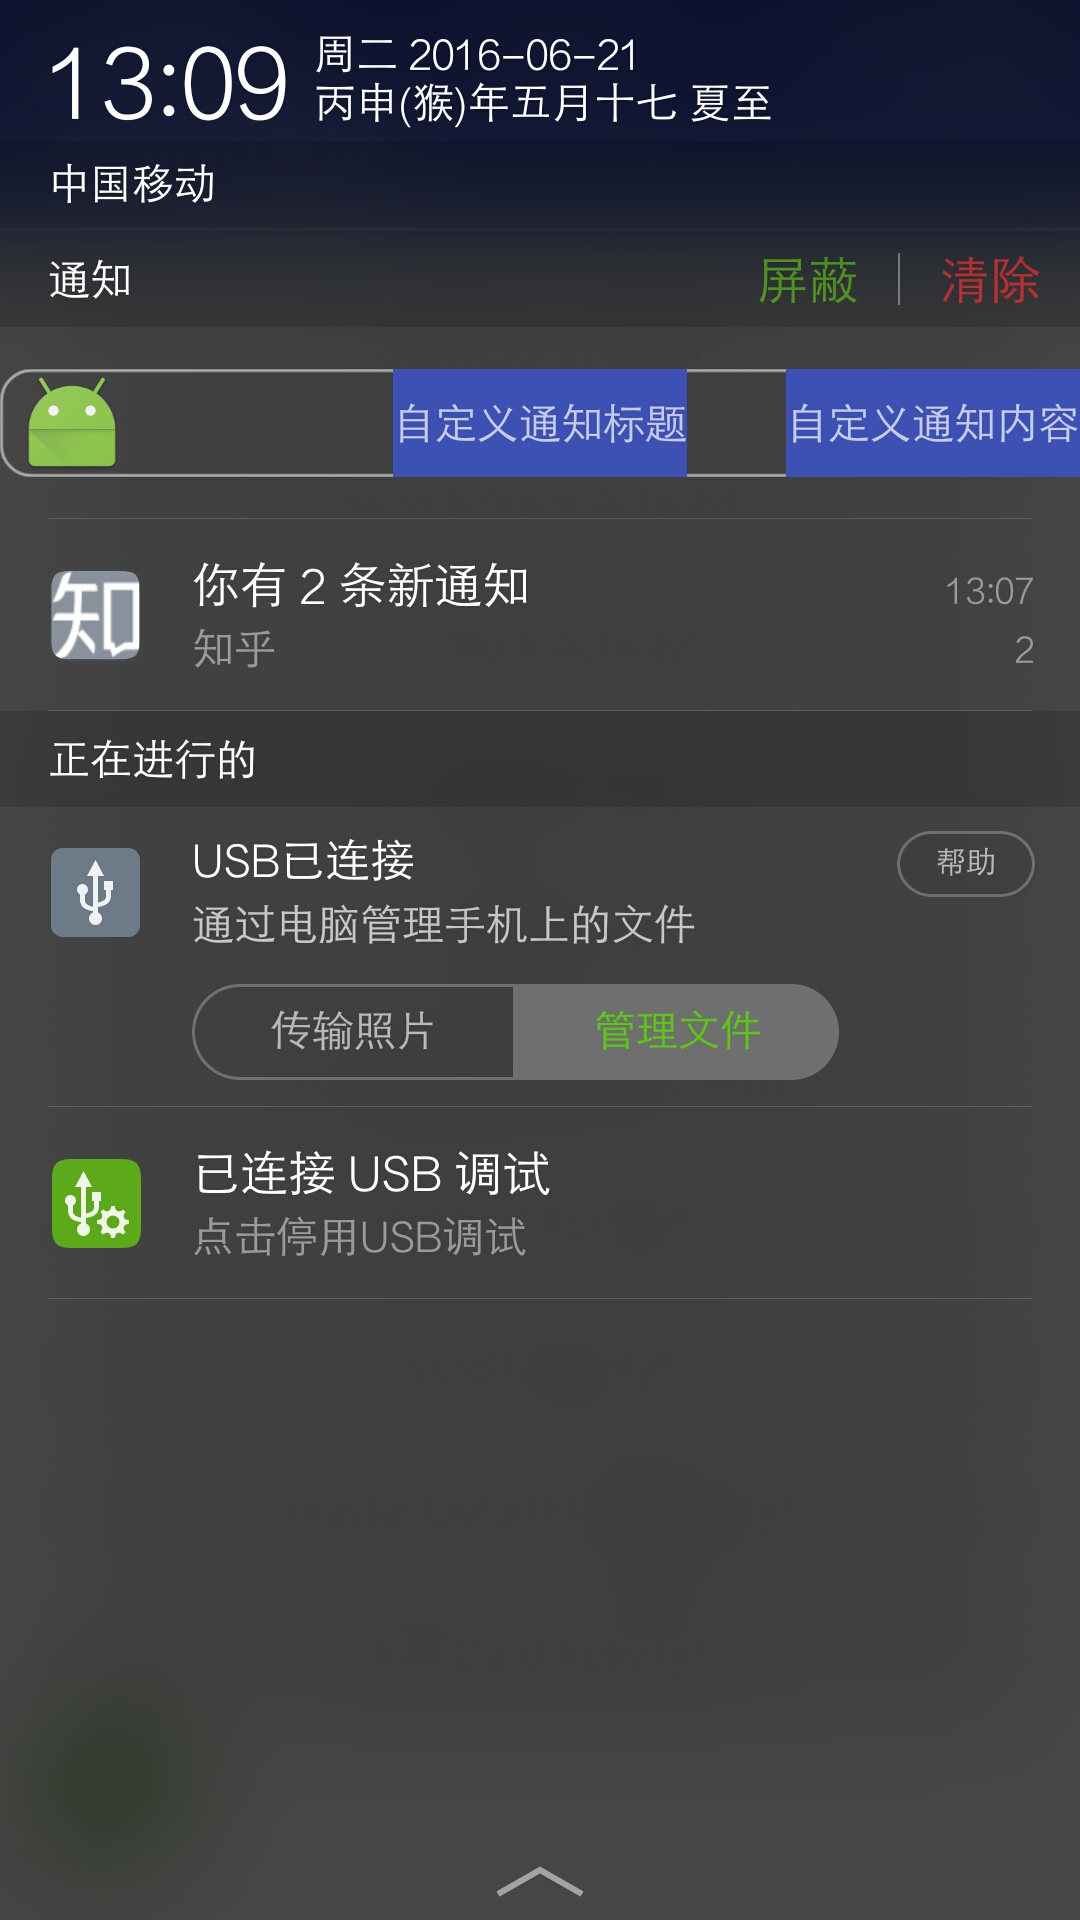
contentViews.setTextViewText(R.id.titleTV,"自定义通知标题");
contentViews.setTextViewText(R.id.textTV,"自定义通知内容");
Intent intent = new Intent(context, MainActivity.class);
PendingIntent pendingIntent = PendingIntent.getActivity(context, 0, intent, PendingIntent.FLAG_UPDATE_CURRENT);
contentViews.setOnClickPendingIntent(R.id.titleTV, pendingIntent);
contentViews.setOnClickPendingIntent(R.id.textTV, PendingIntent.getActivity(context, 0,
new Intent(context, ScrollingActivity.class), PendingIntent.FLAG_UPDATE_CURRENT);
Notification.Builder builder = new Notification.Builder(context);
builder.setSmallIcon(R.mipmap.ic_launcher);
builder.setContentTitle("custom notification");
builder.setContentText("custom test");
builder.setTicker("custom ticker");
builder.setAutoCancel(true);
builder.setContent(contentViews);
notificationManager.notify(0,builder.build());
}
public void cancelById() {
notificationManager.cancel(0);
}
public void cancelAllNotification() {
notificationManager.cancelAll();
}
}
- 1
- 2
- 3
- 4
- 5
- 6
- 7
- 8
- 9
- 10
- 11
- 12
- 13
- 14
- 15
- 16
- 17
- 18
- 19
- 20
- 21
- 22
- 23
- 24
- 25
- 26
- 27
- 28
- 29
- 30
- 31
- 32
- 33
- 34
- 35
- 36
- 37
- 38
- 39
- 40
- 41
- 42
- 43
- 44
- 45
- 46
- 47
- 48
- 49
- 50
- 51
- 52
- 53
- 54
- 55
- 56
- 57
- 58
- 59
- 60
- 61
- 62
- 63
- 64
- 65
- 66
- 67
- 68
- 69
- 70
- 71
- 72
- 73
- 74
- 75
- 76
- 77
- 78
- 79
- 80
- 81
- 82
- 83
- 84
- 85
- 86
- 87
- 88
- 89
- 90
- 91
- 92
- 93
- 94
- 95
- 96
- 97
- 98
- 99
- 100
- 101
- 102
- 103
- 104
- 105
- 106
- 107
- 108
- 109
- 110
- 111
- 112
- 113
- 114
- 115
- 116
- 117
- 118
- 119
- 120
- 121
- 122
- 123
- 124
- 125
- 126
- 127
- 128
- 129
- 130
- 131
- 132
- 133
- 134
- 135
- 136
- 137
- 138
- 139
- 140
- 141
- 142
- 143
- 144
- 145
- 146
- 147
- 148
- 149
- 150
- 151
- 152
- 153
- 154
- 155
- 156
- 157
- 158
- 159
- 160
- 161
- 162
- 163
- 164
- 165
- 166
- 167
- 168
- 169
- 170
- 171
- 172
- 173
- 174
- 175
- 176
- 177
- 178
- 179
- 180
- 181
- 182
- 183
- 184
- 185
- 186
- 187
- 188
- 189
- 190
- 191
- 192
- 193
- 194
- 195
- 196
- 197
- 198
- 199
- 200
- 201
- 202
- 203
- 204
- 205
- 206
- 207
- 208
使用方法:
NotificationUtil notiUtil = new NotificationUtil(this);
notiUtil .postInboxNotification();
其中自定义的postCustomNotification()运行结果如下图:
布局怎么都不能居中,后来使用了如下的方法:
<?xml version="1.0" encoding="utf-8"?>
<LinearLayout xmlns:android="http://schemas.android.com/apk/res/android"
    android:layout_width="wrap_content"
    android:layout_height="match_parent"
    android:layout_gravity="center"
    android:gravity="center_vertical">

    <RelativeLayout
        android:layout_width="wrap_content"
        android:layout_height="36dp"
        android:gravity="center"
        android:layout_gravity="center"
        android:background="@drawable/bg">

        <ImageView
            android:id="@+id/imageNotifi"
            android:layout_width="wrap_content"
            android:layout_height="wrap_content"
            android:layout_centerVertical="true"
            android:gravity="center_vertical" />


 1万+
1万+

 被折叠的 条评论
为什么被折叠?
被折叠的 条评论
为什么被折叠?
 到【灌水乐园】发言


