


iOS在录屏功能是走过了长长的一段路,在其他平台尤其是直播平台日益火爆的推动下,iOS12.0终于开放在应用中唤起系统录屏权限给开发者.以下内容以iOS 12.0+为基础,不再讨论之前的版本.
理论准备
- 了解ReplayKit框架以及了解一下iOS9.x,iOS10.x,iOS11.x以及iOS12.x上录屏权限以及api的不同;
- 了解App Group内存共享实现;
- 了解CFNotificationCenterGetDarwinNotifyCenter进行进程通信实现;
功能拆分
-
App Groups数据共享
由于沙盒机制,在不同的应用进程之间想要共享数据,使用原来的本地持久化数据方法就不行了,这时候需要使用到App Group,该应用组允许你在不同的应用进程之间共享数据空间,通过存取操作,从而实现数据的通信.使用起来也很简单,
在Xcode-->Target-->Capability中添加App Groups功能,添加需要的应用组名(一般习惯上使用group.+bundleid)作为应用组的标识.在统一个开发账号下的应用开启了具有相同id的App Groups时,应用之间可以通过这个空间共享数据(所以不仅仅局限于同一个应用的不同target,统一账号下的多个应用也可以共享这个数据,比如同一家公司的多个应用利用这个技术就可以实现只要登陆了其中一个另外一个就可以自动登录的功能).
通过App Groups共享数据一般有两种方式:
- 使用NSUserDefaults
//初始化一个供App Groups使用的NSUserDefaults对象
NSUserDefaults *userDefaults = [[NSUserDefaults alloc] initWithSuiteName:@"group.Ericydong.TempDemo"];
//写入数据
[userDefaults setValue:@"value" forKey:@"key"];
//读取数据
NSLog(@"%@", [userDefaults valueForKey:@"key"]);- 使用NSFileManager
//获取到对应的空间路径就可以在该路径下读写文件
NSURL *groupURL = [[NSFileManager defaultManager] containerURLForSecurityApplicationGroupIdentifier:@"group.Ericydong.TempDemo"];
在这里,使用NSFileManager来创建一个单独的文件夹来存放录制的视频:
@interface NSDate (Timestamp)
+ (NSString *)timestamp;
@end

@implementation NSDate (Timestamp)
+ (NSString *)timestamp {
    long long timeinterval = (long long)([NSDate timeIntervalSinceReferenceDate] * 1000);
    return [NSString stringWithFormat:@"%lld", timeinterval];
}
@end
@implementation ShareDataManager
/*

    获取文件存储的主路径
*/
+ (NSString *)documentPath {
    static NSString *replaysPath;
    if (!replaysPath) {
        NSFileManager *fileManager = [NSFileManager defaultManager];
        NSURL *documentRootPath = [fileManager containerURLForSecurityApplicationGroupIdentifier:@"group.Ericydong.TempDemo"];
        replaysPath = [documentRootPath.path stringByAppendingPathComponent:@"Replays"];
        if (![fileManager fileExistsAtPath:replaysPath]) {
            NSError *error_createPath = nil;
            BOOL success_createPath = [fileManager createDirectoryAtPath:replaysPath withIntermediateDirectories:true attributes:@{} error:&error_createPath];
            if (success_createPath && !error_createPath) {
                NSLog(@"%@路径创建成功!", replaysPath);
            } else {
                NSLog(@"%@路径创建失败:%@", replaysPath, error_createPath);
            }
        }
    }
    return replaysPath;
}

/*
    获取当前将要录制视频文件的保存路径
*/
+ (NSURL *)filePathURL {
    NSString *timestamp = [NSDate timestamp];
    NSString *fileName = [timestamp stringByAppendingPathExtension:@"mp4"];
    NSString *fullPath = [[self documentPath] stringByAppendingPathComponent:fileName];
    return [NSURL fileURLWithPath:fullPath];
}

/*
    用于获取自定义路径下的所有文件
 */
+ (NSArray <NSURL *> *)fetechAllResource {
    NSFileManager *fileManager = [NSFileManager defaultManager];

    NSString *documentPath = [self documentPath];
    NSURL *documentURL = [NSURL fileURLWithPath:documentPath];
    NSError *error = nil;
    NSArray<NSURL *> *allResource  =  [fileManager contentsOfDirectoryAtURL:documentURL includingPropertiesForKeys:@[] options:(NSDirectoryEnumerationSkipsSubdirectoryDescendants) error:&error];
    return allResource;

}

@end-
RPSystemBroadcastPickerView
在iOS 12.0+上出现了一个新的UI控件RPSystemBroadcastPickerView,用于展示用户启动系统录屏的指定视图.该控件使用起来很简单,文档使用示例是这么说的:
class ViewController: UIViewController {
    @IBOutlet var containerView: UIView!
    override func viewDidLoad() {
        super.viewDidLoad()
        let broadcastPicker = RPSystemBroadcastPickerView(frame: CGRect(x: 0, y: 0, width: 50, height: 50))
        broadcastPicker.preferredExtension = "com.your-app.broadcast.extension"
        containerView.addSubview(broadcastPicker)
    }

}
作为一个听话的孩子乖乖按照文档说明进行集成,创建项目,在界面上放置一个开始录屏的按钮,并创建对应的Broadcast Upload Extension(在Xcode-->File-->New-->Target中):
- (IBAction)startRecorScreen:(id)sender {
    if (@available(iOS 12.0, *)) {
        RPSystemBroadcastPickerView *pickerView = [[RPSystemBroadcastPickerView alloc] initWithFrame:(CGRect){0, 0, 70, 70}];
        //如果不设置改参数,则会展示所有具有Broadcast Upload Extension的应用列表
        pickerView.preferredExtension = @"Ericydong.TempDemo.upload";
        pickerView.showsMicrophoneButton = true;//是否显示录制按钮
        [self.containerView addSubview:pickerView];
    }
}
点击"开始录屏"按钮你就会发现视图上有一个黑点,怎么样,是不是很漂亮?-----?

然后你点击一下又会弹出来一个用户确定开始的界面:
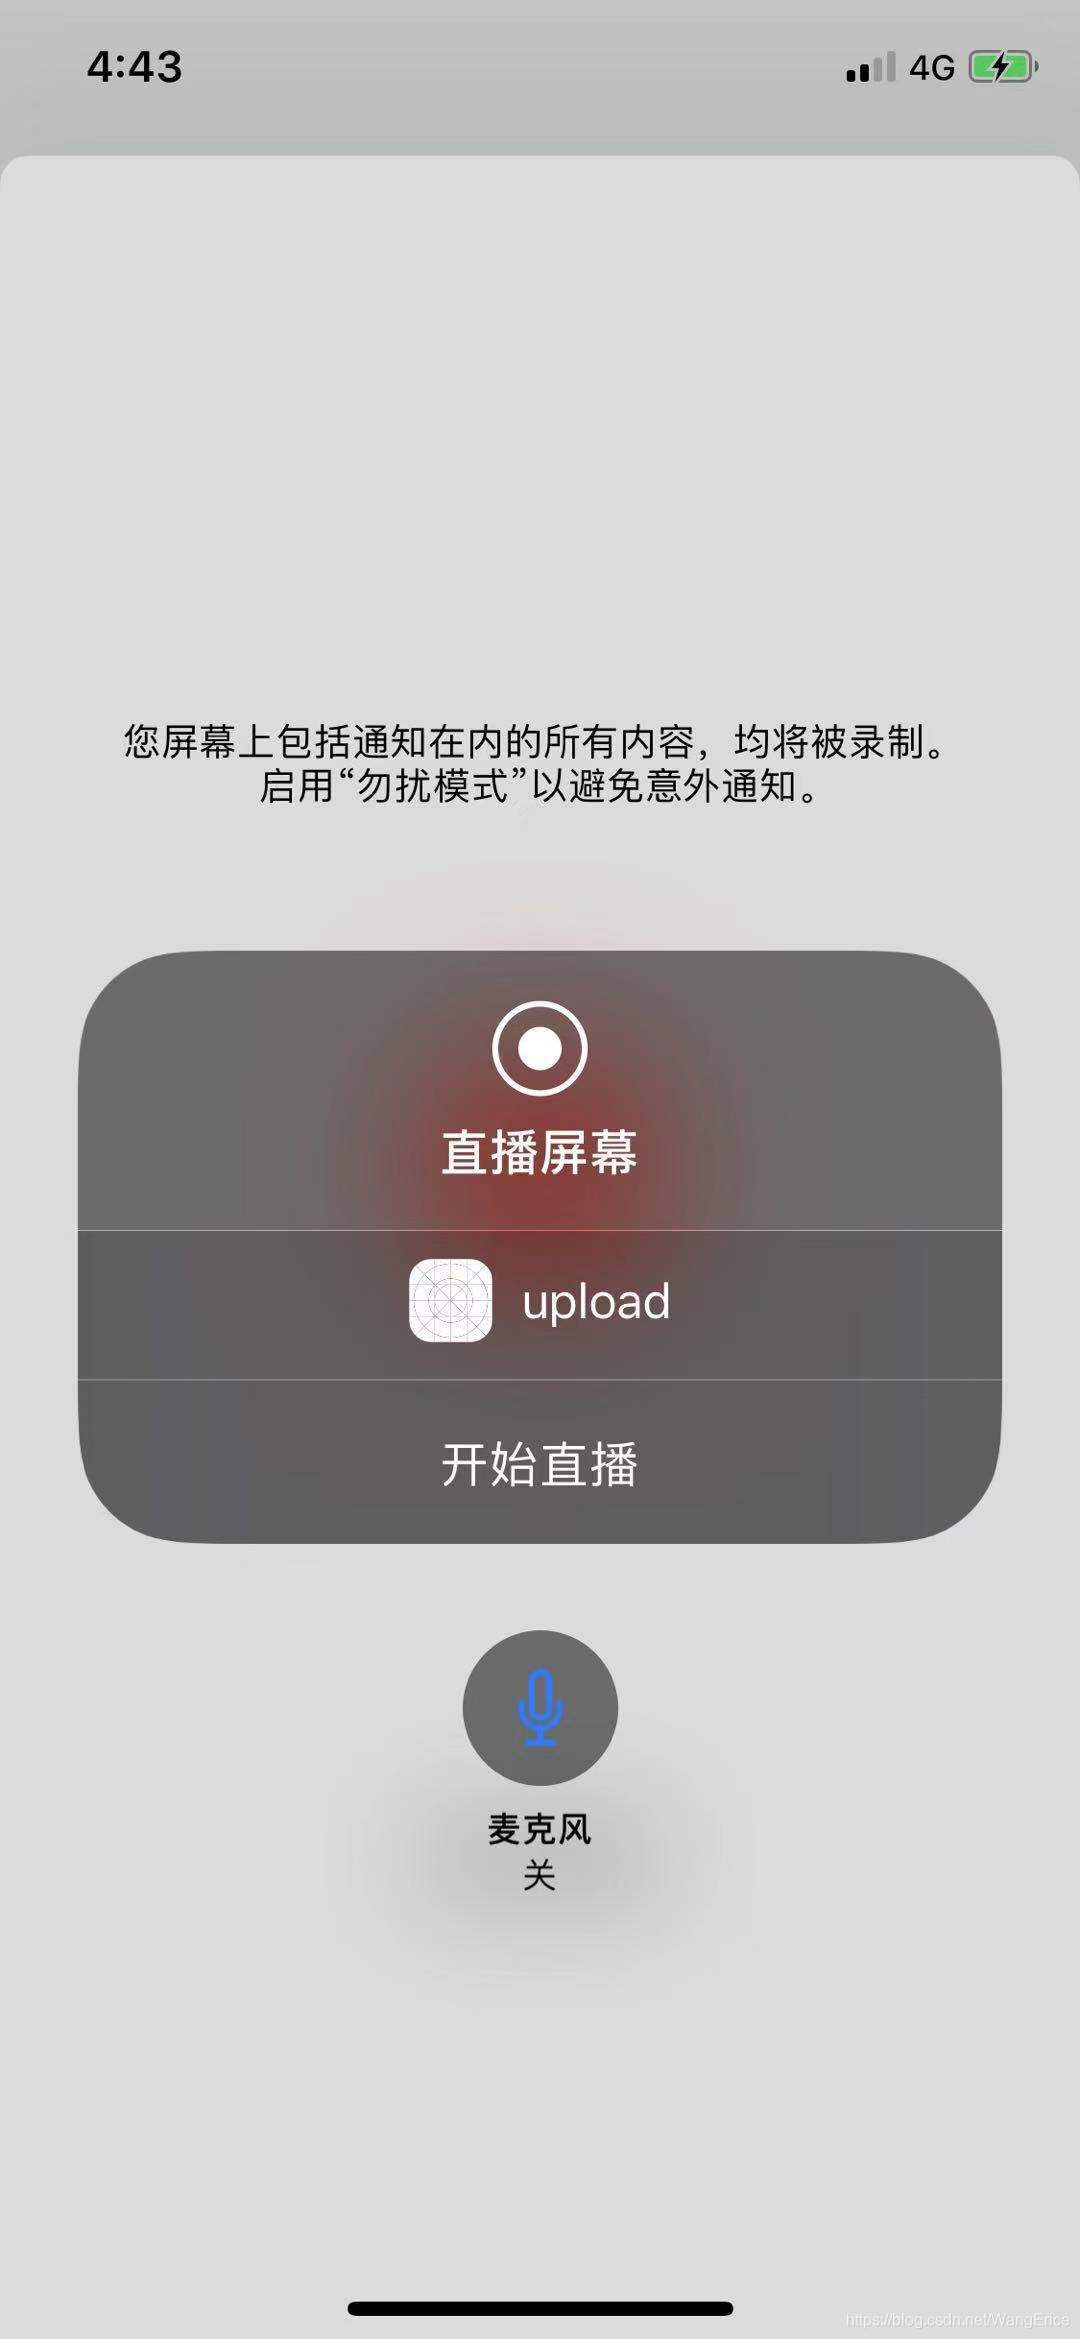
然后再选择 "开始直播",才能开始录屏,是不是有一万句mmp飘过,那前边的小黑钮是干嘛的?到底有完没完!!!!所以,我们这么处理:
- 找到RPSystemBroadcastPickerView中的按钮对象;
@interface RPSystemBroadcastPickerView (FindButton)
- (UIButton *)findButton;
@end
@implementation RPSystemBroadcastPickerView (FindButton)
- (UIButton *)findButton {
    return [self findButton:self];
}
- (UIButton *)findButton:(UIView *)view {
    if (!view.subviews.count) {
        return nil;
    }
    if ([view isKindOfClass:[UIButton class]]) {
        return (UIButton *)view;
    }
    UIButton *btn;
    for (UIView *subView in view.subviews) {
        UIView *destinationView = [self findButton:subView];
        if(destinationView) {
            btn = (UIButton *)destinationView;
            break;
        }
    }
    return btn;
}
@end
- 直接触发按钮点击事件:
只时候你再点击"开始录屏"就可以直接弹出需要用户确定直播录屏界面了,开不开森^_^^_^
Attention:在测试过程中,发现在iOS12.2之前的一些设备上上如果指定了RPSystemPickerView的preferredExtension参数有时候会出现不显示对应extension的情况:

所以安全期间,可以对这些系统做隔离:
- (IBAction)startRecorScreen:(id)sender {
    if (@available(iOS 12.0, *)) {
        RPSystemBroadcastPickerView *pickerView = [[RPSystemBroadcastPickerView alloc] initWithFrame:(CGRect){0, 0, 70, 70}];

        //如果不设置改参数,则会展示所有具有Broadcast Upload Extension的应用列表
        if(@available(iOS 12.2, *)) {
            pickerView.preferredExtension = @"Ericydong.TempDemo.upload";
        }
        pickerView.showsMicrophoneButton = true;//是否显示录制按钮
        [self.containerView addSubview:pickerView];
    }
}
-
开始录屏
当用户确定开始录屏之后,录屏过程会开启另一个应用进程,这时候就来到了Broadcast Upload Extension这个Target中.
- 在启动方法中进行初始化操作
@interface SampleHandler ()
@property (strong, nonatomic) AVAssetWriter *assetWriter;
@property (strong, nonatomic) AVAssetWriterInput *videoInput;
@property (strong, nonatomic) AVAssetWriterInput *audioInput;

@end
@implementation SampleHandler

#pragma 生命周期方法

/*
    用户点击"开始直播"之后就会进入到这个方法[SampleHandler生命周期方法]
*/
- (void)broadcastStartedWithSetupInfo:(NSDictionary<NSString *,NSObject *> *)setupInfo {
    //开始录制时初始化相关对象
    [self _initlization];
}


#pragma 自定义方法

- (void)_initlization {
    if ([self.assetWriter canAddInput:self.videoInput]) {
        [self.assetWriter addInput:self.videoInput];
    } else {
        NSAssert(false, @"添加失败");
    }
}
- (AVAssetWriter *)assetWriter {
    if (!_assetWriter) {
        NSError *error = nil;
        _assetWriter = [[AVAssetWriter alloc] initWithURL:[ShareDataManager filePathURL] fileType:(AVFileTypeMPEG4) error:&error];
        NSAssert(!error, @"_assetWriter初始化失败");
    }
    return _assetWriter;
}

- (AVAssetWriterInput *)audioInput {
    if (!_audioInput) {
        NSDictionary *audioCompressionSettings = @{ AVEncoderBitRatePerChannelKey : @(28000),
                                                    AVFormatIDKey : @(kAudioFormatMPEG4AAC),
                                                    AVNumberOfChannelsKey : @(1),
                                                    AVSampleRateKey : @(22050) };

        _audioInput = [AVAssetWriterInput assetWriterInputWithMediaType:AVMediaTypeAudio outputSettings:audioCompressionSettings];

    }
    return _audioInput;
}

- (AVAssetWriterInput *)videoInput {
    if (!_videoInput) {
        CGSize size = [UIScreen mainScreen].bounds.size;
        //写入视频大小
        NSInteger numPixels = size.width  * size.height /* [UIScreen mainScreen].scale * size.height * [UIScreen mainScreen].scale*/;
        //每像素比特
        CGFloat bitsPerPixel = 7.5;
        NSInteger bitsPerSecond = numPixels * bitsPerPixel;
        // 码率和帧率设置
        NSDictionary *compressionProperties = @{
            AVVideoAverageBitRateKey : @(bitsPerSecond),//码率(平均每秒的比特率)
            AVVideoExpectedSourceFrameRateKey : @(25),//帧率(如果使用了AVVideoProfileLevelKey则该值应该被设置,否则可能会丢弃帧以满足比特流的要求)
            AVVideoMaxKeyFrameIntervalKey : @(15),//关键帧最大间隔
            AVVideoProfileLevelKey : AVVideoProfileLevelH264BaselineAutoLevel,
            AVVideoPixelAspectRatioKey: @{
                    AVVideoPixelAspectRatioHorizontalSpacingKey: @(1),
                    AVVideoPixelAspectRatioVerticalSpacingKey: @(1)
            },
        };
        CGFloat scale = [UIScreen mainScreen].scale;

        NSDictionary *videoOutputSettings = @{
            AVVideoCodecKey : AVVideoCodecTypeH264,
            AVVideoScalingModeKey : AVVideoScalingModeResizeAspectFill,
            AVVideoWidthKey : @(size.width * scale),
            AVVideoHeightKey : @(size.height * scale),
            AVVideoCompressionPropertiesKey : compressionProperties
        };
        _videoInput = [[AVAssetWriterInput alloc] initWithMediaType:AVMediaTypeVideo outputSettings:videoOutputSettings];
        //        self.videoInput.transform = CGAffineTransformMakeRotation(M_PI / 2.0);
        _videoInput.expectsMediaDataInRealTime = true;//实时录制

    }
    return _videoInput;
}
@end- 拼接视频流
#pragma 生命周期方法
/*
    在录制的过程中会不断回调输出视频流
*/
- (void)processSampleBuffer:(CMSampleBufferRef)sampleBuffer withType:(RPSampleBufferType)sampleBufferType {
    switch (sampleBufferType) {
        case RPSampleBufferTypeVideo:
            @autoreleasepool {
                AVAssetWriterStatus status = self.assetWriter.status;
                if ( status == AVAssetWriterStatusFailed || status == AVAssetWriterStatusCompleted || status == AVAssetWriterStatusCancelled) {
                    return;
                }
                if (status == AVAssetWriterStatusUnknown) {
                    [self.assetWriter startWriting];
                    CMTime time = CMSampleBufferGetDuration(sampleBuffer);
                    [self.assetWriter startSessionAtSourceTime:time];
                }


                if (status == AVAssetWriterStatusWriting) {
                    if (self.videoInput.isReadyForMoreMediaData) {
                       BOOL success = [self.videoInput appendSampleBuffer:sampleBuffer];
                        if (!success) {
                            [self stopRecording];
                        }
                    }
                }
            }
            // Handle video sample buffer
            break;
        case RPSampleBufferTypeAudioApp:
            // Handle audio sample buffer for app audio
            break;
        case RPSampleBufferTypeAudioMic:
            if (self.audioInput.isReadyForMoreMediaData) {
                BOOL success = [self.audioInput appendSampleBuffer:sampleBuffer];
                if (!success) {
                    [self stopRecording];
                }
            }
            // Handle audio sample buffer for mic audio
            break;

        default:
            break;
    }
}
- 录制完成或者中断
#pragma 生命周期方法
/*
    录制过程暂停(暂时不知道何时触发)
*/
- (void)broadcastPaused {
    [self stopRecording];
    // User has requested to pause the broadcast. Samples will stop being delivered.
}
/*
    进程被挂起(例如突然来电话等)
*/
- (void)broadcastResumed {
        [self stopRecording];
    // User has requested to resume the broadcast. Samples delivery will resume.
}

/*
    当用户点击停止直播时触发

*/
- (void)broadcastFinished {
    [self stopRecording];
    // User has requested to finish the broadcast.
}

#pragma 自定义方法

- (void)stopRecording {
    if (self.assetWriter.status == AVAssetWriterStatusWriting) {
        [self.audioInput markAsFinished];
        //这里有个问题就是iOS新的api不会触发回调,视频录制有时是不能播放的,未找到具体原因(多半是系统api的问题)
        [self.assetWriter finishWriting];
    }
}
- 读取到录制的视频
可以在最初的控制器中再添加一个浏览视频的按钮,用来查看录制的视频
- (IBAction)scan:(id)sender {

    NSArray<NSURL *> *allResource = [[ShareDataManager fetechAllResource] sortedArrayUsingComparator:^NSComparisonResult(NSURL *  _Nonnull obj1, NSURL * _Nonnull obj2) {
        //排序,每次都查看最新录制的视频
        return [obj1.path compare:obj2.path options:(NSCaseInsensitiveSearch)];
    }];
    AVPlayerViewController *playerViewController;
    playerViewController = [[AVPlayerViewController alloc] init];

    playerViewController.player = [AVPlayer playerWithURL:url];
//    playerViewController.delegate = self;
    [self presentViewController:playerViewController animated:YES completion:^{
        [playerViewController.player play];
        NSLog(@"error == %@", playerViewController.player.error);
    }];


}
同时把ShareDataManager这个类的代码对两个项目进行共享

就可以在控制器中查看刚才录制的视频了.
-
CFNotificationCenterGetDarwinNotifyCenter的使用
这是一个进程级的通知监听方法,可以实现在不同进程之间的消息传递.例如在系统录屏结束之后,想要发送一条通知来方便用户回到原始应用中进行相关的操作,就可以通过CFNotificationCenterGetDarwinNotifyCenter发送一个通知,然后在接收到通知之后注册一个即时生效的本地推送通知,这样只要录制过程一结束,就会收到一条本地的推送,用户发现有推送消息就会回到应用中做进一步的处理.
//定义推送通知的回调方法
//该方法中的第四个参数object在设计时为预留参数并没有实际的作用,也就是说无论你怎么传递在通知中都收不到这个参数(其实也可以理解毕竟broadcast upload extension与宿主应用并不在一个应用中,不同进程之间的对象也就不能共存)

void MyHoleNotificationCallback(CFNotificationCenterRef center,
                                   void * observer,
                                   CFStringRef name,
                                   void const * object,
                                   CFDictionaryRef userInfo) {
    NSString *identifier = (__bridge NSString *)name;
    NSObject *sender = (__bridge NSObject *)observer;
    NSDictionary *info = (__bridge NSDictionary *)userInfo;
    if ([identifier isEqualToString:broadcastFinishedNotification]) {
        if ([UIApplication sharedApplication].applicationState == UIApplicationStateBackground) {
            ViewController *vc = (ViewController *)sender;
            [vc addLocalNotice:identifier];
        }
    }

}


//添加通知
    CFNotificationCenterRef const center = CFNotificationCenterGetDarwinNotifyCenter();
    CFStringRef str = (__bridge CFStringRef)identifier;
    CFNotificationCenterAddObserver(center,
                                    (__bridge const void *)(observer),
                                    notificationCallback,
                                    str,
                                    NULL,               CFNotificationSuspensionBehaviorDeliverImmediately);


//移除通知
            CFNotificationCenterRef const center = CFNotificationCenterGetDarwinNotifyCenter();
            CFStringRef str = (__bridge CFStringRef)identifier;
            CFNotificationCenterRemoveObserver(center,
                                               (__bridge const void *)(observer),
                                               str,
                                               NULL);
整个过程大概就是这个样子,欢迎留言.


 被折叠的 条评论
为什么被折叠?
被折叠的 条评论
为什么被折叠?
 到【灌水乐园】发言


