


官网:https://plugins.jetbrains.com/docs/intellij/welcome.html
1、创建插件项目

配置文件说明
plugin.xml
<idea-plugin>

  <!-- 插件唯一id,不能和其他插件项目重复,所以推荐使用com.xxx.xxx的格式
       插件不同版本之间不能更改,若没有指定,则与插件名称相同 -->
  <id>com.your.company.unique.plugin.id</id>

  <!-- 插件名称,别人在官方插件库搜索你的插件时使用的名称 -->
  <name>Plugin display name here</name>

  <!-- 插件版本号 -->
  <version>1.0</version>

  <!-- 供应商主页和email(不能使用默认值,必须修改成自己的)-->
  <vendor email="support@yourcompany.com" url="http://www.yourcompany.com">YourCompany</vendor>
  <!-- 插件的描述 (不能使用默认值,必须修改成自己的。并且需要大于40个字符)-->
  <description><![CDATA[
      Enter short description for your plugin here.<br>
      <em>most HTML tags may be used</em>
    ]]></description>
  <!-- 插件版本变更信息,支持HTML标签;
       将展示在 settings | Plugins 对话框和插件仓库的Web页面 -->
  <change-notes><![CDATA[
      Add change notes here.<br>
      <em>most HTML tags may be used</em>
    ]]>
  </change-notes>

 <!-- 插件兼容IDEAbuild 号-->
  <idea-version since-build="173.0"/>

  <!-- 插件所依赖的其他插件的id -->
  <depends>com.intellij.modules.platform</depends>

  <extensions defaultExtensionNs="com.intellij">
  <!-- 声明该插件对IDEA core或其他插件的扩展 -->
  </extensions>

  <!-- 编写插件动作 -->
  <actions>
  </actions>

</idea-plugin>
2、创建action
新建Plugin DevKit > Action
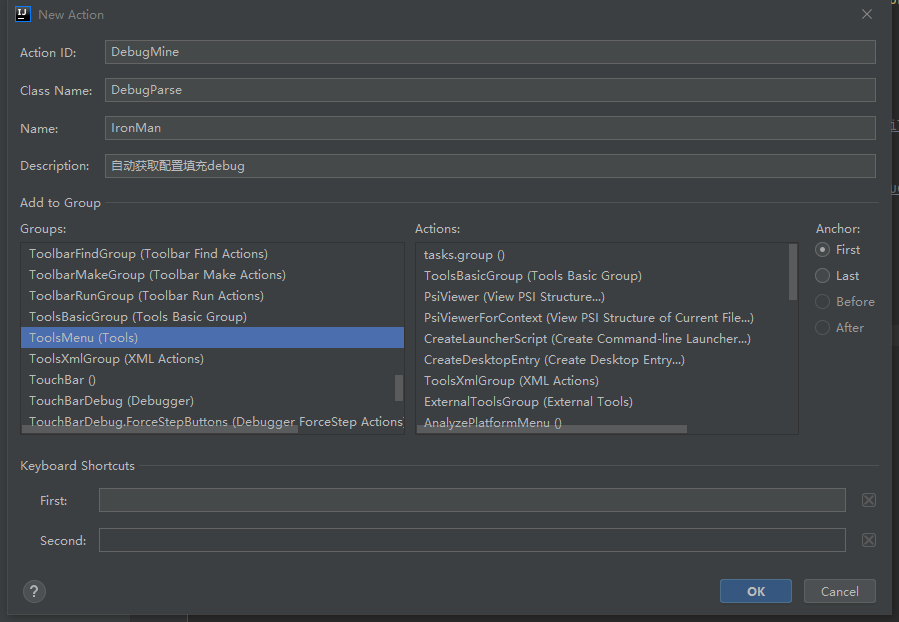
生成的对应代码:
  <actions>
    <!-- Add your actions here -->
    <!-- IronMan为将来菜单中的名字 -->
    <action id="DebugMine" class="com.DebugParse" text="IronMan" description="自动获取配置填充debug">
      <!-- group-id 将菜单挂在ToolsMenu菜单下,位置为first -->
      <add-to-group group-id="ToolsMenu" anchor="first"/>
    </action>
  </actions>
public class DebugParse extends AnAction {

    @Override
    public void actionPerformed(AnActionEvent e) {

        String env = Messages.showInputDialog("请输入环境", "环境", null);
        if (env == null || "".equals(env.trim())) {
            Messages.showMessageDialog("请输入环境信息", "Info", null);
            return;
        }

        Project project = e.getProject();
        String name = project.getName();

        String cmd = getCmdReturn(name, env);
        if (cmd == null) {//查到多个,用项目名全名再查一次
            @SystemIndependent String basePath = project.getBasePath();
            String name2 = Arrays.asList(basePath.split("/")).stream().filter(x -> x.contains(name)).collect(Collectors.toList()).get(0);
            cmd = getCmdReturn(name2, env);
            if (cmd == null) {
                Messages.showMessageDialog("当前项目未查询到debug端口", "Warn", null);
                return;
            }
        }


        List<String> collect = Arrays.asList(cmd.split(" ")).stream()
                .filter(x -> x != null && !"".equals(x.trim()))
                .collect(Collectors.toList());

        String pName = collect.get(0);
        String ip = collect.get(2);

        Messages.showInfoMessage(pName + " " + ip, "Info");

        setRemoteConfig(project, env, ip);
    }

    private String getCmdReturn(String name, String env){
        List<String> keys = Arrays.asList(name.split("-"));

        Shell shell = new Shell("xx_ip", "xx_userName", "xx_pwd");

		//拼接命令
        String cmd = "kubectl get service -n " + env + " | ";

        List<String> collect = keys.stream().map(x -> String.format(" grep '%s'", x)).collect(Collectors.toList());

        for (int i = collect.size(); i > 0; i--) {
            String newCmd = cmd + String.join("|", collect.subList(0, i));
            String execute = cmdExe(shell, newCmd);
            System.out.println("cmd:" + cmd + "\n" + "return:" + execute);
            if (execute != null) {
                return execute;
            }
        }

        return null;
    }


    private String cmdExe(Shell shell, String cmd){
        List<String> execute = shell.execute(cmd);
        if (execute != null) {
            return execute.get(0);
        }
        return null;
    }


    private void setRemoteConfig(Project project, String env, String host){
        RunConfiguration setting = new RemoteConfigurationType()
                .createTemplateConfiguration(Objects.requireNonNull(project));

        //这里可以根据自己需要配置配置源
        RemoteConfiguration remote = (RemoteConfiguration) setting;
        remote.setName(env + "_remote");
        remote.HOST = host;
        remote.PORT = "8000";

        RunManagerImpl runManager = RunManagerImpl.getInstanceImpl(project);
        RunnerAndConfigurationSettingsImpl configurationSettings = new RunnerAndConfigurationSettingsImpl(runManager,
                setting, false, RunConfigurationLevel.WORKSPACE);
        SingleConfigurationConfigurable singleConfigurationConfigurable = SingleConfigurationConfigurable
                .editSettings(configurationSettings, null);
        RunnerAndConfigurationSettings settings =
                (RunnerAndConfigurationSettings) singleConfigurationConfigurable.getSettings();
        runManager.addConfiguration(settings);

        //选中
        runManager.setSelectedConfiguration(settings);
    }

}
异常
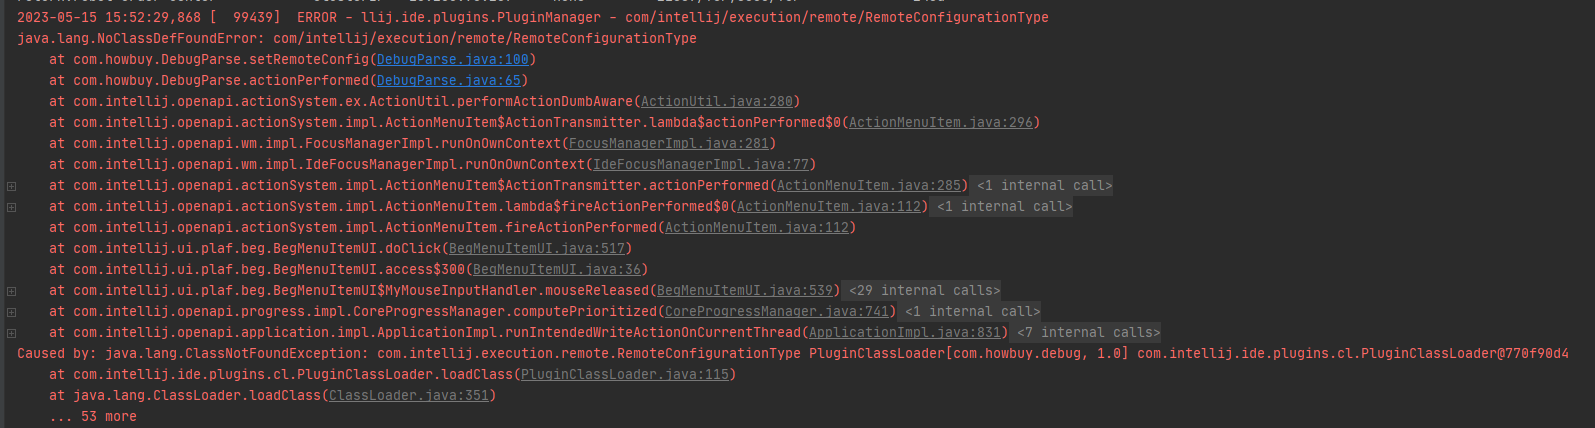
版本问题导致的异常
在plugin.xml中添加相关依赖
com.intellij.java
3、打包

4、导入
setting --> plugins --> installed --> install plugin from disk --> 选中 --> apply


 1115
1115


 被折叠的 条评论
为什么被折叠?
被折叠的 条评论
为什么被折叠?
 到【灌水乐园】发言


